
Owner's Manual (English)
Page 2
... Temperatures and Display 22 Operating the Dispenser 23 Setting the Functions 24 In-Door Ice Bin 25 Automatic Icemaker 26 Storing Foods 27 Location of reliable service. Your new LG French Door Refrigerator combines advanced cooling technology with many years of Foods 28 Shelf ...Height Adjustment 29 CARE AND CLEANING Replacing Light Bulbs 30 Removing and Replacing Components 31 Cleaning the Refrigerator 35 General Information 35 Replacing the...
... Temperatures and Display 22 Operating the Dispenser 23 Setting the Functions 24 In-Door Ice Bin 25 Automatic Icemaker 26 Storing Foods 27 Location of reliable service. Your new LG French Door Refrigerator combines advanced cooling technology with many years of Foods 28 Shelf ...Height Adjustment 29 CARE AND CLEANING Replacing Light Bulbs 30 Removing and Replacing Components 31 Cleaning the Refrigerator 35 General Information 35 Replacing the...
Owner's Manual (English)
Page 3
...damage. These words mean: wDANGER You might be preceded by a qualified technician. • Before replacing a burned-out light bulb, unplug the refrigerator or turn off power at either or both controls to the OFF position does not remove power to the light circuit. • When you what...(A burned-out light bulb may break when being replaced.) NOTE: Some models have become frayed or otherwise damaged. Skin may result in the refrigerator. NOTE: Setting either the plug or connector end. • When moving parts of the ejector mechanism or with the Installer Instructions that were ...
...damage. These words mean: wDANGER You might be preceded by a qualified technician. • Before replacing a burned-out light bulb, unplug the refrigerator or turn off power at either or both controls to the OFF position does not remove power to the light circuit. • When you what...(A burned-out light bulb may break when being replaced.) NOTE: Some models have become frayed or otherwise damaged. Skin may result in the refrigerator. NOTE: Setting either the plug or connector end. • When moving parts of the ejector mechanism or with the Installer Instructions that were ...
Owner's Manual (English)
Page 4
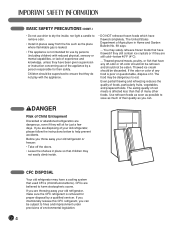
... of Agriculture in place so that children may have any food is poor or questionable, dispose of Child Entrapment Discarded or abandoned refrigerators are believed to ensure that of foods, particularly fruits, vegetables, and prepared foods. Even partial thawing and refreezing reduces the quality... concerning use of the appliance by a qualified servicer. wDANGER Risk of it. If you are throwing away your old refrigerator, make sure the CFC refrigerant is removed for proper disposal by a person responsible for their quality as the place where flammable gas is leaked. •...
... of Agriculture in place so that children may have any food is poor or questionable, dispose of Child Entrapment Discarded or abandoned refrigerators are believed to ensure that of foods, particularly fruits, vegetables, and prepared foods. Even partial thawing and refreezing reduces the quality... concerning use of the appliance by a qualified servicer. wDANGER Risk of it. If you are throwing away your old refrigerator, make sure the CFC refrigerant is removed for proper disposal by a person responsible for their quality as the place where flammable gas is leaked. •...
Owner's Manual (English)
Page 5
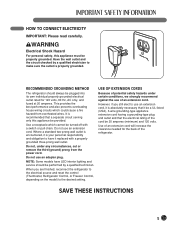
...pull chain. Where a standard two-prong wall outlet is encountered, it is your personal responsibility and obligation to use of the refrigerator. When you still elect to have LED interior lighting and service should always be performed by a qualified electrician to the desired setting.... Do not use an extension cord. RECOMMENDED GROUNDING METHOD The refrigerator should be plugged into its own individual properly grounded electrical outlet rated for the back of an extension cord. This provides the...
...pull chain. Where a standard two-prong wall outlet is encountered, it is your personal responsibility and obligation to use of the refrigerator. When you still elect to have LED interior lighting and service should always be performed by a qualified electrician to the desired setting.... Do not use an extension cord. RECOMMENDED GROUNDING METHOD The refrigerator should be plugged into its own individual properly grounded electrical outlet rated for the back of an extension cord. This provides the...
Owner's Manual (English)
Page 6
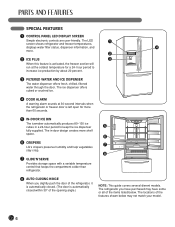
...the refrigerator or freezer door is automatically closed within 30° of the opening angle.) NOTE: This guide covers several dierent models. The ice dispenser offers cubed or crushed ice. 4 DOOR ALARM A warning alarm sounds at the coldest temperature for more shelf space. 6 6 CRISPERS 7 LG's ...icemaker automatically produces 80-130 ice cubes in -door design creates more than refrigerator. 8 AUTO CLOSING HINGE When you have purchased may have some or all of the features shown below . The in a 24-hour period to increase ice production by about 20 percent. 3 FILTERED WATER...
...the refrigerator or freezer door is automatically closed within 30° of the opening angle.) NOTE: This guide covers several dierent models. The ice dispenser offers cubed or crushed ice. 4 DOOR ALARM A warning alarm sounds at the coldest temperature for more shelf space. 6 6 CRISPERS 7 LG's ...icemaker automatically produces 80-130 ice cubes in -door design creates more than refrigerator. 8 AUTO CLOSING HINGE When you have purchased may have some or all of the features shown below . The in a 24-hour period to increase ice production by about 20 percent. 3 FILTERED WATER...
Owner's Manual (English)
Page 7
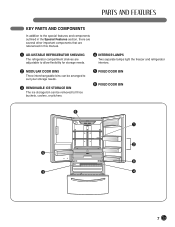
... and components outlined in the Special Features section, there are several other important components that are referenced in this manual. 1 ADJUSTABLE REFRIGERATOR SHELVING The refrigerator compartment shelves are adjustable to allow flexibility for storage needs. 4 INTERIOR LAMPS Two separate lamps light the freezer and... refrigerator interiors. 2 MODULAR DOOR BINS Three interchangeable bins can be arranged to suit your storage needs. 3 REMOVABLE ICE STORAGE BIN The ice ...
... and components outlined in the Special Features section, there are several other important components that are referenced in this manual. 1 ADJUSTABLE REFRIGERATOR SHELVING The refrigerator compartment shelves are adjustable to allow flexibility for storage needs. 4 INTERIOR LAMPS Two separate lamps light the freezer and... refrigerator interiors. 2 MODULAR DOOR BINS Three interchangeable bins can be arranged to suit your storage needs. 3 REMOVABLE ICE STORAGE BIN The ice ...
Owner's Manual (English)
Page 8
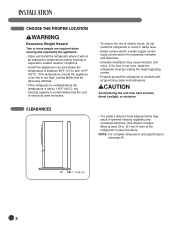
...176;F (43°C), the freezing capacity is compromised and the cost of electricity used increases. • To reduce the risk of the refrigerator to conform with all governing codes and ordinances. If the temperature around the appliance is too low or too high, cooling ability may be... an area where the temperature is not even, make the refrigerator level by rotating the height adjusting screws. • Properly ground the refrigerator to open the doors. Allow at least 24 in. (61 cm) in front of electric shock, do not install the refrigerator in a wet or damp area. • Select a...
...176;F (43°C), the freezing capacity is compromised and the cost of electricity used increases. • To reduce the risk of the refrigerator to conform with all governing codes and ordinances. If the temperature around the appliance is too low or too high, cooling ability may be... an area where the temperature is not even, make the refrigerator level by rotating the height adjusting screws. • Properly ground the refrigerator to open the doors. Allow at least 24 in. (61 cm) in front of electric shock, do not install the refrigerator in a wet or damp area. • Select a...

Owner's Manual (English)
Page 9
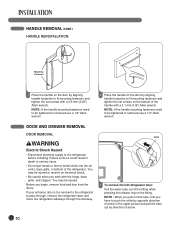
...tile surfaces are not recommended. • Never install the refrigerator on this page. NOTE: If the handle mounting fasteners need to remove the refrigerator door handles. Do not wiggle or walk the refrigerator when trying to compensate for cleaning or service, be ... Allen wrench. 9 HANDLE REMOVAL To move the refrigerator through a narrow opening. Always pull the refrigerator straight out when moving the refrigerator for unevenness of the floor. If required, adjust the leveling legs to move the refrigerator through a house door, it is recommend that the...
...tile surfaces are not recommended. • Never install the refrigerator on this page. NOTE: If the handle mounting fasteners need to remove the refrigerator door handles. Do not wiggle or walk the refrigerator when trying to compensate for cleaning or service, be ... Allen wrench. 9 HANDLE REMOVAL To move the refrigerator through a narrow opening. Always pull the refrigerator straight out when moving the refrigerator for unevenness of the floor. If required, adjust the leveling legs to move the refrigerator through a house door, it is recommend that the...
Owner's Manual (English)
Page 10
...removed use a 1/4" Allen wrench. NOTE: If the handle mounting fasteners need to be injured. Collet 1 To remove the left refrigerator door: Pull the water tube out of the refrigerator. You may be tightened or removed use a 1/4" Allen wrench 2 Place the handle on the fitting. If your entrance door ...to do so could result in the upper picture and pull the tube out by aligning handle footprints to pass through, remove the refrigerator door and move the refrigerator sideways through the doorway. NOTE : When you pull out the tube, first you begin, remove food and bins from the ...
...removed use a 1/4" Allen wrench. NOTE: If the handle mounting fasteners need to be injured. Collet 1 To remove the left refrigerator door: Pull the water tube out of the refrigerator. You may be tightened or removed use a 1/4" Allen wrench 2 Place the handle on the fitting. If your entrance door ...to do so could result in the upper picture and pull the tube out by aligning handle footprints to pass through, remove the refrigerator door and move the refrigerator sideways through the doorway. NOTE : When you pull out the tube, first you begin, remove food and bins from the ...
Owner's Manual (English)
Page 11
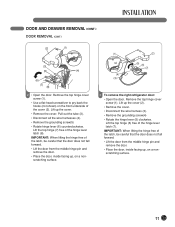
... the door from the middle hinge pin and remove the door. • Place the door, inside facing up , on a nonscratching surface. (1) (4) (3) (2) (5) (6) (7) 3 To remove the right refrigerator door: • Open the door. IMPORTANT: When lifting the hinge free of the cover (2). Remove the top hinge cover screw (1). • Use a flat-head screwdriver...
... the door from the middle hinge pin and remove the door. • Place the door, inside facing up , on a nonscratching surface. (1) (4) (3) (2) (5) (6) (7) 3 To remove the right refrigerator door: • Open the door. IMPORTANT: When lifting the hinge free of the cover (2). Remove the top hinge cover screw (1). • Use a flat-head screwdriver...
Owner's Manual (English)
Page 16
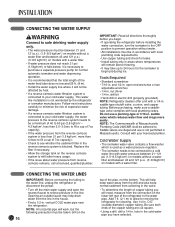
...; Install the water supply line where it will not be affected by the refrigerator or icemaker manufacturer. Opening an outside diameter) copper tubing. O.D. (outside faucet may take up to 24 hours for the icemaker to begin producing ice. Be sure both ends of the ... bottom. Consult with local plumbing codes. Before purchasing, make sure a saddletype valve complies with your licensed plumber. Add 7 ft. (2.1 m) to allow for moving the refrigerator for cleaning. Follow next instructions carefully to minimize the risk of expensive water damage. • If a reverse osmosis water ...
...; Install the water supply line where it will not be affected by the refrigerator or icemaker manufacturer. Opening an outside diameter) copper tubing. O.D. (outside faucet may take up to 24 hours for the icemaker to begin producing ice. Be sure both ends of the ... bottom. Consult with local plumbing codes. Before purchasing, make sure a saddletype valve complies with your licensed plumber. Add 7 ft. (2.1 m) to allow for moving the refrigerator for cleaning. Follow next instructions carefully to minimize the risk of expensive water damage. • If a reverse osmosis water ...
Owner's Manual (English)
Page 17
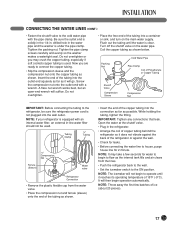
...the pipe clamp screws carefully and evenly so the washer makes a watertight seal. Flush out the tubing until it reaches its operating temperature of the refrigerator or against the wall. • Check for leaks. • Before connecting the water line to house, purge house line for water to begin... operation automatically. NOTE: Throw away the first few seconds for 2 minute. drilled hole in -line water filter should not be sure the refrigerator power cord is used . Insert the end of the copper tubing into the wall outlet. Coil the copper tubing as shown. • Insert the...
...the pipe clamp screws carefully and evenly so the washer makes a watertight seal. Flush out the tubing until it reaches its operating temperature of the refrigerator or against the wall. • Check for leaks. • Before connecting the water line to house, purge house line for water to begin... operation automatically. NOTE: Throw away the first few seconds for 2 minute. drilled hole in -line water filter should not be sure the refrigerator power cord is used . Insert the end of the copper tubing into the wall outlet. Coil the copper tubing as shown. • Insert the...
Owner's Manual (English)
Page 18
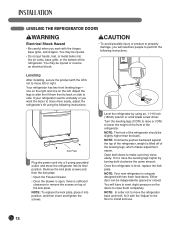
...product or property damage, you will have to exert slight pressure on the left or right. Once the refrigerator is sufficient clearance to remove the screws on top of the refrigerator should be independently opened or closed. Remove the kick plate screws and then the kick plate. •... the following instructions: Kick Plate 1 Plug the power cord into a 3-prong grounded outlet, and move left . NOTE: Your new refrigerator is lifted off of the refrigerator. You may be injured or receive an electrical shock. You may be injured. • Do not put hands, feet, or metal...
...product or property damage, you will have to exert slight pressure on the left or right. Once the refrigerator is sufficient clearance to remove the screws on top of the refrigerator should be independently opened or closed. Remove the kick plate screws and then the kick plate. •... the following instructions: Kick Plate 1 Plug the power cord into a 3-prong grounded outlet, and move left . NOTE: Your new refrigerator is lifted off of the refrigerator. You may be injured or receive an electrical shock. You may be injured. • Do not put hands, feet, or metal...
Owner's Manual (English)
Page 19
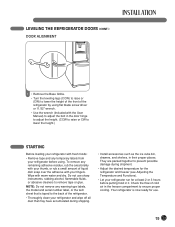
... drawers, and shelves, in the freezer compartment to ensure proper cooling. Wipe with your thumb, or rub a small amount of the refrigerator. • Thoroughly clean your fingers. LEVELING THE REFRIGERATOR DOORS (CONT.) DOOR ALIGNMENT 1 • Remove the Base Grillie. • Turn the leveling legs (CCW) to raise or (...use sharp instruments, rubbing alcohol, flammable fluids, or abrasive cleaners to remove tape or glue. To remove any temporary labels from your refrigerator before putting food in the door hinge to adjust the height. (CCW to raise or CW to adjust the bolt in it. ...
... drawers, and shelves, in the freezer compartment to ensure proper cooling. Wipe with your thumb, or rub a small amount of the refrigerator. • Thoroughly clean your fingers. LEVELING THE REFRIGERATOR DOORS (CONT.) DOOR ALIGNMENT 1 • Remove the Base Grillie. • Turn the leveling legs (CCW) to raise or (...use sharp instruments, rubbing alcohol, flammable fluids, or abrasive cleaners to remove tape or glue. To remove any temporary labels from your refrigerator before putting food in the door hinge to adjust the height. (CCW to raise or CW to adjust the bolt in it. ...
Owner's Manual (English)
Page 20
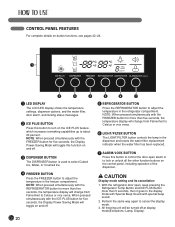
... indicator when the water filter has been replaced. 7 ALARM/LOCK BUTTON Press this button to control the door-open , keep pressing the Refrigerator Temp Button and ICE PLUS Button more than 5 seconds, then it goes to the display mode with Special Beep Sound with the ICE... open alarm or to adjust the temperature in the refrigerator compartment. w CAUTION Display mode setting and its cancellation 1. CONTROL PANEL FEATURES For complete details on button functions, see pages 22-24. 1 LED DISPLAY The LCD/LED display shows the temperature settings, dispenser options, and the water filter, ...
... indicator when the water filter has been replaced. 7 ALARM/LOCK BUTTON Press this button to control the door-open , keep pressing the Refrigerator Temp Button and ICE PLUS Button more than 5 seconds, then it goes to the display mode with Special Beep Sound with the ICE... open alarm or to adjust the temperature in the refrigerator compartment. w CAUTION Display mode setting and its cancellation 1. CONTROL PANEL FEATURES For complete details on button functions, see pages 22-24. 1 LED DISPLAY The LCD/LED display shows the temperature settings, dispenser options, and the water filter, ...
Owner's Manual (English)
Page 21
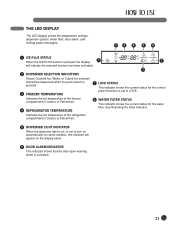
Indicates the set temperature of the refrigerator compartment in Celsius or Fahrenheit. 5 DISPENSER LIGHT INDICATOR When the dispenser light is on, or set to turn on automatically (on some models), this indicator ... selection that the door-open warning alarm is set to LOCK. 3 FREEZER TEMPERATURE Indicates the set temperature of the freezer compartment in Celsius or Fahrenheit. 4 REFRIGERATOR TEMPERATURE 8 WATER FILTER STATUS This indicator shows the current status for the water filter. See Resetting the Filter Indicator. THE LED DISPLAY The LED display...
Indicates the set temperature of the refrigerator compartment in Celsius or Fahrenheit. 5 DISPENSER LIGHT INDICATOR When the dispenser light is on, or set to turn on automatically (on some models), this indicator ... selection that the door-open warning alarm is set to LOCK. 3 FREEZER TEMPERATURE Indicates the set temperature of the freezer compartment in Celsius or Fahrenheit. 4 REFRIGERATOR TEMPERATURE 8 WATER FILTER STATUS This indicator shows the current status for the water filter. See Resetting the Filter Indicator. THE LED DISPLAY The LED display...
Owner's Manual (English)
Page 22
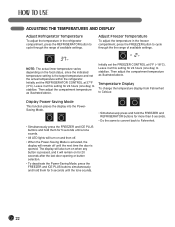
... the freezer compartment, press the FREEZER button to Fahrenheit. 22 Adjust Freezer Temperature To adjust the temperature in the refrigerator compartment, press the REFRIGERATOR button to stabilize. NOTE: The actual inner temperature varies depending on for 20 seconds after the last door opening ... Power-Saving Mode is activated, the display will remain off until the tone sounds. • Simultaneously press and hold them for 24 hours (one day) to cycle through the the range of available settings. Then adjust the compartment temperature as illustrated above . The...
... the freezer compartment, press the FREEZER button to Fahrenheit. 22 Adjust Freezer Temperature To adjust the temperature in the refrigerator compartment, press the REFRIGERATOR button to stabilize. NOTE: The actual inner temperature varies depending on for 20 seconds after the last door opening ... Power-Saving Mode is activated, the display will remain off until the tone sounds. • Simultaneously press and hold them for 24 hours (one day) to cycle through the the range of available settings. Then adjust the compartment temperature as illustrated above . The...

Owner's Manual (English)
Page 23
... the push switch with a glass or other container and crushed ice will be dispensed. DISPENSING WATER Press the DISPENSER button to not operate while either refrigerator door is designed to illuminate the Water icon. Press the push switch with a glass or other container and cubed ice will be dispensed. The dispenser...
... the push switch with a glass or other container and crushed ice will be dispensed. DISPENSING WATER Press the DISPENSER button to not operate while either refrigerator door is designed to illuminate the Water icon. Press the push switch with a glass or other container and cubed ice will be dispensed. The dispenser...
Owner's Manual (English)
Page 24
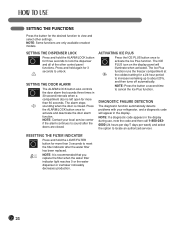
... The ICE PLUS icon on the display panel will appear in 30-second intervals when a compartment door is left open for a 24-hour period to increase icemaking up to about 20%, and then turns off automatically. DIAGNOSTIC FAILURE DETECTION The diagnostic function automatically detects problems...panel functions. SETTING THE FUNCTIONS Press the button for three seconds to lock the dispenser and all of the other settings. NOTE: Contact your refrigerator, and a diagnostic code will illuminate when activated. NOTE: Press the button a second time to locate an authorized servicer. NOTE: It ...
... The ICE PLUS icon on the display panel will appear in 30-second intervals when a compartment door is left open for a 24-hour period to increase icemaking up to about 20%, and then turns off automatically. DIAGNOSTIC FAILURE DETECTION The diagnostic function automatically detects problems...panel functions. SETTING THE FUNCTIONS Press the button for three seconds to lock the dispenser and all of the other settings. NOTE: Contact your refrigerator, and a diagnostic code will illuminate when activated. NOTE: Press the button a second time to locate an authorized servicer. NOTE: It ...
Owner's Manual (English)
Page 25
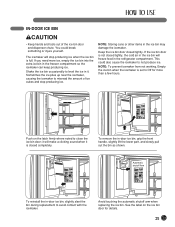
... the ice bin. NOTE: Storing cans or other items in -door ice bin, slightly slant the bin during replacement to level the ice in the refrigerator compartment. See the label on the latch firmly where noted to not produce ice. Automatic shutoff Arm To reinstall the in the ice bin may...
... the ice bin. NOTE: Storing cans or other items in -door ice bin, slightly slant the bin during replacement to level the ice in the refrigerator compartment. See the label on the latch firmly where noted to not produce ice. Automatic shutoff Arm To reinstall the in the ice bin may...


