User Guide
Page 2
... Instructions 5-6 Grounding Requirements 6 Parts And Features 7 Refrigerator Installation 8-17 Unpacking Your Refrigerator 8 Installation 8 Removing And Replacing Your Refrigerator Handles And Doors 9-16 Leveling And Door Alignment 17 Base Cover 17 Using Your Refrigerator 18-28 Setting The Controls 18 Ensuring Proper Air ... Ice Bucket 20 Adjusting Control Settings 21 Food Storage Guide 21 Storing Frozen Food 22 u Refrigerator Section Water Dispenser 22 Refrigerator Shelves 23 Bottle Holder 23 Snack Pan 24 Optibin Crisper 24 Crisper Cover With Lattice On ...
... Instructions 5-6 Grounding Requirements 6 Parts And Features 7 Refrigerator Installation 8-17 Unpacking Your Refrigerator 8 Installation 8 Removing And Replacing Your Refrigerator Handles And Doors 9-16 Leveling And Door Alignment 17 Base Cover 17 Using Your Refrigerator 18-28 Setting The Controls 18 Ensuring Proper Air ... Ice Bucket 20 Adjusting Control Settings 21 Food Storage Guide 21 Storing Frozen Food 22 u Refrigerator Section Water Dispenser 22 Refrigerator Shelves 23 Bottle Holder 23 Snack Pan 24 Optibin Crisper 24 Crisper Cover With Lattice On ...
User Guide
Page 3
... exclusion or limitation may also have other than normal, single-family household use for the remaining portion of Purchase. USA Your LG Refrigerator will be defective in the Operating Guide, accident, vermin, fire, flood, improper installation, acts of Purchase. DISTRIBUTOR SHALL BE...rights and you may not apply to the original purchaser of Purchase. LG ELECTRONICS, INC. LG REFRIGERATOR LIMITED WARRANTY - THIS LIMITED WARRANTY DOES NOT APPLY TO: • Service trips to your LG refrigerator is good only to you. CUSTOMER INTERACTIVE CENTER NUMBERS To obtain ...
... exclusion or limitation may also have other than normal, single-family household use for the remaining portion of Purchase. USA Your LG Refrigerator will be defective in the Operating Guide, accident, vermin, fire, flood, improper installation, acts of Purchase. DISTRIBUTOR SHALL BE...rights and you may not apply to the original purchaser of Purchase. LG ELECTRONICS, INC. LG REFRIGERATOR LIMITED WARRANTY - THIS LIMITED WARRANTY DOES NOT APPLY TO: • Service trips to your LG refrigerator is good only to you. CUSTOMER INTERACTIVE CENTER NUMBERS To obtain ...
User Guide
Page 4
...fuses or correct wiring, plumbing, or correction of unauthorized repairs. 2. CUSTOMER ASSISTANCE NUMBERS: To Prove Warranty Coverage: Retain your product type (refrigerator) and ZIP Code ready. Some provinces do not allow the exclusion or limitation of God. 3. THE ABOVE WARRANTY DOES NOT APPLY TO:...to the original purchaser of the product during the warranty period listed below from province to province. LIMITED WARRANTY (CANADA) LG REFRIGERATOR LG Electronics will repair or at its option replace, without charge, your product which vary from the date of original purchase. ...
...fuses or correct wiring, plumbing, or correction of unauthorized repairs. 2. CUSTOMER ASSISTANCE NUMBERS: To Prove Warranty Coverage: Retain your product type (refrigerator) and ZIP Code ready. Some provinces do not allow the exclusion or limitation of God. 3. THE ABOVE WARRANTY DOES NOT APPLY TO:...to the original purchaser of the product during the warranty period listed below from province to province. LIMITED WARRANTY (CANADA) LG REFRIGERATOR LG Electronics will repair or at its option replace, without charge, your product which vary from the date of original purchase. ...

User Guide
Page 5
...and cabinet are in order to avoid contact with a live wire filament. (A burned-out light bulb may adhere to the front of the refrigerator. • After your product, basic safety precautions should not be killed or seriously injured if you don't follow instructions. DO NOT place fingers... food may safely refreeze frozen foods that can kill or hurt you can be preceded by pulling on the automatic icemaking mechanism while the refrigerator is plugged in. • DO NOT refreeze frozen foods which , if not avoided, may result in accordance with the Attention Installer Instructions...
...and cabinet are in order to avoid contact with a live wire filament. (A burned-out light bulb may adhere to the front of the refrigerator. • After your product, basic safety precautions should not be killed or seriously injured if you don't follow instructions. DO NOT place fingers... food may safely refreeze frozen foods that can kill or hurt you can be preceded by pulling on the automatic icemaking mechanism while the refrigerator is plugged in. • DO NOT refreeze frozen foods which , if not avoided, may result in accordance with the Attention Installer Instructions...
User Guide
Page 6
...This provides the best performance and also prevents overloading house wiring circuits which cannot be properly grounded. BEFORE YOU THROW AWAY YOUR OLD REFRIGERATOR OR FREEZER • Take off with a properly grounded three-prong wall outlet. If you can be plugged into its own individual...use of environmental legislation. Have the wall outlet and the circuit checked by a qualified servicer. It is recommended that it is your old refrigerator, make sure the outlet is encountered, it be a UL-listed (USA), 3-wire grounding type appliance extension cord having a grounding type ...
...This provides the best performance and also prevents overloading house wiring circuits which cannot be properly grounded. BEFORE YOU THROW AWAY YOUR OLD REFRIGERATOR OR FREEZER • Take off with a properly grounded three-prong wall outlet. If you can be plugged into its own individual...use of environmental legislation. Have the wall outlet and the circuit checked by a qualified servicer. It is recommended that it is your old refrigerator, make sure the outlet is encountered, it be a UL-listed (USA), 3-wire grounding type appliance extension cord having a grounding type ...
User Guide
Page 7
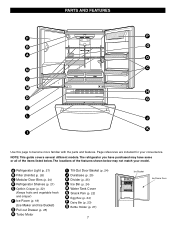
Page references are included for your model. A Refrigerator Light (p. 27) B Filter (Inside) (p. 26) C Modular Door Bins (p. 24) D Refrigerator Shelves (p. 21) E Optibin Crisper (p. 22) (Keeps fruits and vegetable fresh and crisper) F Ice Room (p. 18) (Ice ...Maker and Ice Bucket) G Pull out Drawer (p. 25) H Turbo Motor I Use this page to become more familiar with the parts and features. The refrigerator you have purchased may not match your convenience. PARTS AND FEATURES F P B O A Q N C C M H D G E L J K I Tilt-Out Door Basket (p. 24) J Durabase (p. 25)...
Page references are included for your model. A Refrigerator Light (p. 27) B Filter (Inside) (p. 26) C Modular Door Bins (p. 24) D Refrigerator Shelves (p. 21) E Optibin Crisper (p. 22) (Keeps fruits and vegetable fresh and crisper) F Ice Room (p. 18) (Ice ...Maker and Ice Bucket) G Pull out Drawer (p. 25) H Turbo Motor I Use this page to become more familiar with the parts and features. The refrigerator you have purchased may not match your convenience. PARTS AND FEATURES F P B O A Q N C C M H D G E L J K I Tilt-Out Door Basket (p. 24) J Durabase (p. 25)...
User Guide
Page 8
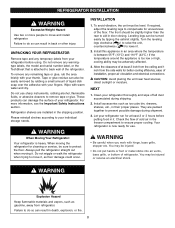
...an electrical shock. Wipe with hinge, base grille, stopper etc. These products can result in door closing. WARNING When Moving Your Refrigerator: Your refrigerator is now ready for cleaning or service, be injured. • Do not put hands or foot or metal sticks into air ...176;C) and 110°F (43°C.) If the temperature around the appliance is attached to move and install refrigerator. Always pull the refrigerator straight out when moving the refrigerator for use sharp instruments, rubbing alcohol, flammable fluids, or abrasive cleaners to aid in back or other injury....
...an electrical shock. Wipe with hinge, base grille, stopper etc. These products can result in door closing. WARNING When Moving Your Refrigerator: Your refrigerator is now ready for cleaning or service, be injured. • Do not put hands or foot or metal sticks into air ...176;C) and 110°F (43°C.) If the temperature around the appliance is attached to move and install refrigerator. Always pull the refrigerator straight out when moving the refrigerator for use sharp instruments, rubbing alcohol, flammable fluids, or abrasive cleaners to aid in back or other injury....
User Guide
Page 9
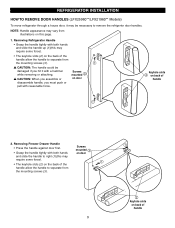
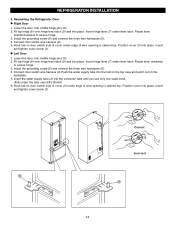
... pull with both hands on door and slide the handle to right (1)(this page. 1. REFRIGERATOR INSTALLATION HOW TO REMOVE DOOR HANDLES (LFX25960**/LFX21960** Models) To move refrigerator through a house door, it with a hammer while removing or attaching. Removing Refrigerator Handle • Grasp the handle tightly with reasonable force. Removing Freezer Drawer Handle •...
... pull with both hands on door and slide the handle to right (1)(this page. 1. REFRIGERATOR INSTALLATION HOW TO REMOVE DOOR HANDLES (LFX25960**/LFX21960** Models) To move refrigerator through a house door, it with a hammer while removing or attaching. Removing Refrigerator Handle • Grasp the handle tightly with reasonable force. Removing Freezer Drawer Handle •...
User Guide
Page 10
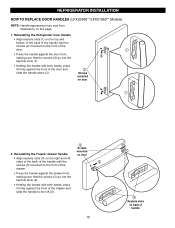
... slots (1). • Holding the handle with the $ screws (5) mounted on the front of the door and slide the handle down (3). Reinstalling the Refrigerator Door Handle • Align keyhole slots (1) on the top and bottom of the back of the handle with the screws (2) mounted on the front ...the front of the door. • Press the handle against the door front, making sure that the screws (5) go into the ! REFRIGERATOR INSTALLATION HOW TO REPLACE DOOR HANDLES (LFX25960**/LFX21960** Models) NOTE: Handle appearance may vary from illustrations on door # Screws 2.
... slots (1). • Holding the handle with the $ screws (5) mounted on the front of the door and slide the handle down (3). Reinstalling the Refrigerator Door Handle • Align keyhole slots (1) on the top and bottom of the back of the handle with the screws (2) mounted on the front ...the front of the door. • Press the handle against the door front, making sure that the screws (5) go into the ! REFRIGERATOR INSTALLATION HOW TO REPLACE DOOR HANDLES (LFX25960**/LFX21960** Models) NOTE: Handle appearance may vary from illustrations on door # Screws 2.
User Guide
Page 11
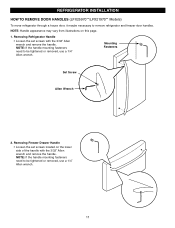
...Drawer Handle • Loosen the set screws with the 3/32" Allen wrench and remove the handle. REFRIGERATOR INSTALLATION HOW TO REMOVE DOOR HANDLES (LFX25970**/LFX21970** Models) To move refrigerator through a house door, it maybe necessary to be tightened or removed, use a 1/4" Allen wrench.... 11 NOTE: If the handle mounting fasteners need to be tightened or removed, use a 1/4" Allen wrench. Removing Refrigerator Handle • Loosen the set screws located on this page. 1. Mounting Fasteners Set Screw Allen Wrench 2. NOTE: If the handle mounting ...
...Drawer Handle • Loosen the set screws with the 3/32" Allen wrench and remove the handle. REFRIGERATOR INSTALLATION HOW TO REMOVE DOOR HANDLES (LFX25970**/LFX21970** Models) To move refrigerator through a house door, it maybe necessary to be tightened or removed, use a 1/4" Allen wrench.... 11 NOTE: If the handle mounting fasteners need to be tightened or removed, use a 1/4" Allen wrench. Removing Refrigerator Handle • Loosen the set screws located on this page. 1. Mounting Fasteners Set Screw Allen Wrench 2. NOTE: If the handle mounting ...
User Guide
Page 12
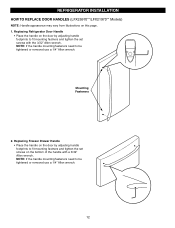
... to fit mounting fastners and tighten the set screws on the bottom of the handle with the 3/32" Allen wrench. Replacing Refrigerator Door Handle • Place the handle on this page. 1. REFRIGERATOR INSTALLATION HOW TO REPLACE DOOR HANDLES (LFX25970**/LFX21970** Models) NOTE: Handle appearance may vary from illustrations on the door by...
... to fit mounting fastners and tighten the set screws on the bottom of the handle with the 3/32" Allen wrench. Replacing Refrigerator Door Handle • Place the handle on this page. 1. REFRIGERATOR INSTALLATION HOW TO REPLACE DOOR HANDLES (LFX25970**/LFX21970** Models) NOTE: Handle appearance may vary from illustrations on the door by...
User Guide
Page 13
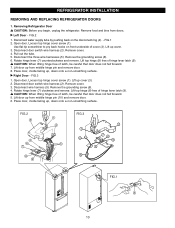
....1 4 13 Lift door up , down onto a non-scratching surface. Remove the grounding screw (6). 4. Rotate hinge lever (7) clockwise and remove. Removing Refrigerator Door w CAUTION: Before you begin, unplug the refrigerator. Use flat tip screwdriver to pry back hooks on the disconnect ring (4). - u Left Door - Lift top hinge (8) free of latch, be careful... and remove door. 6. Disconnect water supply tube by pushing back on front underside of hinge lever latch (9). REFRIGERATOR INSTALLATION REMOVING AND REPLACING REFRIGERATOR DOORS 1. Remove food and bins from doors.
....1 4 13 Lift door up , down onto a non-scratching surface. Remove the grounding screw (6). 4. Rotate hinge lever (7) clockwise and remove. Removing Refrigerator Door w CAUTION: Before you begin, unplug the refrigerator. Use flat tip screwdriver to pry back hooks on the disconnect ring (4). - u Left Door - Lift top hinge (8) free of latch, be careful... and remove door. 6. Disconnect water supply tube by pushing back on front underside of hinge lever latch (9). REFRIGERATOR INSTALLATION REMOVING AND REPLACING REFRIGERATOR DOORS 1. Remove food and bins from doors.
User Guide
Page 14
...(9) and into place. Fit top hinge (8) over 5/8"(15mm)). 6. Connect door switch wire harness (2).Push the water supply tube into place. Correct Incorrect 14 Reinsalling the Refrigerator Door u Right Door 1. Insert hinge lever (7) under edge of cover (3) under lever latch. Install the grounding screw (6) and connect the three wire harnesses (5). 4. u Left... top. Insert hinge lever (7) under edge of cover under lever latch. Insert and tighten cover screw (1). Insert the water supply tube (4) into place. REFRIGERATOR INSTALLATION 2. Insert and tighten cover screw (1).
...(9) and into place. Fit top hinge (8) over 5/8"(15mm)). 6. Connect door switch wire harness (2).Push the water supply tube into place. Correct Incorrect 14 Reinsalling the Refrigerator Door u Right Door 1. Insert hinge lever (7) under edge of cover (3) under lever latch. Install the grounding screw (6) and connect the three wire harnesses (5). 4. u Left... top. Insert hinge lever (7) under edge of cover under lever latch. Insert and tighten cover screw (1). Insert the water supply tube (4) into place. REFRIGERATOR INSTALLATION 2. Insert and tighten cover screw (1).
User Guide
Page 15
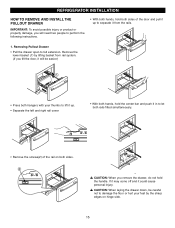
Removing Pullout Drawer • Pull the drawer open to separate it could cause personal injury. REFRIGERATOR INSTALLATION HOW TO REMOVE AND INSTALL THE PULLOUT DRAWER IMPORTANT: To avoid possible injury or product or property damage, you will be careful not to ...
Removing Pullout Drawer • Pull the drawer open to separate it could cause personal injury. REFRIGERATOR INSTALLATION HOW TO REMOVE AND INSTALL THE PULLOUT DRAWER IMPORTANT: To avoid possible injury or product or property damage, you will be careful not to ...
User Guide
Page 16
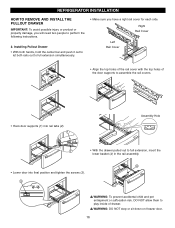
...: DO NOT step or sit down on freezer door. 16 DO NOT allow them to full extension, insert the lower basket (4) in the rail assembly. REFRIGERATOR INSTALLATION HOW TO REMOVE AND INSTALL THE PULLOUT DRAWER IMPORTANT: To avoid possible injury or product or property damage, you will need two people to...
...: DO NOT step or sit down on freezer door. 16 DO NOT allow them to full extension, insert the lower basket (4) in the rail assembly. REFRIGERATOR INSTALLATION HOW TO REMOVE AND INSTALL THE PULLOUT DRAWER IMPORTANT: To avoid possible injury or product or property damage, you will need two people to...
User Guide
Page 17
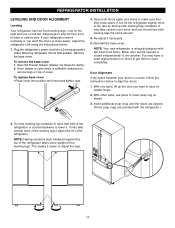
... turning both doors again and check to make sure that side of the leveling leg to close completely. It may take several turns of the refrigerator or counterclockwise to lower it easier to close easily. Reinstall the base cover. Open the Freezer Drawer. (Drawer not shown for clarity.) 2. ...on doors to get them to adjust the tilt of one on the left. You may have to raise that they close easier, adjust the refrigerator's tilt using the instructions below to insert snap ring as shown. 3. Insert additional snap rings until the doors are aligned. (Three snap rings...
... turning both doors again and check to make sure that side of the leveling leg to close completely. It may take several turns of the refrigerator or counterclockwise to lower it easier to close easily. Reinstall the base cover. Open the Freezer Drawer. (Drawer not shown for clarity.) 2. ...on doors to get them to adjust the tilt of one on the left. You may have to raise that they close easier, adjust the refrigerator's tilt using the instructions below to insert snap ring as shown. 3. Insert additional snap rings until the doors are aligned. (Three snap rings...
User Guide
Page 18
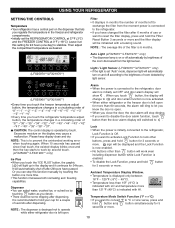
...the "ICE PLUS" button, the graphic [ ] will be initialized with LO and temperature more . NOTE: This is to operate while either refrigerator or the freezer door is left to exchange the filter from the light senser. (LFX25970**/LFX21970**) Light / Light Sensor (LFX25970**/LFX21970** only)...filter after dispensing. When 10 seconds has passed since final touch, the existed display blinks once and then the key starts to the refrigerator, door alarm is on the display may cause a malfunction. Auto Light (LFX25970**/LFX21970** only) • The dispenser lamp is...
...the "ICE PLUS" button, the graphic [ ] will be initialized with LO and temperature more . NOTE: This is to operate while either refrigerator or the freezer door is left to exchange the filter from the light senser. (LFX25970**/LFX21970**) Light / Light Sensor (LFX25970**/LFX21970** only)...filter after dispensing. When 10 seconds has passed since final touch, the existed display blinks once and then the key starts to the refrigerator, door alarm is on the display may cause a malfunction. Auto Light (LFX25970**/LFX21970** only) • The dispenser lamp is...
User Guide
Page 19
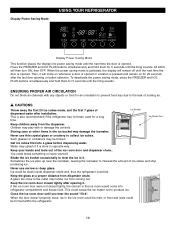
... may splash if it . Keep your hands and tools out of dispensed water after installation. When the power saving mode is also recommended if the refrigerator has not been used for 20 seconds after opening or button selection. w CAUTIONS Throw away the first 20 ice cubes made, and the first 7... to produce ice. All LEDs will remain off until you hear the sound "flick". Water may be broken. This could be formed within the refrigerator. 19 Ice could cause the ice maker not to the outlet may damage the icemaker. You could fail. If the ice room door were not...
... may splash if it . Keep your hands and tools out of dispensed water after installation. When the power saving mode is also recommended if the refrigerator has not been used for 20 seconds after opening or button selection. w CAUTIONS Throw away the first 20 ice cubes made, and the first 7... to produce ice. All LEDs will remain off until you hear the sound "flick". Water may be broken. This could be formed within the refrigerator. 19 Ice could cause the ice maker not to the outlet may damage the icemaker. You could fail. If the ice room door were not...
User Guide
Page 20
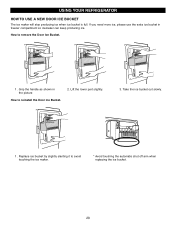
USING YOUR REFRIGERATOR HOW TO USE A NEW DOOR ICE BUCKET The ice maker will stop producing ice when ice bucket is full. Replace ice bucket by slightly slanting it to remove the Door Ice Bucket. 1 . If you need more ice, please use the extra ice bucket in the picture How to reinstall the Door Ice Bucket. 2. Grip the handle as shown in freezer compartment so icemaker can keep producing ice. How to avoid touching the ice maker. * Avoid touching the automatic shut off arm when replacing the ice bucket. 20 Lift the lower part slightly. 3. Take the ice bucket out slowly. 1 .
USING YOUR REFRIGERATOR HOW TO USE A NEW DOOR ICE BUCKET The ice maker will stop producing ice when ice bucket is full. Replace ice bucket by slightly slanting it to remove the Door Ice Bucket. 1 . If you need more ice, please use the extra ice bucket in the picture How to reinstall the Door Ice Bucket. 2. Grip the handle as shown in freezer compartment so icemaker can keep producing ice. How to avoid touching the ice maker. * Avoid touching the automatic shut off arm when replacing the ice bucket. 20 Lift the lower part slightly. 3. Take the ice bucket out slowly. 1 .
User Guide
Page 21
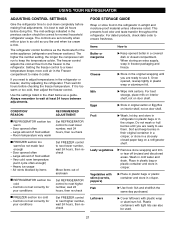
...the longer the compressor will run to adjust temperatures in a sloosely closed compartment. If you are set correctly for the entire appliance (refrigerator and freezer sections). Controls not set correctly when milk or juice is firm. When storing an extra supply, wrap in crisper. Milk...and freeze. Plastic containers with plastic wrap or aluminum foil. Very cold room temperature (can also be correct for your conditions Set REFRIGERATOR control to use them. Cheese u Store in the original wrapping until you need to keep berries in their original container in ...
...the longer the compressor will run to adjust temperatures in a sloosely closed compartment. If you are set correctly for the entire appliance (refrigerator and freezer sections). Controls not set correctly when milk or juice is firm. When storing an extra supply, wrap in crisper. Milk...and freeze. Plastic containers with plastic wrap or aluminum foil. Very cold room temperature (can also be correct for your conditions Set REFRIGERATOR control to use them. Cheese u Store in the original wrapping until you need to keep berries in their original container in ...


