
User Guide
Page 2
...Instructions 5-6 Grounding Requirements 6 Parts And Features 7 Refrigerator Installation Unpacking Your Refrigerator Installation 8-17 8 8 Removing And Replacing Your Refrigerator Handles And Doors 9-16 Leveling And Door Alignment 17 Base Cover 17 Using Your Refrigerator 18-28 Setting The Controls 18 Ensuring Proper Air ... Bucket 20 Adjusting Control Settings 21 Food Storage Guide 21 Storing Frozen Food 22 I_ Refrigerator Section Water Dispenser 22 Refrigerator Shelves 23 Bottle Holder 23 Snack Pan 24 Optibin Crisper 24 Crisper Humidity Control 24 Removing...
...Instructions 5-6 Grounding Requirements 6 Parts And Features 7 Refrigerator Installation Unpacking Your Refrigerator Installation 8-17 8 8 Removing And Replacing Your Refrigerator Handles And Doors 9-16 Leveling And Door Alignment 17 Base Cover 17 Using Your Refrigerator 18-28 Setting The Controls 18 Ensuring Proper Air ... Bucket 20 Adjusting Control Settings 21 Food Storage Guide 21 Storing Frozen Food 22 I_ Refrigerator Section Water Dispenser 22 Refrigerator Shelves 23 Bottle Holder 23 Snack Pan 24 Optibin Crisper 24 Crisper Humidity Control 24 Removing...

User Guide
Page 3
Your LG Refrigerator will be will repaired or replaced, at LG's option, if it proves to be defective in...Purchase. NEITHER THE MANUFACTURER NOR ITS U.S. This warranty gives you specific legal rights and you . WARRANTY PERIOD: REFRIGERATOR/FREEZER LABOR: One Year from the Date of Purchase. SEALED SYSTEM (Compressor, Condenser, and Evaporator) LABOR: ...is used in other than intended purpose. • Repairs when your LG refrigerator is good only to the original purchaser of sale to your nearest LG Authorized Service Center. (Phones are warranted for other than normal, single...
Your LG Refrigerator will be will repaired or replaced, at LG's option, if it proves to be defective in...Purchase. NEITHER THE MANUFACTURER NOR ITS U.S. This warranty gives you specific legal rights and you . WARRANTY PERIOD: REFRIGERATOR/FREEZER LABOR: One Year from the Date of Purchase. SEALED SYSTEM (Compressor, Condenser, and Evaporator) LABOR: ...is used in other than intended purpose. • Repairs when your LG refrigerator is good only to the original purchaser of sale to your nearest LG Authorized Service Center. (Phones are warranted for other than normal, single...

User Guide
Page 4
... PRODUCT. THE ABOVE WARRANTY DOES NOT APPLY TO: 1. Therefore, these limitations or exclusions may also have product type (refrigerator) and ZIP Code ready. This warranD is in -home sin=ice. LIMITED WARRANTY (CANADA) LG REFRIGERATOR LG Electronics will repair or at its option replace, without charge, yore product which vary fiom province to provthce...
... PRODUCT. THE ABOVE WARRANTY DOES NOT APPLY TO: 1. Therefore, these limitations or exclusions may also have product type (refrigerator) and ZIP Code ready. This warranD is in -home sin=ice. LIMITED WARRANTY (CANADA) LG REFRIGERATOR LG Electronics will repair or at its option replace, without charge, yore product which vary fiom province to provthce...
User Guide
Page 5
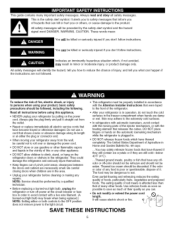
... what can be preceded by the safety alert symbol and the hazard signal word DANGER, WARNING, CAUTION. They could damage the refrigerator and seriously injure themselves. • Keep fingers out of foods, particularly fruits, vegetables and prepared foods. Be careful closing doors...follow instructions. Even partial thawing and refreezing reduces the eating quality of pinch point areas; The United States Department of the refrigerator. Read all safety messages. This is in operation, do not touch the cold surfaces in accordance with the Attention Installer Instructions...
... what can be preceded by the safety alert symbol and the hazard signal word DANGER, WARNING, CAUTION. They could damage the refrigerator and seriously injure themselves. • Keep fingers out of foods, particularly fruits, vegetables and prepared foods. Be careful closing doors...follow instructions. Even partial thawing and refreezing reduces the eating quality of pinch point areas; The United States Department of the refrigerator. Read all safety messages. This is in operation, do not touch the cold surfaces in accordance with the Attention Installer Instructions...

User Guide
Page 6
...EXTENSION CORDS Because of potential safety hazards under any type of installation, cleaning, or removing a light bulb, turn the control (Thermostat, Refrigerator Control or Freezer Control, depending on the model) to fines and imprisonment under provisions of an extension cord will sit for proper disposal by...they will increase the clearance needed for 115 Volts, 60 Hz, AC only, and fused at right to make sure the CFC refrigerant is properly grounded. 3-prong grounding type wall receptacle 3-prong grounding Il plug_ Ensure proper ground exists before use an extension cord. ...
...EXTENSION CORDS Because of potential safety hazards under any type of installation, cleaning, or removing a light bulb, turn the control (Thermostat, Refrigerator Control or Freezer Control, depending on the model) to fines and imprisonment under provisions of an extension cord will sit for proper disposal by...they will increase the clearance needed for 115 Volts, 60 Hz, AC only, and fused at right to make sure the CFC refrigerant is properly grounded. 3-prong grounding type wall receptacle 3-prong grounding Il plug_ Ensure proper ground exists before use an extension cord. ...

User Guide
Page 7
Page references are included for your model. NOTE: This guide covers several different models. The refrigerator you have purchased may not match your convenience. O Refrigerator Light (p. 27) Q Filter (Inside) (p. 26) Modular Door Bins (p. 24) Refrigerator Shelves (p. 21) Optibin Crisper (p. 22) (Keeps fruits and vegetable fresh and crisper) Ice Room (p. 18) (Ice Maker and Ice...
Page references are included for your model. NOTE: This guide covers several different models. The refrigerator you have purchased may not match your convenience. O Refrigerator Light (p. 27) Q Filter (Inside) (p. 26) Modular Door Bins (p. 24) Refrigerator Shelves (p. 21) Optibin Crisper (p. 22) (Keeps fruits and vegetable fresh and crisper) Ice Room (p. 18) (Ice Maker and Ice...
User Guide
Page 8
... of installation, proper air circulation and electrical connections. & CAUTION: Avoid placing the unit near heat sources, direct sunlight or moisture. Refrigerator shelves are packed together to prevent possible damage during shipping. 2. Turn the leveling legs clockwise ("_'_) to raise the unit, counterclockwise (_,.L)...in the freezer compartment to ensure proper cooling. Leveling legs can result in the shipping position. When Moving Your Refrigerator: Your refrigerator is now ready for better cooling efficiency, ease of liquid dish soap over the adhesive with warm water and dry...
... of installation, proper air circulation and electrical connections. & CAUTION: Avoid placing the unit near heat sources, direct sunlight or moisture. Refrigerator shelves are packed together to prevent possible damage during shipping. 2. Turn the leveling legs clockwise ("_'_) to raise the unit, counterclockwise (_,.L)...in the freezer compartment to ensure proper cooling. Leveling legs can result in the shipping position. When Moving Your Refrigerator: Your refrigerator is now ready for better cooling efficiency, ease of liquid dish soap over the adhesive with warm water and dry...

User Guide
Page 9
... Screws mounted _! on door Keyhole slots on this page. 1. Screws on door A Keyhole slots ?_ on the back of handle Removing Refrigerator Handle • Grasp the handle tightly with both hands and slide the handle to separate from the mounting screws (3). Removing Freezer Drawer Handle... force). • The keyhole slots (2) on the back of j handle 2. HOW TO REMOVE DOOR HANDLES (LFX25960**/LFX21960** Models) To move refrigerator through a house door, it with a hammer while removing or attaching. _, CAUTION: When you assemble or disassemble handle, you hit it may be...
... Screws mounted _! on door Keyhole slots on this page. 1. Screws on door A Keyhole slots ?_ on the back of handle Removing Refrigerator Handle • Grasp the handle tightly with both hands and slide the handle to separate from the mounting screws (3). Removing Freezer Drawer Handle... force). • The keyhole slots (2) on the back of j handle 2. HOW TO REMOVE DOOR HANDLES (LFX25960**/LFX21960** Models) To move refrigerator through a house door, it with a hammer while removing or attaching. _, CAUTION: When you assemble or disassemble handle, you hit it may be...

User Guide
Page 10
Screws mounted on this page. 1. HOW TO REPLACE DOOR HANDLES (LFX25960**/LFX21960** NOTE: Handle appearance may vary from illustrations on door Models) 2. Reinstalling the Refrigerator Door Handle • Align keyhole slots (1) on the top and bottom of the back of the handle with the screws (2) mounted on the front of ...
Screws mounted on this page. 1. HOW TO REPLACE DOOR HANDLES (LFX25960**/LFX21960** NOTE: Handle appearance may vary from illustrations on door Models) 2. Reinstalling the Refrigerator Door Handle • Align keyhole slots (1) on the top and bottom of the back of the handle with the screws (2) mounted on the front of ...

User Guide
Page 11
... Handle • Loosen the set screws with the 3/32" Allen wrench and remove the handle. HOW TO REMOVE DOOR HANDLES (LFX25970**/LFX21970** Models) To move refrigerator through a house door, it maybe necessary to be tightened or removed, use a 1/4" Allen wrench. NOTE: If the handle mounting fasteners need to remove...
... Handle • Loosen the set screws with the 3/32" Allen wrench and remove the handle. HOW TO REMOVE DOOR HANDLES (LFX25970**/LFX21970** Models) To move refrigerator through a house door, it maybe necessary to be tightened or removed, use a 1/4" Allen wrench. NOTE: If the handle mounting fasteners need to remove...

User Guide
Page 12
... or removed use a 1/4" Allen wrench. Models) Mounting Fasteners 2. NOTE: If the handle mounting fasteners need to be tightened or removed use a 1/4" Allen wrench. 12 Replacing Refrigerator Door Handle • Place the handle on the door by adjusting handle footprints to fit mounting fastners and tighten the set screws on this page...
... or removed use a 1/4" Allen wrench. Models) Mounting Fasteners 2. NOTE: If the handle mounting fasteners need to be tightened or removed use a 1/4" Allen wrench. 12 Replacing Refrigerator Door Handle • Place the handle on the door by adjusting handle footprints to fit mounting fastners and tighten the set screws on this page...
User Guide
Page 13
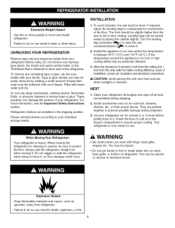
... doors. • Left Door - Lift top hinge (8) free of hinge lever latch (9). _, CAUTION: When lifting hinge free of cover (3). Disconnect wire harness (5). REMOVING AND REPLACING REFRIGERATOR DOORS 1. Removing Refrigerator Door _, CAUTION: Before you begin, unplug the...
... doors. • Left Door - Lift top hinge (8) free of hinge lever latch (9). _, CAUTION: When lifting hinge free of cover (3). Disconnect wire harness (5). REMOVING AND REPLACING REFRIGERATOR DOORS 1. Removing Refrigerator Door _, CAUTION: Before you begin, unplug the...

User Guide
Page 14
... to secure hinge. 3. Hook tab on the backplate. 5. Fit top hinge (8) over hinge lever latch (9) and into place. Insert and tighten cover screw (1). Reinsalling the Refrigerator Door • Right Door 1. Rotate lever counterclockwise to secure hinge. 3. Insert the water supply tube (4) into the hall on the top case and pull it...
... to secure hinge. 3. Hook tab on the backplate. 5. Fit top hinge (8) over hinge lever latch (9) and into place. Insert and tighten cover screw (1). Reinsalling the Refrigerator Door • Right Door 1. Rotate lever counterclockwise to secure hinge. 3. Insert the water supply tube (4) into the hall on the top case and pull it...

User Guide
Page 17
...additional snap rings until the doors are aligned. (Three snap rings are provided with two fresh food doors. Plug the refrigerator's power cord into its final position. Move the refrigerator into a 3-prong grounded outlet. Reinstall the base cover. Turn the leveling leg clockwise to raise that they close completely... below : 1. It may take several turns of the leveling leg to adjust the tilt of cover. LEVELING AND DOOR ALIGNMENT Leveling Your refrigerator has two front leveling legs--one on the right and one on doors to get them to close easily. This makes it . With other...
...additional snap rings until the doors are aligned. (Three snap rings are provided with two fresh food doors. Plug the refrigerator's power cord into its final position. Move the refrigerator into a 3-prong grounded outlet. Reinstall the base cover. Turn the leveling leg clockwise to raise that they close completely... below : 1. It may take several turns of the leveling leg to adjust the tilt of cover. LEVELING AND DOOR ALIGNMENT Leveling Your refrigerator has two front leveling legs--one on the right and one on doors to get them to close easily. This makes it . With other...

User Guide
Page 18
... again. I_1sign will work by touching the button one day) to @) and door alram function is now activated. • When either refrigerator door is left open . • When you close the door, the door alarm will show K] . Please keep display clean and ... will change to stabilize. Leave it continues for 3 seconds or more . NOTE : The average life of use or want to activate Lock Function to the refrigerator, Lock Function is Off. • If you can select water, crushed ice, or cubed ice by brightness of "0" *"-1 " *"-2" *"-3" *"-4" *"-6" *"8" *"6" *"5" *"4" *"3" *"2" *"1"...
... again. I_1sign will work by touching the button one day) to @) and door alram function is now activated. • When either refrigerator door is left open . • When you close the door, the door alarm will show K] . Please keep display clean and ... will change to stabilize. Leave it continues for 3 seconds or more . NOTE : The average life of use or want to activate Lock Function to the refrigerator, Lock Function is Off. • If you can select water, crushed ice, or cubed ice by brightness of "0" *"-1 " *"-2" *"-3" *"-4" *"-6" *"8" *"6" *"5" *"4" *"3" *"2" *"1"...

User Guide
Page 19
... the ice room door until the next time the door is pressed and remain on for 20 seconds after installation. Then, it will come into refrigerator compartment and freeze food. To deactivate the power saving mode, press the FREEZER and ICE PLUS buttons simultaneously and hold them for a long time. ...This is activated, the display will then turn ON, then OFR When the power saving mode is also recommended if the refrigerator has not been used for 5 seconds until the Ding sounds. Ice Bucket Ice Room Door Keep children away from dispenser chute. You could be broken...
... the ice room door until the next time the door is pressed and remain on for 20 seconds after installation. Then, it will come into refrigerator compartment and freeze food. To deactivate the power saving mode, press the FREEZER and ICE PLUS buttons simultaneously and hold them for a long time. ...This is activated, the display will then turn ON, then OFR When the power saving mode is also recommended if the refrigerator has not been used for 5 seconds until the Ding sounds. Ice Bucket Ice Room Door Keep children away from dispenser chute. You could be broken...

User Guide
Page 21
... Fruit • Store in original carton or Egg Box on interior shelf, not on door shelf. • Wash, let dry, and store in refrigerator in plastic bags or in cold water and drain. When storing an extra supply, wrap in freezer packaging and freeze. • Store in plastic wrap...or store in crisper. • Use fresh fish and shellfish the same day purchased. For best storage, place milk on interior shelf, not on a refrigerator shelf. Sort and keep the temperature colder. Place in plastic bag or plastic container and store in crisper. • Place in plastic bags or plastic...
... Fruit • Store in original carton or Egg Box on interior shelf, not on door shelf. • Wash, let dry, and store in refrigerator in plastic bags or in cold water and drain. When storing an extra supply, wrap in freezer packaging and freeze. • Store in plastic wrap...or store in crisper. • Use fresh fish and shellfish the same day purchased. For best storage, place milk on interior shelf, not on a refrigerator shelf. Sort and keep the temperature colder. Place in plastic bag or plastic container and store in crisper. • Place in plastic bags or plastic...
User Guide
Page 22
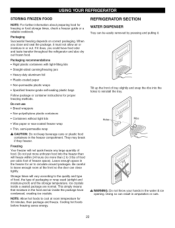
...ice opening. Cooling hot foods before freezing saves energy. Tilt up the front of food. Leave enough space in amputation or cuts. 22 REFRIGERATOR SECTION WATER DISPENSER Tray can be easily removed by pressing and pulling it does, you close tightly. Freezing Your freezer will not quick-... quality and type of food, the type of freezer space). Ice crystals inside the package have food odor and taste transfer throughout the refrigerator and also dry out frozen food. STORING FROZEN FOOD NOTE: For further information about preparing food for air to circulate around packages. If...
...ice opening. Cooling hot foods before freezing saves energy. Tilt up the front of food. Leave enough space in amputation or cuts. 22 REFRIGERATOR SECTION WATER DISPENSER Tray can be easily removed by pressing and pulling it does, you close tightly. Freezing Your freezer will not quick-... quality and type of food, the type of freezer space). Ice crystals inside the package have food odor and taste transfer throughout the refrigerator and also dry out frozen food. STORING FROZEN FOOD NOTE: For further information about preparing food for air to circulate around packages. If...

User Guide
Page 23
... shelves in the position you . • To slide shelf in, push shelf in until it will also reduce the amount of time the refrigerator door is open, saving energy. Sliding Out Shelves You can be stored laterally with warm water when they are cold. Then lower the front ... the shelf in the direction of the shelf you want and pushing it inward. 23 Use special care when removing them . REFRIGERATOR SHELVES The shelves in your refrigerator are adjustable to meet your protection, glass shelves are made with tempered glass, which will shatter into small pebblesized pieces. Your ...
... shelves in the position you . • To slide shelf in, push shelf in until it will also reduce the amount of time the refrigerator door is open, saving energy. Sliding Out Shelves You can be stored laterally with warm water when they are cold. Then lower the front ... the shelf in the direction of the shelf you want and pushing it inward. 23 Use special care when removing them . REFRIGERATOR SHELVES The shelves in your refrigerator are adjustable to meet your protection, glass shelves are made with tempered glass, which will shatter into small pebblesized pieces. Your ...

User Guide
Page 29
... fluids. PLASTIC PARTS (covers and panels) Do not use cleaning waxes, concentrated detergents, bleaches, or cleaners containing petroleum on plastic refrigerator parts. LIGHT BULB REPLACEMENT Electrical Shock Hazard Explosion Hazard Use non-flammable cleaner. Refer to warm up spills immediately. OUTSIDE Before replacing... a burned-out light bulb, either unplug the refrigerator or turn off power at least twice a year using appliance wax (or auto paste wax). Using a flat instrument, gently ...
... fluids. PLASTIC PARTS (covers and panels) Do not use cleaning waxes, concentrated detergents, bleaches, or cleaners containing petroleum on plastic refrigerator parts. LIGHT BULB REPLACEMENT Electrical Shock Hazard Explosion Hazard Use non-flammable cleaner. Refer to warm up spills immediately. OUTSIDE Before replacing... a burned-out light bulb, either unplug the refrigerator or turn off power at least twice a year using appliance wax (or auto paste wax). Using a flat instrument, gently ...


