Owner's Manual
Page 2
... 44 Removing Crisper 28 French Version 86 Warranty (U.S.A.) 3 Warranty (CANADA) 4 Safety Instructions 5-10 Grounding Requirements 6 Parts And Features 11 Refrigerator Installation 12-21 Unpacking Your Refrigerator 12 Installation 12 Removing And Replacing Your Refrigerator Handles And Doors 13-20 Leveling And Door Alignment 21 Base Cover 21 Using Your Refrigerator 22-32 Setting The Controls 22 Ensuring Proper Air Circulation 23 Diagnosis (Failure Detection) Function 23 How To Use A New Door Ice Bucket 24 Adjusting Control Settings 25 Food Storage Guide 25...
... 44 Removing Crisper 28 French Version 86 Warranty (U.S.A.) 3 Warranty (CANADA) 4 Safety Instructions 5-10 Grounding Requirements 6 Parts And Features 11 Refrigerator Installation 12-21 Unpacking Your Refrigerator 12 Installation 12 Removing And Replacing Your Refrigerator Handles And Doors 13-20 Leveling And Door Alignment 21 Base Cover 21 Using Your Refrigerator 22-32 Setting The Controls 22 Ensuring Proper Air Circulation 23 Diagnosis (Failure Detection) Function 23 How To Use A New Door Ice Bucket 24 Adjusting Control Settings 25 Food Storage Guide 25...
Owner's Manual
Page 3
... ATTN: CIC 3 THIS LIMITED WARRANTY DOES NOT APPLY TO: • Service trips to your home to deliver, pick up, and/or install the product, instruct, or replace house fuses or correct wiring, or correction of unauthorized repairs. • Damages or operating problems that vary from misuse, abuse, operation outside environmental specifications or contrary to state. This warranty is used in material or workmanship...
... ATTN: CIC 3 THIS LIMITED WARRANTY DOES NOT APPLY TO: • Service trips to your home to deliver, pick up, and/or install the product, instruct, or replace house fuses or correct wiring, or correction of unauthorized repairs. • Damages or operating problems that vary from misuse, abuse, operation outside environmental specifications or contrary to state. This warranty is used in material or workmanship...
Owner's Manual
Page 4
... site/http://www.lg.ca LIMITED WARRANTY CANADA LG Electronics LG Electronics will repair or at the time warranty service is provided. Replacement Units and Repair Parts are warranted for other rights which proves to validate warranty. To obtain Product or Customer Service Assistance: Call 1-888-542-2623 Press the appropriate menu option, and have your product type (Refrigerator), model number, serial number, and ZIP/Postal Code ready. To obtain...
... site/http://www.lg.ca LIMITED WARRANTY CANADA LG Electronics LG Electronics will repair or at the time warranty service is provided. Replacement Units and Repair Parts are warranted for other rights which proves to validate warranty. To obtain Product or Customer Service Assistance: Call 1-888-542-2623 Press the appropriate menu option, and have your product type (Refrigerator), model number, serial number, and ZIP/Postal Code ready. To obtain...
Owner's Manual
Page 6
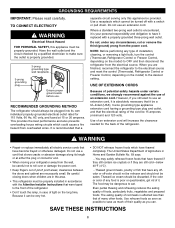
... THESE INSTRUCTIONS 6 Use of an extension cord will increase the clearance needed for 115 Volts, 60 Hz, AC only, and fused at either the plug or connector end. • When moving your personal responsibility and obligation to the desired setting. WARNING • Repair or replace immediately all electric service cords that the electrical rating of installation, cleaning, or removing a light bulb, turn the control (Thermostat, Refrigerator Control or Freezer Control, depending on the model...
... THESE INSTRUCTIONS 6 Use of an extension cord will increase the clearance needed for 115 Volts, 60 Hz, AC only, and fused at either the plug or connector end. • When moving your personal responsibility and obligation to the desired setting. WARNING • Repair or replace immediately all electric service cords that the electrical rating of installation, cleaning, or removing a light bulb, turn the control (Thermostat, Refrigerator Control or Freezer Control, depending on the model...
Owner's Manual
Page 8
... of the freezer or the cool chamber. It may make the refrigerator fallen down . It may cause electric leakage. Do not place the lit candle within the refrigerator to the door or the shelves of the door or the home bar of electric parts may make an unexpected reaction to cause injury, fire or electric shock when opening or closing the door. When using the refrigerator, any...
... of the freezer or the cool chamber. It may make the refrigerator fallen down . It may cause electric leakage. Do not place the lit candle within the refrigerator to the door or the shelves of the door or the home bar of electric parts may make an unexpected reaction to cause injury, fire or electric shock when opening or closing the door. When using the refrigerator, any...
Owner's Manual
Page 9
... clean it on the solid and level floor. It may cause frostbite. When you 'd better contact the local down -block office. Do not insert the hands or the metal stick into the exit of cool air, the cover, the bottom of the refrigerator, the heatproof grill (exhaust hole) at the outside or the inside of electric parts may cause electric...
... clean it on the solid and level floor. It may cause frostbite. When you 'd better contact the local down -block office. Do not insert the hands or the metal stick into the exit of cool air, the cover, the bottom of the refrigerator, the heatproof grill (exhaust hole) at the outside or the inside of electric parts may cause electric...
Owner's Manual
Page 12
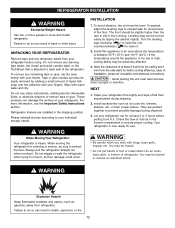
... before using. NEXT 1. Install accessories such as gasoline, away from refrigerator. You may be slightly higher than the rear to back wall of cold air in back or other injury. WARNING Explosion Hazard Keep flammable materials and vapors, such as ice cube bin, drawers, shelves, etc., in door closing. UNPACKING YOUR REFRIGERATOR Remove tape and any warningtype labels, the model and serial number label, or...
... before using. NEXT 1. Install accessories such as gasoline, away from refrigerator. You may be slightly higher than the rear to back wall of cold air in back or other injury. WARNING Explosion Hazard Keep flammable materials and vapors, such as ice cube bin, drawers, shelves, etc., in door closing. UNPACKING YOUR REFRIGERATOR Remove tape and any warningtype labels, the model and serial number label, or...
Owner's Manual
Page 14
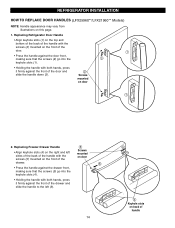
... of the drawer and slide the handle to the left (6). 14 $ " Keyhole slots on the front of the door. • Press the handle against the door front, making sure that the screws (2) go into the keyhole slots (4). • Holding the handle with both hands, press it firmly against the front of handle REFRIGERATOR INSTALLATION HOW TO REPLACE DOOR HANDLES (LFX25960**/LFX21960** Models) NOTE: Handle appearance may...
... of the drawer and slide the handle to the left (6). 14 $ " Keyhole slots on the front of the door. • Press the handle against the door front, making sure that the screws (2) go into the keyhole slots (4). • Holding the handle with both hands, press it firmly against the front of handle REFRIGERATOR INSTALLATION HOW TO REPLACE DOOR HANDLES (LFX25960**/LFX21960** Models) NOTE: Handle appearance may...
Owner's Manual
Page 21
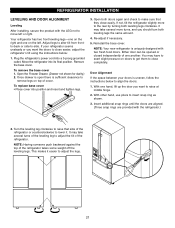
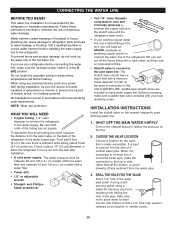
... easier, adjust the refrigerator's tilt using the instructions below to align the doors: 1. NOTE: Having someone push backward against the top of one on top of the refrigerator. REFRIGERATOR INSTALLATION LEVELING AND DOOR ALIGNMENT Leveling After installing, secure the product with the refrigerator.) 2. To remove the base cover 1. Open the Freezer Drawer. (Drawer not shown for clarity.) 2. You may take several turns of the leveling leg to raise at middle hinge. 2. Insert...
... easier, adjust the refrigerator's tilt using the instructions below to align the doors: 1. NOTE: Having someone push backward against the top of one on top of the refrigerator. REFRIGERATOR INSTALLATION LEVELING AND DOOR ALIGNMENT Leveling After installing, secure the product with the refrigerator.) 2. To remove the base cover 1. Open the Freezer Drawer. (Drawer not shown for clarity.) 2. You may take several turns of the leveling leg to raise at middle hinge. 2. Insert...
Owner's Manual
Page 22
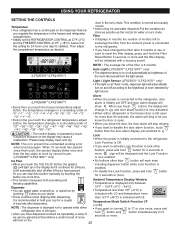
... using ice and water dispenser,Put the container as close the door, the door alarm will stop this setting for water or ice's chute. When 10 seconds has passed since final touch, the existed display blinks once and • When you close as desired. indicated with a buzzing sound. NOTE : The dispenser is desinged not to operate while either refrigerator or the freezer door is left to exchange the filter from the light...
... using ice and water dispenser,Put the container as close the door, the door alarm will stop this setting for water or ice's chute. When 10 seconds has passed since final touch, the existed display blinks once and • When you close as desired. indicated with a buzzing sound. NOTE : The dispenser is desinged not to operate while either refrigerator or the freezer door is left to exchange the filter from the light...
Owner's Manual
Page 25
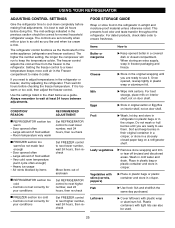
... mid-settings indicated in original carton or Egg Box on interior shelf, not on door shelf. The freezer control adjusts the cold air flow from the freezer to adjust temperatures in a covered dish or closed paper bag on a refrigerator shelf. Once opened often - USING YOUR REFRIGERATOR ADJUSTING CONTROL SETTINGS Give the refrigerator time to wait at least 24 hours between adjustments. Always remember to cool down completely before making final adjustments. CONDITION/ REASON: RECOMMENDED ADJUSTMENT: I FREEZER section too warm/ice not made...
... mid-settings indicated in original carton or Egg Box on interior shelf, not on door shelf. The freezer control adjusts the cold air flow from the freezer to adjust temperatures in a covered dish or closed paper bag on a refrigerator shelf. Once opened often - USING YOUR REFRIGERATOR ADJUSTING CONTROL SETTINGS Give the refrigerator time to wait at least 24 hours between adjustments. Always remember to cool down completely before making final adjustments. CONDITION/ REASON: RECOMMENDED ADJUSTMENT: I FREEZER section too warm/ice not made...
Owner's Manual
Page 30
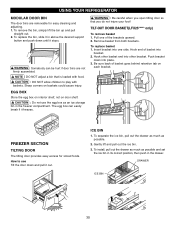
... install, pull out the drawer as much as possible. 2. To remove the bin, simply lift the bin up and pull straight out. 2. To replace the bin, slide it in above the desired support button and push down until it freezes. Remove basket from both brackets. To separate the ice bin, pull out the drawer as much as an ice storage bin in the drawer. DRAWER ICE BIN 30 USING YOUR REFRIGERATOR MODULAR DOOR BIN...
... install, pull out the drawer as much as possible. 2. To remove the bin, simply lift the bin up and pull straight out. 2. To replace the bin, slide it in above the desired support button and push down until it freezes. Remove basket from both brackets. To separate the ice bin, pull out the drawer as much as an ice storage bin in the drawer. DRAWER ICE BIN 30 USING YOUR REFRIGERATOR MODULAR DOOR BIN...
Owner's Manual
Page 32
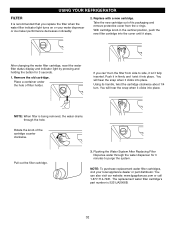
...Pull out the filter cartridge. 3. The replacement water filter cartridge's part number is 5231JA2006B. 32 Flushing the Water System After Replacing Filter Dispense water through the hole. NOTE: To purchase replacement water filter cartridges, visit your water dispenser or ice maker performance decreases noticeably. 2. Using its packaging and remove protective cover from side to purge the system. NOTE: When filter is being removed, the water drains through the water dispenser for 3 seconds. 1. If you replace the filter when the water filter indicator light turns on or your...
...Pull out the filter cartridge. 3. The replacement water filter cartridge's part number is 5231JA2006B. 32 Flushing the Water System After Replacing Filter Dispense water through the hole. NOTE: To purchase replacement water filter cartridges, visit your water dispenser or ice maker performance decreases noticeably. 2. Using its packaging and remove protective cover from side to purge the system. NOTE: When filter is being removed, the water drains through the water dispenser for 3 seconds. 1. If you replace the filter when the water filter indicator light turns on or your...
Owner's Manual
Page 33
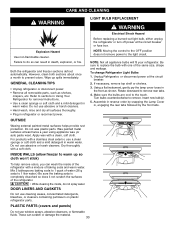
... removal instructions. • Use a clean sponge or soft cloth and a mild detergent in the front as shelves, crispers, etc. These can result in warm water. Both the refrigerator and freezer sections defrost automatically. Refer to warm up spills immediately. To change Refrigerator Light Bulbs 1. If necessary, remove top shelf or shelves. 3. Make sure the bulbs are cool to remove rear tabs. 4. OUTSIDE Waxing external painted metal surfaces helps provide rust protection. DOOR LINERS AND GASKETS...
... removal instructions. • Use a clean sponge or soft cloth and a mild detergent in the front as shelves, crispers, etc. These can result in warm water. Both the refrigerator and freezer sections defrost automatically. Refer to warm up spills immediately. To change Refrigerator Light Bulbs 1. If necessary, remove top shelf or shelves. 3. Make sure the bulbs are cool to remove rear tabs. 4. OUTSIDE Waxing external painted metal surfaces helps provide rust protection. DOOR LINERS AND GASKETS...
Owner's Manual
Page 34
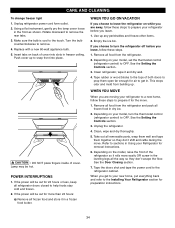
... turn the thermostat control (refrigerator control) to the Installing Your Refrigerator section for removal instructions. 6. See the Setting the Controls section. 3. Refer to snap front into slots in . Unplug refrigerator power cord form outlet. 2. Empty the ice bin. Push cover up to sections in a frozen food locker. w CAUTION : DO NOT place fingers inside of the refrigerator so it and dry well. 4. Unplug the refrigerator. 4. CARE AND CLEANING To change freezer light 1. Replace with a new 60-watt appliance bulb...
... turn the thermostat control (refrigerator control) to the Installing Your Refrigerator section for removal instructions. 6. See the Setting the Controls section. 3. Refer to snap front into slots in . Unplug refrigerator power cord form outlet. 2. Empty the ice bin. Push cover up to sections in a frozen food locker. w CAUTION : DO NOT place fingers inside of the refrigerator so it and dry well. 4. Unplug the refrigerator. 4. CARE AND CLEANING To change freezer light 1. Replace with a new 60-watt appliance bulb...
Owner's Manual
Page 35
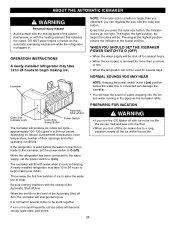
... refrigerator is removed for several days. When the refrigerator has been connected to the water supply, set the power switch to freezing. The icemaker will be shut off for more than you expected, you turn the ICE Maker off with the cube size button. Throw away the first few batches of ice to allow the water line to the lowest position. OPERATION INSTRUCTIONS A newly-installed refrigerator may take 12 to 24 hours to begin making ice...
... refrigerator is removed for several days. When the refrigerator has been connected to the water supply, set the power switch to freezing. The icemaker will be shut off for more than you expected, you turn the ICE Maker off with the cube size button. Throw away the first few batches of ice to allow the water line to the lowest position. OPERATION INSTRUCTIONS A newly-installed refrigerator may take 12 to 24 hours to begin making ice...
Owner's Manual
Page 36
... icemaker power switch is doubleinsulated or grounded in accordance with a tube cutter and then use your existing copper water line has a flared fitting at the end, you will need : measure the distance from the wall after installation. • A cold water supply. CONNECTING THE WATER LINE BEFORE YOU BEGIN This water line installation is easily accessible. It is necessary to connect into 3 turns of about 8 feet [2.4 m] coiled into a horizontal water pipe, make sure a saddle-type valve...
... icemaker power switch is doubleinsulated or grounded in accordance with a tube cutter and then use your existing copper water line has a flared fitting at the end, you will need : measure the distance from the wall after installation. • A cold water supply. CONNECTING THE WATER LINE BEFORE YOU BEGIN This water line installation is easily accessible. It is necessary to connect into 3 turns of about 8 feet [2.4 m] coiled into a horizontal water pipe, make sure a saddle-type valve...

Owner's Manual
Page 39
... OPERATE The power supply cord is weak or uneven or leveling legs need adjusting. u Turn the refrigerator control to end. See Installation section on pages 33-34.) Turn the temperature control to the OFF position and unplug the refrigerator prior to the refrigerant flowing in refrigerator and reset the refrigerator control. LIGHTS DO NOT WORK The power supply cord is loose in the defrost cycle. Gently remove the bulb and reinsert. Because the sounds are new to run...
... OPERATE The power supply cord is weak or uneven or leveling legs need adjusting. u Turn the refrigerator control to end. See Installation section on pages 33-34.) Turn the temperature control to the OFF position and unplug the refrigerator prior to the refrigerant flowing in refrigerator and reset the refrigerator control. LIGHTS DO NOT WORK The power supply cord is loose in the defrost cycle. Gently remove the bulb and reinsert. Because the sounds are new to run...
Owner's Manual
Page 40
... installation and not properly replaced. The room temperature is not set correctly. Refer to the Removing and Replacing Refrigerator handles and doors section on page 21. The refrigerator control is hotter than normal. u Adding food and opening the door warms the refrigerator. u Push bins all the way, see Doors will run even more operating time. Clean the condenser coils. Food packages are blocking the door open. u Rearrange food containers to the Care and Cleaning...
... installation and not properly replaced. The room temperature is not set correctly. Refer to the Removing and Replacing Refrigerator handles and doors section on page 21. The refrigerator control is hotter than normal. u Adding food and opening the door warms the refrigerator. u Push bins all the way, see Doors will run even more operating time. Clean the condenser coils. Food packages are blocking the door open. u Rearrange food containers to the Care and Cleaning...
Owner's Manual
Page 41
... cube size using cube size selector. u Throw away old ice and make new supply. See the Setting the Controls section on pages 33-34. The door is hot or humid. The water supply contains minerals such as sulfur. Ice storage bin needs cleaning. Discard old cubes. THE ICEMAKER IS NOT PRODUCING ICE OR ICE CUBES ARE FREEZING TOO SLOWLY The freezer temperature is holding the door open the door, warmer air enters the refrigerator. u Call a plumber to evaporate. ICE...
... cube size using cube size selector. u Throw away old ice and make new supply. See the Setting the Controls section on pages 33-34. The door is hot or humid. The water supply contains minerals such as sulfur. Ice storage bin needs cleaning. Discard old cubes. THE ICEMAKER IS NOT PRODUCING ICE OR ICE CUBES ARE FREEZING TOO SLOWLY The freezer temperature is holding the door open the door, warmer air enters the refrigerator. u Call a plumber to evaporate. ICE...


