User Guide
Page 3
... NUMBERS To obtain Customer Assistance, Product Information, or Dealer or Authorized Service Center location Call 1-800-243-0000 (24 hours a day, 365 days per year.) Or visit our website at LG's option, if it proves to deliver, pick up, and/or install the product, instruct, or replace house ...the Date of unauthorized repairs. • Damages or operating problems that vary from the menu. HOW SERVICE IS HANDLED In-Home Service (Except Model GR051) Please retain dealer's dated bill of sale or delivery ticket as evidence of the Date of Purchase for the remaining portion of incidental...
... NUMBERS To obtain Customer Assistance, Product Information, or Dealer or Authorized Service Center location Call 1-800-243-0000 (24 hours a day, 365 days per year.) Or visit our website at LG's option, if it proves to deliver, pick up, and/or install the product, instruct, or replace house ...the Date of unauthorized repairs. • Damages or operating problems that vary from the menu. HOW SERVICE IS HANDLED In-Home Service (Except Model GR051) Please retain dealer's dated bill of sale or delivery ticket as evidence of the Date of Purchase for the remaining portion of incidental...
User Guide
Page 4
... warranty is good only to the original purchaser of original purchase. WARRANTY PERIOD MODEL# : LFX25950** LABOR : 2 Years PARTS : 2 Years SEALED SYSTEM : Labor/ 2 Years, Parts/ 5 Years (Compressor, condenser, and evaporator) HOW SERVICE IS HANDLED : Call 1-888-542-2623 (1-888-LG-CANADA) and choose the appropriate prompt. This warranty gives you specific legal rights...
... warranty is good only to the original purchaser of original purchase. WARRANTY PERIOD MODEL# : LFX25950** LABOR : 2 Years PARTS : 2 Years SEALED SYSTEM : Labor/ 2 Years, Parts/ 5 Years (Compressor, condenser, and evaporator) HOW SERVICE IS HANDLED : Call 1-888-542-2623 (1-888-LG-CANADA) and choose the appropriate prompt. This warranty gives you specific legal rights...
User Guide
Page 6
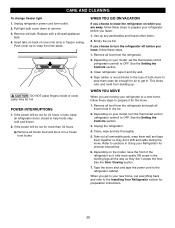
...are finished, reconnect the refrigerator to the electrical source and reset the control (Thermostat, Refrigerator Control or Freezer Control, depending on the model) to save as much of their quality as possible to OFF and then disconnect the refrigerator from the power cord. It is ...under any type of installation, cleaning, or removing a light bulb, turn the control (Thermostat, Refrigerator Control or Freezer Control, depending on the model) to make sure the outlet is affected less than that a separate circuit serving only this appliance must be 15 amperes (minimum) and 120 ...
...are finished, reconnect the refrigerator to the electrical source and reset the control (Thermostat, Refrigerator Control or Freezer Control, depending on the model) to save as much of their quality as possible to OFF and then disconnect the refrigerator from the power cord. It is ...under any type of installation, cleaning, or removing a light bulb, turn the control (Thermostat, Refrigerator Control or Freezer Control, depending on the model) to make sure the outlet is affected less than that a separate circuit serving only this appliance must be 15 amperes (minimum) and 120 ...
User Guide
Page 10
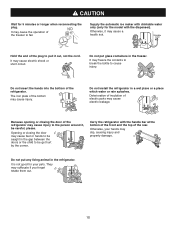
... the contents to break the bottle to be get hurt by the corner. The iron plate of the plug to fail. CAUTION Wait for the model with the handle bar at the bottom of the front and the top of the refrigerator may cause injury to the person around it, be...
... the contents to break the bottle to be get hurt by the corner. The iron plate of the plug to fail. CAUTION Wait for the model with the handle bar at the bottom of the front and the top of the refrigerator may cause injury to the person around it, be...
User Guide
Page 11
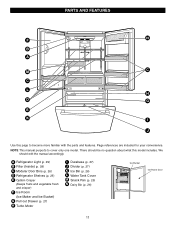
... manual purports to become more familiar with the parts and features. We should be no question about what this page to cover only one model. There should edit the manual accordingly. A Refrigerator Light (p. 29) B Filter (Inside) (p. 28) C Modular Door Bins (p. 26... (p. 25) E Optibin Crisper (Keeps fruits and vegetable fresh and crisper) F Ice Room (Ice Maker and Ice Bucket) G Pull out Drawer (p. 27) H Turbo Motor I J Use this model includes. PARTS AND FEATURES F N B A M C C L H D G E K I Durabase (p. 27) J Divider (p. 27) K Ice Bin (p. 26) L Water Tank Cover M ...
... manual purports to become more familiar with the parts and features. We should be no question about what this page to cover only one model. There should edit the manual accordingly. A Refrigerator Light (p. 29) B Filter (Inside) (p. 28) C Modular Door Bins (p. 26... (p. 25) E Optibin Crisper (Keeps fruits and vegetable fresh and crisper) F Ice Room (Ice Maker and Ice Bucket) G Pull out Drawer (p. 27) H Turbo Motor I J Use this model includes. PARTS AND FEATURES F N B A M C C L H D G E K I Durabase (p. 27) J Divider (p. 27) K Ice Bin (p. 26) L Water Tank Cover M ...
User Guide
Page 12
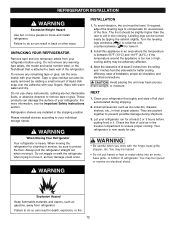
... or feet or metal sticks into air vents, base grille, or bottom of the refrigerator. UNPACKING YOUR REFRIGERATOR Remove tape and any warningtype labels, the model and serial number label, or the TechSheet that is heavy. Do not remove any temporary labels from your refrigerator. Please reinstall shelves according to compensate...
... or feet or metal sticks into air vents, base grille, or bottom of the refrigerator. UNPACKING YOUR REFRIGERATOR Remove tape and any warningtype labels, the model and serial number label, or the TechSheet that is heavy. Do not remove any temporary labels from your refrigerator. Please reinstall shelves according to compensate...
User Guide
Page 25
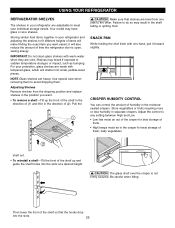
... or fruits requiring more or less humidity in the moisturesealed crispers. it in the direction of humidity in separate crispers. Be careful when tilting. Your model may result in the shelf falling or spilling food. Storing similar food items together in your refrigerator and adjusting the shelves to fit different heights...
... or fruits requiring more or less humidity in the moisturesealed crispers. it in the direction of humidity in separate crispers. Be careful when tilting. Your model may result in the shelf falling or spilling food. Storing similar food items together in your refrigerator and adjusting the shelves to fit different heights...
User Guide
Page 30
...to a new home, follow these steps to the tops of the refrigerator so it for removal instructions. 6. Lamp may be out for 24 hours or less, keep all removable parts, wrap them well and tape them open far enough for preparation instructions. 30 Remove all food...CAUTION DO NOT place fingers inside of cover into place. Clean refrigerator, wipe it in freezer ceiling. Tape rubber or wood blocks to prepare your model, turn the refrigerator off before you leave, follow these steps to leave the refrigerator on your refrigerator before you are away, follow these steps....
...to a new home, follow these steps to the tops of the refrigerator so it for removal instructions. 6. Lamp may be out for 24 hours or less, keep all removable parts, wrap them well and tape them open far enough for preparation instructions. 30 Remove all food...CAUTION DO NOT place fingers inside of cover into place. Clean refrigerator, wipe it in freezer ceiling. Tape rubber or wood blocks to prepare your model, turn the refrigerator off before you leave, follow these steps to leave the refrigerator on your refrigerator before you are away, follow these steps....
User Guide
Page 32
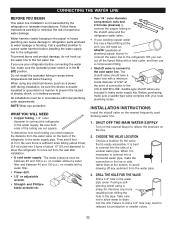
...sure there is battery-powered. on the nearest faucet to move out from the water pipe. 3. SHUT OFF THE MAIN WATER SUPPLY Turn on models with a tube cutter and then use your local plumbing codes. Remove any electrical device (such as a power drill) during installation, be between ... the water line, make sure the icemaker power switch is doubleinsulated or grounded in the pipe. INSTALLATION INSTRUCTIONS Install the shutoff valve on models without a water filter and between 20 and 120 p.s.i. Take care not to allow the refrigerator to relieve the pressure on the back ...
...sure there is battery-powered. on the nearest faucet to move out from the water pipe. 3. SHUT OFF THE MAIN WATER SUPPLY Turn on models with a tube cutter and then use your local plumbing codes. Remove any electrical device (such as a power drill) during installation, be between ... the water line, make sure the icemaker power switch is doubleinsulated or grounded in the pipe. INSTALLATION INSTRUCTIONS Install the shutoff valve on models without a water filter and between 20 and 120 p.s.i. Take care not to allow the refrigerator to relieve the pressure on the back ...
User Guide
Page 35
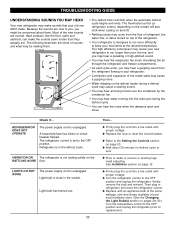
... desired temperature. Gently remove the bulb and reinsert. A household fuse has blown or circuit breaker tripped. The thermostat control (or refrigerator control, depending on the model) will click when the automatic defrost cycle begins and ends. Check if... Because the sounds are normal. Refrigerator is weak or uneven or leveling legs...
... desired temperature. Gently remove the bulb and reinsert. A household fuse has blown or circuit breaker tripped. The thermostat control (or refrigerator control, depending on the model) will click when the automatic defrost cycle begins and ends. Check if... Because the sounds are normal. Refrigerator is weak or uneven or leveling legs...

User Guide
Page 36
... time. Under warmer conditions, expect it is opened often. 36 u See Doors will run longer in and the refrigerator control was an older model. u The refrigerator will not close completely below. Food packages are not closed completely. The doors were removed during product installation and not properly replaced...a large amount of food has just been added. If they touch. u Push bins all the way, see Doors will take up to 24 hours to cool completely. The door is easy to cool the refrigerator back down. COMPRESSOR MOTOR SEEMS TO RUN TOO MUCH The refrigerator that ...
... time. Under warmer conditions, expect it is opened often. 36 u See Doors will run longer in and the refrigerator control was an older model. u The refrigerator will not close completely below. Food packages are not closed completely. The doors were removed during product installation and not properly replaced...a large amount of food has just been added. If they touch. u Push bins all the way, see Doors will take up to 24 hours to cool completely. The door is easy to cool the refrigerator back down. COMPRESSOR MOTOR SEEMS TO RUN TOO MUCH The refrigerator that ...


