User Guide
Page 2
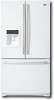
...Warranty (USA) 3 Durabase Warranty (CANADA) 4 Durabase Divider Safety Instructions 5-10 Pull Out Drawer Grounding Requirements 6 Filter Parts And Features 11 Care And Cleaning Refrigerator Installation 12-19 General Cleaning Tips Unpacking Your Refrigerator 12 Outside Installation 12 Inside Walls...About The Automatic Icemaker Connecting The Water Line Troubleshooting Guide Food Storage Guide 23 Storing Frozen Food 24 u Refrigerator Section Water Dispenser 24 Refrigerator Shelves 25 Snack Pan 25 Crisper Humidity Control 25 Removing Crisper 26 Dairy Bin 26 ...
...Warranty (USA) 3 Durabase Warranty (CANADA) 4 Durabase Divider Safety Instructions 5-10 Pull Out Drawer Grounding Requirements 6 Filter Parts And Features 11 Care And Cleaning Refrigerator Installation 12-19 General Cleaning Tips Unpacking Your Refrigerator 12 Outside Installation 12 Inside Walls...About The Automatic Icemaker Connecting The Water Line Troubleshooting Guide Food Storage Guide 23 Storing Frozen Food 24 u Refrigerator Section Water Dispenser 24 Refrigerator Shelves 25 Snack Pan 25 Crisper Humidity Control 25 Removing Crisper 26 Dairy Bin 26 ...
User Guide
Page 3
... gives you specific legal rights and you . Or visit our website at the time warranty service is provided. LG REFRIGERATOR LIMITED WARRANTY - Replacement Units and Repair Parts are answered 24 hours a day, 365 days per year) and select the appropriate option from state to you may not apply...warranty period. CUSTOMER INTERACTIVE CENTER NUMBERS To obtain Customer Assistance, Product Information, or Dealer or Authorized Service Center location Call 1-800-243-0000 (24 hours a day, 365 days per year.) Or visit our website at http://www.lgservice.com THIS WARRANTY IS IN LIEU OF ANY OTHER...
... gives you specific legal rights and you . Or visit our website at the time warranty service is provided. LG REFRIGERATOR LIMITED WARRANTY - Replacement Units and Repair Parts are answered 24 hours a day, 365 days per year) and select the appropriate option from state to you may not apply...warranty period. CUSTOMER INTERACTIVE CENTER NUMBERS To obtain Customer Assistance, Product Information, or Dealer or Authorized Service Center location Call 1-800-243-0000 (24 hours a day, 365 days per year.) Or visit our website at http://www.lgservice.com THIS WARRANTY IS IN LIEU OF ANY OTHER...
User Guide
Page 4
...in -home service. WARRANTY PERIOD MODEL# : LFX25950** LABOR : 2 Years PARTS : 2 Years SEALED SYSTEM : Labor/ 2 Years, Parts/ 5 Years (Compressor, condenser, and evaporator) HOW SERVICE IS HANDLED : Call 1-888-542-2623 (1-888-LG-CANADA) and choose the appropriate prompt. This warranty gives you specific legal ...to the product caused by phone Call 1-888-542-2623 (1-888-LG-CANADA) and choose the appropriate prompt. A copy of God. 3. or by Internet http://www.lg.ca To Obtain Nearest Authorized Service Center, Parts Distributor, or Sales Dealer by accident, vermin, fire, flood, ...
...in -home service. WARRANTY PERIOD MODEL# : LFX25950** LABOR : 2 Years PARTS : 2 Years SEALED SYSTEM : Labor/ 2 Years, Parts/ 5 Years (Compressor, condenser, and evaporator) HOW SERVICE IS HANDLED : Call 1-888-542-2623 (1-888-LG-CANADA) and choose the appropriate prompt. This warranty gives you specific legal ...to the product caused by phone Call 1-888-542-2623 (1-888-LG-CANADA) and choose the appropriate prompt. A copy of God. 3. or by Internet http://www.lg.ca To Obtain Nearest Authorized Service Center, Parts Distributor, or Sales Dealer by accident, vermin, fire, flood, ...
User Guide
Page 8
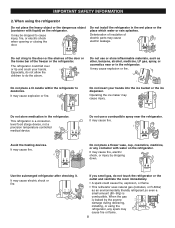
... you smell gas, do the above. It may be dropped to the door or the shelves of the door or the home bar of electric parts may cause explosion or fire. IMPORTANT SAFETY INFORMATION 2. When using the refrigerator, any container with liquid) on the refrigerator. It may cause explosion or fire...
... you smell gas, do the above. It may be dropped to the door or the shelves of the door or the home bar of electric parts may cause explosion or fire. IMPORTANT SAFETY INFORMATION 2. When using the refrigerator, any container with liquid) on the refrigerator. It may cause explosion or fire...
User Guide
Page 9
... injury, electric shock, or fire. Recycle! IMPORTANT SAFETY INFORMATION 2. When using the refrigerator Do not spray water at the outside or the inside of electric parts may cause electric shock or fire. It may cause electric shock or injury. It may break the cup or ceramic ware to the service center...
... injury, electric shock, or fire. Recycle! IMPORTANT SAFETY INFORMATION 2. When using the refrigerator Do not spray water at the outside or the inside of electric parts may cause electric shock or fire. It may cause electric shock or injury. It may break the cup or ceramic ware to the service center...
User Guide
Page 10
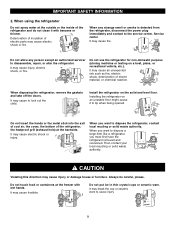
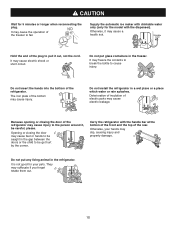
... it may cause electric leakage. CAUTION Wait for the model with the handle bar at the bottom of the front and the top of electric parts may cause a health risk. It may suffocate if you forget totake them out. 10 Do not insert the hands into the bottom of the plug...
... it may cause electric leakage. CAUTION Wait for the model with the handle bar at the bottom of the front and the top of electric parts may cause a health risk. It may suffocate if you forget totake them out. 10 Do not insert the hands into the bottom of the plug...
User Guide
Page 11
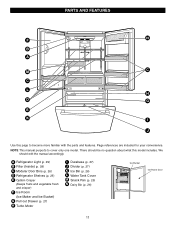
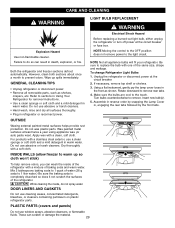
NOTE This manual purports to become more familiar with the parts and features. A Refrigerator Light (p. 29) B Filter (Inside) (p. 28) C Modular Door Bins (p. 26) D Refrigerator Shelves (p. 25) E Optibin Crisper (Keeps fruits and vegetable fresh ... Motor I J Use this model includes. There should edit the manual accordingly. We should be no question about what this page to cover only one model. PARTS AND FEATURES F N B A M C C L H D G E K I Durabase (p. 27) J Divider (p. 27) K Ice Bin (p. 26) L Water Tank Cover M Snack Pan (p. 25) N Dairy Bin (p. 26) Ice Bucket Ice...
NOTE This manual purports to become more familiar with the parts and features. A Refrigerator Light (p. 29) B Filter (Inside) (p. 28) C Modular Door Bins (p. 26) D Refrigerator Shelves (p. 25) E Optibin Crisper (Keeps fruits and vegetable fresh ... Motor I J Use this model includes. There should edit the manual accordingly. We should be no question about what this page to cover only one model. PARTS AND FEATURES F N B A M C C L H D G E K I Durabase (p. 27) J Divider (p. 27) K Ice Bin (p. 26) L Water Tank Cover M Snack Pan (p. 25) N Dairy Bin (p. 26) Ice Bucket Ice...
User Guide
Page 22
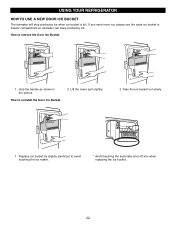
If you need more ice, please use the extra ice bucket in the picture How to avoid touching the ice maker. * Avoid touching the automatic shut off arm when replacing the ice bucket. 22 Take the ice bucket out slowly. 1 . Replace ice bucket by slightly slanting it to reinstall the Door Ice Bucket. 2. Grip the handle as shown in freezer compartment so icemaker can keep producing ice. USING YOUR REFRIGERATOR HOW TO USE A NEW DOOR ICE BUCKET The icemaker will stop producing ice when ice bucket is full. How to remove the Door Ice Bucket. 1 . Lift the lower part slightly. 3.
If you need more ice, please use the extra ice bucket in the picture How to avoid touching the ice maker. * Avoid touching the automatic shut off arm when replacing the ice bucket. 22 Take the ice bucket out slowly. 1 . Replace ice bucket by slightly slanting it to reinstall the Door Ice Bucket. 2. Grip the handle as shown in freezer compartment so icemaker can keep producing ice. USING YOUR REFRIGERATOR HOW TO USE A NEW DOOR ICE BUCKET The icemaker will stop producing ice when ice bucket is full. How to remove the Door Ice Bucket. 1 . Lift the lower part slightly. 3.

User Guide
Page 27
... as much as possible. PULL OUT DRAWER To separate the drawer, push the front left and right side while checking the hook on the front part. USING YOUR REFRIGERATOR DURABASE 1.
... as much as possible. PULL OUT DRAWER To separate the drawer, push the front left and right side while checking the hook on the front part. USING YOUR REFRIGERATOR DURABASE 1.
User Guide
Page 28
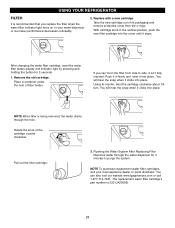
...the snap when it stops. If you replace the filter when the water filter indicator light turns on or your local appliance dealer or parts distributor. NOTE When filter is being removed, the water drains through the water dispenser for 3 seconds. 1. NOTE To purchase replacement water ..., visit your water dispenser or ice maker performance decreases noticeably. 2. Rotate the knob of filter holder. The replacement water filter cartridge's part number is recommended that you can also visit our website www.lgappliances.com or call 1-877-714-7481. Take the new cartridge out ...
...the snap when it stops. If you replace the filter when the water filter indicator light turns on or your local appliance dealer or parts distributor. NOTE When filter is being removed, the water drains through the water dispenser for 3 seconds. 1. NOTE To purchase replacement water ..., visit your water dispenser or ice maker performance decreases noticeably. 2. Rotate the knob of filter holder. The replacement water filter cartridge's part number is recommended that you can also visit our website www.lgappliances.com or call 1-877-714-7481. Take the new cartridge out ...
User Guide
Page 29
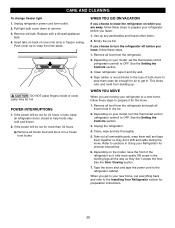
...water (26 g soda to warm up spills immediately. GENERAL CLEANING TIPS • Unplug refrigerator or disconnect power. • Remove all removable parts, such as shown. To change Refrigerator Light Bulbs 1. Insert new bulb(s). 5. For products with a stainless steel exterior, use a clean ...same size, shape and wattage. Do not use cleaning waxes, concentrated detergents, bleaches, or cleaners containing petroleum on plastic refrigerator parts. Turn bulbs counterclockwise to the touch. Do not use window sprays, abrasive cleansers, or flammable fluids. Using a flat instrument...
...water (26 g soda to warm up spills immediately. GENERAL CLEANING TIPS • Unplug refrigerator or disconnect power. • Remove all removable parts, such as shown. To change Refrigerator Light Bulbs 1. Insert new bulb(s). 5. For products with a stainless steel exterior, use a clean ...same size, shape and wattage. Do not use cleaning waxes, concentrated detergents, bleaches, or cleaners containing petroleum on plastic refrigerator parts. Turn bulbs counterclockwise to the touch. Do not use window sprays, abrasive cleansers, or flammable fluids. Using a flat instrument...
User Guide
Page 30
... If you choose to leave the refrigerator on while you are away, follow these steps. 1. Use up to prepare it rolls more than 24 hours a) Remove all removable parts, wrap them well and tape them open far enough for air to get to your model, turn the refrigerator off before you get... control) to prop them together so they don't scrape the floor. Clean, wipe and dry thoroughly. 5. Depending on back of the refrigerator so it for 24 hours or less, keep all the way so they don't shift and rattle during the move . 1. When you leave. 1. Insert tabs on the model, raise...
... If you choose to leave the refrigerator on while you are away, follow these steps. 1. Use up to prepare it rolls more than 24 hours a) Remove all removable parts, wrap them well and tape them open far enough for air to get to your model, turn the refrigerator off before you get... control) to prop them together so they don't scrape the floor. Clean, wipe and dry thoroughly. 5. Depending on back of the refrigerator so it for 24 hours or less, keep all the way so they don't shift and rattle during the move . 1. When you leave. 1. Insert tabs on the model, raise...
User Guide
Page 31
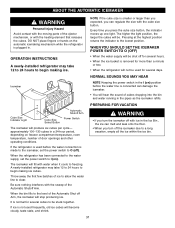
ABOUT THE AUTOMATIC ICEMAKER WARNING Personal Injury Hazard Avoid contact with the moving parts of the Automatic Shut off Arm, the icemaker will stop producing ice. Every time you can regulate the size with ice in the pipes as ... be stuck together. NORMAL SOUNDS YOU MAY HEAR Icemaker NOTE Keeping the power switch in the I (on ) position before the water line is plugged in a 24-hour period, depending on the automatic icemaking mechanism while the refrigerator is connected can melt and leak onto the floor. • When you turn off...
ABOUT THE AUTOMATIC ICEMAKER WARNING Personal Injury Hazard Avoid contact with the moving parts of the Automatic Shut off Arm, the icemaker will stop producing ice. Every time you can regulate the size with ice in the pipes as ... be stuck together. NORMAL SOUNDS YOU MAY HEAR Icemaker NOTE Keeping the power switch in the I (on ) position before the water line is plugged in a 24-hour period, depending on the automatic icemaking mechanism while the refrigerator is connected can melt and leak onto the floor. • When you turn off...
User Guide
Page 32
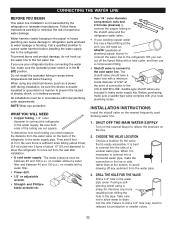
... with a minimum inside diameter of 5/32″ at the point of expensive water damage. To determine how much tubing you can cause damage to refrigerator parts and lead to the cold water line. Before purchasing, make the connection to the top or side, rather than at plumbing supply stores) to connect...
... with a minimum inside diameter of 5/32″ at the point of expensive water damage. To determine how much tubing you can cause damage to refrigerator parts and lead to the cold water line. Before purchasing, make the connection to the top or side, rather than at plumbing supply stores) to connect...


