Specification (English)
Page 1
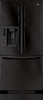
Smooth White Smooth Black Stainless Steel LGusa.com R E F R I G E R ATO R S FRENCH DOOR L F X 2 39 61 22.6 Cu.Ft. Total Capacity Style and Design • French Door refrigerator with self-contained Ice System and Bottom Freezer • Premium Finishes in Stainless Steel, Smooth White, and Smooth Black with Commercial Metal Handles • Contour ...
Smooth White Smooth Black Stainless Steel LGusa.com R E F R I G E R ATO R S FRENCH DOOR L F X 2 39 61 22.6 Cu.Ft. Total Capacity Style and Design • French Door refrigerator with self-contained Ice System and Bottom Freezer • Premium Finishes in Stainless Steel, Smooth White, and Smooth Black with Commercial Metal Handles • Contour ...
Specification (English)
Page 2
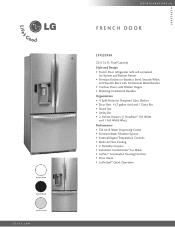
... 3/8" Width 32 7/8" Width (Door Open 90° with Handle) 41 1/8" Width (Door Open 90° without Handle) 36 1/4" Door Edge Clearance with cover) Refrigerator Light 2 x 40W REFRIGERATOR DOOR No. LG Design and Life's Good are property of Shelves 4 Split Cantilevered Shelves Shelf Construction Spill Protector Tempered Glass Crisper Bins 2 Humidity Crispers Snack Pan...
... 3/8" Width 32 7/8" Width (Door Open 90° with Handle) 41 1/8" Width (Door Open 90° without Handle) 36 1/4" Door Edge Clearance with cover) Refrigerator Light 2 x 40W REFRIGERATOR DOOR No. LG Design and Life's Good are property of Shelves 4 Split Cantilevered Shelves Shelf Construction Spill Protector Tempered Glass Crisper Bins 2 Humidity Crispers Snack Pan...

Owner's Manual
Page 2
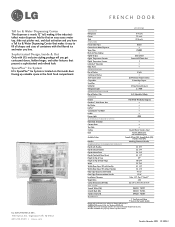
...or replace house fuses or correct house wiring or plumbing, or correction of purchase is provided. Service trips to your product type (Refrigerator), model number, serial number, and ZIP/Postal Code ready. 2 Damages caused during the warranty period as long as it is...www.lgservice.com LIMITED WARRANTY United States of America LG Electronics LG Electronics will repair or at the time warranty service is required and must be provided to LG in order to validate warranty. LG Refrigerator / Freezer Warranty Period Product Parts Labor Refrigerator / Freezer 1 year 1 year [In-Home...
...or replace house fuses or correct house wiring or plumbing, or correction of purchase is provided. Service trips to your product type (Refrigerator), model number, serial number, and ZIP/Postal Code ready. 2 Damages caused during the warranty period as long as it is...www.lgservice.com LIMITED WARRANTY United States of America LG Electronics LG Electronics will repair or at the time warranty service is required and must be provided to LG in order to validate warranty. LG Refrigerator / Freezer Warranty Period Product Parts Labor Refrigerator / Freezer 1 year 1 year [In-Home...

Owner's Manual
Page 4
... (USA) 2-3 Safety Instructions Grounding Requirements Parts and Features Refrigerator Installation Unpacking your refrigerator Installation Base Grille Removing, Reversing and Replacing Pull out drawer Leveling and door alignment Using your refrigerator Ensuring proper air circulation Multi Flow Door alarm Control Panel ...features Setting the controls Adjusting control settings Food storage guide Storing frozen food Refrigerator Section Refrigerator shelves Chef Fresh Crisper humidity control Optibin Crisper Crisper cover with lattice on inner surface Design-A-Door ...
... (USA) 2-3 Safety Instructions Grounding Requirements Parts and Features Refrigerator Installation Unpacking your refrigerator Installation Base Grille Removing, Reversing and Replacing Pull out drawer Leveling and door alignment Using your refrigerator Ensuring proper air circulation Multi Flow Door alarm Control Panel ...features Setting the controls Adjusting control settings Food storage guide Storing frozen food Refrigerator Section Refrigerator shelves Chef Fresh Crisper humidity control Optibin Crisper Crisper cover with lattice on inner surface Design-A-Door ...

Owner's Manual
Page 5
... in the freezer compartment when hands are in . Do not use a cord that have thawed completely. They could damage the refrigerator and seriously injure themselves. Be careful when you don't follow instructions. The United States Department of any repairs. If the odor..., electric shock, or injury to persons when using this appliance must be discarded. For personal safety, this appliance. After your refrigerator by a qualified individual. IMPORTANT SAFETY INSTRUCTIONS SAFETY MESSAGES This guide contains many other flammable vapors and liquids in Home and Garden ...
... in the freezer compartment when hands are in . Do not use a cord that have thawed completely. They could damage the refrigerator and seriously injure themselves. Be careful when you don't follow instructions. The United States Department of any repairs. If the odor..., electric shock, or injury to persons when using this appliance must be discarded. For personal safety, this appliance. After your refrigerator by a qualified individual. IMPORTANT SAFETY INSTRUCTIONS SAFETY MESSAGES This guide contains many other flammable vapors and liquids in Home and Garden ...

Owner's Manual
Page 6
...safety hazards under provisions of the past. DANGER: RISK OF CHILD ENTRAPMENT Child entrapment and suffocation are throwing away your old refrigerator, make sure the outlet is removed for their safety. All the important materials should be supervised to help prevent accidents. ...GROUNDING REQUIREMENTS IMPORTANT: Please read carefully. Have the wall outlet and the circuit checked by LG Electronics, to harm Stratospheric Ozone. CAUTION This appliance is recommended that a separate circuit serving only this appliance be 15 amperes ...
...safety hazards under provisions of the past. DANGER: RISK OF CHILD ENTRAPMENT Child entrapment and suffocation are throwing away your old refrigerator, make sure the outlet is removed for their safety. All the important materials should be supervised to help prevent accidents. ...GROUNDING REQUIREMENTS IMPORTANT: Please read carefully. Have the wall outlet and the circuit checked by LG Electronics, to harm Stratospheric Ozone. CAUTION This appliance is recommended that a separate circuit serving only this appliance be 15 amperes ...

Owner's Manual
Page 7
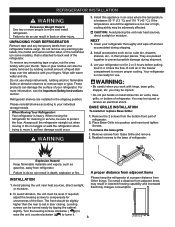
... Cover G Crisper H Ice Bin I A J B K C D E E F L M G N H O P Use this page to become more familiar with the parts and features. The refrigerator you have purchased may not match your convenience. PARTS AND FEATURES I Filter (Inside) J Dairy Bin K Refrigerator Shelves L Freezer Light M Turbo Motor N Glide out Drawer O Durabase P Divider 7 Ice Bucket Ice Room Door *On some or...
... Cover G Crisper H Ice Bin I A J B K C D E E F L M G N H O P Use this page to become more familiar with the parts and features. The refrigerator you have purchased may not match your convenience. PARTS AND FEATURES I Filter (Inside) J Dairy Bin K Refrigerator Shelves L Freezer Light M Turbo Motor N Glide out Drawer O Durabase P Divider 7 Ice Bucket Ice Room Door *On some or...
Owner's Manual
Page 8
...away from Base Grille and remove. 2. They are installed in lowered freezing capability and increased Electricity charges consumption . 2. Let your refrigerator before putting food in their proper places. Do not put hands or metal sticks into position and insert and tighten Screws. Remove...the cabinet slightly. CAUTION: Avoid placing the unit near heat sources, direct sunlight, or moisture. NEXT 1. you work with your refrigerator thoroughly and wipe off all dust accumulated during shipment. 3. Too small a distance from Other things. If required, adjust the ...
...away from Base Grille and remove. 2. They are installed in lowered freezing capability and increased Electricity charges consumption . 2. Let your refrigerator before putting food in their proper places. Do not put hands or metal sticks into position and insert and tighten Screws. Remove...the cabinet slightly. CAUTION: Avoid placing the unit near heat sources, direct sunlight, or moisture. NEXT 1. you work with your refrigerator thoroughly and wipe off all dust accumulated during shipment. 3. Too small a distance from Other things. If required, adjust the ...
Owner's Manual
Page 9
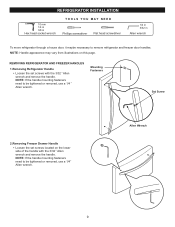
... need to be tightened or removed, use a 1/4 " Allen wrench. NOTE: If the handle mounting fasteners need to remove refrigerator and freezer door handles. REFRIGERATOR INSTALLATION 10 mm 1/4 in 3/8 in Hex head socket wrench TOOLS YOU MAY NEED Phillips screwdriver Flat head screwdriver 1/4 in 3/32... in Allen wrench To move refrigerator through a house door, it maybe necessary to be tightened or removed, use a 1/4" Allen wrench. NOTE: Handle appearance may vary from...
... need to be tightened or removed, use a 1/4 " Allen wrench. NOTE: If the handle mounting fasteners need to remove refrigerator and freezer door handles. REFRIGERATOR INSTALLATION 10 mm 1/4 in 3/8 in Hex head socket wrench TOOLS YOU MAY NEED Phillips screwdriver Flat head screwdriver 1/4 in 3/32... in Allen wrench To move refrigerator through a house door, it maybe necessary to be tightened or removed, use a 1/4" Allen wrench. NOTE: Handle appearance may vary from...

Owner's Manual
Page 10
... the disconnect ring (3). Pull out the tube (4). Right Door Loosen the cover screw (1). IMPORTANT: Before you begin, turn the refrigerator OFF and unplug it. Loosen the cover screw (1). Disconnect water supply tube by pushing back on back side (see figure A). ...wire (2). Place the door on a non-scratching surface with the inside up . (1) (2) (6) (4) (5) (7) (8) (1) (7) (2) (8) Figure A 3 10 Removing Refrigerator Door NOTE: Handle appearance may vary. REFRIGERATOR INSTALLATION REMOVING REFRIGERATOR DOORS 1. Place the door on a non-scratching surface with the inside up .
... the disconnect ring (3). Pull out the tube (4). Right Door Loosen the cover screw (1). IMPORTANT: Before you begin, turn the refrigerator OFF and unplug it. Loosen the cover screw (1). Disconnect water supply tube by pushing back on back side (see figure A). ...wire (2). Place the door on a non-scratching surface with the inside up . (1) (2) (6) (4) (5) (7) (8) (1) (7) (2) (8) Figure A 3 10 Removing Refrigerator Door NOTE: Handle appearance may vary. REFRIGERATOR INSTALLATION REMOVING REFRIGERATOR DOORS 1. Place the door on a non-scratching surface with the inside up .
Owner's Manual
Page 11
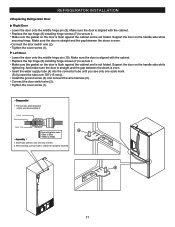
... tube until you see only one scale mark. (Fully insert the tube over 5/8" (15 mm)). Support the door on the handle side while securing hinge. REFRIGERATOR INSTALLATION 2.Replacing Refrigerator Door Right Door Lower the door onto the middle hinge pin (9). Install the ground screw (6) and connect the wire harness (5).
... tube until you see only one scale mark. (Fully insert the tube over 5/8" (15 mm)). Support the door on the handle side while securing hinge. REFRIGERATOR INSTALLATION 2.Replacing Refrigerator Door Right Door Lower the door onto the middle hinge pin (9). Install the ground screw (6) and connect the wire harness (5).
Owner's Manual
Page 12
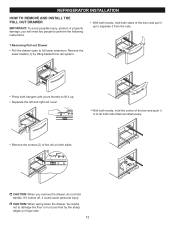
REFRIGERATOR INSTALLATION HOW TO REMOVE AND INSTALL THE PULL OUT DRAWER IMPORTANT: To avoid possible injury, product or property damage, you will need two people to ...
REFRIGERATOR INSTALLATION HOW TO REMOVE AND INSTALL THE PULL OUT DRAWER IMPORTANT: To avoid possible injury, product or property damage, you will need two people to ...

Owner's Manual
Page 14
... the leveling screw clockwise to raise that they close easily. It may take several turns of the leveling screw to adjust the tilt of the refrigerator or counterclockwise to lower it easier to insert snap ring as shown. 3. With one hand, lift up the door you want to raise at.... (Three snap rings are provided with two fresh food doors. Re-adjust if necessary. 5. Either door can be opened or closed independently of the refrigerator takes some weight off the leveling screws. You may take several more to the rear by turning both leveling screws the same amount. 4. Plug the...
... the leveling screw clockwise to raise that they close easily. It may take several turns of the leveling screw to adjust the tilt of the refrigerator or counterclockwise to lower it easier to insert snap ring as shown. 3. With one hand, lift up the door you want to raise at.... (Three snap rings are provided with two fresh food doors. Re-adjust if necessary. 5. Either door can be opened or closed independently of the refrigerator takes some weight off the leveling screws. You may take several more to the rear by turning both leveling screws the same amount. 4. Plug the...

Owner's Manual
Page 15
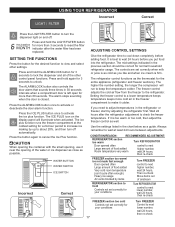
... Press the button for more than five seconds, the temperature display will transfer to the other. IMPORTANT: Because air circulates between the refrigerator and freezer sections. These tones repeat every 30 seconds. Feature, which increases ice making capabilities up to freezer. Do not block any...bottom, where it is closed within 1 minute after 20 seconds of freezer, air is placed in the freezer compartment. • REFRIGERATOR Press the REFRIGERATOR button to lock or unlock all the other settings. Display Off Mode: To activate energy save mode press and hold ICE PLUS and...
... Press the button for more than five seconds, the temperature display will transfer to the other. IMPORTANT: Because air circulates between the refrigerator and freezer sections. These tones repeat every 30 seconds. Feature, which increases ice making capabilities up to freezer. Do not block any...bottom, where it is closed within 1 minute after 20 seconds of freezer, air is placed in the freezer compartment. • REFRIGERATOR Press the REFRIGERATOR button to lock or unlock all the other settings. Display Off Mode: To activate energy save mode press and hold ICE PLUS and...

Owner's Manual
Page 16
...The dispenser light is on, this setting for the control panel functions is the target temperature and not the actual temperature within the refrigerator. NOTE: The actual inner temperature varies depending on the display panel. 6 Door alarm indicator This indicator shows that the door-open... press the FREEZER button to illuminate the Crushed and Cubed Ice icon. Then adjust the compartment temperature as illustrated above. USING YOUR REFRIGERATOR SETTING THE CONTROLS The LED display shows the temperature settings, dispenser options, and the water filter, door alarm, and locking status...
...The dispenser light is on, this setting for the control panel functions is the target temperature and not the actual temperature within the refrigerator. NOTE: The actual inner temperature varies depending on the display panel. 6 Door alarm indicator This indicator shows that the door-open... press the FREEZER button to illuminate the Crushed and Cubed Ice icon. Then adjust the compartment temperature as illustrated above. USING YOUR REFRIGERATOR SETTING THE CONTROLS The LED display shows the temperature settings, dispenser options, and the water filter, door alarm, and locking status...
Owner's Manual
Page 17
...cream is left open for the desired function to view and select other control panel functions. CONDITION/REASON: RECOMMENDED ADJUSTMENT: REFRIGERATOR section too warm Turn REFRIGERATOR Door opened often Large amount of food added Room temperature very warm control to next higher number, wait 24 hours, ... control adjusts the cold air flow from the freezer to cancel the Ice Plus function. Press the button again to the refrigerator. USING YOUR REFRIGERATOR Incorrect Correct Press the LIGHT/FILTER button to turn the dispenser light on the display panel will run to wait at the...
...cream is left open for the desired function to view and select other control panel functions. CONDITION/REASON: RECOMMENDED ADJUSTMENT: REFRIGERATOR section too warm Turn REFRIGERATOR Door opened often Large amount of food added Room temperature very warm control to next higher number, wait 24 hours, ... control adjusts the cold air flow from the freezer to cancel the Ice Plus function. Press the button again to the refrigerator. USING YOUR REFRIGERATOR Incorrect Correct Press the LIGHT/FILTER button to turn the dispenser light on the display panel will run to wait at the...

Owner's Manual
Page 18
...sealed package are ready to leave enough room at room temperature for air to malfunction. This prevents food odor and taste transfer throughout the refrigerator. Cheese Store in the freezer compartment - Milk Wipe milk cartons. For best storage, place milk on interior shelf, not on correct...When you are normal. Do not use it must not allow air or moisture in original carton on interior shelf, not on a refrigerator shelf. This simply means that moisture in airtight and moisture-proof material unless otherwise noted. NOTE: Allow hot foods to ensure freshness....
...sealed package are ready to leave enough room at room temperature for air to malfunction. This prevents food odor and taste transfer throughout the refrigerator. Cheese Store in the freezer compartment - Milk Wipe milk cartons. For best storage, place milk on interior shelf, not on correct...When you are normal. Do not use it must not allow air or moisture in original carton on interior shelf, not on a refrigerator shelf. This simply means that moisture in airtight and moisture-proof material unless otherwise noted. NOTE: Allow hot foods to ensure freshness....
Owner's Manual
Page 19
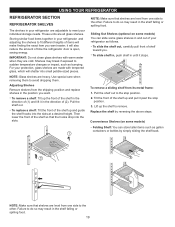
... by reversing the above steps. Lift up and pull it stops. Failure to avoid dropping them. USING YOUR REFRIGERATOR REFRIGERATOR SECTION REFRIGERATOR SHELVES The shelves in your refrigerator are heavy. Use special care when removing them to do so may result in the shelf falling or spilling food... shelf out. Sliding Out Shelves (optional on some glass shelves in your individual storage needs. Pull the shelf out to meet your refrigerator and adjusting the shelves to fit different heights of the shelf up the shelf to the other . Replace the shelf by simply sliding...
... by reversing the above steps. Lift up and pull it stops. Failure to avoid dropping them. USING YOUR REFRIGERATOR REFRIGERATOR SECTION REFRIGERATOR SHELVES The shelves in your refrigerator are heavy. Use special care when removing them to do so may result in the shelf falling or spilling food... shelf out. Sliding Out Shelves (optional on some glass shelves in your individual storage needs. Pull the shelf out to meet your refrigerator and adjusting the shelves to fit different heights of the shelf up the shelf to the other . Replace the shelf by simply sliding...

Owner's Manual
Page 20
... the cover to the stop . 20 Replace the crisper by letting you easily control humidity inside the crisper. Adjust the control to remove. 3. USING YOUR REFRIGERATOR CHEF FRESH / SNACK PAN (on some models is applied an independent temperature control. Lift slightly and pull it back in the crisper for best storage...
... the cover to the stop . 20 Replace the crisper by letting you easily control humidity inside the crisper. Adjust the control to remove. 3. USING YOUR REFRIGERATOR CHEF FRESH / SNACK PAN (on some models is applied an independent temperature control. Lift slightly and pull it back in the crisper for best storage...

Owner's Manual
Page 21
... surface: 1. To replace the dairy bin, slide it stops. For each lattice hold lattice and pull sides of the cover to remove lattice. USING YOUR REFRIGERATOR CRISPER COVER WITH LATTICE ON INNER SURFACE (on some models) To remove the crisper cover: 1. Remove crisper cover(as an ice storage bin in above...
... surface: 1. To replace the dairy bin, slide it stops. For each lattice hold lattice and pull sides of the cover to remove lattice. USING YOUR REFRIGERATOR CRISPER COVER WITH LATTICE ON INNER SURFACE (on some models) To remove the crisper cover: 1. Remove crisper cover(as an ice storage bin in above...


