

Owner's Manual
Page 2
...Storing Foods 27 Location of reliable service. IMPORTANT SAFETY INFORMATION Basic Safety Precautions 3 CFC Disposal 4 How to the LG family. Your new LG French Door Refrigerator combines advanced cooling technology with many years of Foods 28 Shelf Height Adjustment 29 CARE AND CLEANING... Removing and Replacing Components 30 Cleaning the Refrigerator 34 General Information 34 Replacing the Water Filter 35 TROUBLESHOOTING Before ...
...Storing Foods 27 Location of reliable service. IMPORTANT SAFETY INFORMATION Basic Safety Precautions 3 CFC Disposal 4 How to the LG family. Your new LG French Door Refrigerator combines advanced cooling technology with many years of Foods 28 Shelf Height Adjustment 29 CARE AND CLEANING... Removing and Replacing Components 30 Cleaning the Refrigerator 34 General Information 34 Replacing the Water Filter 35 TROUBLESHOOTING Before ...
Owner's Manual
Page 3
.... • In refrigerators with automatic icemakers, avoid contact with the moving your refrigerator away from the outlet. • Repair or replace immediately all electric service cords that have LED interior lighting and service should be killed or seriously injured if you are finished, reconnect.... BASIC SAFETY PRECAUTIONS This guide contains many important safety messages. wWARNING You can be performed by a qualified technician. • Before replacing a burned-out light bulb, unplug the refrigerator or turn off power at either or both controls to the OFF position does not ...
.... • In refrigerators with automatic icemakers, avoid contact with the moving your refrigerator away from the outlet. • Repair or replace immediately all electric service cords that have LED interior lighting and service should be killed or seriously injured if you are finished, reconnect.... BASIC SAFETY PRECAUTIONS This guide contains many important safety messages. wWARNING You can be performed by a qualified technician. • Before replacing a burned-out light bulb, unplug the refrigerator or turn off power at either or both controls to the OFF position does not ...
Owner's Manual
Page 5
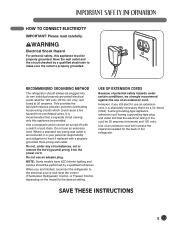
... an extension cord. SAVE THESE INSTRUCTIONS 5 RECOMMENDED GROUNDING METHOD The refrigerator should be 20 amperes (minimum) and 120 volts. It is absolutely necessary that it replaced with a switch or pull chain. Use of the refrigerator. Do not use an extension cord, it is recommended that the electrical rating of potential safety...
... an extension cord. SAVE THESE INSTRUCTIONS 5 RECOMMENDED GROUNDING METHOD The refrigerator should be 20 amperes (minimum) and 120 volts. It is absolutely necessary that it replaced with a switch or pull chain. Use of the refrigerator. Do not use an extension cord, it is recommended that the electrical rating of potential safety...
Owner's Manual
Page 18
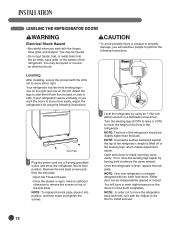
... clearance to side. Leveling After installing, secure the product with the 'Adjust' to the floor to move the refrigerator into its final position. NOTE: To replace the kick plate, place it with the LEG not to perform the following instructions: Kick Plate 1 Plug the power cord into a 3-prong grounded outlet, and... closed. Remove the kick plate screws and then the kick plate. • Open the Freezer Drawer. • Once the drawer is open, there is level, replace the kickplate.
... clearance to side. Leveling After installing, secure the product with the 'Adjust' to the floor to move the refrigerator into its final position. NOTE: To replace the kick plate, place it with the LEG not to perform the following instructions: Kick Plate 1 Plug the power cord into a 3-prong grounded outlet, and... closed. Remove the kick plate screws and then the kick plate. • Open the Freezer Drawer. • Once the drawer is open, there is level, replace the kickplate.

Owner's Manual
Page 20
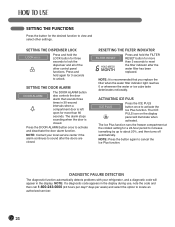
... buttons on the control panel, including operation of the dispenser. 9 FILTER RESET BUTTON The FILTER RESET button resets the water filter replacement indicator when the water filter has been replaced. 20 NOTE: When pressed simultaneously with the FREEZER button for more than five seconds, the temperature display will change from Fahrenheit to...
... buttons on the control panel, including operation of the dispenser. 9 FILTER RESET BUTTON The FILTER RESET button resets the water filter replacement indicator when the water filter has been replaced. 20 NOTE: When pressed simultaneously with the FREEZER button for more than five seconds, the temperature display will change from Fahrenheit to...
Owner's Manual
Page 24
... setting for more than 60 seconds. SETTING THE DOOR ALARM DOOR ALARM The DOOR ALARM button also controls the door alarm that you replace the filter when the water filter indicator light reaches 0 or whenever the water or ice cube taste deteriorates noticeably. Press the DOOR ... FAILURE DETECTION The diagnostic function automatically detects problems with your local service center if the alarm continues to sound after the water filter has been replaced. NOTE: It is closed . NOTE: Press the button again to locate an authorized servicer. 24 NOTE: Contact your refrigerator, and a ...
... setting for more than 60 seconds. SETTING THE DOOR ALARM DOOR ALARM The DOOR ALARM button also controls the door alarm that you replace the filter when the water filter indicator light reaches 0 or whenever the water or ice cube taste deteriorates noticeably. Press the DOOR ... FAILURE DETECTION The diagnostic function automatically detects problems with your local service center if the alarm continues to sound after the water filter has been replaced. NOTE: It is closed . NOTE: Press the button again to locate an authorized servicer. 24 NOTE: Contact your refrigerator, and a ...
Owner's Manual
Page 25
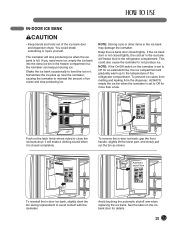
If you need more than a few. Automatic shutoff Arm To reinstall the in-door ice bank, slightly slant the bin during replacement to close the ice bank door; NOTE: Storing cans or other items in -door ice bank, grip the front handle, slightly lift the lower part, ... extra ice bin in the refrigerator compartment. To remove the in the ice bank may damage the icemaker. Avoid touching the automatic shutoff arm when replacing the ice bank. See the label on the icemaker is not closed tightly.
If you need more than a few. Automatic shutoff Arm To reinstall the in-door ice bank, slightly slant the bin during replacement to close the ice bank door; NOTE: Storing cans or other items in -door ice bank, grip the front handle, slightly lift the lower part, ... extra ice bin in the refrigerator compartment. To remove the in the ice bank may damage the icemaker. Avoid touching the automatic shutoff arm when replacing the ice bank. See the label on the icemaker is not closed tightly.
Owner's Manual
Page 30
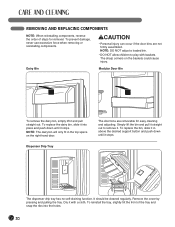
... not firmly assembled. To reinstall the tray, slightly tilt the front of steps for easy cleaning and adjusting. To replace the dairy bin, slide it into the holes. 30 To replace the bin, slide it stops. The dispenser drip tray has no self-draining function. The sharp corners on the... right-hand door. It should be cleaned regularly. Remove the cover by pressing and pulling the tray. REMOVING AND REPLACING COMPONENTS NOTE: When reinstalling components, reverse the order of the tray and snap the ribs into place and push down until it with baskets. ...
... not firmly assembled. To reinstall the tray, slightly tilt the front of steps for easy cleaning and adjusting. To replace the dairy bin, slide it into the holes. 30 To replace the bin, slide it stops. The dispenser drip tray has no self-draining function. The sharp corners on the... right-hand door. It should be cleaned regularly. Remove the cover by pressing and pulling the tray. REMOVING AND REPLACING COMPONENTS NOTE: When reinstalling components, reverse the order of the tray and snap the ribs into place and push down until it with baskets. ...

Owner's Manual
Page 31
... straight out and off of the desired shelf and push it . It attaches to full extension. To remove the glass in a horizontal position. REMOVING AND REPLACING COMPONENTS (CONT.) Removing the OptiBin ™ Crispers Reinstalling the OptiBin ™ Crispers Humidity Control gh Low Optibin Crisper Humidity Control High Low Humidity Control High...
... straight out and off of the desired shelf and push it . It attaches to full extension. To remove the glass in a horizontal position. REMOVING AND REPLACING COMPONENTS (CONT.) Removing the OptiBin ™ Crispers Reinstalling the OptiBin ™ Crispers Humidity Control gh Low Optibin Crisper Humidity Control High Low Humidity Control High...
Owner's Manual
Page 32
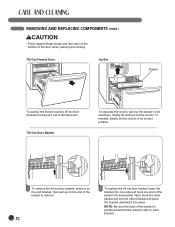
Tilt-Out Door Basket To separate the ice bin, pull out the drawer to remove. 32 2 To replace the tilt-out door basket, insert the bracket into one side and hook one end of the basket into place. To reinstall, simply set the .... Tilt-Out Freezer Door Ice Bin Drawer To access the freezer section, tilt the door downward and pull it out to full extension. REMOVING AND REPLACING COMPONENTS (CONT.) wCAUTION • Pinch hazard!
Tilt-Out Door Basket To separate the ice bin, pull out the drawer to remove. 32 2 To replace the tilt-out door basket, insert the bracket into one side and hook one end of the basket into place. To reinstall, simply set the .... Tilt-Out Freezer Door Ice Bin Drawer To access the freezer section, tilt the door downward and pull it out to full extension. REMOVING AND REPLACING COMPONENTS (CONT.) wCAUTION • Pinch hazard!

Owner's Manual
Page 33
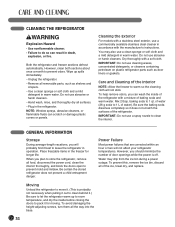
... into sections. Next, gently lift the rear left and right. Making sure that the guides at left and right sides of the DuraBase. REMOVING AND REPLACING COMPONENTS (CONT.) wWARNING Child Entrapment Hazard • When the divider of each rail. To reinstall it . Insert the end of rib in a straight motion to...
... into sections. Next, gently lift the rear left and right. Making sure that the guides at left and right sides of the DuraBase. REMOVING AND REPLACING COMPONENTS (CONT.) wWARNING Child Entrapment Hazard • When the divider of each rail. To reinstall it . Insert the end of rib in a straight motion to...
Owner's Manual
Page 34
... warm water. Do not use a spray nozzle to prevent odors. To help remove odors, you should minimize the number of the ice, towel dry, and replace. Moving Unload the refrigerator to move it. (This is off. You may drip from the ice bin during a power outage. Be sure the baking soda...
... warm water. Do not use a spray nozzle to prevent odors. To help remove odors, you should minimize the number of the ice, towel dry, and replace. Moving Unload the refrigerator to move it. (This is off. You may drip from the ice bin during a power outage. Be sure the baking soda...
Owner's Manual
Page 35
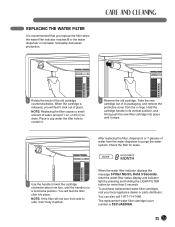
...it click out of the old cartridge counterclockwise. NOTE: If the filter will not turn , until it stops. The replacement water filter cartridge's part number is released, you replace the filter when the water filter indicator reaches 0 or the water dispenser or icemaker noticeably decreases production. 1 Rotate ...holding the LIGHT/FILTER button for leaks. 1 Use the handle to purge the water system. You can also call 1-877-714-7486. REPLACING THE WATER FILTER It is recommended that you will feel the filter click into place until the handle is in its packaging, and remove...
...it click out of the old cartridge counterclockwise. NOTE: If the filter will not turn , until it stops. The replacement water filter cartridge's part number is released, you replace the filter when the water filter indicator reaches 0 or the water dispenser or icemaker noticeably decreases production. 1 Rotate ...holding the LIGHT/FILTER button for leaks. 1 Use the handle to purge the water system. You can also call 1-877-714-7486. REPLACING THE WATER FILTER It is recommended that you will feel the filter click into place until the handle is in its packaging, and remove...
Owner's Manual
Page 38
... moved slightly. • Refrigerator is touching the wall or the cabinets. • Move the packages that supplies water to the kitchen faucet. • Replace with a new filter. Drawers are high. • Wipe off the moisture. Odors in the drawer. • Clean the drawer and the track. ... too hard, causing other door to open . • The refrigerator or freezer door is not closed . • Check the installed tube. • Replace with a new filter. 38 The door(s) will not act as an abrasive compound. • Cover food completely. • Use a different container or brand...
... moved slightly. • Refrigerator is touching the wall or the cabinets. • Move the packages that supplies water to the kitchen faucet. • Replace with a new filter. Drawers are high. • Wipe off the moisture. Odors in the drawer. • Clean the drawer and the track. ... too hard, causing other door to open . • The refrigerator or freezer door is not closed . • Check the installed tube. • Replace with a new filter. 38 The door(s) will not act as an abrasive compound. • Cover food completely. • Use a different container or brand...
Owner's Manual
Page 39
... after dropping the automatically made when the icemaker is supplied with the dispenser. • Check the installed tube. Clean the bin, wipe it dry, and replace it in this manual. 39 Please thoroughly read the Automatic Icemaker and Operating the Dispenser sections in its proper position. Other • The icemaker is...
... after dropping the automatically made when the icemaker is supplied with the dispenser. • Check the installed tube. Clean the bin, wipe it dry, and replace it in this manual. 39 Please thoroughly read the Automatic Icemaker and Operating the Dispenser sections in its proper position. Other • The icemaker is...
Owner's Manual
Page 41
...or limitations on the inner case or back of Purchase: The model and serial number can be repaired or replaced, at : http://us .lgservice.com TO CONTACT LG ELECTRONICS BY MAIL: LG Customer Interactive Center P. This warranty gives you specific legal rights and you . Box 240007 201 James Record ... other rights that result from state to you may not apply to state. Or visit our website at LG's option, if it proves to validate warranty. The cost of repair or replacement under normal use . • Damages caused during the warranty period ("Warranty Period") set forth below, ...
...or limitations on the inner case or back of Purchase: The model and serial number can be repaired or replaced, at : http://us .lgservice.com TO CONTACT LG ELECTRONICS BY MAIL: LG Customer Interactive Center P. This warranty gives you specific legal rights and you . Box 240007 201 James Record ... other rights that result from state to you may not apply to state. Or visit our website at LG's option, if it proves to validate warranty. The cost of repair or replacement under normal use . • Damages caused during the warranty period ("Warranty Period") set forth below, ...
Owner's Manual
Page 42
...WARRANTY DOES NOT APPLY TO: • Service trips to your home to deliver, pick up, and/or install the product, instruct, or replace house fuses or correct wiring, or correction of unauthorized repairs. • Damages or operating problems that result from misuse, abuse, operation outside ... lasts; PARTS: One Year from the date of Purchase. HOW SERVICE IS HANDLED: Call 1-888-542-2623 (1-888-LG-CANADA) and choose the appropriate prompt. CANADA LG Electronics will repair or at its option replace, without charge, your Sales Receipt must be defective in any Canadian Province...
...WARRANTY DOES NOT APPLY TO: • Service trips to your home to deliver, pick up, and/or install the product, instruct, or replace house fuses or correct wiring, or correction of unauthorized repairs. • Damages or operating problems that result from misuse, abuse, operation outside ... lasts; PARTS: One Year from the date of Purchase. HOW SERVICE IS HANDLED: Call 1-888-542-2623 (1-888-LG-CANADA) and choose the appropriate prompt. CANADA LG Electronics will repair or at its option replace, without charge, your Sales Receipt must be defective in any Canadian Province...


