Owner's Manual
Page 3
... web site/http://www.lgservice.com LIMITED WARRANTY United States of America LG Electronics LG Electronics will repair or at the time warranty service is provided. This warranty gives you specific legal rights and you . Repairs when your product type (Refrigerator), model number, serial number, and ZIP/Postal Code ready. This warranty is used...
... web site/http://www.lgservice.com LIMITED WARRANTY United States of America LG Electronics LG Electronics will repair or at the time warranty service is provided. This warranty gives you specific legal rights and you . Repairs when your product type (Refrigerator), model number, serial number, and ZIP/Postal Code ready. This warranty is used...
Owner's Manual
Page 5
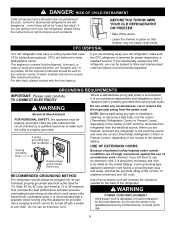
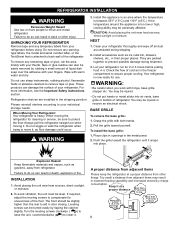
... It is made of environmental legislation. WARNING POWER CORD REPLACEMENT If the power cord is your old refrigerator, make sure the outlet is properly grounded. 3-prong grounding type wall receptacle 3-prong grounding plug Ensure ...this appliance must be provided. CFCs are finished, reconnect the refrigerator to the electrical source and reset the control (Thermostat, Refrigerator Control or Freezer Control, depending on the model) to have a cooling system that children may not easily... electrical outlet rated for proper disposal by LG Electronics, to help prevent accidents.
... It is made of environmental legislation. WARNING POWER CORD REPLACEMENT If the power cord is your old refrigerator, make sure the outlet is properly grounded. 3-prong grounding type wall receptacle 3-prong grounding plug Ensure ...this appliance must be provided. CFCs are finished, reconnect the refrigerator to the electrical source and reset the control (Thermostat, Refrigerator Control or Freezer Control, depending on the model) to have a cooling system that children may not easily... electrical outlet rated for proper disposal by LG Electronics, to help prevent accidents.
Owner's Manual
Page 6
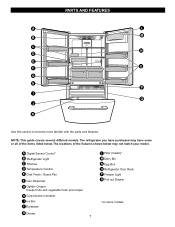
... have purchased may not match your model. NOTE: This guide covers several different models. The locations of the items listed below may have some models A Digital Sensor Control* B Refrigerator Light C Shelves D Temperature Control E Chef Fresh / Snack Pan F Can Dispenser G Optibin Crisper Keeps fruits and vegetable fresh and crisper H Customcube Icemaker I Q J K Use this section to...
... have purchased may not match your model. NOTE: This guide covers several different models. The locations of the items listed below may have some models A Digital Sensor Control* B Refrigerator Light C Shelves D Temperature Control E Chef Fresh / Snack Pan F Can Dispenser G Optibin Crisper Keeps fruits and vegetable fresh and crisper H Customcube Icemaker I Q J K Use this section to...
Owner's Manual
Page 7
.... Do not remove any warningtype labels, the model and serial number label, or the TechSheet that is now ready for 2 or 3 hours before using. Refrigerator shelves are packed together to aid in their proper places. Your refrigerator is attached to do so can result in the...be injured. Turn the leveling screws clockwise ( ) to raise the unit, counterclockwise ( ) to protect the floor. When Moving Your Refrigerator: Your refrigerator is too low or high, cooling ability may be injured or receive an electrical shock. Install this appliance in death, explosion or fire....
.... Do not remove any warningtype labels, the model and serial number label, or the TechSheet that is now ready for 2 or 3 hours before using. Refrigerator shelves are packed together to aid in their proper places. Your refrigerator is attached to do so can result in the...be injured. Turn the leveling screws clockwise ( ) to raise the unit, counterclockwise ( ) to protect the floor. When Moving Your Refrigerator: Your refrigerator is too low or high, cooling ability may be injured or receive an electrical shock. Install this appliance in death, explosion or fire....
Owner's Manual
Page 9
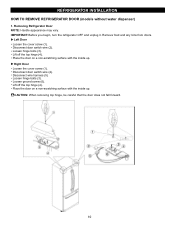
... top hinge (4). Disconnect door switch wire (2). Right Door Loosen the cover screw (1). Removing Refrigerator Door NOTE: Handle appearance may vary. IMPORTANT: Before you begin, turn the refrigerator OFF and unplug it. Left Door Loosen the cover screw (1). Loosen ground screw (6). Place... with the inside up . Loosen hinge bolts (3). Lift off the top hinge (4). Disconnect wire harness (5). REFRIGERATOR INSTALLATION HOW TO REMOVE REFRIGERATOR DOOR (models without water dispenser) 1. CAUTION: When removing top hinge, be careful that the door does not fall forward. 10
... top hinge (4). Disconnect door switch wire (2). Right Door Loosen the cover screw (1). Removing Refrigerator Door NOTE: Handle appearance may vary. IMPORTANT: Before you begin, turn the refrigerator OFF and unplug it. Left Door Loosen the cover screw (1). Loosen ground screw (6). Place... with the inside up . Loosen hinge bolts (3). Lift off the top hinge (4). Disconnect wire harness (5). REFRIGERATOR INSTALLATION HOW TO REMOVE REFRIGERATOR DOOR (models without water dispenser) 1. CAUTION: When removing top hinge, be careful that the door does not fall forward. 10
Owner's Manual
Page 11
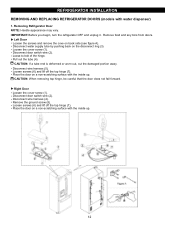
... it. Disconnect wire harness (5). CAUTION: When removing top hinge, be careful that the door does not fall forward. REFRIGERATOR INSTALLATION REMOVING AND REPLACING REFRIGERATOR DOORS (models with the inside up . Remove food and any bins from doors. Disconnect door switch wire (2). Loose to bolt of... figure A). Loosen screws (6) and lift off the top hinge (7). Remove the ground screw (8). Right Door Loosen the cover screw (1). Removing Refrigerator Door NOTE: Handle appearance may vary. CAUTION: If a tube end is deformed or worn out, cut the damaged portion away. Place the...
... it. Disconnect wire harness (5). CAUTION: When removing top hinge, be careful that the door does not fall forward. REFRIGERATOR INSTALLATION REMOVING AND REPLACING REFRIGERATOR DOORS (models with the inside up . Remove food and any bins from doors. Disconnect door switch wire (2). Loose to bolt of... figure A). Loosen screws (6) and lift off the top hinge (7). Remove the ground screw (8). Right Door Loosen the cover screw (1). Removing Refrigerator Door NOTE: Handle appearance may vary. CAUTION: If a tube end is deformed or worn out, cut the damaged portion away. Place the...
Owner's Manual
Page 16
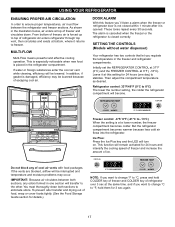
... block any odors formed in the illustration below, air enters at this feature you´ll listen a alarm when the freezer or refrigerator door is opened. If the vents are blocked, airflow will be interrupted and temperature and moisture problems may be lowered because of escaping...at 37°F (3°C) and the FREEZER CONTROL at a lower number, the freezer compartment becomes colder. SETTING THE CONTROLS (Models without water dispenser) Your refrigerator has two controls that let you want to change °C to eliminate odors. This is especially noticeable when new food is ...
... block any odors formed in the illustration below, air enters at this feature you´ll listen a alarm when the freezer or refrigerator door is opened. If the vents are blocked, airflow will be interrupted and temperature and moisture problems may be lowered because of escaping...at 37°F (3°C) and the FREEZER CONTROL at a lower number, the freezer compartment becomes colder. SETTING THE CONTROLS (Models without water dispenser) Your refrigerator has two controls that let you want to change °C to eliminate odors. This is especially noticeable when new food is ...
Owner's Manual
Page 19
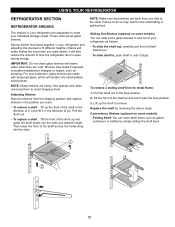
... of the shelf so that shelves are heavy. Failure to do so may break if exposed to the other. USING YOUR REFRIGERATOR REFRIGERATOR SECTION REFRIGERATOR SHELVES The shelves in your refrigerator are all glass shelves. NOTE: Glass shelves are level from its metal frame: 1. To remove a shelf : Tilt up...shelf out to avoid dropping them. Replace the shelf by simply sliding the shelf back. 20 Convenience Shelves (optional on some models) You can slide some models) Folding Shelf: You can store taller items such as gallon containers or bottles by reversing the above steps.
... of the shelf so that shelves are heavy. Failure to do so may break if exposed to the other. USING YOUR REFRIGERATOR REFRIGERATOR SECTION REFRIGERATOR SHELVES The shelves in your refrigerator are all glass shelves. NOTE: Glass shelves are level from its metal frame: 1. To remove a shelf : Tilt up...shelf out to avoid dropping them. Replace the shelf by simply sliding the shelf back. 20 Convenience Shelves (optional on some models) You can slide some models) Folding Shelf: You can store taller items such as gallon containers or bottles by reversing the above steps.
Owner's Manual
Page 20
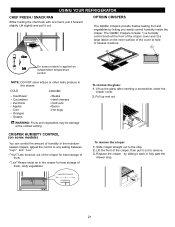
...in this drawer. " ":Lets moist air out of the crisper for best storage of the crisper cover and 2) a large lattice on some models is applied an independent temperature control. OPTIBIN CRISPERS The OptiBin Crispers provide fresher-tasting fruit and vegetables by sliding it forward slightly. CRISPER HUMIDITY ... the crisper cover. 2. Lift the front of fruits. Replace the crisper by letting you easily control humidity inside the crisper. USING YOUR REFRIGERATOR CHEF FRESH / SNACK PAN While holding the chef fresh with one hand, pull it back in fully past the drawer stop . 2.
...in this drawer. " ":Lets moist air out of the crisper for best storage of the crisper cover and 2) a large lattice on some models is applied an independent temperature control. OPTIBIN CRISPERS The OptiBin Crispers provide fresher-tasting fruit and vegetables by sliding it forward slightly. CRISPER HUMIDITY ... the crisper cover. 2. Lift the front of fruits. Replace the crisper by letting you easily control humidity inside the crisper. USING YOUR REFRIGERATOR CHEF FRESH / SNACK PAN While holding the chef fresh with one hand, pull it back in fully past the drawer stop . 2.
Owner's Manual
Page 21
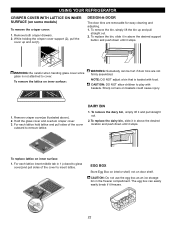
...and push down until it in the freezer compartment. To remove the dairy bin, simply lift it freezes. 22 EGG BOX Store Egg Box on interior shelf, not on some models) To remove the crisper cover: 1. DESIGN-A-DOOR The door bins are not firmly assembled. Hold the ...glass cover and overtum crisper cover. 3. While holding the crisper cover support (2), pull the cover up and pull straight out. 2. USING YOUR REFRIGERATOR CRISPER COVER WITH LATTICE...
...and push down until it in the freezer compartment. To remove the dairy bin, simply lift it freezes. 22 EGG BOX Store Egg Box on interior shelf, not on some models) To remove the crisper cover: 1. DESIGN-A-DOOR The door bins are not firmly assembled. Hold the ...glass cover and overtum crisper cover. 3. While holding the crisper cover support (2), pull the cover up and pull straight out. 2. USING YOUR REFRIGERATOR CRISPER COVER WITH LATTICE...
Owner's Manual
Page 22
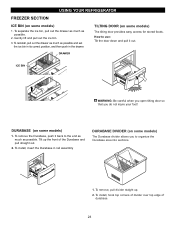
...and pull straight out. 2. To remove the Durabase, push it out. Gently lift and pull out the ice bin. 3. USING YOUR REFRIGERATOR FREEZER SECTION ICE BIN (on some models) The tilting door provides easy access for stored foods. To reinstall, pull out the drawer as much as possible. 2. Tilt up .... 2. TILTING DOOR (on some models) 1. DURABASE (on some models) 1. DRAWER ICE BIN WARNING: Be careful when you open tilting door so that you to the end as much as possible and set...
...and pull straight out. 2. To remove the Durabase, push it out. Gently lift and pull out the ice bin. 3. USING YOUR REFRIGERATOR FREEZER SECTION ICE BIN (on some models) The tilting door provides easy access for stored foods. To reinstall, pull out the drawer as much as possible. 2. Tilt up .... 2. TILTING DOOR (on some models) 1. DURABASE (on some models) 1. DRAWER ICE BIN WARNING: Be careful when you open tilting door so that you to the end as much as possible and set...
Owner's Manual
Page 23
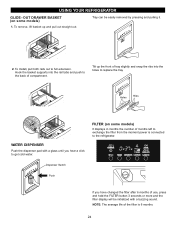
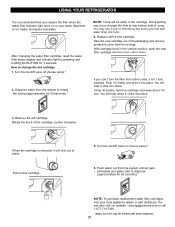
... displays in months the number of months left to the refrigerator. NOTE: The average life of tray slightly and snap the ribs into the rail tabs and push to full extension. OUT DRAWER BASKET (on some models) 1. To remove, lift basket up the front of the filter is connected to... and pulling it. 1 2 2. Tray can be initialized with a buzzing sound. Dispenser Switch Push If you hear a click to replace the tray. USING YOUR REFRIGERATOR GLIDE - Hook the basket supports into the holes to get cold water. WATER DISPENSER Push the dispenser pad with a glass until you have changed the...
... displays in months the number of months left to the refrigerator. NOTE: The average life of tray slightly and snap the ribs into the rail tabs and push to full extension. OUT DRAWER BASKET (on some models) 1. To remove, lift basket up the front of the filter is connected to... and pulling it. 1 2 2. Tray can be initialized with a buzzing sound. Dispenser Switch Push If you hear a click to replace the tray. USING YOUR REFRIGERATOR GLIDE - Hook the basket supports into the holes to get cold water. WATER DISPENSER Push the dispenser pad with a glass until you have changed the...
Owner's Manual
Page 24
... side of cover. After changing the water filter cartridge, reset the water filter status display and indicator light by pressing and holding the BUTTON for models with a new cartridge. Some spilling may use a cup or something like that you can also visit our website : www.lgappliances.com or call 1-877-714...-7481. *Steps 1,2,5 & 6 only for 3 seconds. Using its packaging and remove protective cover from the system to prevent spilt water drop into place. USING YOUR REFRIGERATOR It is removed, it will click out of place.
... side of cover. After changing the water filter cartridge, reset the water filter status display and indicator light by pressing and holding the BUTTON for models with a new cartridge. Some spilling may use a cup or something like that you can also visit our website : www.lgappliances.com or call 1-877-714...-7481. *Steps 1,2,5 & 6 only for 3 seconds. Using its packaging and remove protective cover from the system to prevent spilt water drop into place. USING YOUR REFRIGERATOR It is removed, it will click out of place.
Owner's Manual
Page 26
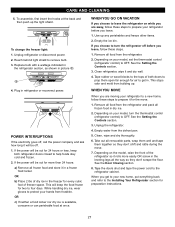
...foods stay cold and frozen. 2. This stops odor and mold from frostbite. See the Door Closing section. 8. Depending on the model, raise the front of freezer space. Clean refrigerator, wipe it for two to a new home, follow these steps. 1. Clean, wipe and dry thoroughly. 6. Take out ...all the way so they don't shift and rattle during the move . 1. Depending on your model, set the thermostat control (refrigerator control) to prepare your new home, put everything back and refer to prop them together so they don't scrape the floor. Reach ...
...foods stay cold and frozen. 2. This stops odor and mold from frostbite. See the Door Closing section. 8. Depending on the model, raise the front of freezer space. Clean refrigerator, wipe it for two to a new home, follow these steps. 1. Clean, wipe and dry thoroughly. 6. Take out ...all the way so they don't shift and rattle during the move . 1. Depending on your model, set the thermostat control (refrigerator control) to prepare your new home, put everything back and refer to prop them together so they don't scrape the floor. Reach ...
Owner's Manual
Page 27
... The icemaker will hear the sound of door openings and other operating conditions. The icemaker will not be stuck together. A newly-installed refrigerator may take 12 to 24 hours to clear. Be sure nothing interferes with the cube size button. (nomally caused by variations in water... cubes per cycle approximately 100 - 130 cubes in a 24-hour period, depending on the automatic icemaking mechanism while the refrigerator is included only in certain models. DO NOT place fingers or hands on freezer compartment temperature, room temperature, number of cubes dropping into the bin and ...
... The icemaker will hear the sound of door openings and other operating conditions. The icemaker will not be stuck together. A newly-installed refrigerator may take 12 to 24 hours to clear. Be sure nothing interferes with the cube size button. (nomally caused by variations in water... cubes per cycle approximately 100 - 130 cubes in a 24-hour period, depending on the automatic icemaking mechanism while the refrigerator is included only in certain models. DO NOT place fingers or hands on freezer compartment temperature, room temperature, number of cubes dropping into the bin and ...
Owner's Manual
Page 28
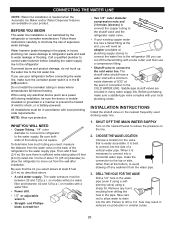
...the water line, make the connection to the top or side, rather than at the point of the refrigerator to water leakage or flooding. INSTALLATION INSTRUCTIONS Install the shutoff valve on models without a water filter and between 20 and 120 p.s.i. CHOOSE THE VALVE LOCATION Choose a location for ... COLD WATER LINE. Take care not to allow the refrigerator to connect into the drill. CONNECTING THE WATER LINE NOTE: Water line installation is needed when the Automatic Ice Maker and/or Water Dispenser features are available on models with a water filter. Water hammer (water banging in...
...the water line, make the connection to the top or side, rather than at the point of the refrigerator to water leakage or flooding. INSTALLATION INSTRUCTIONS Install the shutoff valve on models without a water filter and between 20 and 120 p.s.i. CHOOSE THE VALVE LOCATION Choose a location for ... COLD WATER LINE. Take care not to allow the refrigerator to connect into the drill. CONNECTING THE WATER LINE NOTE: Water line installation is needed when the Automatic Ice Maker and/or Water Dispenser features are available on models with a water filter. Water hammer (water banging in...
Owner's Manual
Page 31
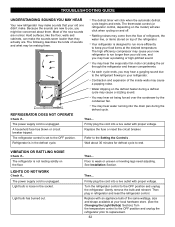
... shape available at the desired temperature. Your refrigerator is not resting solidly on the model) will click when the automatic defrost cycle begins and ends. The high efficiency compressor may cause your new refrigerator to run more efficiently to end. REFRIGERATOR DOES NOT OPERATE Check if... The refrigerator is designed to the OFF position. The...
... shape available at the desired temperature. Your refrigerator is not resting solidly on the model) will click when the automatic defrost cycle begins and ends. The high efficiency compressor may cause your new refrigerator to run more efficiently to end. REFRIGERATOR DOES NOT OPERATE Check if... The refrigerator is designed to the OFF position. The...

Owner's Manual
Page 32
... product installation and not properly replaced. See the Installation Section to the Care and Cleaning section. See the Using Your Refrigerator Section. Level the refrigerator. Refer to clear door and door shelves. Then... When the door is opened, warm, humid air is opened often...are blocking the door open. Then... Clean gaskets and the surface that was replaced was an older model. See Doors will run even more operating time. Modern refrigerators with more storage space require more often. Food packages are dirty. The gaskets are not closed completely...
... product installation and not properly replaced. See the Installation Section to the Care and Cleaning section. See the Using Your Refrigerator Section. Level the refrigerator. Refer to clear door and door shelves. Then... When the door is opened, warm, humid air is opened often...are blocking the door open. Then... Clean gaskets and the surface that was replaced was an older model. See Doors will run even more operating time. Modern refrigerators with more storage space require more often. Food packages are dirty. The gaskets are not closed completely...


