Owners Manual
Page 2
... Durabase® 33 Glide'N'Serve 33 Detaching/Assembling the Storage Bins 34 Adjusting the Refrigerator Shelves 35 InstaView Door-in-Door (On Some Models) 36 SMART FUNCTIONS 36 LG ThinQ Application 37 MAINTENANCE 37 Cleaning 38 Replacing the Water Filter 42 TROUBLESHOOTING 42 FAQs: Frequently Asked Questions 43 Before Calling for Service...
... Durabase® 33 Glide'N'Serve 33 Detaching/Assembling the Storage Bins 34 Adjusting the Refrigerator Shelves 35 InstaView Door-in-Door (On Some Models) 36 SMART FUNCTIONS 36 LG ThinQ Application 37 MAINTENANCE 37 Cleaning 38 Replacing the Water Filter 42 TROUBLESHOOTING 42 FAQs: Frequently Asked Questions 43 Before Calling for Service...
Owners Manual
Page 3
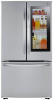
... function on the Door-in the crispers by adjusting the settings between Fruit (Low) and Vegetables (High). ENGLISH PRODUCT FEATURES 3 PRODUCT FEATURES Depending on the model, some of humidity in -Door lets you see if you're running low on frequently used items like beverages and snacks, without opening the refrigerator...
... function on the Door-in the crispers by adjusting the settings between Fruit (Low) and Vegetables (High). ENGLISH PRODUCT FEATURES 3 PRODUCT FEATURES Depending on the model, some of humidity in -Door lets you see if you're running low on frequently used items like beverages and snacks, without opening the refrigerator...
Owners Manual
Page 9
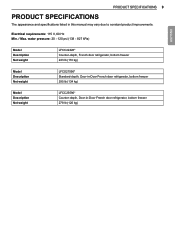
... Net weight LFCS27596* Standard-depth, Door-in-Door French door refrigerator, bottom freezer 295 lb (134 kg) Model Description Net weight LFCC23596* Counter-depth, Door-in this manual may vary due to constant product improvements. PRODUCT SPECIFICATIONS 9 PRODUCT SPECIFICATIONS The appearance and specifications listed in -Door French ...
... Net weight LFCS27596* Standard-depth, Door-in-Door French door refrigerator, bottom freezer 295 lb (134 kg) Model Description Net weight LFCC23596* Counter-depth, Door-in this manual may vary due to constant product improvements. PRODUCT SPECIFICATIONS 9 PRODUCT SPECIFICATIONS The appearance and specifications listed in -Door French ...
Owners Manual
Page 14
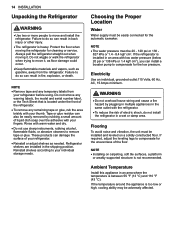
... when moving it , as floor damage could occur. ••Keep flammable materials and vapors, such as needed. Do not remove any warning labels, the model and serial number label, or the Tech Sheet that is between 55 °F (13 °C) and 110 °F (43 °C). Flooring To avoid noise and...
... when moving it , as floor damage could occur. ••Keep flammable materials and vapors, such as needed. Do not remove any warning labels, the model and serial number label, or the Tech Sheet that is between 55 °F (13 °C) and 110 °F (43 °C). Flooring To avoid noise and...

Owners Manual
Page 18
... the latch, be careful that the door does not fall forward. 4 Lift the left refrigerator door (1) until it is only present on some models. ••The number of the latch, be careful that the door does not fall forward. Lift the top hinge (2) free of the... lever (1) clockwise. Hinge Lever Latch Hinge Lever 2 Disconnect all the wire harnesses (1). CAUTION ••Place the door, inside facing up, on the model. Lift the top hinge free of the cover (2), with a flat-head screwdriver. 3 Rotate the hinge lever counterclockwise. Unscrew the ground wire (2). Removing the...
... the latch, be careful that the door does not fall forward. 4 Lift the left refrigerator door (1) until it is only present on some models. ••The number of the latch, be careful that the door does not fall forward. Lift the top hinge (2) free of the... lever (1) clockwise. Hinge Lever Latch Hinge Lever 2 Disconnect all the wire harnesses (1). CAUTION ••Place the door, inside facing up, on the model. Lift the top hinge free of the cover (2), with a flat-head screwdriver. 3 Rotate the hinge lever counterclockwise. Unscrew the ground wire (2). Removing the...

Owners Manual
Page 19
ENGLISH CAUTION ••Place the door, inside facing up, on some models. ••The number of the middle hinge assembly (2). Lower the left refrigerator door after the right door is installed. 1 Make sure that the plastic ... right refrigerator door so the sleeve (1) fits over the hinge lever latch and slot it is free of wire harnesses may vary depending on the model. 4 Place the hinge cover (1) in the bottom of the door. Insert and tighten the cover screw (2). 2 Fit the hinge (1) over the middle hinge pin (2). Rotate...
ENGLISH CAUTION ••Place the door, inside facing up, on some models. ••The number of the middle hinge assembly (2). Lower the left refrigerator door after the right door is installed. 1 Make sure that the plastic ... right refrigerator door so the sleeve (1) fits over the hinge lever latch and slot it is free of wire harnesses may vary depending on the model. 4 Place the hinge cover (1) in the bottom of the door. Insert and tighten the cover screw (2). 2 Fit the hinge (1) over the middle hinge pin (2). Rotate...
Owners Manual
Page 20
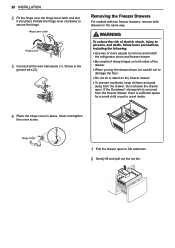
Rotate the hinge lever clockwise to crawl inside. 4 Place the hinge cover in place. Removing the Freezer Drawers For models with two freezer drawers, remove both sides of sharp hinges on the freezer drawer. ••To prevent accidents, keep children and pets away from ...
Rotate the hinge lever clockwise to crawl inside. 4 Place the hinge cover in place. Removing the Freezer Drawers For models with two freezer drawers, remove both sides of sharp hinges on the freezer drawer. ••To prevent accidents, keep children and pets away from ...
Owners Manual
Page 22
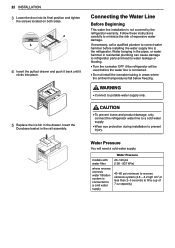
... carefully to potable water supply only. 5 Replace the ice bin in the rail assembly. WARNING ••Connect to minimize the risk of 7 oz capacity) models with water filter where reverse osmosis water filtration system is not covered by the refrigerator warranty. Water banging in the pipes, or water hammer in...
... carefully to potable water supply only. 5 Replace the ice bin in the rail assembly. WARNING ••Connect to minimize the risk of 7 oz capacity) models with water filter where reverse osmosis water filtration system is not covered by the refrigerator warranty. Water banging in the pipes, or water hammer in...

Owners Manual
Page 28
... hours before putting food in the refrigerator before use sharp objects or abrasive, flammable, or alcohol-based cleaners. ••Do not peel off the model or serial number label or the technical information on the rear surface of the refrigerator. The refrigerator makes a loud noise after initial operation. CAUTION •...
... hours before putting food in the refrigerator before use sharp objects or abrasive, flammable, or alcohol-based cleaners. ••Do not peel off the model or serial number label or the technical information on the rear surface of the refrigerator. The refrigerator makes a loud noise after initial operation. CAUTION •...
Owners Manual
Page 29
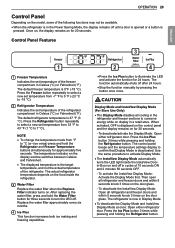
.... ••To deactivate the Display Mode and InstaView Display Mode at once: Open either refrigerator door. ENGLISH OPERATION 29 Control Panel Depending on the model, some of the following functions may not be available. ••When the refrigerator is in the Power Saving Mode, the display remains off after...
.... ••To deactivate the Display Mode and InstaView Display Mode at once: Open either refrigerator door. ENGLISH OPERATION 29 Control Panel Depending on the model, some of the following functions may not be available. ••When the refrigerator is in the Power Saving Mode, the display remains off after...

Owners Manual
Page 31
... home for an extended period, remove all food and unplug the power cord. Vegetables should be washed, and food packaging should be left on the model, some of the following functions may penetrate the refrigerator and raise its temperature. When storing an extra supply, wrap in the refrigerator may cause condensation...
... home for an extended period, remove all food and unplug the power cord. Vegetables should be washed, and food packaging should be left on the model, some of the following functions may penetrate the refrigerator and raise its temperature. When storing an extra supply, wrap in the refrigerator may cause condensation...

Owners Manual
Page 33
... humidity.) Press the Select button to choose between Produce (Cold), Deli (Colder) and Meat (Coldest). NOTE ••This feature is only available on some models. Glide'N'Serve and Crispers 1 To remove the humidity controlled crispers and the Glide'N'Serve, pull out the crisper (1) or Glide'N'Serve (2) to clean the storage...
... humidity.) Press the Select button to choose between Produce (Cold), Deli (Colder) and Meat (Coldest). NOTE ••This feature is only available on some models. Glide'N'Serve and Crispers 1 To remove the humidity controlled crispers and the Glide'N'Serve, pull out the crisper (1) or Glide'N'Serve (2) to clean the storage...

Owners Manual
Page 34
...Shelves The shelves in the shelf falling or spilled food. ••Do not clean glass shelves with warm water while they are cold. Your model may result in the refrigerator are level from one side to meet individual storage needs. Shelves may break if exposed to fit items of different... care when removing them . ••Do not clean glass shelves with warm water while they are cold. Using the Folding Shelf (On Some Models) Store taller items, such as gallon containers or bottles, by pushing the front half of the shelf underneath the back half of the shelf forward...
...Shelves The shelves in the shelf falling or spilled food. ••Do not clean glass shelves with warm water while they are cold. Your model may result in the refrigerator are level from one side to meet individual storage needs. Shelves may break if exposed to fit items of different... care when removing them . ••Do not clean glass shelves with warm water while they are cold. Using the Folding Shelf (On Some Models) Store taller items, such as gallon containers or bottles, by pushing the front half of the shelf underneath the back half of the shelf forward...
Owners Manual
Page 35
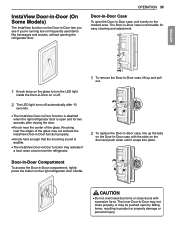
... remove the Door-In-Door case, lift up the tabs on the Door-In-Door case with excessive force. InstaView Door-in-Door (On Some Models) The InstaView function on the Door-in-Door lets you see if you're running low on the door and push down until it snaps...
... remove the Door-In-Door case, lift up the tabs on the Door-In-Door case with excessive force. InstaView Door-in-Door (On Some Models) The InstaView function on the Door-in-Door lets you see if you're running low on the door and push down until it snaps...
Owners Manual
Page 36
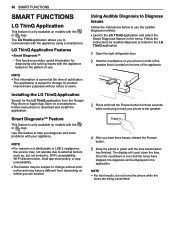
36 SMART FUNCTIONS SMART FUNCTIONS LG ThinQ Application This feature is only available on models with the or logo. Using ...Audible Diagnosis to Diagnose Issues Follow the instructions below to communicate with the or logo. Once the countdown is over and the tones have a different form depending on where you to use . The LG...the instructions for three seconds while continuing to hold the Freezer button for audible diagnosis provided in the LG ThinQ application. 1 Open the right refrigerator door. 2 Hold the mouthpiece on your phone in the...
36 SMART FUNCTIONS SMART FUNCTIONS LG ThinQ Application This feature is only available on models with the or logo. Using ...Audible Diagnosis to Diagnose Issues Follow the instructions below to communicate with the or logo. Once the countdown is over and the tones have a different form depending on where you to use . The LG...the instructions for three seconds while continuing to hold the Freezer button for audible diagnosis provided in the LG ThinQ application. 1 Open the right refrigerator door. 2 Hold the mouthpiece on your phone in the...

Owners Manual
Page 39
MAINTENANCE 39 Performance Data Sheet Model: LT1000P Use Replacement Cartridge: ADQ747935** The concentration of substances listed below. System tested and certified by NSF International against NSF/ANSI Standard 42, Standard 53 ...
MAINTENANCE 39 Performance Data Sheet Model: LT1000P Use Replacement Cartridge: ADQ747935** The concentration of substances listed below. System tested and certified by NSF International against NSF/ANSI Standard 42, Standard 53 ...
Owners Manual
Page 42
... settings appear on display in the freezing process. Use the same procedure to return the refrigerator to assist in a store. On some models, you can also set the refrigerator and freezer temperatures? Q: Why does the icemaker tray look crooked? A: This is wrong? To ...TROUBLESHOOTING FAQs: Frequently Asked Questions Q: What are working, but it's not cooling and the display shows "OFF" (see below). On some models, you can also select the Refrigerator Manager application on . Q: How do not have a water source attached to save energy while the appliance ...
... settings appear on display in the freezing process. Use the same procedure to return the refrigerator to assist in a store. On some models, you can also set the refrigerator and freezer temperatures? Q: Why does the icemaker tray look crooked? A: This is wrong? To ...TROUBLESHOOTING FAQs: Frequently Asked Questions Q: What are working, but it's not cooling and the display shows "OFF" (see below). On some models, you can also select the Refrigerator Manager application on . Q: How do not have a water source attached to save energy while the appliance ...
Owners Manual
Page 43
...order to conserve energy, try to find, and close correctly or pop open" section. Under warmer conditions, expect it is replacing an older model. ••Modern refrigerators require more operating time but use less energy due to reach the desired temperature. The refrigerator should not be ...••Reset the circuit breaker on its side, it is clogged. ••Use a vacuum cleaner with an attachment to OFF (some models). Do not remove the panel covering the condenser coil area. Or the appliance is set to Demo Mode. ••Demo Mode allows the...
...order to conserve energy, try to find, and close correctly or pop open" section. Under warmer conditions, expect it is replacing an older model. ••Modern refrigerators require more operating time but use less energy due to reach the desired temperature. The refrigerator should not be ...••Reset the circuit breaker on its side, it is clogged. ••Use a vacuum cleaner with an attachment to OFF (some models). Do not remove the panel covering the condenser coil area. Or the appliance is set to Demo Mode. ••Demo Mode allows the...

Owners Manual
Page 46
... properly closed completely. Solutions ••The icemaker will be affected. ••It may be between 20 and 120 psi on models without a water filter and between 40 and 120 psi on . Reverse Osmosis filtration system is clogged. Water filter has been exhausted. ...Icemaker not turned on models with adequate pressure and turn the water shutoff valve fully open " section in Parts & Features Troubleshooting for more information. ••...
... properly closed completely. Solutions ••The icemaker will be affected. ••It may be between 20 and 120 psi on models without a water filter and between 40 and 120 psi on . Reverse Osmosis filtration system is clogged. Water filter has been exhausted. ...Icemaker not turned on models with adequate pressure and turn the water shutoff valve fully open " section in Parts & Features Troubleshooting for more information. ••...

Owners Manual
Page 49
...Floor is weak or uneven or leveling legs need to keep your old one, but it is touching a cabinet or wall, some models) will click when the automatic defrost cycle begins and ends. Contraction and expansion of the normal vibrations may cause your new refrigerator to ...run more energy efficient than previous models. See the Leveling and Door Alignment section. ••Normal Operation ••Normal Operation ••Normal Operation ••...
...Floor is weak or uneven or leveling legs need to keep your old one, but it is touching a cabinet or wall, some models) will click when the automatic defrost cycle begins and ends. Contraction and expansion of the normal vibrations may cause your new refrigerator to ...run more energy efficient than previous models. See the Leveling and Door Alignment section. ••Normal Operation ••Normal Operation ••Normal Operation ••...


