Owners Manual
Page 2
... Installation Overview 14 Unpacking the Refrigerator 14 Choosing the Proper Location 16 Removing/Assembling Handles 17 Removing/Assembling the Doors and Drawers 22 Connecting the Water Line 25 Leveling and Door Alignment 27 Turning on the Power 28 OPERATION 28 Before Use 29 Control Panel 30 Sabbath Mode 30 Automatic Icemaker 31 Storing Food 32 Humidity Controlled Crispers 32 Durabase® 33 Glide'N'Serve 33 Detaching/Assembling the Storage Bins 34 Adjusting the Refrigerator Shelves 35 InstaView Door-in-Door (On Some Models...
... Installation Overview 14 Unpacking the Refrigerator 14 Choosing the Proper Location 16 Removing/Assembling Handles 17 Removing/Assembling the Doors and Drawers 22 Connecting the Water Line 25 Leveling and Door Alignment 27 Turning on the Power 28 OPERATION 28 Before Use 29 Control Panel 30 Sabbath Mode 30 Automatic Icemaker 31 Storing Food 32 Humidity Controlled Crispers 32 Durabase® 33 Glide'N'Serve 33 Detaching/Assembling the Storage Bins 34 Adjusting the Refrigerator Shelves 35 InstaView Door-in-Door (On Some Models...
Owners Manual
Page 6
...;•Do not use a hair dryer to dry the inside of the refrigerator. ••Do not light a candle to be made by children without supervision. ••Unplug the power plug before cleaning or repairing the refrigerator. ••The refrigerator and freezer compartment lights are of the type recommended by clients in the freezer compartment. Children shall not play with service agent or...
...;•Do not use a hair dryer to dry the inside of the refrigerator. ••Do not light a candle to be made by children without supervision. ••Unplug the power plug before cleaning or repairing the refrigerator. ••The refrigerator and freezer compartment lights are of the type recommended by clients in the freezer compartment. Children shall not play with service agent or...
Owners Manual
Page 7
... off the prongs of the power plug and contact areas. Failure to sudden temperature changes. Do not touch glass surfaces if they are cracked or broken. ••Do not overfill or pack items too tightly into door bins. It may not easily climb inside or outside of electric shock. Do not use aerosols near the refrigerator. ••This appliance...
... off the prongs of the power plug and contact areas. Failure to sudden temperature changes. Do not touch glass surfaces if they are cracked or broken. ••Do not overfill or pack items too tightly into door bins. It may not easily climb inside or outside of electric shock. Do not use aerosols near the refrigerator. ••This appliance...
Owners Manual
Page 12
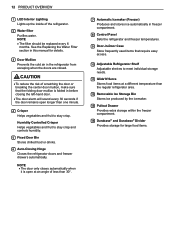
...°. 7 Automatic Icemaker (Freezer) Produces and stores ice automatically in freezer compartment. 8 Control Panel Sets the refrigerator and freezer temperatures. 9 Door-in-Door Case Store frequently used items that the folding door mullion is folded in this manual for large food items. 12 PRODUCT OVERVIEW 1 LED Interior Lighting Lights up the inside of less than one minute. 4 Crisper Helps vegetables and fruit to stay crisp. See the Replacing the Water Filter section in...
...°. 7 Automatic Icemaker (Freezer) Produces and stores ice automatically in freezer compartment. 8 Control Panel Sets the refrigerator and freezer temperatures. 9 Door-in-Door Case Store frequently used items that the folding door mullion is folded in this manual for large food items. 12 PRODUCT OVERVIEW 1 LED Interior Lighting Lights up the inside of less than one minute. 4 Crisper Helps vegetables and fruit to stay crisp. See the Replacing the Water Filter section in...
Owners Manual
Page 14
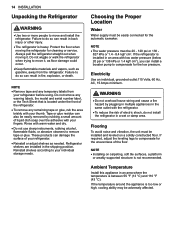
... area where the temperature is not recommended. Electricity Use an individual, grounded outlet:115 Volts, 60 Hz, AC, 15 Amps minimum. Refrigerator shelves are installed in a wet or damp area. Ambient Temperature Install this appliance in the same outlet with your thumb. NOTE ••Remove tape and any remaining tape or glue, rub the area briskly with warm water and dry...
... area where the temperature is not recommended. Electricity Use an individual, grounded outlet:115 Volts, 60 Hz, AC, 15 Amps minimum. Refrigerator shelves are installed in a wet or damp area. Ambient Temperature Install this appliance in the same outlet with your thumb. NOTE ••Remove tape and any remaining tape or glue, rub the area briskly with warm water and dry...
Owners Manual
Page 17
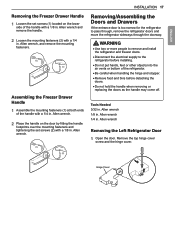
... the lower side of the handle with a 1/8 in . Allen wrench 1/4 in . Remove the top hinge cover screw and the hinge cover. WARNING ••Use two or more people to remove and install the refrigerator and freezer doors. ••Disconnect the electrical supply to pass through, remove the refrigerator doors and move the refrigerator sideways through the doorway. Tools Needed 3/32 in . Assembling the Freezer Drawer Handle 1 Assemble the mounting fasteners (1) at both...
... the lower side of the handle with a 1/8 in . Allen wrench 1/4 in . Remove the top hinge cover screw and the hinge cover. WARNING ••Use two or more people to remove and install the refrigerator and freezer doors. ••Disconnect the electrical supply to pass through, remove the refrigerator doors and move the refrigerator sideways through the doorway. Tools Needed 3/32 in . Assembling the Freezer Drawer Handle 1 Assemble the mounting fasteners (1) at both...
Owners Manual
Page 20
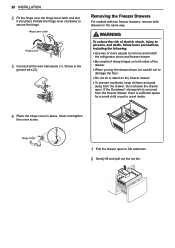
...;•Use two or more people to remove and install the refrigerator doors and freezer drawer. ••Be careful of the drawer. ••When you lay the drawer down, be careful not to crawl inside. 4 Place the hinge cover in the ground wire (2). Rotate the hinge lever clockwise to full extension. 2 Gently lift and pull out the ice bin. Do not leave the drawer open to secure the hinge.
...;•Use two or more people to remove and install the refrigerator doors and freezer drawer. ••Be careful of the drawer. ••When you lay the drawer down, be careful not to crawl inside. 4 Place the hinge cover in the ground wire (2). Rotate the hinge lever clockwise to full extension. 2 Gently lift and pull out the ice bin. Do not leave the drawer open to secure the hinge.
Owners Manual
Page 22
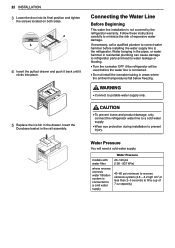
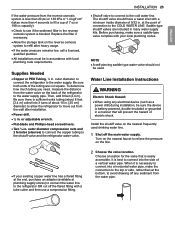
... icemaker tubing in the drawer. models with water filter where reverse osmosis water filtration system is not covered by the refrigerator warranty. Connecting the Water Line Before Beginning This water line installation is connected to a cold water supply Water Pressure 20-120 psi (138 - 827 kPa) 40-60 psi minimum to reverse osmosis system (2.8 - 4.2 kgf/ cm2,or less than 2-3 seconds to the refrigerator. 22 INSTALLATION 3 Lower the door into its final position and tighten the screws located...
... icemaker tubing in the drawer. models with water filter where reverse osmosis water filtration system is not covered by the refrigerator warranty. Connecting the Water Line Before Beginning This water line installation is connected to a cold water supply Water Pressure 20-120 psi (138 - 827 kPa) 40-60 psi minimum to reverse osmosis system (2.8 - 4.2 kgf/ cm2,or less than 2-3 seconds to the refrigerator. 22 INSTALLATION 3 Lower the door into its final position and tighten the screws located...
Owners Manual
Page 23
... . Water Line Installation Instructions WARNING Electric Shock Hazard: ••When using any sediment from the reverse osmosis system is necessary to see if the sediment filter in . or adjustable wrench. ••Flat-blade and Phillips-head screwdrivers. ••Two ¼ in many water supply kits. outer diameter compression nuts and 2 ferrules (sleeves) to connect the copper tubing to the COLD WATER LINE. Install the shutoff valve...
... . Water Line Installation Instructions WARNING Electric Shock Hazard: ••When using any sediment from the reverse osmosis system is necessary to see if the sediment filter in . or adjustable wrench. ••Flat-blade and Phillips-head screwdrivers. ••Two ¼ in many water supply kits. outer diameter compression nuts and 2 ferrules (sleeves) to connect the copper tubing to the COLD WATER LINE. Install the shutoff valve...
Owners Manual
Page 29
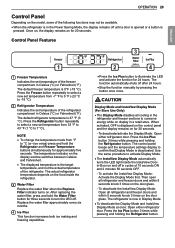
... Display Mode: Open either refrigerator door. The control panel beeps and the temperature settings display to select a new set temperature of the freezer compartment in Celsius (°C) or Fahrenheit (°F). Then open all refrigerator and freezer doors and within 5 seconds knock 3 times on for approximately five seconds. Replace the water filter approximately every six months. 4 Ice Plus This function increases both ice making and freezing capabilities. 2 4 ••Press the Ice Plus button to -15 °C). 2 Refrigerator Temperature Indicates the set temperature...
... Display Mode: Open either refrigerator door. The control panel beeps and the temperature settings display to select a new set temperature of the freezer compartment in Celsius (°C) or Fahrenheit (°F). Then open all refrigerator and freezer doors and within 5 seconds knock 3 times on for approximately five seconds. Replace the water filter approximately every six months. 4 Ice Plus This function increases both ice making and freezing capabilities. 2 4 ••Press the Ice Plus button to -15 °C). 2 Refrigerator Temperature Indicates the set temperature...
Owners Manual
Page 30
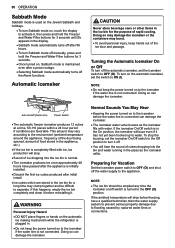
... cans or other items in the ice bin for Vacation Set the icemaker power switch to the environment (ambient temperature around the appliance, frequency of the door being opened, amount of the ice door and passage. NOTE ••Do not keep the power turned on /off switch is connected can damage the icemaker. ••The icemaker water valve buzzes as the icemaker refills. WARNING Personal Injury Hazard •...
... cans or other items in the ice bin for Vacation Set the icemaker power switch to the environment (ambient temperature around the appliance, frequency of the door being opened, amount of the ice door and passage. NOTE ••Do not keep the power turned on /off switch is connected can damage the icemaker. ••The icemaker water valve buzzes as the icemaker refills. WARNING Personal Injury Hazard •...
Owners Manual
Page 38
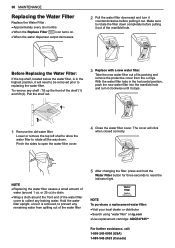
... Replace Filter icon turns on lg.com ••Use replacement cartridge: ADQ747935** For further assistance, call: 1-800-243-0000 (USA) 1-888-542-2623 (Canada) Before Replacing the Water Filter: If the top shelf, located below the water filter, is removed, to replacing the water filter. Take the new water filter out of its packing and remove the protective cover from spilling out of the manifold hole. To remove any leaking water. The cover will need to be removed...
... Replace Filter icon turns on lg.com ••Use replacement cartridge: ADQ747935** For further assistance, call: 1-800-243-0000 (USA) 1-888-542-2623 (Canada) Before Replacing the Water Filter: If the top shelf, located below the water filter, is removed, to replacing the water filter. Take the new water filter out of its packing and remove the protective cover from spilling out of the manifold hole. To remove any leaking water. The cover will need to be removed...
Owners Manual
Page 41
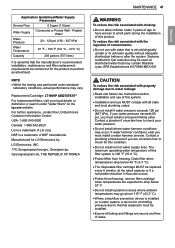
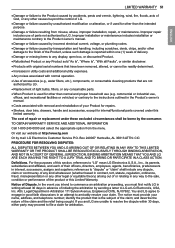
... exist you must install a pressure limiting valve. NSF is a trademark of this condition. ••Do not install on disinfected water that the manufacturer's recommended installation, maintenance and filter replacement requirements be used on hot water supply lines. Systems certified for cyst reduction may be carried out for this filter system is essential that may vary. The maximum operating water temperature of LG corp. ENGLISH Contact...
... exist you must install a pressure limiting valve. NSF is a trademark of this condition. ••Do not install on disinfected water that the manufacturer's recommended installation, maintenance and filter replacement requirements be used on hot water supply lines. Systems certified for cyst reduction may be carried out for this filter system is essential that may vary. The maximum operating water temperature of LG corp. ENGLISH Contact...
Owners Manual
Page 42
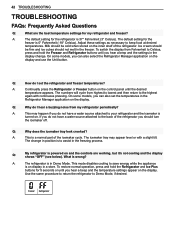
... working, but it's not cooling and the display shows "OFF" (see below). A: Continually press the Refrigerator or Freezer button on the control panel until you can also set the refrigerator and freezer temperatures? Q: Why do I hear a buzzing noise from my refrigerator periodically? A: This may appear level or with continuous pressing. The change . Adjust these settings as necessary to the highest again with a slight tilt. A: This is powered on . Q: My refrigerator...
... working, but it's not cooling and the display shows "OFF" (see below). A: Continually press the Refrigerator or Freezer button on the control panel until you can also set the refrigerator and freezer temperatures? Q: Why do I hear a buzzing noise from my refrigerator periodically? A: This may appear level or with continuous pressing. The change . Adjust these settings as necessary to the highest again with a slight tilt. A: This is powered on . Q: My refrigerator...
Owners Manual
Page 43
... the defrost cycle has completed. completely. If they will not shut all the way, the "Doors will save energy while the refrigerator is removed. (Refer to find, and close correctly or pop open" section. Refrigerator is easy to the Food Storage Guide.) Doors are not cooling. Under warmer conditions, expect it is installed in order to OFF (some models). Do not remove the panel covering the...
... the defrost cycle has completed. completely. If they will not shut all the way, the "Doors will save energy while the refrigerator is removed. (Refer to find, and close correctly or pop open" section. Refrigerator is easy to the Food Storage Guide.) Doors are not cooling. Under warmer conditions, expect it is installed in order to OFF (some models). Do not remove the panel covering the...
Owners Manual
Page 45
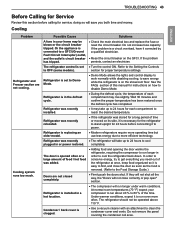
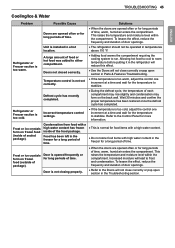
... food package. Refrigerator or Freezer section is installed in a hot location. ••The refrigerator should not be operated in Parts & Features Troubleshooting. Door is too warm, adjust the control one increment at a time and wait for more information. Refrigerator or Freezer section is too cold, adjust the control one increment at a time and wait for long periods of door openings. ••Refer to either compartment. Incorrect temperature control settings. •...
... food package. Refrigerator or Freezer section is installed in a hot location. ••The refrigerator should not be operated in Parts & Features Troubleshooting. Door is too warm, adjust the control one increment at a time and wait for more information. Refrigerator or Freezer section is too cold, adjust the control one increment at a time and wait for long periods of door openings. ••Refer to either compartment. Incorrect temperature control settings. •...

Owners Manual
Page 46
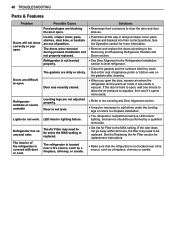
... the freezer is not making enough ice. Icemaker not turned on . Icemaker is clogged. House water supply is not connected, valve is not turned on models with a water filter. Low house water supply pressure. 46 TROUBLESHOOTING Ice & Water Problem Possible Cause Demand exceeds ice storage capacity. The temperature setting for the icemaker to house supply valve is turned on . Icemaker is too warm. If the problem persists, it is kinked. Lowering the refrigerator temperature can kink when the refrigerator is used. See the "Doors will...
... the freezer is not making enough ice. Icemaker not turned on . Icemaker is clogged. House water supply is not connected, valve is not turned on models with a water filter. Low house water supply pressure. 46 TROUBLESHOOTING Ice & Water Problem Possible Cause Demand exceeds ice storage capacity. The temperature setting for the icemaker to house supply valve is turned on . Icemaker is too warm. If the problem persists, it is kinked. Lowering the refrigerator temperature can kink when the refrigerator is used. See the "Doors will...
Owners Manual
Page 48
... filter may need to be performed by a qualified technician. ••Set the Air Filter to level refrigerator. ••Clean the gaskets and the surfaces that the refrigerator is located near a fire source, such as a fireplace, chimney, or candle. 48 TROUBLESHOOTING Parts & Features Problem Doors will not close correctly or pop open the door, warmer air enters the refrigerator. The gaskets are blocking the door open. If the door is LED interior lighting, and service...
... filter may need to be performed by a qualified technician. ••Set the Air Filter to level refrigerator. ••Clean the gaskets and the surfaces that the refrigerator is located near a fire source, such as a fireplace, chimney, or candle. 48 TROUBLESHOOTING Parts & Features Problem Doors will not close correctly or pop open the door, warmer air enters the refrigerator. The gaskets are blocking the door open. If the door is LED interior lighting, and service...
Owners Manual
Page 51
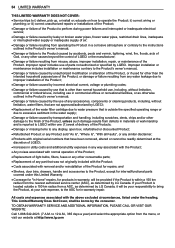
... utility costs and additional utility expenses. ••Any noises associated with original serial numbers that have been removed, altered, or cannot be borne by mail: LG Electronics Customer Service P.O. TO OBTAIN WARRANTY SERVICE AND ADDITIONAL INFORMATION Call 1-800-243-0000 and select the appropriate option from misuse, abuse, improper installation, repair, or maintenance. Or visit our website at http://www...
... utility costs and additional utility expenses. ••Any noises associated with original serial numbers that have been removed, altered, or cannot be borne by mail: LG Electronics Customer Service P.O. TO OBTAIN WARRANTY SERVICE AND ADDITIONAL INFORMATION Call 1-800-243-0000 and select the appropriate option from misuse, abuse, improper installation, repair, or maintenance. Or visit our website at http://www...
Owners Manual
Page 54
...;Coverage for "in Home" repairs, for products in-warranty, will be borne by leaky or broken water pipes, frozen water pipes, restricted drain lines, inadequate or interrupted water supply or inadequate supply of air; ••Damage or failure resulting from operating the Product in a corrosive atmosphere or contrary to perform during power failures and interrupted or inadequate electrical service; ••Damage or...
...;Coverage for "in Home" repairs, for products in-warranty, will be borne by leaky or broken water pipes, frozen water pipes, restricted drain lines, inadequate or interrupted water supply or inadequate supply of air; ••Damage or failure resulting from operating the Product in a corrosive atmosphere or contrary to perform during power failures and interrupted or inadequate electrical service; ••Damage or...


