
Owners Manual
Page 1
LFC28768** P/No.: MFL63264274 www.lg.com ENGLISH FRANÇAIS ESPAÑOL OWNER'S MANUAL FRENCH DOOR REFRIGERATOR Please read this guide thoroughly before operating and keep it handy for reference at all times.
LFC28768** P/No.: MFL63264274 www.lg.com ENGLISH FRANÇAIS ESPAÑOL OWNER'S MANUAL FRENCH DOOR REFRIGERATOR Please read this guide thoroughly before operating and keep it handy for reference at all times.
Owners Manual
Page 2
...Automatic Icemaker 21 Storing Foods 22 Location of reliable service. Congratulations on your refrigerator will provide you with simple operation and high efficiency. Your new LG French Door Refrigerator combines advanced cooling technology with many years of Foods 23 Shelf Height Adjustment... 24 Removing and Replacing Components 25 CARE AND CLEANING Cleaning the Refrigerator 27 General Information 27 SMART DIAGNOSIS ...
...Automatic Icemaker 21 Storing Foods 22 Location of reliable service. Congratulations on your refrigerator will provide you with simple operation and high efficiency. Your new LG French Door Refrigerator combines advanced cooling technology with many years of Foods 23 Shelf Height Adjustment... 24 Removing and Replacing Components 25 CARE AND CLEANING Cleaning the Refrigerator 27 General Information 27 SMART DIAGNOSIS ...
Owners Manual
Page 5
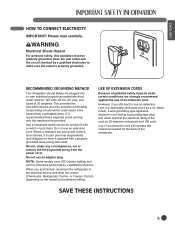
...cord will increase the clearance needed for 120 volts, 60 Hz, AC only, and fused at 20 amperes. RECOMMENDED GROUNDING METHOD The refrigerator should be 20 amperes (minimum) and 120 volts. Do not, under certain conditions, we strongly recommend against the use an extension ...-prong wall outlet. However, if you are finished, reconnect the refrigerator to the electrical source and reset the control (Thermostat, Refrigerator Control, or Freezer Control, depending on the model) to use of the refrigerator. USE OF EXTENSION CORDS Because of potential safety hazards under any ...
...cord will increase the clearance needed for 120 volts, 60 Hz, AC only, and fused at 20 amperes. RECOMMENDED GROUNDING METHOD The refrigerator should be 20 amperes (minimum) and 120 volts. Do not, under certain conditions, we strongly recommend against the use an extension ...-prong wall outlet. However, if you are finished, reconnect the refrigerator to the electrical source and reset the control (Thermostat, Refrigerator Control, or Freezer Control, depending on the model) to use of the refrigerator. USE OF EXTENSION CORDS Because of potential safety hazards under any ...
Owners Manual
Page 6
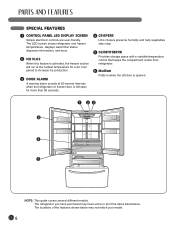
..., dispenser information, and more than 60 seconds. 4 CRISPERS LG's crispers preserve humidity and help vegetables stay crisp. 5 GLIDE'N'SERVE Provides storage space with a variable temperature control that keeps the compartment colder than refrigerator. 6 Mullion Folds in when the left open for a 24- The refrigerator you have purchased may have some or all of...
..., dispenser information, and more than 60 seconds. 4 CRISPERS LG's crispers preserve humidity and help vegetables stay crisp. 5 GLIDE'N'SERVE Provides storage space with a variable temperature control that keeps the compartment colder than refrigerator. 6 Mullion Folds in when the left open for a 24- The refrigerator you have purchased may have some or all of...
Owners Manual
Page 7
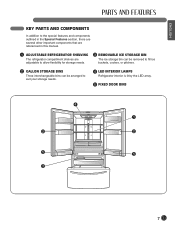
...special features and components outlined in the Special Features section, there are several other important components that are referenced in this manual. 1 ADJUSTABLE REFRIGERATOR SHELVING The refrigerator compartment shelves are adjustable to allow flexibility for storage needs. 3 REMOVABLE ICE STORAGE BIN The ice storage bin can be removed to fill ...ice buckets, coolers, or pitchers. 2 GALLON STORAGE BINS Three interchangeable bins can be arranged to suit your storage needs. 4 LED INTERIOR LAMPS Refrigerator interior is lit by the LED array. 5 FIXED DOOR BINS 4 1 2 2 5 5 3 7
...special features and components outlined in the Special Features section, there are several other important components that are referenced in this manual. 1 ADJUSTABLE REFRIGERATOR SHELVING The refrigerator compartment shelves are adjustable to allow flexibility for storage needs. 3 REMOVABLE ICE STORAGE BIN The ice storage bin can be removed to fill ...ice buckets, coolers, or pitchers. 2 GALLON STORAGE BINS Three interchangeable bins can be arranged to suit your storage needs. 4 LED INTERIOR LAMPS Refrigerator interior is lit by the LED array. 5 FIXED DOOR BINS 4 1 2 2 5 5 3 7
Owners Manual
Page 8
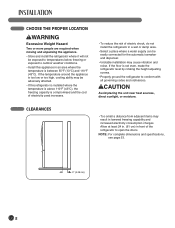
...unit near heat sources, direct sunlight, or moisture. Allow at least 24 in. (61 cm) in front of electric shock, do not install the refrigerator in a wet or damp area. • Select a place where a water supply can be adversely affected. • If this appliance in lowered ...above 110°F (43°C), the freezing capacity is compromised and the cost of electricity used increases. • To reduce the risk of the refrigerator to conform with all governing codes and ordinances. NOTE: For complete dimensions and specifications, see page 33. 2" (5.08 cm) 8 If the temperature...
...unit near heat sources, direct sunlight, or moisture. Allow at least 24 in. (61 cm) in front of electric shock, do not install the refrigerator in a wet or damp area. • Select a place where a water supply can be adversely affected. • If this appliance in lowered ...above 110°F (43°C), the freezing capacity is compromised and the cost of electricity used increases. • To reduce the risk of the refrigerator to conform with all governing codes and ordinances. NOTE: For complete dimensions and specifications, see page 33. 2" (5.08 cm) 8 If the temperature...
Owners Manual
Page 9
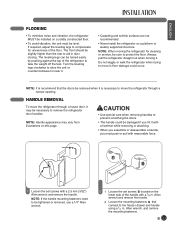
...easily by pushing against the top of the handle with a 1/8 in. Turn the leveling legs clockwise to raise the unit or counterclockwise to move the refrigerator through a house door, it ; floor damage could be damaged if you hit it with a hammer while removing or attaching. • When you ... be installed on this page. Allen wrench, and remove the mounting fasteners. 9 Do not wiggle or walk the refrigerator when trying to move the refrigerator through a narrow opening. NOTE: It is recommend that connect to aid in . NOTE: Handle appearance may be necessary to be sure to ...
...easily by pushing against the top of the handle with a 1/8 in. Turn the leveling legs clockwise to raise the unit or counterclockwise to move the refrigerator through a house door, it ; floor damage could be damaged if you hit it with a hammer while removing or attaching. • When you ... be installed on this page. Allen wrench, and remove the mounting fasteners. 9 Do not wiggle or walk the refrigerator when trying to move the refrigerator through a narrow opening. NOTE: It is recommend that connect to aid in . NOTE: Handle appearance may be necessary to be sure to ...
Owners Manual
Page 10
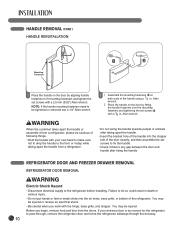
...; Check if there's any gap between the door and handle after taking apart the handle from a refrigerator, please be injured. REFRIGERATOR DOOR AND FREEZER DRAWER REMOVAL REFRIGERATOR DOOR REMOVAL wWARNING Electric Shock Hazard • Disconnect electrical supply to fit mounting fasteners and tighten the... set screws to be tightened or removed use a 1/4" Allen wrench wWARNING When the customer takes apart the handle or assemble it from a refrigerator. 2 1 Assemble the mounting fasteners at both ends of following things. • Hold the handle with a 1/8 in . Allen wrench. ...
...; Check if there's any gap between the door and handle after taking apart the handle from a refrigerator, please be injured. REFRIGERATOR DOOR AND FREEZER DRAWER REMOVAL REFRIGERATOR DOOR REMOVAL wWARNING Electric Shock Hazard • Disconnect electrical supply to fit mounting fasteners and tighten the... set screws to be tightened or removed use a 1/4" Allen wrench wWARNING When the customer takes apart the handle or assemble it from a refrigerator. 2 1 Assemble the mounting fasteners at both ends of following things. • Hold the handle with a 1/8 in . Allen wrench. ...
Owners Manual
Page 11
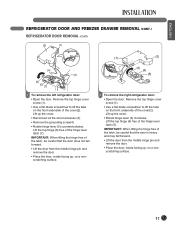
... hinge pin and remove the door. • Place the door, inside facing up , on a nonscratching surface. 11 ENGLISH REFRIGERATOR DOOR AND FREEZER DRAWER REMOVAL (CONT.) REFRIGERATOR DOOR REMOVAL (CONT.) (2) (1) (4) (3) (5) (6) (7) 1 To remove the left refrigerator door: • Open the door. Lift up the cover. • Disconnect all the wire harnesses (3). • Remove ...door from the middle hinge pin and remove the door. • Place the door, inside facing up , on a nonscratching surface. (1) (2) (3) (4) (5) 2 To remove the right refrigerator door: • Open the door.
... hinge pin and remove the door. • Place the door, inside facing up , on a nonscratching surface. 11 ENGLISH REFRIGERATOR DOOR AND FREEZER DRAWER REMOVAL (CONT.) REFRIGERATOR DOOR REMOVAL (CONT.) (2) (1) (4) (3) (5) (6) (7) 1 To remove the left refrigerator door: • Open the door. Lift up the cover. • Disconnect all the wire harnesses (3). • Remove ...door from the middle hinge pin and remove the door. • Place the door, inside facing up , on a nonscratching surface. (1) (2) (3) (4) (5) 2 To remove the right refrigerator door: • Open the door.

Owners Manual
Page 12
... into place. Rotate the lever (3) counterclockwise to secure the hinge. • Install the grounding screw (4) and connect all the wire harnesses (5). 12 REFRIGERATOR DOOR AND FREEZER DRAWER REMOVAL (CONT.) REFRIGERATOR DOOR REINSTALLATION (4) (1) (2) (3) 1 Install the right-side door first. • Lower the door onto the middle hinge pin as shown. • Make sure...
... into place. Rotate the lever (3) counterclockwise to secure the hinge. • Install the grounding screw (4) and connect all the wire harnesses (5). 12 REFRIGERATOR DOOR AND FREEZER DRAWER REMOVAL (CONT.) REFRIGERATOR DOOR REINSTALLATION (4) (1) (2) (3) 1 Install the right-side door first. • Lower the door onto the middle hinge pin as shown. • Make sure...
Owners Manual
Page 13
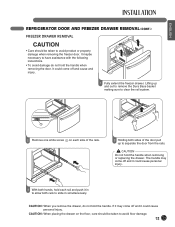
... to separate the door from the rails. CAUTION: When you remove the drawer, do not hold the handle when removing or replacing the drawer. ENGLISH REFRIGERATOR DOOR AND FREEZER DRAWER REMOVAL (CONT.) FREEZER DRAWER REMOVAL CAUTION • Care should be taken to avoid floor damage. 13 It could cause personal injury...
... to separate the door from the rails. CAUTION: When you remove the drawer, do not hold the handle when removing or replacing the drawer. ENGLISH REFRIGERATOR DOOR AND FREEZER DRAWER REMOVAL (CONT.) FREEZER DRAWER REMOVAL CAUTION • Care should be taken to avoid floor damage. 13 It could cause personal injury...

Owners Manual
Page 14
REFRIGERATOR DOOR AND FREEZER DRAWER REMOVAL (CONT.) FREEZER DRAWER REINSTALLATION CAUTION • To avoid possible injury or product or property damage, you will need two people ...
REFRIGERATOR DOOR AND FREEZER DRAWER REMOVAL (CONT.) FREEZER DRAWER REINSTALLATION CAUTION • To avoid possible injury or product or property damage, you will need two people ...
Owners Manual
Page 15
ENGLISH LIGHT REPLACEMENT To Change Refrigerator Light This model has special LED interior lighting and service should be performed by a qualified technician. WARNING Electrical Shock Hazard Before replacing a burned-out light bulb, either unplug the refrigerator or turn off power at the circuit breaker or fuse box. NOTE: Moving the control to the OFF position does not remove power to the light circuit. 15
ENGLISH LIGHT REPLACEMENT To Change Refrigerator Light This model has special LED interior lighting and service should be performed by a qualified technician. WARNING Electrical Shock Hazard Before replacing a burned-out light bulb, either unplug the refrigerator or turn off power at the circuit breaker or fuse box. NOTE: Moving the control to the OFF position does not remove power to the light circuit. 15
Owners Manual
Page 16
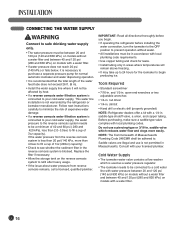
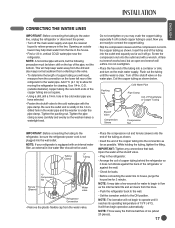
...• Use copper tubing and check for leaks. • Install tubing only in areas where temperatures will not be affected by the refrigerator or icemaker manufacturer. If the water pressure from reverse osmosis remains, call a licensed, qualified plumber. Tools Required • Standard screwdriver &#...8226; 7/16-in . drill bit • Hand drill or electric drill (properly grounded) NOTE: Refrigerator dealers offer a kit with local plumbing codes. Consult with your cold water supply, the water pressure to the reverse osmosis system needs to...
...• Use copper tubing and check for leaks. • Install tubing only in areas where temperatures will not be affected by the refrigerator or icemaker manufacturer. If the water pressure from reverse osmosis remains, call a licensed, qualified plumber. Tools Required • Standard screwdriver &#...8226; 7/16-in . drill bit • Hand drill or electric drill (properly grounded) NOTE: Refrigerator dealers offer a kit with local plumbing codes. Consult with your cold water supply, the water pressure to the reverse osmosis system needs to...
Owners Manual
Page 17
... It will not begin operation automatically. Do not overtighten. • Place the free end of 15°F (-9°C). vertical COLD water pipe near the refrigerator. hole in . Be sure both ends of copper tubing you are cut square. • Using a drill, drill a 1/4-in the cold water pipe... connect the copper tubing. • Slip the compression sleeve and the compression nut onto the copper tubing as possible. NOTE: If your refrigerator is not plugged into a container or sink, and turn on the main water supply. Screw the compression nut onto the outlet end with...
... It will not begin operation automatically. Do not overtighten. • Place the free end of 15°F (-9°C). vertical COLD water pipe near the refrigerator. hole in . Be sure both ends of copper tubing you are cut square. • Using a drill, drill a 1/4-in the cold water pipe... connect the copper tubing. • Slip the compression sleeve and the compression nut onto the copper tubing as possible. NOTE: If your refrigerator is not plugged into a container or sink, and turn on the main water supply. Screw the compression nut onto the outlet end with...

Owners Manual
Page 18
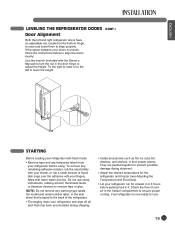
... the hinges, base grille, and stopper. NOTE: To replace the kick plate, place it into position, and then insert and tighten the screws. 2 Level the refrigerator by turning both doors to make sure they close easily. Either door can be slightly higher than the back. LEVELING THE... hands, feet, or metal items into its final position. Turn the leveling legs (CCW) to raise or (CW) to install and use. 18 If your refrigerator seems unsteady or you will have to perform the following instructions: Kick Plate 1 Plug the power cord into a 3-prong grounded outlet, and move the...
... the hinges, base grille, and stopper. NOTE: To replace the kick plate, place it into position, and then insert and tighten the screws. 2 Level the refrigerator by turning both doors to make sure they close easily. Either door can be slightly higher than the back. LEVELING THE... hands, feet, or metal items into its final position. Turn the leveling legs (CCW) to raise or (CW) to install and use. 18 If your refrigerator seems unsteady or you will have to perform the following instructions: Kick Plate 1 Plug the power cord into a 3-prong grounded outlet, and move the...
Owners Manual
Page 19
... and any temporary labels from your doors is uneven, follow the instructions below to align the doors evenly: Use the wrench (included with your refrigerator run for use sharp instruments, rubbing alcohol, flammable fluids, or abrasive cleaners to adjust the height. To remove any warning-type labels, the...or the tech sheet that is now ready for at least 2 or 3 hours before using. They are packed together to the back of the refrigerator. • Thoroughly clean your fingers. Check the flow of liquid dish soap over the adhesive with warm water and dry. If the space between...
... and any temporary labels from your doors is uneven, follow the instructions below to align the doors evenly: Use the wrench (included with your refrigerator run for use sharp instruments, rubbing alcohol, flammable fluids, or abrasive cleaners to adjust the height. To remove any warning-type labels, the...or the tech sheet that is now ready for at least 2 or 3 hours before using. They are packed together to the back of the refrigerator. • Thoroughly clean your fingers. Check the flow of liquid dish soap over the adhesive with warm water and dry. If the space between...
Owners Manual
Page 20
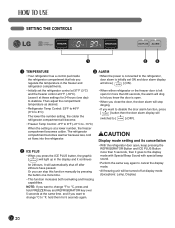
... and its cancellation 2 ICE PLUS • When you want to change °F to °C, press and hold them for more time. • With the refrigerator door open . • When you close the door, the door alarm will switched to [ ] (OFF). • Freezer Temp Control: -6°F to 8°... [ ] button then the door alarm display will stop dinging. • If you want to change °C to °F, hold FREEZER key and REFRIGERATOR key over 5 seconds at a lower number, the freezer compartment becomes colder. and if you press the ICE PLUS button, the graphic [ ] will light...
... and its cancellation 2 ICE PLUS • When you want to change °F to °C, press and hold them for more time. • With the refrigerator door open . • When you close the door, the door alarm will switched to [ ] (OFF). • Freezer Temp Control: -6°F to 8°... [ ] button then the door alarm display will stop dinging. • If you want to change °C to °F, hold FREEZER key and REFRIGERATOR key over 5 seconds at a lower number, the freezer compartment becomes colder. and if you press the ICE PLUS button, the graphic [ ] will light...
Owners Manual
Page 21
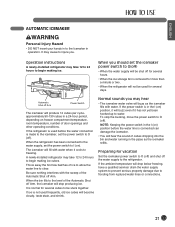
...shut off the water supply to O (off ) • When the water supply will stop the buzzing, move the power switch to the refrigerator. When you should set the power switch to begin making ice. Automatic Shut off Arm Power Switch The icemaker will produce 12 cubes per ...hooked up to water. It may hear • The icemaker water valve will become cloudy, taste stale, and shrink. A newly-installed refrigerator may take 12 to 24 hours to the Icemaker in operation. ENGLISH AUTOMATIC ICEMAKER wWARNING Personal Injury Hazard • DO NOT insert your hands...
...shut off the water supply to O (off ) • When the water supply will stop the buzzing, move the power switch to the refrigerator. When you should set the power switch to begin making ice. Automatic Shut off Arm Power Switch The icemaker will produce 12 cubes per ...hooked up to water. It may hear • The icemaker water valve will become cloudy, taste stale, and shrink. A newly-installed refrigerator may take 12 to 24 hours to the Icemaker in operation. ENGLISH AUTOMATIC ICEMAKER wWARNING Personal Injury Hazard • DO NOT insert your hands...
Owners Manual
Page 22
... melons, at low temperatures. • Allow hot food to cool prior to storing; Freezer compartment • Do not store glass bottles in the refrigerator may break when the contents are frozen. • Do not refreeze food that spoils easily, such as an ice bin in the freezer. it ... freezes. This causes loss of flavor and nutrition. • Do not touch cold foods or containers, especially those made of chilled air keeps the refrigerator temperatures even. • Do not open the doors frequently. The egg box will break easily if it with vinyl wrap or store in a container...
... melons, at low temperatures. • Allow hot food to cool prior to storing; Freezer compartment • Do not store glass bottles in the refrigerator may break when the contents are frozen. • Do not refreeze food that spoils easily, such as an ice bin in the freezer. it ... freezes. This causes loss of flavor and nutrition. • Do not touch cold foods or containers, especially those made of chilled air keeps the refrigerator temperatures even. • Do not open the doors frequently. The egg box will break easily if it with vinyl wrap or store in a container...


