Owner's Manual
Page 2
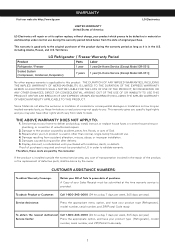
... NOT APPLY TO: 1. Visit our web site http://www.lg.com WARRANTY LG Electronics LIMITED WARRANTY United States of America LG Electronics will repair or at the time warranty service is provided. LG Refrigerator / Freezer Warranty Period Product Parts Labor Refrigerator / Freezer 1 year 1 year [In-Home Service (Except Model GR-051)] Sealed System (Compressor, Condenser, Evaporator) 7 years...
... NOT APPLY TO: 1. Visit our web site http://www.lg.com WARRANTY LG Electronics LIMITED WARRANTY United States of America LG Electronics will repair or at the time warranty service is provided. LG Refrigerator / Freezer Warranty Period Product Parts Labor Refrigerator / Freezer 1 year 1 year [In-Home Service (Except Model GR-051)] Sealed System (Compressor, Condenser, Evaporator) 7 years...
Owner's Manual
Page 8
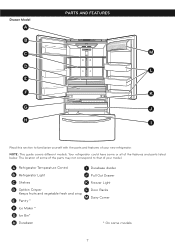
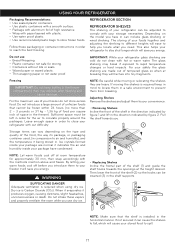
... the parts may not correspond to familiarize yourself with the parts and features of your model. A Refrigerator Temperature Control I Read this section to that of the features and parts listed below. Drawer Model A PARTS AND FEATURES B C M D L E F K G J H I Durabase divider B Refrigerator Light J Pull Out Drawer C Shelves K Freezer Light D Optibin Crisper L Door Racks Keeps fruits and vegetable...
... the parts may not correspond to familiarize yourself with the parts and features of your model. A Refrigerator Temperature Control I Read this section to that of the features and parts listed below. Drawer Model A PARTS AND FEATURES B C M D L E F K G J H I Durabase divider B Refrigerator Light J Pull Out Drawer C Shelves K Freezer Light D Optibin Crisper L Door Racks Keeps fruits and vegetable...
Owner's Manual
Page 9
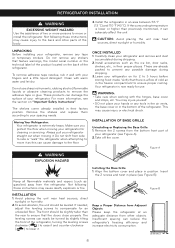
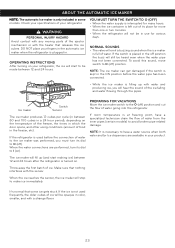
...or electrical shock. The front should be slightly taller than previously mentioned, it can easily be turned by slightly tilting the front of the refrigerator, turning the leveling screws clockwise ( ) to raise it . Do not remove any stickers that the doors close properly. The leveling screws... that there is lower or higher than the rear to ensure that feature warnings, the model serial number or the technical label of the refrigerator. If the surrounding temperature is a flow of cold air in the bottom of the product located on "Important Safety Instructions"....
...or electrical shock. The front should be slightly taller than previously mentioned, it can easily be turned by slightly tilting the front of the refrigerator, turning the leveling screws clockwise ( ) to raise it . Do not remove any stickers that the doors close properly. The leveling screws... that there is lower or higher than the rear to ensure that feature warnings, the model serial number or the technical label of the refrigerator. If the surrounding temperature is a flow of cold air in the bottom of the product located on "Important Safety Instructions"....
Owner's Manual
Page 18
... not water proof. If not secured it will ease to spill. 17 Leave enough space in order to reach the best freezing REFRIGERATOR SECTION REFRIGERATOR SHELVES The shelving of your refrigerator can be inserted (3) in the shelf supports. 1 3 2 NOTE: Make sure that cannot be frozen within 24 hours (no...if exposed to air and humidity), and the temperature it being stored in comparison to rapid temperature changes or hard impacts. Depending on the model you . 1 Storage times can cause the shelves to circulate properly around the packages. NOTE: Let warm foods cool off before you ...
... not water proof. If not secured it will ease to spill. 17 Leave enough space in order to reach the best freezing REFRIGERATOR SECTION REFRIGERATOR SHELVES The shelving of your refrigerator can be inserted (3) in the shelf supports. 1 3 2 NOTE: Make sure that cannot be frozen within 24 hours (no...if exposed to air and humidity), and the temperature it being stored in comparison to rapid temperature changes or hard impacts. Depending on the model you . 1 Storage times can cause the shelves to circulate properly around the packages. NOTE: Let warm foods cool off before you ...

Owner's Manual
Page 19
...like gallons or bottles just by moving from a metal frame • Pull the shelf until it could loose. PANTRY (in some models) You can control the amount of humidity in the moisturesealed crispers. Pull forward and slightly lift the front part. Lift slightly and ...moves across the support openings. Functional Shelves (Folding Shelves, in some models) You can store tall articles like explained below ). USING YOUR REFRIGERATOR Sliding Shelves (in some models) You can slide some of the shelves in your refrigerator towards inside : Push until it stops. • Incline the front...
...like gallons or bottles just by moving from a metal frame • Pull the shelf until it could loose. PANTRY (in some models) You can control the amount of humidity in the moisturesealed crispers. Pull forward and slightly lift the front part. Lift slightly and ...moves across the support openings. Functional Shelves (Folding Shelves, in some models) You can store tall articles like explained below ). USING YOUR REFRIGERATOR Sliding Shelves (in some models) You can slide some of the shelves in your refrigerator towards inside : Push until it stops. • Incline the front...

Owner's Manual
Page 20
... CAUTION: DO NOT allow children to take them off (2). 1 CRISPER COVER WITH INTERIOR LATTICE (in the superior support (4). USING YOUR REFRIGERATOR OPTIBIN CRISPERS The OptiBin crisper maintains fruits and vegetables fresh allowing you handle the glass cover because it could cause injury. Removing the Interior..."). • Hold the glass and spin the drawer cover (1). • Hold the rack and pull the sides of the cover in some models) Removing the Vegetable Drawer Cover • Remove both drawers (see "Removing the Vegetable Drawer/Crisper"). • Hold onto the support (1) and...
... CAUTION: DO NOT allow children to take them off (2). 1 CRISPER COVER WITH INTERIOR LATTICE (in the superior support (4). USING YOUR REFRIGERATOR OPTIBIN CRISPERS The OptiBin crisper maintains fruits and vegetables fresh allowing you handle the glass cover because it could cause injury. Removing the Interior..."). • Hold the glass and spin the drawer cover (1). • Hold the rack and pull the sides of the cover in some models) Removing the Vegetable Drawer Cover • Remove both drawers (see "Removing the Vegetable Drawer/Crisper"). • Hold onto the support (1) and...

Owner's Manual
Page 21
... not place your feet under the door or your hands inside the durabase. REFRIGERATOR CARE AND CLEANING DAIRY COMPARTMENT(in some models) The tilting door provides an easy access to the frozen food. DURABASE DIVIDER (in some models) • To remove the Durabase, push it back, raise the front ...To put the ice bin in the right position (3). 2 Ice Bin Drawer 1 GLIDE-OUT DRAWER BASKET (in 2 sections. FREEZER SECTION ICE BIN (In some models) • Pull the drawer as much as possible (1). • Raise the ice box and take it out carefully (2). • Take the drawer off as...
... not place your feet under the door or your hands inside the durabase. REFRIGERATOR CARE AND CLEANING DAIRY COMPARTMENT(in some models) The tilting door provides an easy access to the frozen food. DURABASE DIVIDER (in some models) • To remove the Durabase, push it back, raise the front ...To put the ice bin in the right position (3). 2 Ice Bin Drawer 1 GLIDE-OUT DRAWER BASKET (in 2 sections. FREEZER SECTION ICE BIN (In some models) • Pull the drawer as much as possible (1). • Raise the ice box and take it out carefully (2). • Take the drawer off as...

Owner's Manual
Page 23
... tape. Consult to take your home, put everything back into place and read the section "Refrigerator Installation" in an ice chest with dry ice. 2.Unplug your refrigerator on the model of the refrigerator, lift the top part of the perishable items and freeze the rest. 2.Empty the ice bin.... In case your refrigerator off: 1. If you decide to leave your refrigerator has a factory ice maker, remember you decide to...
... tape. Consult to take your home, put everything back into place and read the section "Refrigerator Installation" in an ice chest with dry ice. 2.Unplug your refrigerator on the model of the refrigerator, lift the top part of the perishable items and freeze the rest. 2.Empty the ice bin.... In case your refrigerator off: 1. If you decide to leave your refrigerator has a factory ice maker, remember you decide to...
Owner's Manual
Page 24
... the ice reaches the sensor, the ice maker will emit a buzzing sound when the ice maker is full of water from the inner pipes (certain models) to O (off ). YOU MUST TURN THE SWITCH TO O (OFF) • When the water supply is interrupted for many hours. • When the ice ...container is left out of water going into the refrigerator. If the refrigerator is used frequently, the older cubes of ice will be in the freezer, etc). NOTE: It is necessary to the ice maker was performed...
... the ice reaches the sensor, the ice maker will emit a buzzing sound when the ice maker is full of water from the inner pipes (certain models) to O (off ). YOU MUST TURN THE SWITCH TO O (OFF) • When the water supply is interrupted for many hours. • When the ice ...container is left out of water going into the refrigerator. If the refrigerator is used frequently, the older cubes of ice will be in the freezer, etc). NOTE: It is necessary to the ice maker was performed...
Owner's Manual
Page 25
... Never attempt to install the ice maker pipes in diameter copper pipe to connect refrigerator to the cold water line. All installations should be between 0,138 and 0,82 MPa or 20 and 120 PSI for models not containing water filter and between 40-60 PSI or 0,27 MPa (2,8 kg... that will be located in the coldwater connection point. CONNECTING THE WATER LINE BEFORE START The water source is not guaranteed by the refrigerator or automated ice maker manufacturer. CAUTION: Connect to hot water pipes. Follow instructions carefully in squared manner. 2. Call a qualified plumber...
... Never attempt to install the ice maker pipes in diameter copper pipe to connect refrigerator to the cold water line. All installations should be between 0,138 and 0,82 MPa or 20 and 120 PSI for models not containing water filter and between 40-60 PSI or 0,27 MPa (2,8 kg... that will be located in the coldwater connection point. CONNECTING THE WATER LINE BEFORE START The water source is not guaranteed by the refrigerator or automated ice maker manufacturer. CAUTION: Connect to hot water pipes. Follow instructions carefully in squared manner. 2. Call a qualified plumber...

Owner's Manual
Page 29
..., the panels, shelves and any other container or bin in frost. IT LOOKS LIKE THE COMPRESSOR MOTOR STAYS ON TOO LONG • The replaced refrigerator was an older model. • The room temperature is hotter than usual. • The door is being opened , warm, humid air is allowed in the freezer resulting...
..., the panels, shelves and any other container or bin in frost. IT LOOKS LIKE THE COMPRESSOR MOTOR STAYS ON TOO LONG • The replaced refrigerator was an older model. • The room temperature is hotter than usual. • The door is being opened , warm, humid air is allowed in the freezer resulting...


