Owner's Manual
Page 2
LG Refrigerator / Freezer Warranty Period Product Parts Labor Refrigerator / Freezer 1 year 1 year [In-Home Service (Except Model GR-051)] Sealed System (Compressor, Condenser, Evaporator) 7 years 1 year [In-Home Service (Except Model GR-051)] ... units purchased with scratches, dents, or defects. Service Assistance: Press the appropriate menu option, and have your product type (Refrigerator), model number, serial number, and ZIP/Postal Code ready. LG ELECTRONICS SHALL NOT BE LIABLE FOR THE LOSS OF USE OF THE PRODUCT, INCONVENIENCE OR ANY OTHER DAMAGES, DIRECT OR CONSEQUENTIAL...
LG Refrigerator / Freezer Warranty Period Product Parts Labor Refrigerator / Freezer 1 year 1 year [In-Home Service (Except Model GR-051)] Sealed System (Compressor, Condenser, Evaporator) 7 years 1 year [In-Home Service (Except Model GR-051)] ... units purchased with scratches, dents, or defects. Service Assistance: Press the appropriate menu option, and have your product type (Refrigerator), model number, serial number, and ZIP/Postal Code ready. LG ELECTRONICS SHALL NOT BE LIABLE FOR THE LOSS OF USE OF THE PRODUCT, INCONVENIENCE OR ANY OTHER DAMAGES, DIRECT OR CONSEQUENTIAL...

Owner's Manual
Page 5
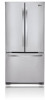
...the doors 8-14 8 8 8 9 10-11 12-13 14 Refrigerator Care and Cleaning Refrigerator Cleaning Outside Inside Walls Door Lining & Gaskets Plastic Parts (Covers and Panel) Back Cover Replacing Refrigerator Lights Replacing Freezer Lights Power Interruptions When Going on Vacation When Moving ... Ice Plus Door Alarm Energy Saving Adjusting the Controls Adjusting Control Settings Food Storage Guide Storing Frozen Food Refrigerator Section Refrigerator Shelves Pantry Crisper Humidity Control OptiBin Crispers Crisper cover with interior lattice Door Racks Dairy Compartment Egg Compartment ...
...the doors 8-14 8 8 8 9 10-11 12-13 14 Refrigerator Care and Cleaning Refrigerator Cleaning Outside Inside Walls Door Lining & Gaskets Plastic Parts (Covers and Panel) Back Cover Replacing Refrigerator Lights Replacing Freezer Lights Power Interruptions When Going on Vacation When Moving ... Ice Plus Door Alarm Energy Saving Adjusting the Controls Adjusting Control Settings Food Storage Guide Storing Frozen Food Refrigerator Section Refrigerator Shelves Pantry Crisper Humidity Control OptiBin Crispers Crisper cover with interior lattice Door Racks Dairy Compartment Egg Compartment ...
Owner's Manual
Page 6
...position does not disconnect the power from the light bulb circuit. • Do not keep bottles in the ice dispenser mechanism while the refrigerator is operating, avoid touching cold surfaces of injury and tell you what can refreeze food that have already thawed. the skin could cause.... This can become adhered to reduce the risk of the freezer with the heating mechanism that any other foods. The quality of the refrigerator. The food may be properly grounded. Be careful closing the doors when children are not followed. Consumption of the food, especially fruit,...
...position does not disconnect the power from the light bulb circuit. • Do not keep bottles in the ice dispenser mechanism while the refrigerator is operating, avoid touching cold surfaces of injury and tell you what can refreeze food that have already thawed. the skin could cause.... This can become adhered to reduce the risk of the freezer with the heating mechanism that any other foods. The quality of the refrigerator. The food may be properly grounded. Be careful closing the doors when children are not followed. Consumption of the food, especially fruit,...

Owner's Manual
Page 7
...have a cooling system that the electrical current support a minimum of an adequately grounded three-prong outlet. 6 RECOMMENDED GROUNDING METHOD Your refrigerator must disconnect the appliance from the overheating of the appliance by the person responsible for their safety. REQUIREMENTS FOR GROUND CONNECTION IMPORTANT: ...of the past. The use of an extension cable will increase the amount of your old refrigerator, ensure that cannot be replaced by our service center or qualified LG technician to prevent any risk. CAUTION This appliance is not intended for use by children,...
...have a cooling system that the electrical current support a minimum of an adequately grounded three-prong outlet. 6 RECOMMENDED GROUNDING METHOD Your refrigerator must disconnect the appliance from the overheating of the appliance by the person responsible for their safety. REQUIREMENTS FOR GROUND CONNECTION IMPORTANT: ...of the past. The use of an extension cable will increase the amount of your old refrigerator, ensure that cannot be replaced by our service center or qualified LG technician to prevent any risk. CAUTION This appliance is not intended for use by children,...
Owner's Manual
Page 8
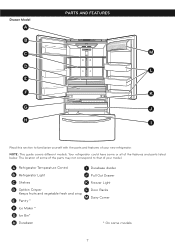
... K Freezer Light D Optibin Crisper L Door Racks Keeps fruits and vegetable fresh and crisp M Dairy Corner E Pantry * F Ice Maker * G Ice Bin* H Durabase * On some models 7 Your refrigerator could have some of the parts may not correspond to familiarize yourself with the parts and features of the features and parts listed below. NOTE...
... K Freezer Light D Optibin Crisper L Door Racks Keeps fruits and vegetable fresh and crisp M Dairy Corner E Pantry * F Ice Maker * G Ice Bin* H Durabase * On some models 7 Your refrigerator could have some of the parts may not correspond to familiarize yourself with the parts and features of the features and parts listed below. NOTE...
Owner's Manual
Page 9
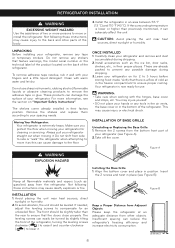
... humidity. If the surrounding temperature is now ready for use sharp instruments, rubbing alcohol, flammable liquids or abrasive cleaning products to your refrigerator, remove any tools in the air vents, the base cover or in place (see Figure A). 2.Take off the cover. UNPACKING ... INSTALLATION OF BASE GRILLE Uninstalling or Replacing the Base Grille 1. Remove the 2 screws from other parts of the body. 3.Install the refrigerator in their factory position. Align the bottom cover and place in their proper places. Keep all flammable materials and vapors (such as the...
... humidity. If the surrounding temperature is now ready for use sharp instruments, rubbing alcohol, flammable liquids or abrasive cleaning products to your refrigerator, remove any tools in the air vents, the base cover or in place (see Figure A). 2.Take off the cover. UNPACKING ... INSTALLATION OF BASE GRILLE Uninstalling or Replacing the Base Grille 1. Remove the 2 screws from other parts of the body. 3.Install the refrigerator in their factory position. Align the bottom cover and place in their proper places. Keep all flammable materials and vapors (such as the...
Owner's Manual
Page 10
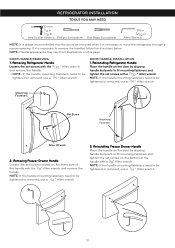
... with a 3/32 " Allen wrench. NOTE: Handle appearance may vary from illustrations on the bottom of the handle with a 1/8" Allen wrench. Reinstalling Refrigerator Handle Place the handle on the door by aligning handle footprints to fit mounting fasteners and tighten the set screws located on the door by... Place the handle on the lower side of the handle with the 1/8" Allen wrench and remove the handle. DOOR HANDLE INSTALLATION 1. Removing Refrigerator Handle Loosen the set screws on this page. NOTE: If the handle mounting fasteners need to be removed when it is necessary to be...
... with a 3/32 " Allen wrench. NOTE: Handle appearance may vary from illustrations on the bottom of the handle with a 1/8" Allen wrench. Reinstalling Refrigerator Handle Place the handle on the door by aligning handle footprints to fit mounting fasteners and tighten the set screws located on the door by... Place the handle on the lower side of the handle with the 1/8" Allen wrench and remove the handle. DOOR HANDLE INSTALLATION 1. Removing Refrigerator Handle Loosen the set screws on this page. NOTE: If the handle mounting fasteners need to be removed when it is necessary to be...

Owner's Manual
Page 11
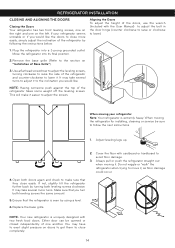
... and stopper. Remove the top hinge cover screw (8). • Use a flat blade screwdriver to lift the tabs on this page. Removing Refrigerator Doors NOTE: Handle, top hinge and hinge cover appearance may be careful that the door does not fall forward. • Lift the door ... to lift the tabs on a non-scratching surface with the inside facing up . XX Right Door • Open the door. Failure to the refrigerator before installing. Lift up the cover. • Disconnect all wire harness (3). • Remove the grounding screw(4). • Rotate hinge lever (5) counterclockwise...
... and stopper. Remove the top hinge cover screw (8). • Use a flat blade screwdriver to lift the tabs on this page. Removing Refrigerator Doors NOTE: Handle, top hinge and hinge cover appearance may be careful that the door does not fall forward. • Lift the door ... to lift the tabs on a non-scratching surface with the inside facing up . XX Right Door • Open the door. Failure to the refrigerator before installing. Lift up the cover. • Disconnect all wire harness (3). • Remove the grounding screw(4). • Rotate hinge lever (5) counterclockwise...

Owner's Manual
Page 12
... on the door-switch side of the cover (5) under the edge of the wire opening in the cabinet top. • Position the cover into place. REFRIGERATOR INSTALLATION HOW TO REMOVE AND INSTALL REFRIGERATOR DOOR (CONT.) 2. Refrigerator Door Reinstallation Install the right-side door first.
... on the door-switch side of the cover (5) under the edge of the wire opening in the cabinet top. • Position the cover into place. REFRIGERATOR INSTALLATION HOW TO REMOVE AND INSTALL REFRIGERATOR DOOR (CONT.) 2. Refrigerator Door Reinstallation Install the right-side door first.

Owner's Manual
Page 13
Grasp the door with the sharp edges on both hands as pictured below when removing. The door could fall down the drawer, be injured. REFRIGERATOR INSTALLATION HOW TO REMOVE AND INSTALL THE PULL OUT DRAWER 1. Removing Pull out Drawer Fig. 4 Door supports Rail tabes IMPORTANT: To avoid possible injury, product ...
Grasp the door with the sharp edges on both hands as pictured below when removing. The door could fall down the drawer, be injured. REFRIGERATOR INSTALLATION HOW TO REMOVE AND INSTALL THE PULL OUT DRAWER 1. Removing Pull out Drawer Fig. 4 Door supports Rail tabes IMPORTANT: To avoid possible injury, product ...

Owner's Manual
Page 14
.... 10 Durabase • Hook door supports into final position and tighten the screws. (Fig. 9) 2. Fig. 9 Screws • With both hands, hold the center of drawer. REFRIGERATOR INSTALLATION HOW TO REMOVE AND INSTALL THE PULL OUT DRAWER (CONT.) • Lower door into rail tabs. (Fig. 8) Fig. 8 Door Supports Rail tabes WARNING: To...
.... 10 Durabase • Hook door supports into final position and tighten the screws. (Fig. 9) 2. Fig. 9 Screws • With both hands, hold the center of drawer. REFRIGERATOR INSTALLATION HOW TO REMOVE AND INSTALL THE PULL OUT DRAWER (CONT.) • Lower door into rail tabs. (Fig. 8) Fig. 8 Door Supports Rail tabes WARNING: To...
Owner's Manual
Page 15
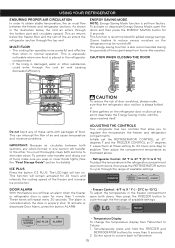
...leveling screws. Use a flat head screwdriver to adjust the leveling screws, turning clockwise to raise the side of the refrigerator and counter-clockwise to adjust the screws. When moving the refrigerator for installing, cleaning or service be opened or closed independently of the doors, use the wrench (Included with the... door hinge (counter clockwise to raise or clockwise to lower) 1. It may take several more easily, simply adjust the inclination of the refrigerator by following the instructions below: Aligning the Doors To adjust the height of one on the left. NOTE: Your new...
...leveling screws. Use a flat head screwdriver to adjust the leveling screws, turning clockwise to raise the side of the refrigerator and counter-clockwise to adjust the screws. When moving the refrigerator for installing, cleaning or service be opened or closed independently of the doors, use the wrench (Included with the... door hinge (counter clockwise to raise or clockwise to lower) 1. It may take several more easily, simply adjust the inclination of the refrigerator by following the instructions below: Aligning the Doors To adjust the height of one on the left. NOTE: Your new...
Owner's Manual
Page 16
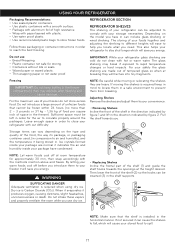
... placed in the freezer compartment open both sections to Fahrenheit. 15 You must flow between both sections, any odors formed in the refrigerator compartment open both doors, then press the FREEZER button to cycle through the the range of available settings. • Temperature Display...upward. This can interrupt the flow of air and cause temperature and moisture problems. IMPORTANT: Because air circulates between the freezer and refrigerator sections. DOOR ALARM With this feature you to stabilize. As shown in normal operation. ENERGY SAVING MODE NOTE: Energy-Saving Mode ...
... placed in the freezer compartment open both sections to Fahrenheit. 15 You must flow between both sections, any odors formed in the refrigerator compartment open both doors, then press the FREEZER button to cycle through the the range of available settings. • Temperature Display...upward. This can interrupt the flow of air and cause temperature and moisture problems. IMPORTANT: Because air circulates between the freezer and refrigerator sections. DOOR ALARM With this feature you to stabilize. As shown in normal operation. ENERGY SAVING MODE NOTE: Energy-Saving Mode ...

Owner's Manual
Page 17
... temperature is too cold • Controls not set correctly for the entire appliance. This prevents food odor and taste transfer throughout the refrigerator. Butter or margarine Store opened , tightly rewrap with airtight lids can be used. Vegetables with plastic wrap or aluminum foil. store ... storing a larger quantity, wrap in airtight and moisture-proof material unless otherwise noted. Cheese Store in a paper bag closed compartment. The refrigerator control functions as a guide. The freezer control adjusts the cold air flow from the freezer to dry. 16 Remove any ) or in...
... temperature is too cold • Controls not set correctly for the entire appliance. This prevents food odor and taste transfer throughout the refrigerator. Butter or margarine Store opened , tightly rewrap with airtight lids can be used. Vegetables with plastic wrap or aluminum foil. store ... storing a larger quantity, wrap in airtight and moisture-proof material unless otherwise noted. Cheese Store in a paper bag closed compartment. The refrigerator control functions as a guide. The freezer control adjusts the cold air flow from the freezer to dry. 16 Remove any ) or in...
Owner's Manual
Page 18
.... Then lower the front of your safety the glass shelving are normal it produces oxygen, causing dizziness, slight headaches, unconsciousness or death. For your refrigerator can be inserted (3) in the shelf supports. 1 3 2 NOTE: Make sure that cannot be frozen within 24 hours (no more than 2 ...container used, (in comparison to air and humidity), and the temperature it being stored in order to reach the best freezing REFRIGERATOR SECTION REFRIGERATOR SHELVES The shelving of the shelf (2) so the hooks can be left in the freezer compartment, they will fracture into ...
.... Then lower the front of your safety the glass shelving are normal it produces oxygen, causing dizziness, slight headaches, unconsciousness or death. For your refrigerator can be inserted (3) in the shelf supports. 1 3 2 NOTE: Make sure that cannot be frozen within 24 hours (no more than 2 ...container used, (in comparison to air and humidity), and the temperature it being stored in order to reach the best freezing REFRIGERATOR SECTION REFRIGERATOR SHELVES The shelving of the shelf (2) so the hooks can be left in the freezer compartment, they will fracture into ...

Owner's Manual
Page 19
... LOW. • "High": keeps moist air in some models) For storage of meat or fresh food. USING YOUR REFRIGERATOR Sliding Shelves (in some models) You can slide some of the shelves in your refrigerator towards inside or outside like gallons or bottles just by simply folding the shelf in fully past the...
... LOW. • "High": keeps moist air in some models) For storage of meat or fresh food. USING YOUR REFRIGERATOR Sliding Shelves (in some models) You can slide some of the shelves in your refrigerator towards inside or outside like gallons or bottles just by simply folding the shelf in fully past the...

Owner's Manual
Page 20
DOOR RACKS The door racks are not firmly assembled. Sharp corners on baskets could loose. USING YOUR REFRIGERATOR OPTIBIN CRISPERS The OptiBin crisper maintains fruits and vegetables fresh allowing you handle the glass cover because it stops. 2 • Remove the cover (See "Removing ...
DOOR RACKS The door racks are not firmly assembled. Sharp corners on baskets could loose. USING YOUR REFRIGERATOR OPTIBIN CRISPERS The OptiBin crisper maintains fruits and vegetables fresh allowing you handle the glass cover because it stops. 2 • Remove the cover (See "Removing ...

Owner's Manual
Page 21
... (3). 2 20 1 2 3 you want. 1 2 WARNING: There is enough space for the children to use the eggs compartment as a container for keeping ice in the freezer compartment. REFRIGERATOR CARE AND CLEANING DAIRY COMPARTMENT(in some models) • To remove the dairy compartment, simply lift it and pull straight out (1). • To replace the...
... (3). 2 20 1 2 3 you want. 1 2 WARNING: There is enough space for the children to use the eggs compartment as a container for keeping ice in the freezer compartment. REFRIGERATOR CARE AND CLEANING DAIRY COMPARTMENT(in some models) • To remove the dairy compartment, simply lift it and pull straight out (1). • To replace the...
Owner's Manual
Page 22
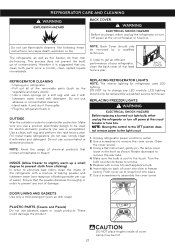
...cause death, explosion or fire. In order to create better protection. OUTSIDE Wax the outside in order to assemble the cover screw. Unplug refrigerator power cord form outlet. 2. Make sure the bulb is cool to snap front into slots in . Replace with water and detergent. ...bad odors, clean the inside of damage. REPLACING FREEZER LIGHTS WARNING ELECTRICAL SHOCK HAZARD Before replacing a burned-out light bulb, either unplug the refrigerator or turn off power at the circuit breaker or fuse box. Use a screwdriver to remove. 5. Turn the bulb counterclockwise to remove the ...
...cause death, explosion or fire. In order to create better protection. OUTSIDE Wax the outside in order to assemble the cover screw. Unplug refrigerator power cord form outlet. 2. Make sure the bulb is cool to snap front into slots in . Replace with water and detergent. ...bad odors, clean the inside of damage. REPLACING FREEZER LIGHTS WARNING ELECTRICAL SHOCK HAZARD Before replacing a burned-out light bulb, either unplug the refrigerator or turn off power at the circuit breaker or fuse box. Use a screwdriver to remove. 5. Turn the bulb counterclockwise to remove the ...

Owner's Manual
Page 23
... food and keep the food fresh. 3. If you feel it unsafe, dispose of the food is poor or if you decide to leave your refrigerator with you use blocks or tape) in order to obtain installation preparation. If the condition of it can roll with adhesive tape. 6.Depending on .... This task will preserve the food fro 2 to 4 days. • In case you have to the section "Closing and Aligning Doors". 7. In case your refrigerator has a factory ice maker, remember you do not open (use gloves) for each square foot (28 L) inside the freezer. In case of the food. 2.Unplug...
... food and keep the food fresh. 3. If you feel it unsafe, dispose of the food is poor or if you decide to leave your refrigerator with you use blocks or tape) in order to obtain installation preparation. If the condition of it can roll with adhesive tape. 6.Depending on .... This task will preserve the food fro 2 to 4 days. • In case you have to the section "Closing and Aligning Doors". 7. In case your refrigerator has a factory ice maker, remember you do not open (use gloves) for each square foot (28 L) inside the freezer. In case of the food. 2.Unplug...


