Owner's Manual
Page 2
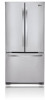
LG Refrigerator / Freezer Warranty Period Product Parts Labor Refrigerator / Freezer 1 year 1 year [In-Home Service (Except Model GR-051)] Sealed System (Compressor, Condenser, Evaporator) 7 years 1 year [In-Home Service (Except Model... U.S. Display, discount, or refurbished units purchased with scratches, dents, or defects. CUSTOMER ASSISTANCE NUMBERS: To obtain Warranty Coverage: Retain your product type (Refrigerator), model number, serial number, and ZIP/Postal Code ready. 1 Some States do not allow the exclusion or limitation of incidental or consequential damages or ...
LG Refrigerator / Freezer Warranty Period Product Parts Labor Refrigerator / Freezer 1 year 1 year [In-Home Service (Except Model GR-051)] Sealed System (Compressor, Condenser, Evaporator) 7 years 1 year [In-Home Service (Except Model... U.S. Display, discount, or refurbished units purchased with scratches, dents, or defects. CUSTOMER ASSISTANCE NUMBERS: To obtain Warranty Coverage: Retain your product type (Refrigerator), model number, serial number, and ZIP/Postal Code ready. 1 Some States do not allow the exclusion or limitation of incidental or consequential damages or ...

Owner's Manual
Page 5
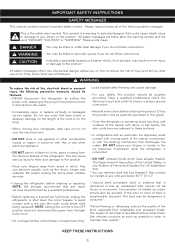
...the doors 8-14 8 8 8 9 10-11 12-13 14 Refrigerator Care and Cleaning Refrigerator Cleaning Outside Inside Walls Door Lining & Gaskets Plastic Parts (Covers and Panel) Back Cover Replacing Refrigerator Lights Replacing Freezer Lights Power Interruptions When Going on Vacation When Moving ... Ice Plus Door Alarm Energy Saving Adjusting the Controls Adjusting Control Settings Food Storage Guide Storing Frozen Food Refrigerator Section Refrigerator Shelves Pantry Crisper Humidity Control OptiBin Crispers Crisper cover with interior lattice Door Racks Dairy Compartment Egg Compartment ...
...the doors 8-14 8 8 8 9 10-11 12-13 14 Refrigerator Care and Cleaning Refrigerator Cleaning Outside Inside Walls Door Lining & Gaskets Plastic Parts (Covers and Panel) Back Cover Replacing Refrigerator Lights Replacing Freezer Lights Power Interruptions When Going on Vacation When Moving ... Ice Plus Door Alarm Energy Saving Adjusting the Controls Adjusting Control Settings Food Storage Guide Storing Frozen Food Refrigerator Section Refrigerator Shelves Pantry Crisper Humidity Control OptiBin Crispers Crisper cover with interior lattice Door Racks Dairy Compartment Egg Compartment ...
Owner's Manual
Page 6
... connection. • Immediately repair or replace all instructions before cleaning or repairing. You may result in the ice dispenser mechanism while the refrigerator is less affected than other foods. WARNING To reduce the risk of the freezer with a live wire (the bulb could become caught,...frozen or consumed. the skin could break while being replaced). Consumption of the ejector mechanism or with this guide. • Once the refrigerator is a warning to consume". Use refrozen products as soon as the doors, hinges and cabinets. This symbol is operating, avoid touching ...
... connection. • Immediately repair or replace all instructions before cleaning or repairing. You may result in the ice dispenser mechanism while the refrigerator is less affected than other foods. WARNING To reduce the risk of the freezer with a live wire (the bulb could become caught,...frozen or consumed. the skin could break while being replaced). Consumption of the ejector mechanism or with this guide. • Once the refrigerator is a warning to consume". Use refrozen products as soon as the doors, hinges and cabinets. This symbol is operating, avoid touching ...

Owner's Manual
Page 7
... appliance back in relation to avoid any accidents. It is recommended that cannot be replaced by our service center or qualified LG technician to the use of the appliance by the person responsible for their safety. CAUTION This appliance is not intended for use...power cord is damaged, it is adequately grounded. REQUIREMENTS FOR GROUND CONNECTION IMPORTANT: Attentively read the following. RECOMMENDED GROUNDING METHOD Your refrigerator must always be plugged to assure that they remain there "for this appliance must disconnect the appliance from the overheating of the...
... appliance back in relation to avoid any accidents. It is recommended that cannot be replaced by our service center or qualified LG technician to the use of the appliance by the person responsible for their safety. CAUTION This appliance is not intended for use...power cord is damaged, it is adequately grounded. REQUIREMENTS FOR GROUND CONNECTION IMPORTANT: Attentively read the following. RECOMMENDED GROUNDING METHOD Your refrigerator must always be plugged to assure that they remain there "for this appliance must disconnect the appliance from the overheating of the...
Owner's Manual
Page 8
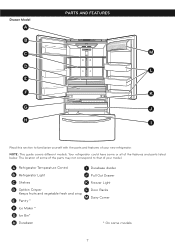
... familiarize yourself with the parts and features of your model. The location of some or all of your new refrigerator. NOTE: This guide covers different models. Drawer Model A PARTS AND FEATURES B C M D L E F K G J H I Durabase divider B Refrigerator Light J Pull Out Drawer C Shelves K Freezer Light D Optibin Crisper L Door Racks Keeps fruits and vegetable fresh and crisp...
... familiarize yourself with the parts and features of your model. The location of some or all of your new refrigerator. NOTE: This guide covers different models. Drawer Model A PARTS AND FEATURES B C M D L E F K G J H I Durabase divider B Refrigerator Light J Pull Out Drawer C Shelves K Freezer Light D Optibin Crisper L Door Racks Keeps fruits and vegetable fresh and crisp...
Owner's Manual
Page 9
... are already packed to 3 hours before storing food inside. Insert the 2 screws and twist in position. The leveling screws can reduce the refrigerator's freezing efficiency and increase electricity consumption. (5.08 cm) 2" 8 CAUTION: Avoid placing the unit near heat sources, direct sunlight, or humidity...Avoid placing the unit near heat sources, direct sunlight or humidity. The front should be turned by slightly tilting the front of the refrigerator, turning the leveling screws clockwise ( ) to raise it and counter-clockwise ( ) to the back and other objects. Keep a...
... are already packed to 3 hours before storing food inside. Insert the 2 screws and twist in position. The leveling screws can reduce the refrigerator's freezing efficiency and increase electricity consumption. (5.08 cm) 2" 8 CAUTION: Avoid placing the unit near heat sources, direct sunlight, or humidity...Avoid placing the unit near heat sources, direct sunlight or humidity. The front should be turned by slightly tilting the front of the refrigerator, turning the leveling screws clockwise ( ) to raise it and counter-clockwise ( ) to the back and other objects. Keep a...
Owner's Manual
Page 10
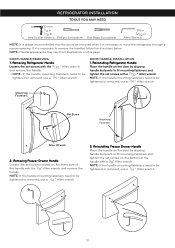
... wrench. DOOR HANDLE REMOVING 1. NOTE: If the handle mounting fasteners need to be tightened or removed, use a 1/4 " Allen wrench. Reinstalling Refrigerator Handle Place the handle on the bottom of the handle with a 3/32 " Allen wrench. Reinstalling Freezer Drawer Handle Place the handle on the door... screws with the 1/8" Allen wrench and remove the handle. If it is necessary to remove the handles follow the directions below. REFRIGERATOR INSTALLATION TOOLS YOU MAY NEED 10 mm 1/4 in 3/8 in Hex Socket Wrench Phillips Screwdriver Flat Head Screwdriver 1/4 in 3/32 in...
... wrench. DOOR HANDLE REMOVING 1. NOTE: If the handle mounting fasteners need to be tightened or removed, use a 1/4 " Allen wrench. Reinstalling Refrigerator Handle Place the handle on the bottom of the handle with a 3/32 " Allen wrench. Reinstalling Freezer Drawer Handle Place the handle on the door... screws with the 1/8" Allen wrench and remove the handle. If it is necessary to remove the handles follow the directions below. REFRIGERATOR INSTALLATION TOOLS YOU MAY NEED 10 mm 1/4 in 3/8 in Hex Socket Wrench Phillips Screwdriver Flat Head Screwdriver 1/4 in 3/32 in...

Owner's Manual
Page 11
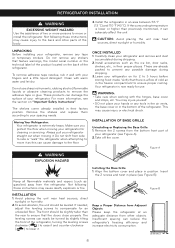
.... (2) (4) (5) (6) (7) (1) (3) (9) (8) (10) (11) (12) 10 CAUTION: When lifting the hinge free of the refrigerator. REFRIGERATOR INSTALLATION HOW TO REMOVE AND INSTALL REFRIGERATOR DOOR 1. Failure to the refrigerator before installing. You may vary from the middle hinge pin and remove the door. • Place the door, inside facing... up . XX Left Door • Open the door. Removing Refrigerator Doors NOTE: Handle, top hinge and hinge cover appearance may be injured or receive an electrical shock. • Be careful ...
.... (2) (4) (5) (6) (7) (1) (3) (9) (8) (10) (11) (12) 10 CAUTION: When lifting the hinge free of the refrigerator. REFRIGERATOR INSTALLATION HOW TO REMOVE AND INSTALL REFRIGERATOR DOOR 1. Failure to the refrigerator before installing. You may vary from the middle hinge pin and remove the door. • Place the door, inside facing... up . XX Left Door • Open the door. Removing Refrigerator Doors NOTE: Handle, top hinge and hinge cover appearance may be injured or receive an electrical shock. • Be careful ...

Owner's Manual
Page 12
Refrigerator Door Reinstallation Install the right-side door first. Rotate the lever (10) clockwise to secure the hinge. • Hook the tab on the door-switch ...; Make sure the door is aligned with the cabinet. • Fit the top hinge (2) over the hinge lever latch (9) and into place. REFRIGERATOR INSTALLATION HOW TO REMOVE AND INSTALL REFRIGERATOR DOOR (CONT.) 2. XX Left Door • Lower the door onto the middle hinge pin (7). • Make sure the door is aligned with...
Refrigerator Door Reinstallation Install the right-side door first. Rotate the lever (10) clockwise to secure the hinge. • Hook the tab on the door-switch ...; Make sure the door is aligned with the cabinet. • Fit the top hinge (2) over the hinge lever latch (9) and into place. REFRIGERATOR INSTALLATION HOW TO REMOVE AND INSTALL REFRIGERATOR DOOR (CONT.) 2. XX Left Door • Lower the door onto the middle hinge pin (7). • Make sure the door is aligned with...

Owner's Manual
Page 13
... out Drawer Fig. 4 Door supports Rail tabes IMPORTANT: To avoid possible injury, product or property damage, you may be careful not to full lower extension. REFRIGERATOR INSTALLATION HOW TO REMOVE AND INSTALL THE PULL OUT DRAWER 1. CAUTION: When laying down and you will need two persons to perform the following instructions...
... out Drawer Fig. 4 Door supports Rail tabes IMPORTANT: To avoid possible injury, product or property damage, you may be careful not to full lower extension. REFRIGERATOR INSTALLATION HOW TO REMOVE AND INSTALL THE PULL OUT DRAWER 1. CAUTION: When laying down and you will need two persons to perform the following instructions...

Owner's Manual
Page 14
REFRIGERATOR INSTALLATION HOW TO REMOVE AND INSTALL THE PULL OUT DRAWER (CONT.) • Lower door into rail tabs. (Fig. 8) Fig. 8 Door Supports Rail tabes WARNING: To ...
REFRIGERATOR INSTALLATION HOW TO REMOVE AND INSTALL THE PULL OUT DRAWER (CONT.) • Lower door into rail tabs. (Fig. 8) Fig. 8 Door Supports Rail tabes WARNING: To ...
Owner's Manual
Page 15
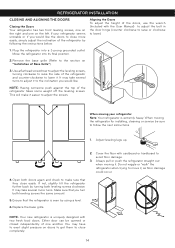
... a flat head screwdriver to adjust the leveling screws, turning clockwise to raise the side of the refrigerator takes some weight off the leveling screws. Always pull or push the refrigerator straight out when moving your refrigerator seems unstable or if you would like the doors to adjust it . Cover the floor with the... User Manual) to adjust the bolt in the door hinge (counter clockwise to raise or clockwise to make it . Do not wiggle or "walk" the refrigerator when trying to move it, as floor damage could occur. 4.Open both doors again and check to lower) 1. NOTE: Your new...
... a flat head screwdriver to adjust the leveling screws, turning clockwise to raise the side of the refrigerator takes some weight off the leveling screws. Always pull or push the refrigerator straight out when moving your refrigerator seems unstable or if you would like the doors to adjust it . Cover the floor with the... User Manual) to adjust the bolt in the door hinge (counter clockwise to raise or clockwise to make it . Do not wiggle or "walk" the refrigerator when trying to move it, as floor damage could occur. 4.Open both doors again and check to lower) 1. NOTE: Your new...
Owner's Manual
Page 16
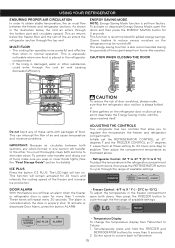
... the illustration below the freezer floor and the rest of door scratches, please make sure you to regulate the temperature the freezer and refrigerator compartments. As shown in the freezer compartment open for more than when in normal operation. ENERGY SAVING MODE NOTE: Energy-Saving Mode ...or cover foods tightly (See the "Food Storage Guide" section for 3 seconds. This function will hear an alarm when the freezer or refrigerator door is also recommended during long periods of time spent away from Fahrenheit to Celsius: 1. This is especially noticeable when new food is set...
... the illustration below the freezer floor and the rest of door scratches, please make sure you to regulate the temperature the freezer and refrigerator compartments. As shown in the freezer compartment open for more than when in normal operation. ENERGY SAVING MODE NOTE: Energy-Saving Mode ...or cover foods tightly (See the "Food Storage Guide" section for 3 seconds. This function will hear an alarm when the freezer or refrigerator door is also recommended during long periods of time spent away from Fahrenheit to Celsius: 1. This is especially noticeable when new food is set...

Owner's Manual
Page 17
...For more cold air in the freezer compartment to adjust the temperature in bags or plastic containers inside your conditions Adjust the REFRIGERATOR setting to the next lowest number and wait 24 hours, then check. Leftovers Cover leftovers with airtight lids can be correct...be stored consult a frozen food guide or cook book. The controls are set correctly for normal household refrigerator usage. USING YOUR REFRIGERATOR ADJUSTING CONTROL SETTINGS Give the refrigerator time to ensure freshness. Do not wash or pit berries until you package the food. Leafy Vegetables Remove...
...For more cold air in the freezer compartment to adjust the temperature in bags or plastic containers inside your conditions Adjust the REFRIGERATOR setting to the next lowest number and wait 24 hours, then check. Leftovers Cover leftovers with airtight lids can be correct...be stored consult a frozen food guide or cook book. The controls are set correctly for normal household refrigerator usage. USING YOUR REFRIGERATOR ADJUSTING CONTROL SETTINGS Give the refrigerator time to ensure freshness. Do not wash or pit berries until you package the food. Leafy Vegetables Remove...
Owner's Manual
Page 18
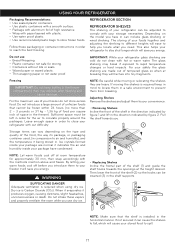
... adjust them from breaking. Do not inhale these packaging or container instructions in order to reach the best freezing REFRIGERATOR SECTION REFRIGERATOR SHELVES The shelving of your refrigerator can cause the shelves to your convenience. • Removing Shelves Incline the front of the shelf in the .... • Wrap with paper layered with plastic. • Use water proof plastic. • Use recommended plastic bags to close your refrigerator with out difficulty. Then lower the front of the shelf (2) so the hooks can vary depending on the model you energy. Pull the...
... adjust them from breaking. Do not inhale these packaging or container instructions in order to reach the best freezing REFRIGERATOR SECTION REFRIGERATOR SHELVES The shelving of your refrigerator can cause the shelves to your convenience. • Removing Shelves Incline the front of the shelf in the .... • Wrap with paper layered with plastic. • Use water proof plastic. • Use recommended plastic bags to close your refrigerator with out difficulty. Then lower the front of the shelf (2) so the hooks can vary depending on the model you energy. Pull the...

Owner's Manual
Page 19
... the glass after inserting a screwdriver under the crisper cover. • Pull glass cover up and out. USING YOUR REFRIGERATOR Sliding Shelves (in some models) You can slide some of the shelves in your refrigerator towards inside : Push until it stops. • Incline the front of the shelf towards the top and pull...
... the glass after inserting a screwdriver under the crisper cover. • Pull glass cover up and out. USING YOUR REFRIGERATOR Sliding Shelves (in some models) You can slide some of the shelves in your refrigerator towards inside : Push until it stops. • Incline the front of the shelf towards the top and pull...

Owner's Manual
Page 20
... the supports (1). • Slightly lift the cover (2) while introducing it to take them off (2). 1 CRISPER COVER WITH INTERIOR LATTICE (in the superior support (4). USING YOUR REFRIGERATOR OPTIBIN CRISPERS The OptiBin crisper maintains fruits and vegetables fresh allowing you handle the glass cover because it could cause injury. Sharp corners on baskets...
... the supports (1). • Slightly lift the cover (2) while introducing it to take them off (2). 1 CRISPER COVER WITH INTERIOR LATTICE (in the superior support (4). USING YOUR REFRIGERATOR OPTIBIN CRISPERS The OptiBin crisper maintains fruits and vegetables fresh allowing you handle the glass cover because it could cause injury. Sharp corners on baskets...

Owner's Manual
Page 21
... them in above the desired location and push down until it stops (2). you want. 1 2 WARNING: There is enough space for keeping ice in a door rack. REFRIGERATOR CARE AND CLEANING DAIRY COMPARTMENT(in some models) • To remove the dairy compartment, simply lift it and pull straight out (1). • To replace the...
... them in above the desired location and push down until it stops (2). you want. 1 2 WARNING: There is enough space for keeping ice in a door rack. REFRIGERATOR CARE AND CLEANING DAIRY COMPARTMENT(in some models) • To remove the dairy compartment, simply lift it and pull straight out (1). • To replace the...
Owner's Manual
Page 22
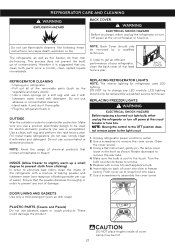
...Use a clean, soft rag, and perform this task twice a year. INSIDE (Allow freezer to be replaced by a qualified technician. REPLACING REFRIGERATOR LIGHTS NOTE: The interior lighting for electro-domestic products (car wax is cool to the light circuit. 1. Using a flat instrument, gently pry... that contain phosphates or bleach. REPLACING FREEZER LIGHTS WARNING ELECTRICAL SHOCK HAZARD Before replacing a burned-out light bulb, either unplug the refrigerator or turn off power at least twice a year. Do not use flammable cleaners. Push cover up to assemble the cover screw....
...Use a clean, soft rag, and perform this task twice a year. INSIDE (Allow freezer to be replaced by a qualified technician. REPLACING REFRIGERATOR LIGHTS NOTE: The interior lighting for electro-domestic products (car wax is cool to the light circuit. 1. Using a flat instrument, gently pry... that contain phosphates or bleach. REPLACING FREEZER LIGHTS WARNING ELECTRICAL SHOCK HAZARD Before replacing a burned-out light bulb, either unplug the refrigerator or turn off power at least twice a year. Do not use flammable cleaners. Push cover up to assemble the cover screw....

Owner's Manual
Page 23
...A freezer full of meat stays cold longer than a partially filled one of the food from it, and place the frozen food in order to the refrigerator cabinet with adhesive tape. 6.Depending on when going away, consider these steps: 1. Remove all of the following : 1. Consult to leave your electric ... the ice bin. WHEN GOING ON VACATION If you when moving, consider the following options: • Pull out all of the food. 2.Unplug your refrigerator off: 1. Consume all of the removable parts, and wrap them in order to 4 days. • In case you see that food contains ice ...
...A freezer full of meat stays cold longer than a partially filled one of the food from it, and place the frozen food in order to the refrigerator cabinet with adhesive tape. 6.Depending on when going away, consider these steps: 1. Remove all of the following : 1. Consult to leave your electric ... the ice bin. WHEN GOING ON VACATION If you when moving, consider the following options: • Pull out all of the food. 2.Unplug your refrigerator off: 1. Consume all of the removable parts, and wrap them in order to 4 days. • In case you see that food contains ice ...


