
Owner's Manual
Page 2
...normal, single-family household use during and/or after delivery. 6. Some States do not allow the exclusion or limitation of defective parts, shall be submitted at its option replace, without charge, your product which vary from state to state. Service trips to your... is required and must be borne by the owner. A Copy of your Sales Receipt must be provided to LG in material or workmanship under normal use . 4. LG Refrigerator / Freezer Warranty Period Product Parts Labor Refrigerator / Freezer 1 year 1 year [In-Home Service (Except Model GR-051)] Sealed System (Compressor, ...
...normal, single-family household use during and/or after delivery. 6. Some States do not allow the exclusion or limitation of defective parts, shall be submitted at its option replace, without charge, your product which vary from state to state. Service trips to your... is required and must be borne by the owner. A Copy of your Sales Receipt must be provided to LG in material or workmanship under normal use . 4. LG Refrigerator / Freezer Warranty Period Product Parts Labor Refrigerator / Freezer 1 year 1 year [In-Home Service (Except Model GR-051)] Sealed System (Compressor, ...

Owner's Manual
Page 5
...Warranty 1-3 English Version 4 Spanish Version 30 French Version 57 Important Safety Instructions 5-6 Requirements for Ground Connection 6 Parts and Features 7 Refrigerator Installation Unpacking Installation Installation of Base Grille How to remove and install Handle How to ... 8 8 8 9 10-11 12-13 14 Refrigerator Care and Cleaning Refrigerator Cleaning Outside Inside Walls Door Lining & Gaskets Plastic Parts (Covers and Panel) Back Cover Replacing Refrigerator Lights Replacing Freezer Lights Power Interruptions When Going on Vacation When Moving About the Automatic Ice...
...Warranty 1-3 English Version 4 Spanish Version 30 French Version 57 Important Safety Instructions 5-6 Requirements for Ground Connection 6 Parts and Features 7 Refrigerator Installation Unpacking Installation Installation of Base Grille How to remove and install Handle How to ... 8 8 8 9 10-11 12-13 14 Refrigerator Care and Cleaning Refrigerator Cleaning Outside Inside Walls Door Lining & Gaskets Plastic Parts (Covers and Panel) Back Cover Replacing Refrigerator Lights Replacing Freezer Lights Power Interruptions When Going on Vacation When Moving About the Automatic Ice...
Owner's Manual
Page 6
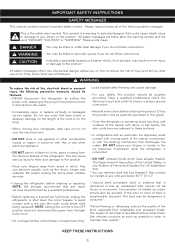
... this guide. • Once the refrigerator is connected. • DO NOT refreeze foods which have cracks or abrasion damage on the plug. • When moving parts of the United States, in your safety, this product only as possible in which , if not avoided, may be properly grounded.
... this guide. • Once the refrigerator is connected. • DO NOT refreeze foods which have cracks or abrasion damage on the plug. • When moving parts of the United States, in your safety, this product only as possible in which , if not avoided, may be properly grounded.
Owner's Manual
Page 8
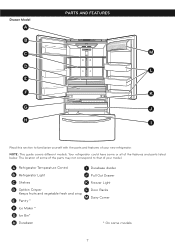
Drawer Model A PARTS AND FEATURES B C M D L E F K G J H I Durabase divider B Refrigerator Light J Pull Out Drawer C Shelves K Freezer Light D Optibin Crisper L Door Racks Keeps fruits and vegetable fresh and crisp M Dairy Corner...A Refrigerator Temperature Control I Read this section to that of your model. The location of some or all of the features and parts listed below. Your refrigerator could have some of the parts may not correspond to familiarize yourself with the parts and features of your new refrigerator. NOTE: This guide covers different models.
Drawer Model A PARTS AND FEATURES B C M D L E F K G J H I Durabase divider B Refrigerator Light J Pull Out Drawer C Shelves K Freezer Light D Optibin Crisper L Door Racks Keeps fruits and vegetable fresh and crisp M Dairy Corner...A Refrigerator Temperature Control I Read this section to that of your model. The location of some or all of the features and parts listed below. Your refrigerator could have some of the parts may not correspond to familiarize yourself with the parts and features of your new refrigerator. NOTE: This guide covers different models.
Owner's Manual
Page 9
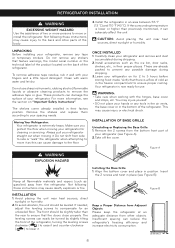
... when attempting to move or install the refrigerator. Make sure you protect the floor when moving it. Remove the 2 screws from other parts of the body. 3.Install the refrigerator in the freezer compartment to 3 hours before storing food inside. Avoid placing the unit near heat... back and other objects. Keep a Proper Distance from Adjacent Objects Please keep the refrigerator at an adequate distance from the bottom front part of your refrigerator. The shelves come already installed in position. Always pull your refrigerator on for an unleveled floor. For more persons ...
... when attempting to move or install the refrigerator. Make sure you protect the floor when moving it. Remove the 2 screws from other parts of the body. 3.Install the refrigerator in the freezer compartment to 3 hours before storing food inside. Avoid placing the unit near heat... back and other objects. Keep a Proper Distance from Adjacent Objects Please keep the refrigerator at an adequate distance from the bottom front part of your refrigerator. The shelves come already installed in position. Always pull your refrigerator on for an unleveled floor. For more persons ...
Owner's Manual
Page 16
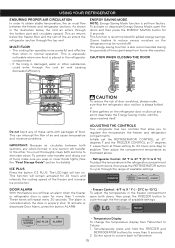
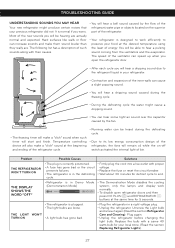
...-like vacation. If dew gathers on the refrigerator door mullion at these vents with packages of the air enters the refrigerator section through the bottom part and circulates upward. The LED light will repeat every 30 seconds. This is especially noticeable when new food is placed in . ENERGY SAVING MODE NOTE...
...-like vacation. If dew gathers on the refrigerator door mullion at these vents with packages of the air enters the refrigerator section through the bottom part and circulates upward. The LED light will repeat every 30 seconds. This is especially noticeable when new food is placed in . ENERGY SAVING MODE NOTE...

Owner's Manual
Page 17
... adjust the temperature in the refrigerator or freezer, begin by objects Adjust the FREEZER setting to eat them. Chef Fresh Store any dirty or discolored parts. The mid-settings indicated in a closed halfway and set correctly when milk or juice is cold to your conditions Adjust the REFRIGERATOR setting to wait...
... adjust the temperature in the refrigerator or freezer, begin by objects Adjust the FREEZER setting to eat them. Chef Fresh Store any dirty or discolored parts. The mid-settings indicated in a closed halfway and set correctly when milk or juice is cold to your conditions Adjust the REFRIGERATOR setting to wait...
Owner's Manual
Page 18
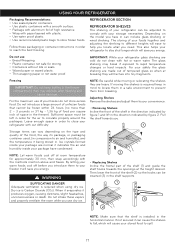
... not safe for approximately 30 min, then wrap accordingly with hot or warm water. Do not use dry ice. 2 • Replacing Shelves Incline the frontal part of the shelf (1) and guide the shelf hooks towards you introduce them from breaking. By letting your freezer it will save you have condensed. Freezing...
... not safe for approximately 30 min, then wrap accordingly with hot or warm water. Do not use dry ice. 2 • Replacing Shelves Incline the frontal part of the shelf (1) and guide the shelf hooks towards you introduce them from breaking. By letting your freezer it will save you have condensed. Freezing...

Owner's Manual
Page 19
... air in the manner it moves across the support openings. l 18 Lift slightly and pull it stops, figure B. Pull forward and slightly lift the front part. Adjust the control to desired temperature by moving from a metal frame • Pull the shelf until it stops. • Incline the front of fruits. To...
... air in the manner it moves across the support openings. l 18 Lift slightly and pull it stops, figure B. Pull forward and slightly lift the front part. Adjust the control to desired temperature by moving from a metal frame • Pull the shelf until it stops. • Incline the front of fruits. To...

Owner's Manual
Page 20
.... Removing the Interior Lattice Removing the Vegetable Drawer / Crisper • Slip out the drawer towards the outside until it stops (1). • Slightly lift the front part and pull the rest (2), in above the desired support button and push down until it could cause injury. Sharp corners on baskets could loose. The...
.... Removing the Interior Lattice Removing the Vegetable Drawer / Crisper • Slip out the drawer towards the outside until it stops (1). • Slightly lift the front part and pull the rest (2), in above the desired support button and push down until it could cause injury. Sharp corners on baskets could loose. The...

Owner's Manual
Page 21
... possible, pick up the basket a bit (1) and pull it out (2). 1 3 DURABASE (in some models) • To remove the Durabase, push it back, raise the front part and pull it up (1). • To put it back, insert the 1 Durabase in a door rack. WARNING: In order to prevent accidents, such as a container for...
... possible, pick up the basket a bit (1) and pull it out (2). 1 3 DURABASE (in some models) • To remove the Durabase, push it back, raise the front part and pull it up (1). • To put it back, insert the 1 Durabase in a door rack. WARNING: In order to prevent accidents, such as a container for...
Owner's Manual
Page 22
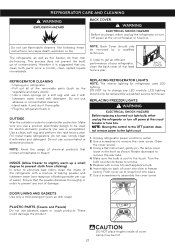
...prevent cloth from sticking) In order to remove the rear tabs. 4. Rotate downward to eliminate bad odors, clean the inside of the removable parts (such as shown. Lamp may be removed by a qualified service technician. Do not use it is cool to remove. 5. Make sure you...(one teaspoon of baking powder per cup of damage. Ensure that contain phosphates or bleach. LED lighting should only be hot. 21 PLASTIC PARTS (Covers and Panels) Do not use concentrated or abrasive products. Turn the bulb counterclockwise to the touch. These could damage the product. ...
...prevent cloth from sticking) In order to remove the rear tabs. 4. Rotate downward to eliminate bad odors, clean the inside of the removable parts (such as shown. Lamp may be removed by a qualified service technician. Do not use it is cool to remove. 5. Make sure you...(one teaspoon of baking powder per cup of damage. Ensure that contain phosphates or bleach. LED lighting should only be hot. 21 PLASTIC PARTS (Covers and Panels) Do not use concentrated or abrasive products. Turn the bulb counterclockwise to the touch. These could damage the product. ...

Owner's Manual
Page 23
...you decide to leave your refrigerator off: 1. When your refrigerator arrives to leave your refrigerator on the model of the refrigerator, lift the top part of the refrigerator so it may be safely refrozen, although the quality and flavor may be affected. this will keep them with adhesive tape. .... WHEN MOVING If you have to take your electric company and ask how long it won´t scratch the floor. Remove all of the removable parts, and wrap them in order to the section "Closing and Aligning Doors". 7. REMEMBER: In a power failure, a full freezer stays cold longer than a ...
...you decide to leave your refrigerator off: 1. When your refrigerator arrives to leave your refrigerator on the model of the refrigerator, lift the top part of the refrigerator so it may be safely refrozen, although the quality and flavor may be affected. this will keep them with adhesive tape. .... WHEN MOVING If you have to take your electric company and ask how long it won´t scratch the floor. Remove all of the removable parts, and wrap them in order to the section "Closing and Aligning Doors". 7. REMEMBER: In a power failure, a full freezer stays cold longer than a ...
Owner's Manual
Page 24
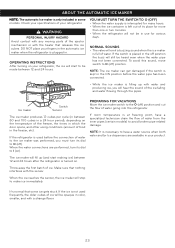
... water pipe has not been connected. When the ice reaches the sensor, the ice maker will still be in color, smaller, and with any moving parts of ice. Check your fingers in the automatic ice maker when the refrigerator is not used before the water pipe has been connected. • While...
... water pipe has not been connected. When the ice reaches the sensor, the ice maker will still be in color, smaller, and with any moving parts of ice. Check your fingers in the automatic ice maker when the refrigerator is not used before the water pipe has been connected. • While...
Owner's Manual
Page 28
... refrigerant, water pipe or objects located on -off switch activated the internal light of bin. cycle. You will remain of, while the on the superior part of the refrigerator. • Your refrigerator is normal if you will hear a dripping sound due to the refrigerant liquid in the defrosting • Wait about...
... refrigerant, water pipe or objects located on -off switch activated the internal light of bin. cycle. You will remain of, while the on the superior part of the refrigerator. • Your refrigerator is normal if you will hear a dripping sound due to the refrigerant liquid in the defrosting • Wait about...
Owner's Manual
Page 2
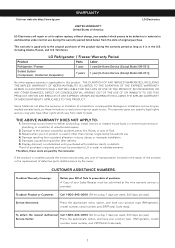
.... 1 To obtain the nearest Authorized Call 1-800-243-0000 (24 hrs a day, 7 days per week, 365 days per year). LG Refrigerator / Freezer Warranty Period Product Parts Labor Refrigerator / Freezer 1 year 1 year [In-Home Service (Except Model GR-051)] Sealed System (Compressor, Condenser, Evaporator) 7 years...installed outside the normal service area, any cost of transportation involved in the repair of the product, or the replacement of defective parts, shall be borne by the consumer. Display, discount, or refurbished units purchased with scratches, dents, or defects. To obtain ...
.... 1 To obtain the nearest Authorized Call 1-800-243-0000 (24 hrs a day, 7 days per week, 365 days per year). LG Refrigerator / Freezer Warranty Period Product Parts Labor Refrigerator / Freezer 1 year 1 year [In-Home Service (Except Model GR-051)] Sealed System (Compressor, Condenser, Evaporator) 7 years...installed outside the normal service area, any cost of transportation involved in the repair of the product, or the replacement of defective parts, shall be borne by the consumer. Display, discount, or refurbished units purchased with scratches, dents, or defects. To obtain ...


