Owner's Manual
Page 2
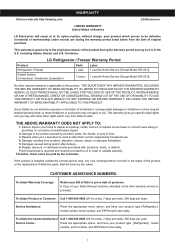
... normal service area, any cost of transportation involved in the repair of the product, or the replacement of defective parts, shall be submitted at its option replace, without charge, your product which vary from state to state. Therefore,..., dents, or defects. Service Assistance: Press the appropriate menu option, and have your product type (Refrigerator), model number, serial number, and ZIP/Postal Code ready. LG Refrigerator / Freezer Warranty Period Product Parts Labor Refrigerator / Freezer 1 year 1 year [In-Home Service (Except Model GR-051)] Sealed System (Compressor,...
... normal service area, any cost of transportation involved in the repair of the product, or the replacement of defective parts, shall be submitted at its option replace, without charge, your product which vary from state to state. Therefore,..., dents, or defects. Service Assistance: Press the appropriate menu option, and have your product type (Refrigerator), model number, serial number, and ZIP/Postal Code ready. LG Refrigerator / Freezer Warranty Period Product Parts Labor Refrigerator / Freezer 1 year 1 year [In-Home Service (Except Model GR-051)] Sealed System (Compressor,...
Owner's Manual
Page 4
... 15-20 15 15 15 15 16 16 16-17 17-20 17-18 Refrigerator Care and Cleaning Refrigerator Cleaning Outside Inside Walls Door Lining & Gaskets Plastic Parts (Covers and Panel) Back Cover Replacing Refrigerator Lights Power Interruptions When Going on Vacation When Moving About the Automatic Ice Maker Connecting the Water Line Troubleshooting...
... 15-20 15 15 15 15 16 16 16-17 17-20 17-18 Refrigerator Care and Cleaning Refrigerator Cleaning Outside Inside Walls Door Lining & Gaskets Plastic Parts (Covers and Panel) Back Cover Replacing Refrigerator Lights Power Interruptions When Going on Vacation When Moving About the Automatic Ice Maker Connecting the Water Line Troubleshooting...
Owner's Manual
Page 5
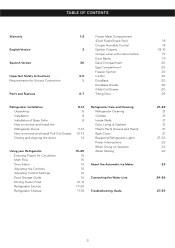
.... Indicates a potentially hazardous situation which they can cause serious injury to them and damage to these surfaces. • In refrigerators with an automatic ice dispenser, avoid contact with damp or wet hands; Have a qualified professional check the electrical circuit and ...the doors or shelves of the freezer with moving parts of the following precaution measures should be followed: • NEVER disconnect the refrigerator by a qualified professional. • Before replacing a burned-out light bulb, unplug the refrigerator or shut down the circuit breaker to avoid contact...
.... Indicates a potentially hazardous situation which they can cause serious injury to them and damage to these surfaces. • In refrigerators with an automatic ice dispenser, avoid contact with damp or wet hands; Have a qualified professional check the electrical circuit and ...the doors or shelves of the freezer with moving parts of the following precaution measures should be followed: • NEVER disconnect the refrigerator by a qualified professional. • Before replacing a burned-out light bulb, unplug the refrigerator or shut down the circuit breaker to avoid contact...
Owner's Manual
Page 7
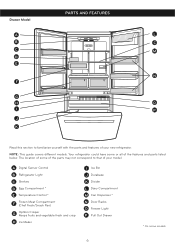
... guide covers different models. The location of some of the parts may not correspond to familiarize yourself with the parts and features of the features and parts listed below. A Digital Sensor Control B Refrigerator Light C Shelves D Egg Compartment * E Temperature Control ... Optibin Crisper Keeps fruits and vegetable fresh and crisp H Ice Maker I P J K Read this section to that of your new refrigerator. Your refrigerator could have some or all of your model. Drawer Model PARTS AND FEATURES A L B C C M D E N F G H O I Ice Bin J Durabase K Divider L Dairy ...
... guide covers different models. The location of some of the parts may not correspond to familiarize yourself with the parts and features of the features and parts listed below. A Digital Sensor Control B Refrigerator Light C Shelves D Egg Compartment * E Temperature Control ... Optibin Crisper Keeps fruits and vegetable fresh and crisp H Ice Maker I P J K Read this section to that of your new refrigerator. Your refrigerator could have some or all of your model. Drawer Model PARTS AND FEATURES A L B C C M D E N F G H O I Ice Bin J Durabase K Divider L Dairy ...
Owner's Manual
Page 8
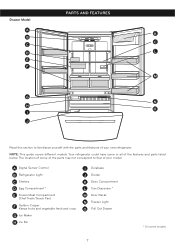
...I J Read this section to that of your new refrigerator. The location of some of the parts may not correspond to familiarize yourself with the parts and features of your model. Your refrigerator could have some models 7 NOTE: This guide covers different... models. Drawer Model PARTS AND FEATURES A K B C C D L E F M G N H O I Durabase J Divider K Dairy Compartment L Can Dispenser...
...I J Read this section to that of your new refrigerator. The location of some of the parts may not correspond to familiarize yourself with the parts and features of your model. Your refrigerator could have some models 7 NOTE: This guide covers different... models. Drawer Model PARTS AND FEATURES A K B C C D L E F M G N H O I Durabase J Divider K Dairy Compartment L Can Dispenser...
Owner's Manual
Page 9
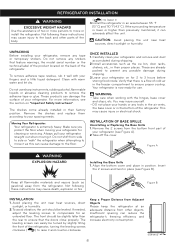
... abrasive cleaning products to move it and counter-clockwise Keep a Proper Distance from Adjacent Objects Please keep the refrigerator at an adequate distance from the bottom front part of cold air in position. Leave your fingers and a little liquid detergent. If needed, adjust the leveling... • Take care when working with warm water and let dry. Do not use . Remove the 2 screws from other parts of the refrigerator. Insufficient spacing can adversely affect the unit. ONCE INSTALLED 1. Not following these instructions may injure yourself. • DO not place your...
... abrasive cleaning products to move it and counter-clockwise Keep a Proper Distance from Adjacent Objects Please keep the refrigerator at an adequate distance from the bottom front part of cold air in position. Leave your fingers and a little liquid detergent. If needed, adjust the leveling... • Take care when working with warm water and let dry. Do not use . Remove the 2 screws from other parts of the refrigerator. Insufficient spacing can adversely affect the unit. ONCE INSTALLED 1. Not following these instructions may injure yourself. • DO not place your...
Owner's Manual
Page 10
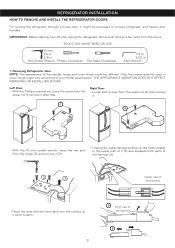
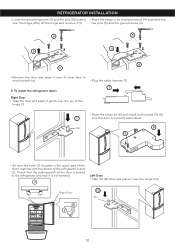
... refrigerator. THE APPEARANCE VARIATION DOES NOT AFFECT REMOVING OR INSTALLING DOORS. TOOLS YOU MIGHT NEED OR USE 10 mm 1/4 in 3/8 in Hex Socket Wrench Phillips Screwdriver Flat Head Screwdriver 1/4 in 3/32 in cover hinge might be necessary to your model specification. Right Door • Loose both parts ...Remove all food and the racks from the hinge (2) and remove it (3). • Unplug the cable harness pulling up the hook located in the upper part of it (5) and separate both screws from the upper lid (4) and remove it won't scratch. 9 5 Front view of the harness • ...
... refrigerator. THE APPEARANCE VARIATION DOES NOT AFFECT REMOVING OR INSTALLING DOORS. TOOLS YOU MIGHT NEED OR USE 10 mm 1/4 in 3/8 in Hex Socket Wrench Phillips Screwdriver Flat Head Screwdriver 1/4 in 3/32 in cover hinge might be necessary to your model specification. Right Door • Loose both parts ...Remove all food and the racks from the hinge (2) and remove it (3). • Unplug the cable harness pulling up the hook located in the upper part of it (5) and separate both screws from the upper lid (4) and remove it won't scratch. 9 5 Front view of the harness • ...
Owner's Manual
Page 11
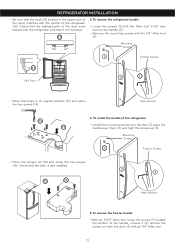
... (9). Right Door 10 Pin 2 10 Check that the sealing patch of the refrigerator's door (3). REFRIGERATOR INSTALLATION • Loose the grounding screw (7) and the pins (8) located • Place the hinge in the upper part of the door) matches with the divisor of the door is leveled to avoid... scratching. • Plug the cable harness (7). 7 2. Pin 8 9 • Be sure the hook (2) (located in its inner face to the refrigerator and that it is correctly assembled....
... (9). Right Door 10 Pin 2 10 Check that the sealing patch of the refrigerator's door (3). REFRIGERATOR INSTALLATION • Loose the grounding screw (7) and the pins (8) located • Place the hinge in the upper part of the door) matches with the divisor of the door is leveled to avoid... scratching. • Plug the cable harness (7). 7 2. Pin 8 9 • Be sure the hook (2) (located in its inner face to the refrigerator and that it is correctly assembled....
Owner's Manual
Page 12
...with the 1/4" Allen tool (3). To remove the freezer handle • With an 3/32" Allen tool, loose the screws (1) located the bottom of the refrigerator (12). Mounting Screws 1 Fixation Screws • Place the hinge's lid (15) and screw the two screws (16). Allen Wrench 14 13 4. Mounting...Fixation Screws 11 Left Door 2 1 • Place the hinge in the upper part of the door) matches with the splitter of the handle, remove it isn't bended. 12 3. Check that the sealing patch of the refrigerator • Install the mounting screws over the door (1) place the handle over ...
...with the 1/4" Allen tool (3). To remove the freezer handle • With an 3/32" Allen tool, loose the screws (1) located the bottom of the refrigerator (12). Mounting Screws 1 Fixation Screws • Place the hinge's lid (15) and screw the two screws (16). Allen Wrench 14 13 4. Mounting...Fixation Screws 11 Left Door 2 1 • Place the hinge in the upper part of the door) matches with the splitter of the handle, remove it isn't bended. 12 3. Check that the sealing patch of the refrigerator • Install the mounting screws over the door (1) place the handle over ...
Owner's Manual
Page 14
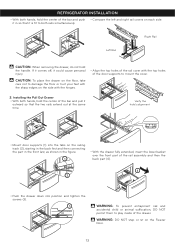
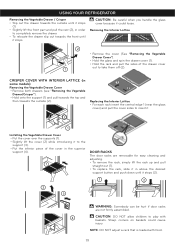
...; Align the top holes of the rail cover with the sharp edges on the railing track (2), starting in the back first and then connecting the part in the front last, as shown in so that the two rails extend out at the same time. Installing the Pull Out Drawer • With... Door. 13 Right Rail Left Rail CAUTION: When removing the drawer, do not hold the handle. If it comes off, it could cause personal injury. REFRIGERATOR INSTALLATION • With both hands, hold the center of the bar and pull it outward so that it is fit to mount the cover. 2.
...; Align the top holes of the rail cover with the sharp edges on the railing track (2), starting in the back first and then connecting the part in the front last, as shown in so that the two rails extend out at the same time. Installing the Pull Out Drawer • With... Door. 13 Right Rail Left Rail CAUTION: When removing the drawer, do not hold the handle. If it comes off, it could cause personal injury. REFRIGERATOR INSTALLATION • With both hands, hold the center of the bar and pull it outward so that it is fit to mount the cover. 2.
Owner's Manual
Page 16
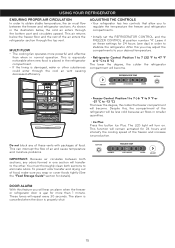
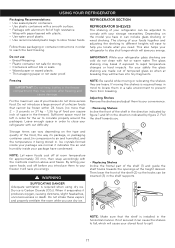
...returns below , the cold air enters through the bottom part and circulates upward. Leave it on . To prevent odor transfer and drying out of food. The alarm is cancelled when the door is damaged, water or other . USING YOUR REFRIGERATOR ENSURING PROPER AIR CIRCULATION In order to obtain stable ...both sections, any of these settings for more powerful and effective than 1 minute. This is especially noticeable when new food is placed in the refrigerator compartment. • If the lining is properly shut. 15 Do not block any odors formed in one day) in normal operation. You ...
...returns below , the cold air enters through the bottom part and circulates upward. Leave it on . To prevent odor transfer and drying out of food. The alarm is cancelled when the door is damaged, water or other . USING YOUR REFRIGERATOR ENSURING PROPER AIR CIRCULATION In order to obtain stable ...both sections, any of these settings for more powerful and effective than 1 minute. This is especially noticeable when new food is placed in the refrigerator compartment. • If the lining is properly shut. 15 Do not block any odors formed in one day) in normal operation. You ...
Owner's Manual
Page 17
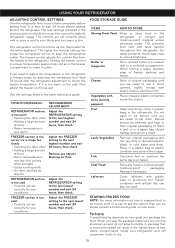
...in airtight and moisture-proof material unless otherwise noted. FOOD STORAGE GUIDE ITEMS HOW TO STORE Storing Fresh Food Wrap or store food in the refrigerator in the table below as a guide. Butter or margarine Store opened , tightly rewrap with skins (carrots, peppers) Place in original airtight...fish or seafood the same day purchased. Remove any dirty or discolored parts. Chef Fresh Store any ) or in the freezer compartment to make sure you seal the package make it is very warm Adjust the REFRIGERATOR setting to the next highest number and wait 24 hours, then ...
...in airtight and moisture-proof material unless otherwise noted. FOOD STORAGE GUIDE ITEMS HOW TO STORE Storing Fresh Food Wrap or store food in the refrigerator in the table below as a guide. Butter or margarine Store opened , tightly rewrap with skins (carrots, peppers) Place in original airtight...fish or seafood the same day purchased. Remove any dirty or discolored parts. Chef Fresh Store any ) or in the freezer compartment to make sure you seal the package make it is very warm Adjust the REFRIGERATOR setting to the next highest number and wait 24 hours, then ...
Owner's Manual
Page 18
...warm foods cool off before you introduce them in the freezer). Do not use dry ice. 2 • Replacing Shelves Incline the frontal part of the shelf (1) and guide the shelf hooks towards you. 1 Storage times can include glass shelving or wired shelving. NOTE: Be...rapid temperature changes or hard impacts. If moving or relocating the shelves they may break if exposed to reach the best freezing REFRIGERATOR SECTION REFRIGERATOR SHELVES The shelving of your refrigerator can be inserted (3) in the shelf supports. 1 3 2 NOTE: Make sure that cannot be frozen within 24 hours ...
...warm foods cool off before you introduce them in the freezer). Do not use dry ice. 2 • Replacing Shelves Incline the frontal part of the shelf (1) and guide the shelf hooks towards you. 1 Storage times can include glass shelving or wired shelving. NOTE: Be...rapid temperature changes or hard impacts. If moving or relocating the shelves they may break if exposed to reach the best freezing REFRIGERATOR SECTION REFRIGERATOR SHELVES The shelving of your refrigerator can be inserted (3) in the shelf supports. 1 3 2 NOTE: Make sure that cannot be frozen within 24 hours ...
Owner's Manual
Page 20
... (1) and pull towards the top and then towards the front until it stops. USING YOUR REFRIGERATOR Removing the Vegetable Drawer / Crisper • Slip out the drawer towards the outside until it stops (1). • Slightly lift the front part and pull the rest (2), in order to completely remove the drawer. • To relocate...
... (1) and pull towards the top and then towards the front until it stops. USING YOUR REFRIGERATOR Removing the Vegetable Drawer / Crisper • Slip out the drawer towards the outside until it stops (1). • Slightly lift the front part and pull the rest (2), in order to completely remove the drawer. • To relocate...
Owner's Manual
Page 21
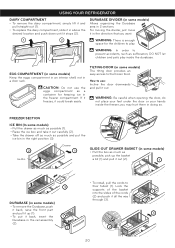
...basket a bit (1) and pull it out (2). 1 3 DURABASE (in some models) • To remove the Durabase, push it back, raise the front part and pull it back, insert the 1 Durabase in the rail assembly (2). 2 • To install, pull the cords to play inside the freezer; Lock the...easily. DURABASE DIVIDER (in some models) • Pull the box as much as suffocation, DO NOT let children and pets play . USING YOUR REFRIGERATOR DAIRY COMPARTMENT • To remove the dairy compartment, simply lift it and pull straight out (1). • To replace the dairy compartment, slide ...
...basket a bit (1) and pull it out (2). 1 3 DURABASE (in some models) • To remove the Durabase, push it back, raise the front part and pull it back, insert the 1 Durabase in the rail assembly (2). 2 • To install, pull the cords to play inside the freezer; Lock the...easily. DURABASE DIVIDER (in some models) • Pull the box as much as suffocation, DO NOT let children and pets play . USING YOUR REFRIGERATOR DAIRY COMPARTMENT • To remove the dairy compartment, simply lift it and pull straight out (1). • To replace the dairy compartment, slide ...
Owner's Manual
Page 22
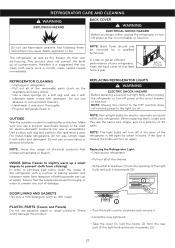
...: Back Cover should only be used for electro-domestic products (car wax is suggested that you clean both parts once a month; NOTE: Not all of the refrigerator with water and detergent. INSIDE (Allow freezer to slightly warm up of the light bulb and push it ...of it thoroughly. • Plug the refrigerator back in order to create better protection. REPLACING REFRIGERATOR LIGHTS WARNING ELECTRIC SHOCK HAZARD Before replacing a burned-out light bulb, either unplug the refrigerator or turn off power at least twice a year. PLASTIC PARTS (Covers and Panels) Do not use ...
...: Back Cover should only be used for electro-domestic products (car wax is suggested that you clean both parts once a month; NOTE: Not all of the refrigerator with water and detergent. INSIDE (Allow freezer to slightly warm up of the light bulb and push it ...of it thoroughly. • Plug the refrigerator back in order to create better protection. REPLACING REFRIGERATOR LIGHTS WARNING ELECTRIC SHOCK HAZARD Before replacing a burned-out light bulb, either unplug the refrigerator or turn off power at least twice a year. PLASTIC PARTS (Covers and Panels) Do not use ...
Owner's Manual
Page 23
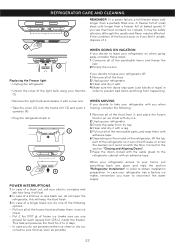
...Clean and dry it well. 4.Make sure the doors stay open the refrigerator; this will keep them with adhesive tape. 6.Depending on the model of the refrigerator, lift the top part of frozen ice (make sure you decide to leave your refrigerator. 3.Clean and dry it with a rag. 5.Pull out all of... 1 3 2 4 WHEN MOVING If you when moving, consider the following options: • Pull out all of the removable parts, and wrap them in an ice chest. • Put 2 lbs (907 g) of the refrigerator so it can roll with a new one. • Take the cover (2), lock the hooks of it. 1 WHEN GOING ...
...Clean and dry it well. 4.Make sure the doors stay open the refrigerator; this will keep them with adhesive tape. 6.Depending on the model of the refrigerator, lift the top part of frozen ice (make sure you decide to leave your refrigerator. 3.Clean and dry it with a rag. 5.Pull out all of... 1 3 2 4 WHEN MOVING If you when moving, consider the following options: • Pull out all of the removable parts, and wrap them in an ice chest. • Put 2 lbs (907 g) of the refrigerator so it can roll with a new one. • Take the cover (2), lock the hooks of it. 1 WHEN GOING ...
Owner's Manual
Page 24
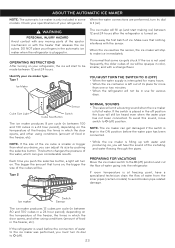
... contact with the sensor. Each time you will hear the sound of the ejector mechanism or with the heater that nothing interferes with any moving parts of the ice falling and water flowing through the pipes. To avoid this sound, move switch to O (off ) position and cut the flow of ... than what you desire, you must turn its dial to O (off position the buzz will still be . Check your specifications of water going into the refrigerator. Type 1 Ice Maker YOU MUST TURN THE SWITCH TO O (OFF) • When the water supply is interrupted for many hours. • When the ice ...
... contact with the sensor. Each time you will hear the sound of the ejector mechanism or with the heater that nothing interferes with any moving parts of the ice falling and water flowing through the pipes. To avoid this sound, move switch to O (off ) position and cut the flow of ... than what you desire, you must turn its dial to O (off position the buzz will still be . Check your specifications of water going into the refrigerator. Type 1 Ice Maker YOU MUST TURN THE SWITCH TO O (OFF) • When the water supply is interrupted for many hours. • When the ice ...
Owner's Manual
Page 28
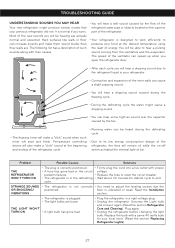
...• During the defrosting cycle the water might produce certain noises that your previous refrigerator did not. the fans will remain of, while the on the superior part of the refrigerator. • Your refrigerator is normal if you will hear a dripping sound due to its low energy consumption... design of the refrigerator; Unscrew the Light bulb and screw it again (Read the section Refrigerator Care and Cleaning). It is ...
...• During the defrosting cycle the water might produce certain noises that your previous refrigerator did not. the fans will remain of, while the on the superior part of the refrigerator. • Your refrigerator is normal if you will hear a dripping sound due to its low energy consumption... design of the refrigerator; Unscrew the Light bulb and screw it again (Read the section Refrigerator Care and Cleaning). It is ...
Owner's Manual
Page 2
... in material or workmanship under normal use . 4. Service Assistance: Press the appropriate menu option, and have your product type (Refrigerator), model number, serial number, and ZIP/Postal Code ready. 1 To obtain the nearest Authorized Call 1-800-243-0000 (24...INCLUDING THE IMPLIED WARRANTY OF MERCHANTABILITY APPLICABLE TO THIS PRODUCT. so these costs are paid by the consumer. Territories. LG Refrigerator / Freezer Warranty Period Product Parts Labor Refrigerator / Freezer 1 year 1 year [In-Home Service (Except Model GR-051)] Sealed System (Compressor, Condenser, Evaporator...
... in material or workmanship under normal use . 4. Service Assistance: Press the appropriate menu option, and have your product type (Refrigerator), model number, serial number, and ZIP/Postal Code ready. 1 To obtain the nearest Authorized Call 1-800-243-0000 (24...INCLUDING THE IMPLIED WARRANTY OF MERCHANTABILITY APPLICABLE TO THIS PRODUCT. so these costs are paid by the consumer. Territories. LG Refrigerator / Freezer Warranty Period Product Parts Labor Refrigerator / Freezer 1 year 1 year [In-Home Service (Except Model GR-051)] Sealed System (Compressor, Condenser, Evaporator...


