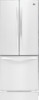
Owner's Manual
Page 2
LG Refrigerator / Freezer Warranty Period Product Parts Labor Refrigerator / Freezer 1 year 1 year [In-Home Service (Except Model GR-051)]...cost of transportation involved in the repair of the product, or the replacement of defective parts, shall be provided to LG in the U.S. Proof of purchase is required and must be submitted at its option ..., alteration, misuse, abuse, or improper installation. 5. CUSTOMER ASSISTANCE NUMBERS: To obtain Warranty Coverage: Retain your LG product is applicable to you may not apply to this product. including Alaska, Hawaii, and U.S. THE DURATION OF...
LG Refrigerator / Freezer Warranty Period Product Parts Labor Refrigerator / Freezer 1 year 1 year [In-Home Service (Except Model GR-051)]...cost of transportation involved in the repair of the product, or the replacement of defective parts, shall be provided to LG in the U.S. Proof of purchase is required and must be submitted at its option ..., alteration, misuse, abuse, or improper installation. 5. CUSTOMER ASSISTANCE NUMBERS: To obtain Warranty Coverage: Retain your LG product is applicable to you may not apply to this product. including Alaska, Hawaii, and U.S. THE DURATION OF...
Owner's Manual
Page 4
TABLE OF CONTENTS Warranty English Version Spanish Version Important Safety Instructions Requirements for Ground Connection Parts and Features 1-2 Frozen Meat Compartment (Chef Fresh/Snack Pan) Crisper Humidity Control 3 Optibin Crispers Crisper cover with interior lattice Door Racks 30... 15 15 16 16 16-17 17-20 17-18 Refrigerator Care and Cleaning Refrigerator Cleaning Outside Inside Walls Door Lining & Gaskets Plastic Parts (Covers and Panel) Back Cover Replacing Refrigerator Lights Power Interruptions When Going on Vacation When Moving About the Automatic Ice Maker Connecting the ...
TABLE OF CONTENTS Warranty English Version Spanish Version Important Safety Instructions Requirements for Ground Connection Parts and Features 1-2 Frozen Meat Compartment (Chef Fresh/Snack Pan) Crisper Humidity Control 3 Optibin Crispers Crisper cover with interior lattice Door Racks 30... 15 15 16 16 16-17 17-20 17-18 Refrigerator Care and Cleaning Refrigerator Cleaning Outside Inside Walls Door Lining & Gaskets Plastic Parts (Covers and Panel) Back Cover Replacing Refrigerator Lights Power Interruptions When Going on Vacation When Moving About the Automatic Ice Maker Connecting the ...
Owner's Manual
Page 5
... children to avoid contact with damp or wet hands; the skin could cause death, injury or damage to you on the plug. • When moving parts of injury and tell you what can refreeze food that could become caught, such as the doors, hinges and cabinets. NOTE: Setting the control to...
... children to avoid contact with damp or wet hands; the skin could cause death, injury or damage to you on the plug. • When moving parts of injury and tell you what can refreeze food that could become caught, such as the doors, hinges and cabinets. NOTE: Setting the control to...
Owner's Manual
Page 7
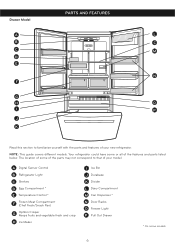
NOTE: This guide covers different models. The location of some of the parts may not correspond to familiarize yourself with the parts and features of your new refrigerator. A Digital Sensor Control B Refrigerator Light C Shelves D Egg Compartment * E Temperature... (Chef Fresh/Snack Pan) G Optibin Crisper Keeps fruits and vegetable fresh and crisp H Ice Maker I P J K Read this section to that of your model. Drawer Model PARTS AND FEATURES A L B C C M D E N F G H O I Ice Bin J Durabase K Divider L Dairy Compartment M Can Dispenser * N Door Racks O Freezer ...
NOTE: This guide covers different models. The location of some of the parts may not correspond to familiarize yourself with the parts and features of your new refrigerator. A Digital Sensor Control B Refrigerator Light C Shelves D Egg Compartment * E Temperature... (Chef Fresh/Snack Pan) G Optibin Crisper Keeps fruits and vegetable fresh and crisp H Ice Maker I P J K Read this section to that of your model. Drawer Model PARTS AND FEATURES A L B C C M D E N F G H O I Ice Bin J Durabase K Divider L Dairy Compartment M Can Dispenser * N Door Racks O Freezer ...
Owner's Manual
Page 8
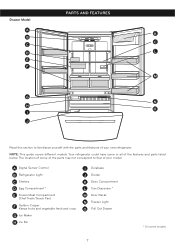
... FEATURES A K B C C D L E F M G N H O I Durabase J Divider K Dairy Compartment L Can Dispenser * M Door Racks N Freezer Light O Pull Out Drawer * On some of the parts may not correspond to familiarize yourself with the parts and features of the features and parts listed below. Your refrigerator could have some or all of your model. The location of some models 7 A Digital...
... FEATURES A K B C C D L E F M G N H O I Durabase J Divider K Dairy Compartment L Can Dispenser * M Door Racks N Freezer Light O Pull Out Drawer * On some of the parts may not correspond to familiarize yourself with the parts and features of the features and parts listed below. Your refrigerator could have some or all of your model. The location of some models 7 A Digital...
Owner's Manual
Page 9
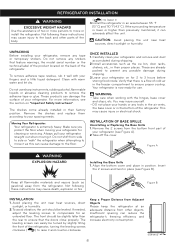
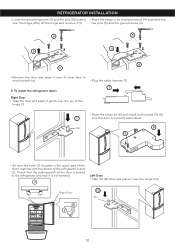
... remove and dust accumulated during shipping. 3. This may cause death, explosion or fire Figure B INSTALLATION 1. Remove the 2 screws from other parts of the body. ( ) to lower it. 3.Install the refrigerator in place (see the section on the back of your refrigerator on ...raise it and counter-clockwise Keep a Proper Distance from Adjacent Objects Please keep the refrigerator at an adequate distance from the bottom front part of the refrigerator. REFRIGERATOR INSTALLATION WARNING EXCESSIVE WEIGHT HAZARD Use the assistance of two or more information, see Figure B). If the ...
... remove and dust accumulated during shipping. 3. This may cause death, explosion or fire Figure B INSTALLATION 1. Remove the 2 screws from other parts of the body. ( ) to lower it. 3.Install the refrigerator in place (see the section on the back of your refrigerator on ...raise it and counter-clockwise Keep a Proper Distance from Adjacent Objects Please keep the refrigerator at an adequate distance from the bottom front part of the refrigerator. REFRIGERATOR INSTALLATION WARNING EXCESSIVE WEIGHT HAZARD Use the assistance of two or more information, see Figure B). If the ...
Owner's Manual
Page 10
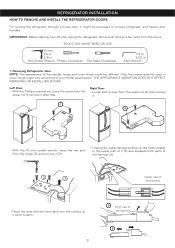
Remove all food and the racks from the hinge (2) and remove it (3). • Unplug the cable harness pulling up the hook located in the upper part of it (5) and separate both screws from the upper lid (4) and remove it. 1 4 • With the 10 mm socket wrench, loose the two ...AND INSTALL THE REFRIGERATOR DOORS For moving the refrigerator through a house door, it might be necessary to your model specification. Right Door • Loose both parts of the harness (6). 2 3 Upper view of the harness • Place the door with the inner face over the surface so it after that. ...
Remove all food and the racks from the hinge (2) and remove it (3). • Unplug the cable harness pulling up the hook located in the upper part of it (5) and separate both screws from the upper lid (4) and remove it. 1 4 • With the 10 mm socket wrench, loose the two ...AND INSTALL THE REFRIGERATOR DOORS For moving the refrigerator through a house door, it might be necessary to your model specification. Right Door • Loose both parts of the harness (6). 2 3 Upper view of the harness • Place the door with the inner face over the surface so it after that. ...
Owner's Manual
Page 11
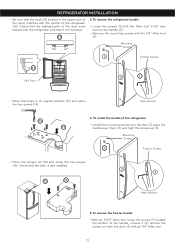
REFRIGERATOR INSTALLATION • Loose the grounding screw (7) and the pins (8) located • Place the hinge in the upper part of the door) matches with the divisor of the refrigerator's door (3). Pin 8 9 • Be sure the hook (2) (located in its inner face to the refrigerator ...
REFRIGERATOR INSTALLATION • Loose the grounding screw (7) and the pins (8) located • Place the hinge in the upper part of the door) matches with the divisor of the refrigerator's door (3). Pin 8 9 • Be sure the hook (2) (located in its inner face to the refrigerator ...
Owner's Manual
Page 12
Mounting Screws 3 Fixation Screws 11 Left Door 2 1 • Place the hinge in the upper part of the door) matches with the splitter of the door ends leveled with the 1/4" Allen tool (3). REFRIGERATOR INSTALLATION • Be sure that the door is ...
Mounting Screws 3 Fixation Screws 11 Left Door 2 1 • Place the hinge in the upper part of the door) matches with the splitter of the door ends leveled with the 1/4" Allen tool (3). REFRIGERATOR INSTALLATION • Be sure that the door is ...
Owner's Manual
Page 14
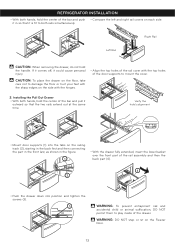
... to damage the floor or hurt your feet with the sharp edges on the railing track (2), starting in the back first and then connecting the part in the front last, as shown in so that the two rails extend out at the same time. If it comes off, it is fit... sit on each side. it in the figure. 1 • With the drawer fully extended, insert the lower basket over the front part of the rail assembly and then the back part (4). 4 2 • Push the drawer down into position and tighten the screws (3). 3 WARNING: To prevent entrapment risk and accidental child or animal...
... to damage the floor or hurt your feet with the sharp edges on the railing track (2), starting in the back first and then connecting the part in the front last, as shown in so that the two rails extend out at the same time. If it comes off, it is fit... sit on each side. it in the figure. 1 • With the drawer fully extended, insert the lower basket over the front part of the rail assembly and then the back part (4). 4 2 • Push the drawer down into position and tighten the screws (3). 3 WARNING: To prevent entrapment risk and accidental child or animal...
Owner's Manual
Page 16
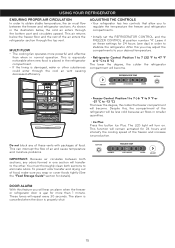
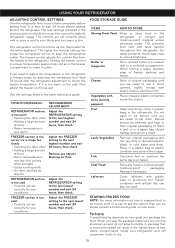
... 8 °C) The lower the degree, the colder the refrigerator compartment will become . As shown in order to the other substances could enter through the bottom part and circulates upward. This air returns below , the cold air enters through the cool air vent causing decreased efficiency. Leave it on . USING YOUR REFRIGERATOR...
... 8 °C) The lower the degree, the colder the refrigerator compartment will become . As shown in order to the other substances could enter through the bottom part and circulates upward. This air returns below , the cold air enters through the cool air vent causing decreased efficiency. Leave it on . USING YOUR REFRIGERATOR...
Owner's Manual
Page 17
... liking and ice cream is best to wait 24 hours before adding food to cool down completely before adding food. Remove any dirty or discolored parts. Fruit Wash and let dry; Wash in airtight and moisture-proof material unless otherwise noted. Packaging A great freezing depends on a shelf. A package that is incorrectly...
... liking and ice cream is best to wait 24 hours before adding food to cool down completely before adding food. Remove any dirty or discolored parts. Fruit Wash and let dry; Wash in airtight and moisture-proof material unless otherwise noted. Packaging A great freezing depends on a shelf. A package that is incorrectly...
Owner's Manual
Page 18
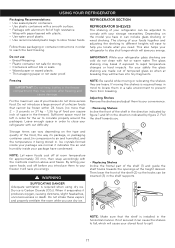
... save you introduce them from breaking. Follow these vapors and properly ventilate the room while you use dry ice. 2 • Replacing Shelves Incline the frontal part of the shelf (1) and guide the shelf hooks towards you have condensed. Do not introduce a large amount of tempered glass so when at the height...
... save you introduce them from breaking. Follow these vapors and properly ventilate the room while you use dry ice. 2 • Replacing Shelves Incline the frontal part of the shelf (1) and guide the shelf hooks towards you have condensed. Do not introduce a large amount of tempered glass so when at the height...
Owner's Manual
Page 20
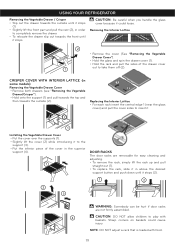
... Drawer/Crisper"). • Hold onto the support (1) and pull towards the top and then towards the front until it stops (1). • Slightly lift the front part and pull the rest (2), in order to play with food. 19
... Drawer/Crisper"). • Hold onto the support (1) and pull towards the top and then towards the front until it stops (1). • Slightly lift the front part and pull the rest (2), in order to play with food. 19
Owner's Manual
Page 21
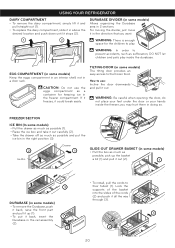
... replace the dairy compartment, slide it in a door rack. EGG COMPARTMENT (in some models) • To remove the Durabase, push it back, raise the front part and pull it up (1). • To put it back, insert the 1 Durabase in the rail assembly (2). 2 • To install, pull the cords to use the...
... replace the dairy compartment, slide it in a door rack. EGG COMPARTMENT (in some models) • To remove the Durabase, push it back, raise the front part and pull it up (1). • To put it back, insert the 1 Durabase in the rail assembly (2). 2 • To install, pull the cords to use the...
Owner's Manual
Page 22
...for seven minutes. Ensure that the powder dissolves thoroughly, in order to prevent any sort of damage. • Pull out all of the removable parts (such as the vegetable and dairy doors). • Use a clean sponge (or a soft rag) and use a product specifically design to prevent... your refrigerator. When replacing them, make sure they are the same size, shape, and of a potency of chemical products that you clean both parts once a month; Not following these instructions can cause death, explosion or fire. Do not use flammable cleaners. The refrigerator, as well as dish...
...for seven minutes. Ensure that the powder dissolves thoroughly, in order to prevent any sort of damage. • Pull out all of the removable parts (such as the vegetable and dairy doors). • Use a clean sponge (or a soft rag) and use a product specifically design to prevent... your refrigerator. When replacing them, make sure they are the same size, shape, and of a potency of chemical products that you clean both parts once a month; Not following these instructions can cause death, explosion or fire. Do not use flammable cleaners. The refrigerator, as well as dish...
Owner's Manual
Page 23
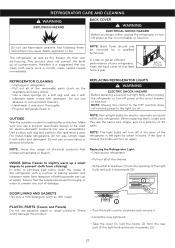
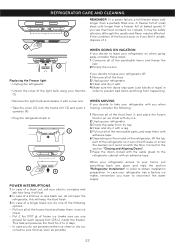
... ON VACATION If you do not possess neither ice chest or dry ice, consume your refrigerator on the model of the refrigerator, lift the top part of the perishable items and freeze the rest. 3 2.Empty the ice bin. REFRIGERATOR CARE AND CLEANING REMEMBER: In a power failure, a full freezer stays cold longer... cover (2), lock the hooks of frozen ice (make sure you see that food contains ice crystals, it with a rag. 5.Pull out all of the removable parts, and wrap them in an ice chest. • Put 2 lbs (907 g) of it (3) and push it can roll with an adhesive tape. Keep the doors...
... ON VACATION If you do not possess neither ice chest or dry ice, consume your refrigerator on the model of the refrigerator, lift the top part of the perishable items and freeze the rest. 3 2.Empty the ice bin. REFRIGERATOR CARE AND CLEANING REMEMBER: In a power failure, a full freezer stays cold longer... cover (2), lock the hooks of frozen ice (make sure you see that food contains ice crystals, it with a rag. 5.Pull out all of the removable parts, and wrap them in an ice chest. • Put 2 lbs (907 g) of it (3) and push it can roll with an adhesive tape. Keep the doors...
Owner's Manual
Page 24
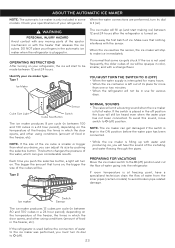
... the water pipe has not been connected. DO NOT place your specifications of the cubes will be opaque in color, smaller, and with any moving parts of ice. OPERATING INSTRUCTIONS After turning on . It's normal that nothing interferes with water and producing ice, you can adjust its place for various days...
... the water pipe has not been connected. DO NOT place your specifications of the cubes will be opaque in color, smaller, and with any moving parts of ice. OPERATING INSTRUCTIONS After turning on . It's normal that nothing interferes with water and producing ice, you can adjust its place for various days...
Owner's Manual
Page 28
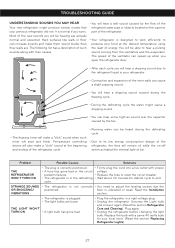
... open the refrigerator door. • After each cycle you will hear a dripping sound due to end. You will remain of, while the on the superior part of the refrigerator. • Your refrigerator is in a right voltage plug. • Unplug the refrigerator. It is plugged. • The light bulbs are . Temperature controlling...
... open the refrigerator door. • After each cycle you will hear a dripping sound due to end. You will remain of, while the on the superior part of the refrigerator. • Your refrigerator is in a right voltage plug. • Unplug the refrigerator. It is plugged. • The light bulbs are . Temperature controlling...
Owner's Manual
Page 2
...the warranty period as long as it is in the repair of the product, or the replacement of defective parts, shall be borne by the owner. LG ELECTRONICS SHALL NOT BE LIABLE FOR THE LOSS OF USE OF THE PRODUCT, INCONVENIENCE OR ANY OTHER DAMAGES, DIRECT... after delivery. 6. so these costs are paid by accident, pests, fire, floods, or acts of God. 3. including Alaska, Hawaii, and U.S. LG Refrigerator / Freezer Warranty Period Product Parts Labor Refrigerator / Freezer 1 year 1 year [In-Home Service (Except Model GR-051)] Sealed System (Compressor, Condenser, Evaporator) 7 years 1 year...
...the warranty period as long as it is in the repair of the product, or the replacement of defective parts, shall be borne by the owner. LG ELECTRONICS SHALL NOT BE LIABLE FOR THE LOSS OF USE OF THE PRODUCT, INCONVENIENCE OR ANY OTHER DAMAGES, DIRECT... after delivery. 6. so these costs are paid by accident, pests, fire, floods, or acts of God. 3. including Alaska, Hawaii, and U.S. LG Refrigerator / Freezer Warranty Period Product Parts Labor Refrigerator / Freezer 1 year 1 year [In-Home Service (Except Model GR-051)] Sealed System (Compressor, Condenser, Evaporator) 7 years 1 year...


