Owner's Manual
Page 3
... EXPRESS OR IMPLIED WARRANTY, INCLUDINGTHE IMPLIED WARRANTYOF MERCHANTABILITYAPPLICABLE TO THIS PRODUCT. Call 1-888-542-2623(1-888-LG-CANADA) and choose the appropriate prompt. LG ELECTRONICS CANADA, INC. so these costs are the responsibility of God. 3. This warranty gives you ... the intended purpose. 4. Therefore, these limitationsor exclusionsmay not apply to you may also have product type (refrigerator) and PostalCode ready. WARRANTY PERIOD MODEL# : LABOR : 1 Years PARTS : 1 Years SERIALNUMBER : SEALED SYSTEM : Labor/1 Year, Parts/7 Years (Compressor, condenser and evaporator). ...
... EXPRESS OR IMPLIED WARRANTY, INCLUDINGTHE IMPLIED WARRANTYOF MERCHANTABILITYAPPLICABLE TO THIS PRODUCT. Call 1-888-542-2623(1-888-LG-CANADA) and choose the appropriate prompt. LG ELECTRONICS CANADA, INC. so these costs are the responsibility of God. 3. This warranty gives you ... the intended purpose. 4. Therefore, these limitationsor exclusionsmay not apply to you may also have product type (refrigerator) and PostalCode ready. WARRANTY PERIOD MODEL# : LABOR : 1 Years PARTS : 1 Years SERIALNUMBER : SEALED SYSTEM : Labor/1 Year, Parts/7 Years (Compressor, condenser and evaporator). ...
Owner's Manual
Page 5
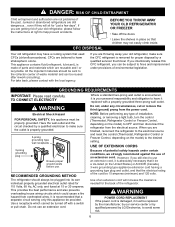
... back of installation, cleaning, or removing a light bulb, turn the control (Thermostat, Refrigerator Control or Freezer Control, depending on the model) to fines and imprisonment under provisions of an extension cord. This provides the best performance and also prevents overloading house wiring circuits which ...could cause a fire hazard from the electrical source. Use of an extension cord will sit for proper disposal by LG Electronics, to the collecton center of parts and materials which cannot be subject to the desired setting. BEFORE YOU THROW AWAY YOUR...
... back of installation, cleaning, or removing a light bulb, turn the control (Thermostat, Refrigerator Control or Freezer Control, depending on the model) to fines and imprisonment under provisions of an extension cord. This provides the best performance and also prevents overloading house wiring circuits which ...could cause a fire hazard from the electrical source. Use of an extension cord will sit for proper disposal by LG Electronics, to the collecton center of parts and materials which cannot be subject to the desired setting. BEFORE YOU THROW AWAY YOUR...
Owner's Manual
Page 6
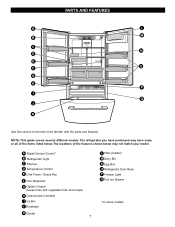
The refrigerator you have purchased may not match your model. The locations of the features shown below may have some models A Digital Sensor Control* B Refrigerator Light C Shelves D Temperature Control E Chef Fresh / Snack Pan F Can Dispenser G Optibin Crisper Keeps fruits and vegetable fresh and crisper H Customcube Icemaker I Q J K ... N Egg Box O Refrigerator Door Rack P Freezer Light Q Pull out Drawer *on some or all of the items listed below. NOTE: This guide covers several different models.
The refrigerator you have purchased may not match your model. The locations of the features shown below may have some models A Digital Sensor Control* B Refrigerator Light C Shelves D Temperature Control E Chef Fresh / Snack Pan F Can Dispenser G Optibin Crisper Keeps fruits and vegetable fresh and crisper H Customcube Icemaker I Q J K ... N Egg Box O Refrigerator Door Rack P Freezer Light Q Pull out Drawer *on some or all of the items listed below. NOTE: This guide covers several different models.
Owner's Manual
Page 7
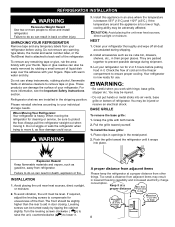
... are installed in door closing. Explosion Hazard Keep flammable materials and vapors, such as floor damage could occur. 3. Do not remove any warningtype labels, the model and serial number label, or the TechSheet that is heavy. Do not use . Let your thumb. Leveling screws can result in their proper places. To...
... are installed in door closing. Explosion Hazard Keep flammable materials and vapors, such as floor damage could occur. 3. Do not remove any warningtype labels, the model and serial number label, or the TechSheet that is heavy. Do not use . Let your thumb. Leveling screws can result in their proper places. To...
Owner's Manual
Page 9
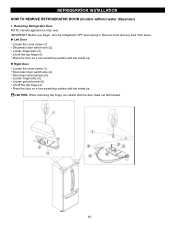
..., be careful that the door does not fall forward. 10 Loosen hinge bolts (3). Lift off the top hinge (4). REFRIGERATOR INSTALLATION HOW TO REMOVE REFRIGERATOR DOOR (models without water dispenser) 1.
..., be careful that the door does not fall forward. 10 Loosen hinge bolts (3). Lift off the top hinge (4). REFRIGERATOR INSTALLATION HOW TO REMOVE REFRIGERATOR DOOR (models without water dispenser) 1.
Owner's Manual
Page 11
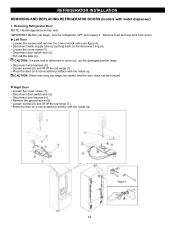
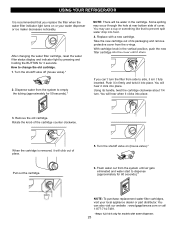
... careful that the door does not fall forward. Place the door on a non-scratching surface with water dispenser) 1. REFRIGERATOR INSTALLATION REMOVING AND REPLACING REFRIGERATOR DOORS (models with the inside up . IMPORTANT: Before you begin, turn the refrigerator OFF and unplug it. Loosen screws (6) and lift off the top hinge (7). Right Door...
... careful that the door does not fall forward. Place the door on a non-scratching surface with water dispenser) 1. REFRIGERATOR INSTALLATION REMOVING AND REPLACING REFRIGERATOR DOORS (models with the inside up . IMPORTANT: Before you begin, turn the refrigerator OFF and unplug it. Loosen screws (6) and lift off the top hinge (7). Right Door...
Owner's Manual
Page 16
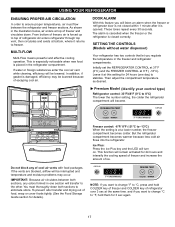
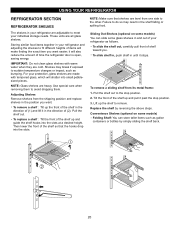
... freezer compartment becomes colder. Initially set the REFRIGERATOR CONTROL at 37°F (3°C) and the FREEZER CONTROL at the same time. Premium Model (Identify your control type) Refrigerator control: 33°F/46°F (0°C to stabilize. But the refrigerator compartment becomes warmer because less ...this setting for 24 hours and intensify the cooling speed of freezer and increase the amount of refrigerator. SETTING THE CONTROLS (Models without water dispenser) Your refrigerator has two controls that let you regulate the temperature in the illustration below, air enters at ...
... freezer compartment becomes colder. Initially set the REFRIGERATOR CONTROL at 37°F (3°C) and the FREEZER CONTROL at the same time. Premium Model (Identify your control type) Refrigerator control: 33°F/46°F (0°C to stabilize. But the refrigerator compartment becomes warmer because less ...this setting for 24 hours and intensify the cooling speed of freezer and increase the amount of refrigerator. SETTING THE CONTROLS (Models without water dispenser) Your refrigerator has two controls that let you regulate the temperature in the illustration below, air enters at ...
Owner's Manual
Page 19
... slots at a desired height. These units are heavy. Shelves may result in the shelf falling or spilling food. Convenience Shelves (optional on some models) You can slide some models) Folding Shelf: You can store taller items such as bumping. Lift up the front of the shelf in the direction of time the...
... slots at a desired height. These units are heavy. Shelves may result in the shelf falling or spilling food. Convenience Shelves (optional on some models) You can slide some models) Folding Shelf: You can store taller items such as bumping. Lift up the front of the shelf in the direction of time the...
Owner's Manual
Page 20
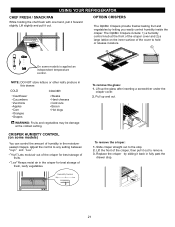
...cuts Bacon Hot dogs WARNING: Fruits and vegetables may be damage at the front of the crisper cover and 2) a large lattice on some models is applied an independent temperature control. Lift slightly and pull it forward slightly. The OptiBin Crispers include: 1) a humidity control knob at the .... OPTIBIN CRISPERS The OptiBin Crispers provide fresher-tasting fruit and vegetables by sliding it out to hold or release moisture. 1 2 On some models) You can control the amount of fresh, leafy vegetables. " ":Lets moist air out of the crisper for best storage of humidity in ...
...cuts Bacon Hot dogs WARNING: Fruits and vegetables may be damage at the front of the crisper cover and 2) a large lattice on some models is applied an independent temperature control. Lift slightly and pull it forward slightly. The OptiBin Crispers include: 1) a humidity control knob at the .... OPTIBIN CRISPERS The OptiBin Crispers provide fresher-tasting fruit and vegetables by sliding it out to hold or release moisture. 1 2 On some models) You can control the amount of fresh, leafy vegetables. " ":Lets moist air out of the crisper for best storage of humidity in ...
Owner's Manual
Page 21
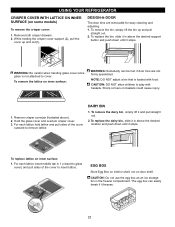
... crisper drawers. 2. For each lattice insert middle tab in above the desired support button and push down until it stops. To replace lattice on some models) To remove the crisper cover: 1. The egg box can be hurt if door bins are removable for easy cleaning and adjusting. 1. DESIGN-A-DOOR The door...
... crisper drawers. 2. For each lattice insert middle tab in above the desired support button and push down until it stops. To replace lattice on some models) To remove the crisper cover: 1. The egg box can be hurt if door bins are removable for easy cleaning and adjusting. 1. DESIGN-A-DOOR The door...
Owner's Manual
Page 22
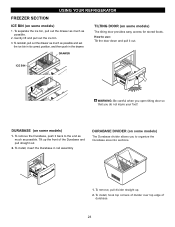
... access for stored foods. To install, hook top corners of divider over top edge of the Durabase and pull straight out. 2. TILTING DOOR (on some models) 1. DRAWER ICE BIN WARNING: Be careful when you open tilting door so that you to use: Tilt the door down and pull it back to... end as much as possible. To remove, pull divider straight up the front of durabase. 23 USING YOUR REFRIGERATOR FREEZER SECTION ICE BIN (on some models) The Durabase divider allows you do not injure your foot! Gently lift and pull out the ice bin. 3. To install, insert the Durabase in the...
... access for stored foods. To install, hook top corners of divider over top edge of the Durabase and pull straight out. 2. TILTING DOOR (on some models) 1. DRAWER ICE BIN WARNING: Be careful when you open tilting door so that you to use: Tilt the door down and pull it back to... end as much as possible. To remove, pull divider straight up the front of durabase. 23 USING YOUR REFRIGERATOR FREEZER SECTION ICE BIN (on some models) The Durabase divider allows you do not injure your foot! Gently lift and pull out the ice bin. 3. To install, insert the Durabase in the...
Owner's Manual
Page 23
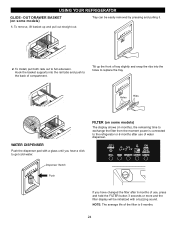
... the filter from the moment power is 6 months. 24 NOTE: The average life of the filter is connected to get cold water. FILTER (on some models) The display shows (in months), the remaining time to full extension. OUT DRAWER BASKET (on some...
... the filter from the moment power is 6 months. 24 NOTE: The average life of the filter is connected to get cold water. FILTER (on some models) The display shows (in months), the remaining time to full extension. OUT DRAWER BASKET (on some...
Owner's Manual
Page 24
... out of cover. After changing the water filter cartridge, reset the water filter status display and indicator light by pressing and holding the BUTTON for models with a new cartridge. When the cartridge is recommended that to empty the tubing (approximately for 60 seconds).* NOTE: To purchase replacement water filter cartridges, visit...
... out of cover. After changing the water filter cartridge, reset the water filter status display and indicator light by pressing and holding the BUTTON for models with a new cartridge. When the cartridge is recommended that to empty the tubing (approximately for 60 seconds).* NOTE: To purchase replacement water filter cartridges, visit...
Owner's Manual
Page 26
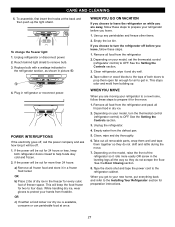
... will be out for 24 hours or less, keep the food frozen for two to OFF. While handling dry ice, wear gloves to protect your model, set the thermostat control (refrigerator control) to four days. See the Setting the Controls section. 3. Clean refrigerator, wipe it in a frozen food locker....the move . 7. WHEN YOU GO ON VACATION If you are moving your new home, put everything back and refer to leave the refrigerator on the model, raise the front of freezer space. Empty the ice bin. Replace bulb with a wattage indicated in the refrigerator section, as shown in . Remove ...
... will be out for 24 hours or less, keep the food frozen for two to OFF. While handling dry ice, wear gloves to protect your model, set the thermostat control (refrigerator control) to four days. See the Setting the Controls section. 3. Clean refrigerator, wipe it in a frozen food locker....the move . 7. WHEN YOU GO ON VACATION If you are moving your new home, put everything back and refer to leave the refrigerator on the model, raise the front of freezer space. Empty the ice bin. Replace bulb with a wattage indicated in the refrigerator section, as shown in . Remove ...

Owner's Manual
Page 27
... to 24 hours to flooding from ruptured water lines or connections. 28 If the refrigerator is used before the water line is plugged in certain models. It is made to the icemaker, set the power switch to be . (1st step is smaller or larger than a minute or two. NOTE: Keeping the... power switch in water pressure.) Every time you can damage the icemaker. DO NOT place fingers or hands on some models) to prevent serious property damage due to begin making ice. NOTE: If the cube size is the next after the 5th step.) WHEN YOU SHOULD...
... to 24 hours to flooding from ruptured water lines or connections. 28 If the refrigerator is used before the water line is plugged in certain models. It is made to the icemaker, set the power switch to be . (1st step is smaller or larger than a minute or two. NOTE: Keeping the... power switch in water pressure.) Every time you can damage the icemaker. DO NOT place fingers or hands on some models) to prevent serious property damage due to begin making ice. NOTE: If the cube size is the next after the 5th step.) WHEN YOU SHOULD...
Owner's Manual
Page 28
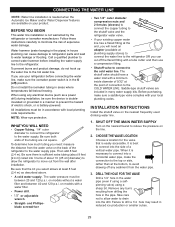
...and 2 ferrules (sleeves) to connect the copper tubing to the hot water line. Shutoff valve to connect to relieve the pressure on models without a water filter and between 20 and 120 p.s.i. SHUT OFF THE MAIN WATER SUPPLY Turn on the back of the refrigerator to ...to prevent the hazard of expensive water damage. BEFORE YOU BEGIN This water line installation is easily accessible. INSTALLATION INSTRUCTIONS Install the shutoff valve on models with a tube cutter and then use your product. When using a sharp bit. A cold water supply. Straight- Before purchasing, make the...
...and 2 ferrules (sleeves) to connect the copper tubing to the hot water line. Shutoff valve to connect to relieve the pressure on models without a water filter and between 20 and 120 p.s.i. SHUT OFF THE MAIN WATER SUPPLY Turn on the back of the refrigerator to ...to prevent the hazard of expensive water damage. BEFORE YOU BEGIN This water line installation is easily accessible. INSTALLATION INSTRUCTIONS Install the shutoff valve on models with a tube cutter and then use your product. When using a sharp bit. A cold water supply. Straight- Before purchasing, make the...
Owner's Manual
Page 31
.... Replace with an appliance bulb of refrigerant, the water line, or items stored on the floor. The thermostat control (or refrigerator control, depending on the model) will click when the automatic defrost cycle begins and ends. Refrigerator is loose in your refrigerator. Replace the fuse or reset the circuit breaker. See...
.... Replace with an appliance bulb of refrigerant, the water line, or items stored on the floor. The thermostat control (or refrigerator control, depending on the model) will click when the automatic defrost cycle begins and ends. Refrigerator is loose in your refrigerator. Replace the fuse or reset the circuit breaker. See...
Owner's Manual
Page 32
... refrigerator. The room temperature is not level. The gaskets are blocking the door open. Clean gaskets and the surface that was replaced was an older model. The refrigerator that they will not close completely above. See the Food Storage Guide Section. The doors were removed during product installation and not properly...
... refrigerator. The room temperature is not level. The gaskets are blocking the door open. Clean gaskets and the surface that was replaced was an older model. The refrigerator that they will not close completely above. See the Food Storage Guide Section. The doors were removed during product installation and not properly...


