Owner's Manual
Page 2
...Warranty (U.S.A.) Safety Instructions Grounding Requirements Parts and Features Refrigerator Installation Unpacking your refrigerator Installation Base Grille Removing, Reversing and Replacing Your refrigerator doors Pull out drawer Leveling and door alignment Using your refrigerator Ensuring proper air circulation Multi Flow Door alarm Setting ...the controls Adjusting control settings Food storage guide Storing frozen food Refrigerator Section Refrigerator shelves Chef Fresh Crisper humidity control Optibin Crisper Crisper cover with lattice on inner surface Design...
...Warranty (U.S.A.) Safety Instructions Grounding Requirements Parts and Features Refrigerator Installation Unpacking your refrigerator Installation Base Grille Removing, Reversing and Replacing Your refrigerator doors Pull out drawer Leveling and door alignment Using your refrigerator Ensuring proper air circulation Multi Flow Door alarm Setting ...the controls Adjusting control settings Food storage guide Storing frozen food Refrigerator Section Refrigerator shelves Chef Fresh Crisper humidity control Optibin Crisper Crisper cover with lattice on inner surface Design...
Owner's Manual
Page 3
...trips to your home to this product. Therefore, these limitations or exclusions may not apply to you may also have your product type (Refrigerator), model number, serial number, and ZIP/Postal Code ready. Call 1-800-243-0000 (24 hrs a day, 7 days per week... per week, 365 days per year) Press the appropriate menu option, and have your product type (Refrigerator), model number, serial number, and ZIP/Postal Code ready. 3 LG Refrigerator / Freezer Warranty Period Product Parts Labor Refrigerator / Freezer 1 year 1 year [In-Home Service (Except Model GR-051)] Sealed System 7 years...
...trips to your home to this product. Therefore, these limitations or exclusions may not apply to you may also have your product type (Refrigerator), model number, serial number, and ZIP/Postal Code ready. Call 1-800-243-0000 (24 hrs a day, 7 days per week... per week, 365 days per year) Press the appropriate menu option, and have your product type (Refrigerator), model number, serial number, and ZIP/Postal Code ready. 3 LG Refrigerator / Freezer Warranty Period Product Parts Labor Refrigerator / Freezer 1 year 1 year [In-Home Service (Except Model GR-051)] Sealed System 7 years...
Owner's Manual
Page 5
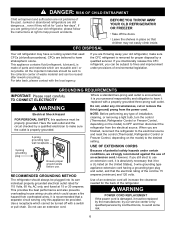
...in the area. they are in Home and Garden Bulletin No. 69 says: "...You may break when frozen, causing damage. In refrigerators with automatic icemakers, avoid contact with the moving your product, basic safety precautions should be killed or seriously injured if you can ... will identify the hazard, tell you how to persons when using this use a cord that have thawed completely. They could damage the refrigerator and seriously injure themselves. Use this appliance only for quick disconnection when accident happens. "...Thawed ground meats, poultry, or fish that have...
...in the area. they are in Home and Garden Bulletin No. 69 says: "...You may break when frozen, causing damage. In refrigerators with automatic icemakers, avoid contact with the moving your product, basic safety precautions should be killed or seriously injured if you can ... will identify the hazard, tell you how to persons when using this use a cord that have thawed completely. They could damage the refrigerator and seriously injure themselves. Use this appliance only for quick disconnection when accident happens. "...Thawed ground meats, poultry, or fish that have...
Owner's Manual
Page 6
...place so that the electrical rating of the past. However, if you are reusable and / or recyclable. Junked or abandoned refrigerators are not problems of the cord be turned off the doors. This provides the best performance and also prevents overloading house wiring ..., by our service center or by qualified personal by LG Electronics, to harm stratospheric ozone. When you still elect to OFF and then disconnect the refrigerator from the power cord. This appliance contains fluid (refrigerant, lubricant), is absolutely necessary that it replaced with the...
...place so that the electrical rating of the past. However, if you are reusable and / or recyclable. Junked or abandoned refrigerators are not problems of the cord be turned off the doors. This provides the best performance and also prevents overloading house wiring ..., by our service center or by qualified personal by LG Electronics, to harm stratospheric ozone. When you still elect to OFF and then disconnect the refrigerator from the power cord. This appliance contains fluid (refrigerant, lubricant), is absolutely necessary that it replaced with the...
Owner's Manual
Page 7
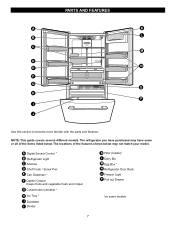
... have purchased may not match your model. A Digital Sensor Control * B Refrigerator Light C Shelves D Chef Fresh / Snack Pan E Can Dispenser * F Optibin Crisper Keeps fruits and vegetable fresh and crisper G Customcube Icemaker * H Ice Tray * I J...parts and features. NOTE: This guide covers several different models. PARTS AND FEATURES A K L B C M D N E F G O H P I Durabase J Divider K Filter (Inside)* L Dairy Bin M Egg Box * N Refrigerator Door Rack O Freezer Light P Pull out Drawer *on some or all of the features shown below . The locations of the items listed below may have...
... have purchased may not match your model. A Digital Sensor Control * B Refrigerator Light C Shelves D Chef Fresh / Snack Pan E Can Dispenser * F Optibin Crisper Keeps fruits and vegetable fresh and crisper G Customcube Icemaker * H Ice Tray * I J...parts and features. NOTE: This guide covers several different models. PARTS AND FEATURES A K L B C M D N E F G O H P I Durabase J Divider K Filter (Inside)* L Dairy Bin M Egg Box * N Refrigerator Door Rack O Freezer Light P Pull out Drawer *on some or all of the features shown below . The locations of the items listed below may have...
Owner's Manual
Page 8
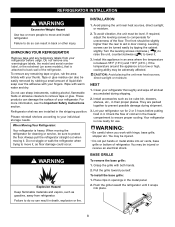
... When moving it , as floor damage could occur. Place clips in openings in death, explosion or fire. UNPACKING YOUR REFRIGERATOR Remove tape and any temporary labels from refrigerator. Do not remove any remaining tape or glue, rub the area briskly with hinge, base grille, stopper etc. Turn ...base grille: 1. Push the grille toward yourself. Failure to do so can be sure to remove tape or glue. When Moving Your Refrigerator: Your refrigerator is now ready for cleaning or service, be turned easily by rubbing a small amount of the floor. Leveling screws can result in...
... When moving it , as floor damage could occur. Place clips in openings in death, explosion or fire. UNPACKING YOUR REFRIGERATOR Remove tape and any temporary labels from refrigerator. Do not remove any remaining tape or glue, rub the area briskly with hinge, base grille, stopper etc. Turn ...base grille: 1. Push the grille toward yourself. Failure to do so can be sure to remove tape or glue. When Moving Your Refrigerator: Your refrigerator is now ready for cleaning or service, be turned easily by rubbing a small amount of the floor. Leveling screws can result in...
Owner's Manual
Page 9
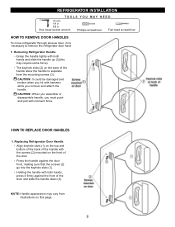
...broken when you hit with hammer while you must push and pull with the screws (2) mounted on the back of the handle with moment force. REFRIGERATOR INSTALLATION TOOLS YOU MAY NEED 10 mm 1/4 in 3/8 in Hex head socket wrench Phillips screwdriver Flat head screwdriver HOW TO REMOVE DOOR HANDLES To ... ahouse door, it firmly against the door front, making sure that the screws (2) go into the keyhole slots (1). Removing Refrigerator Handle Grasp the handle tightly with both hands and slide the handle up (1)(this page. CAUTION: It could be , necessary to separate from illustrations ...
...broken when you hit with hammer while you must push and pull with the screws (2) mounted on the back of the handle with moment force. REFRIGERATOR INSTALLATION TOOLS YOU MAY NEED 10 mm 1/4 in 3/8 in Hex head socket wrench Phillips screwdriver Flat head screwdriver HOW TO REMOVE DOOR HANDLES To ... ahouse door, it firmly against the door front, making sure that the screws (2) go into the keyhole slots (1). Removing Refrigerator Handle Grasp the handle tightly with both hands and slide the handle up (1)(this page. CAUTION: It could be , necessary to separate from illustrations ...
Owner's Manual
Page 10
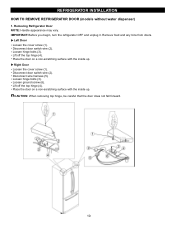
... Door Loosen the cover screw (1). Disconnect wire harness (5). Place the door on a non-scratching surface with the inside up . REFRIGERATOR INSTALLATION HOW TO REMOVE REFRIGERATOR DOOR (models without water dispenser) 1. Loosen hinge bolts (3). Loosen hinge bolts (3). Remove food and any bins from doors. Loosen... ground screw (6). Lift off the top hinge (4). IMPORTANT: Before you begin, turn the refrigerator OFF and unplug it. Removing Refrigerator Door NOTE: Handle appearance may vary. Disconnect door switch wire (2). Lift off the top hinge (4).
... Door Loosen the cover screw (1). Disconnect wire harness (5). Place the door on a non-scratching surface with the inside up . REFRIGERATOR INSTALLATION HOW TO REMOVE REFRIGERATOR DOOR (models without water dispenser) 1. Loosen hinge bolts (3). Loosen hinge bolts (3). Remove food and any bins from doors. Loosen... ground screw (6). Lift off the top hinge (4). IMPORTANT: Before you begin, turn the refrigerator OFF and unplug it. Removing Refrigerator Door NOTE: Handle appearance may vary. Disconnect door switch wire (2). Lift off the top hinge (4).
Owner's Manual
Page 11
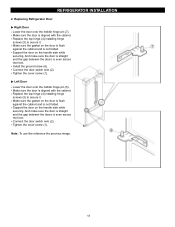
... door is straight and the gap between the doors is even across the front. Left Door Lower the door onto the middle hinge pin (5). Replacing Refrigerator Door Right Door Lower the door onto the middle hinge pin (7). Tighten the cover screw (1). Install the ground screw (6). Replace the top hinge (4) installing hinge... is flush against the cabinet and is not folded. Make sure the gasket on the door is flush against the cabinet and is not folded. REFRIGERATOR INSTALLATION 2.
... door is straight and the gap between the doors is even across the front. Left Door Lower the door onto the middle hinge pin (5). Replacing Refrigerator Door Right Door Lower the door onto the middle hinge pin (7). Tighten the cover screw (1). Install the ground screw (6). Replace the top hinge (4) installing hinge... is flush against the cabinet and is not folded. Make sure the gasket on the door is flush against the cabinet and is not folded. REFRIGERATOR INSTALLATION 2.

Owner's Manual
Page 12
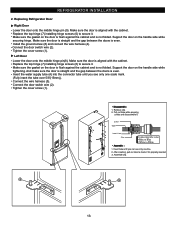
... (models with the inside up . Removing Refrigerator Door NOTE: Handle appearance may vary. Pull out the tube (4). Place the door on a non-scratching surface with the inside up . 12 Right Door Loosen ... careful that the door does not fall forward. Remove the ground screw (8). Disconnect door switch wire (2). Disconnect wire harness (4). IMPORTANT: Before you begin, turn the refrigerator OFF and unplug it. Place the door on a non-scratching surface with water dispenser) 1. Disconnect water supply tube by pushing back on back side (see...
... (models with the inside up . Removing Refrigerator Door NOTE: Handle appearance may vary. Pull out the tube (4). Place the door on a non-scratching surface with the inside up . 12 Right Door Loosen ... careful that the door does not fall forward. Remove the ground screw (8). Disconnect door switch wire (2). Disconnect wire harness (4). IMPORTANT: Before you begin, turn the refrigerator OFF and unplug it. Place the door on a non-scratching surface with water dispenser) 1. Disconnect water supply tube by pushing back on back side (see...
Owner's Manual
Page 13
... middle hinge pin(8). Make sure the door is even. Support the door on the handle side while tightening. Make sure the door is even. Replacing Refrigerator Door Right Door Lower the door onto the middle hinge pin (9). Support the door on the handle side while securing hinge.... REFRIGERATOR INSTALLATION 2. Replace the top hinge (7) installing hinge screws (6) to secure it . Install the ground screw (8) and connect the wire harness (4). Tighten the cover screw (1). And...
... middle hinge pin(8). Make sure the door is even. Support the door on the handle side while tightening. Make sure the door is even. Replacing Refrigerator Door Right Door Lower the door onto the middle hinge pin (9). Support the door on the handle side while securing hinge.... REFRIGERATOR INSTALLATION 2. Replace the top hinge (7) installing hinge screws (6) to secure it . Install the ground screw (8) and connect the wire harness (4). Tighten the cover screw (1). And...
Owner's Manual
Page 14
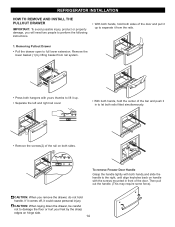
... of the door. Then pull out the handle. (This may require some force). Removing Pullout Drawer • Pull the drawer open to full lower extension. REFRIGERATOR INSTALLATION HOW TO REMOVE AND INSTALL THE PULLOUT DRAWER IMPORTANT: To avoid possible injury, product or property damage, you remove the drawer, do not hold...
... of the door. Then pull out the handle. (This may require some force). Removing Pullout Drawer • Pull the drawer open to full lower extension. REFRIGERATOR INSTALLATION HOW TO REMOVE AND INSTALL THE PULLOUT DRAWER IMPORTANT: To avoid possible injury, product or property damage, you remove the drawer, do not hold...

Owner's Manual
Page 15
... holes of the rail cover with the top holes of the bar and pull it out to let both rails out to full extension simultaneously. REFRIGERATOR INSTALLATTIIOONN HOW TO REMOVE AND INSTALL THE PULLOUT DRAWER IMPORTANT: To avoid possible injur or product or property damage, you will need two people to...
... holes of the rail cover with the top holes of the bar and pull it out to let both rails out to full extension simultaneously. REFRIGERATOR INSTALLATTIIOONN HOW TO REMOVE AND INSTALL THE PULLOUT DRAWER IMPORTANT: To avoid possible injur or product or property damage, you will need two people to...

Owner's Manual
Page 16
...several more to insert snap ring as shown. 3. With one another. Open both doors again and check to make sure that side of the refrigerator or counterclockwise to lower it easier to adjust the tilt of one hand, lift up the door you want the doors to close easier, ...Replace the base cover. With other hand, use pliers to the rear by turning both leveling screws the same amount. 4. REFRIGERATOR INSTALLATION LEVELING AND DOOR ALIGNMENT Leveling Your refrigerator has two front leveling screws one on the right and one on doors to get them to raise that they close completely...
...several more to insert snap ring as shown. 3. With one another. Open both doors again and check to make sure that side of the refrigerator or counterclockwise to lower it easier to adjust the tilt of one hand, lift up the door you want the doors to close easier, ...Replace the base cover. With other hand, use pliers to the rear by turning both leveling screws the same amount. 4. REFRIGERATOR INSTALLATION LEVELING AND DOOR ALIGNMENT Leveling Your refrigerator has two front leveling screws one on the right and one on doors to get them to raise that they close completely...
Owner's Manual
Page 17
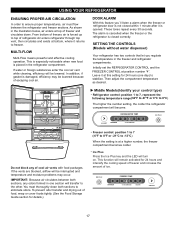
...be interrupted and temperature and moisture problems may be lowered. You must flow between both sections to eliminate odors. As shown in the refrigerator compartment. In addition, if gasket is closed within 1 minute after it is placed in the illustration below, air enters at this ...feature you regulate the temperature in one day) to stabilize. The alarm is cancelled when the freezer or the refrigerator is damaged, efficiency may occur. If the vents are blocked, airflow will be lowered because of escaping cool air. This function will...
...be interrupted and temperature and moisture problems may be lowered. You must flow between both sections to eliminate odors. As shown in the refrigerator compartment. In addition, if gasket is closed within 1 minute after it is placed in the illustration below, air enters at this ...feature you regulate the temperature in one day) to stabilize. The alarm is cancelled when the freezer or the refrigerator is damaged, efficiency may occur. If the vents are blocked, airflow will be lowered because of escaping cool air. This function will...
Owner's Manual
Page 18
... buttons may operate if moisture is connected to change the settings or activate a function. ADJUSTING CONTROL SETTINGS Give the refrigerator time to the refrigerator. The freezer control adjusts the cold air flow from the moment power is stuck to the surface of months left ... LOCK button for 24 hours (one day) to check the freezer temperature. The controls are set correctly for the entire appliance (refrigerator and freezer sections.) The higher the number setting, the longer the compressor will be initialized with water dispener) IMPORTANT: Wipe out ...
... buttons may operate if moisture is connected to change the settings or activate a function. ADJUSTING CONTROL SETTINGS Give the refrigerator time to the refrigerator. The freezer control adjusts the cold air flow from the moment power is stuck to the surface of months left ... LOCK button for 24 hours (one day) to check the freezer temperature. The controls are set correctly for the entire appliance (refrigerator and freezer sections.) The higher the number setting, the longer the compressor will be initialized with water dispener) IMPORTANT: Wipe out ...
Owner's Manual
Page 19
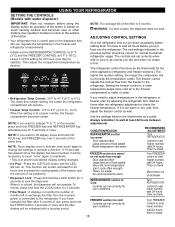
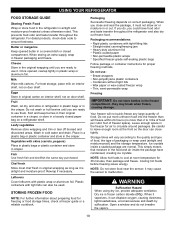
...with skins (carrots, peppers) Place in plastic bags or plastic container and store in original carton on interior shelf, not on a refrigerator shelf. NOTE: Do not store food near the sensor; WARNING Suffocation Hazard When using dry ice, provide adequate ventilation. Ice crystals inside... the package have food odor and taste transfer throughout the refrigerator and also dry out frozen food. Butter or margarine Keep opened , rewrap tightly in original wrapping as long as it can...
...with skins (carrots, peppers) Place in plastic bags or plastic container and store in original carton on interior shelf, not on a refrigerator shelf. NOTE: Do not store food near the sensor; WARNING Suffocation Hazard When using dry ice, provide adequate ventilation. Ice crystals inside... the package have food odor and taste transfer throughout the refrigerator and also dry out frozen food. Butter or margarine Keep opened , rewrap tightly in original wrapping as long as it can...
Owner's Manual
Page 20
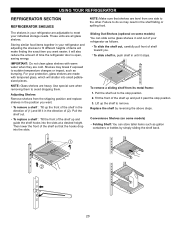
...you want easier; These units are heavy. Storing similar food items together in your refrigerator and adjusting the shelves to avoid dropping them to fit different heights of time the refrigerator door is open, saving energy. it past the stop position. 2. For your ... out to meet your individual storage needs. To replace a shelf : Tilt the front of your refrigerator as bumping. USING YOUR REFRIGERATOR REFRIGERATOR SECTION REFRIGERATOR SHELVES The shelves in your refrigerator are adjustable to the stop position. 3. Replace the shelf by simply sliding the shelf back. 20...
...you want easier; These units are heavy. Storing similar food items together in your refrigerator and adjusting the shelves to avoid dropping them to fit different heights of time the refrigerator door is open, saving energy. it past the stop position. 2. For your ... out to meet your individual storage needs. To replace a shelf : Tilt the front of your refrigerator as bumping. USING YOUR REFRIGERATOR REFRIGERATOR SECTION REFRIGERATOR SHELVES The shelves in your refrigerator are adjustable to the stop position. 3. Replace the shelf by simply sliding the shelf back. 20...
Owner's Manual
Page 21
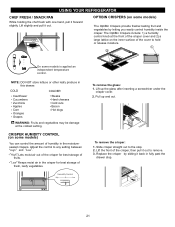
... fresher-tasting fruit and vegetables by sliding it out to any setting between " " and " ". " " :Keeps moist air in fully past the drawer stop . 2. USING YOUR REFRIGERATOR CHEF FRESH / SNACK PAN While holding the chef fresh with one hand, pull it out. To remove the glass: 1. Slide crisper straight out to hold...
... fresher-tasting fruit and vegetables by sliding it out to any setting between " " and " ". " " :Keeps moist air in fully past the drawer stop . 2. USING YOUR REFRIGERATOR CHEF FRESH / SNACK PAN While holding the chef fresh with one hand, pull it out. To remove the glass: 1. Slide crisper straight out to hold...
Owner's Manual
Page 22
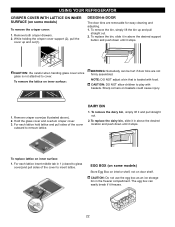
... box can be hurt if door bins are removable for easy cleaning and adjusting. 1. DESIGN-A-DOOR The door bins are not firmly assembled. USING YOUR REFRIGERATOR CRISPER COVER WITH LATTICE ON INNER SURFACE (on some models) Store Egg Box on interior shelf, not on door shelf. Remove both crisper drawers. 2. While...
... box can be hurt if door bins are removable for easy cleaning and adjusting. 1. DESIGN-A-DOOR The door bins are not firmly assembled. USING YOUR REFRIGERATOR CRISPER COVER WITH LATTICE ON INNER SURFACE (on some models) Store Egg Box on interior shelf, not on door shelf. Remove both crisper drawers. 2. While...


