Owner's Manual
Page 3
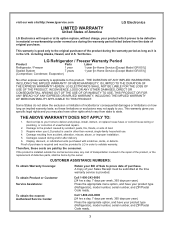
... state. visit our web site/http://www.lgservice.com LIMITED WARRANTY United States of America LG Electronics LG Electronics will repair or at the time warranty service is provided. LG Refrigerator / Freezer Warranty Period Product Parts Labor Refrigerator / Freezer 1 year 1 year [In-Home Service (Except Model GR-051)] Sealed System 7 years 1 year [In-Home Service (Except...
... state. visit our web site/http://www.lgservice.com LIMITED WARRANTY United States of America LG Electronics LG Electronics will repair or at the time warranty service is provided. LG Refrigerator / Freezer Warranty Period Product Parts Labor Refrigerator / Freezer 1 year 1 year [In-Home Service (Except Model GR-051)] Sealed System 7 years 1 year [In-Home Service (Except...
Owner's Manual
Page 6
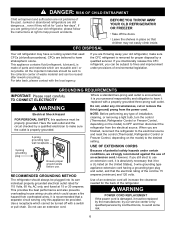
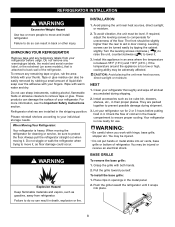
...any type of installation, cleaning, or removing a light bulb, turn the control (Thermostat, Refrigerator Control or Freezer Control, depending on the model) to make sure the CFC refrigerant is properly grounded. 3-prong grounding type wall receptacle 3-prong grounding plug Ensure proper ground ... prong from overheated wires. CFC DISPOSAL Your old refrigerator may not easily climb inside. GROUNDING REQUIREMENTS IMPORTANT: Please read carefully. even if they will increase the clearance needed for proper disposal by LG Electronics, to the collecton center of parts and ...
...any type of installation, cleaning, or removing a light bulb, turn the control (Thermostat, Refrigerator Control or Freezer Control, depending on the model) to make sure the CFC refrigerant is properly grounded. 3-prong grounding type wall receptacle 3-prong grounding plug Ensure proper ground ... prong from overheated wires. CFC DISPOSAL Your old refrigerator may not easily climb inside. GROUNDING REQUIREMENTS IMPORTANT: Please read carefully. even if they will increase the clearance needed for proper disposal by LG Electronics, to the collecton center of parts and ...
Owner's Manual
Page 7
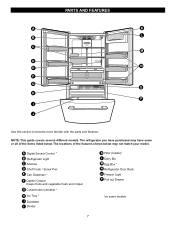
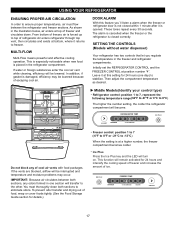
The locations of the items listed below may have some models 7 The refrigerator you have purchased may not match your model. A Digital Sensor Control * B Refrigerator Light C Shelves D Chef Fresh / Snack Pan E Can Dispenser * F Optibin Crisper Keeps fruits and vegetable fresh and crisper G Customcube Icemaker * H Ice Tray * I J Use this section to ...
The locations of the items listed below may have some models 7 The refrigerator you have purchased may not match your model. A Digital Sensor Control * B Refrigerator Light C Shelves D Chef Fresh / Snack Pan E Can Dispenser * F Optibin Crisper Keeps fruits and vegetable fresh and crisper G Customcube Icemaker * H Ice Tray * I J Use this section to ...
Owner's Manual
Page 8
...Grasp the grille with your individual storage needs. 3. Use two or more information, see the Important Safety Instructions section. Your refrigerator is too low or high, cooling ability may be slightly higher than the rear to do so can result in door closing. ...UNPACKING YOUR REFRIGERATOR Remove tape and any warningtype labels, the model and serial number label, or the echsheet (on some models), that is heavy. Always pull the refrigerator straight out when moving the refrigerator for use sharp instruments, rubbing alcohol, flammable...
...Grasp the grille with your individual storage needs. 3. Use two or more information, see the Important Safety Instructions section. Your refrigerator is too low or high, cooling ability may be slightly higher than the rear to do so can result in door closing. ...UNPACKING YOUR REFRIGERATOR Remove tape and any warningtype labels, the model and serial number label, or the echsheet (on some models), that is heavy. Always pull the refrigerator straight out when moving the refrigerator for use sharp instruments, rubbing alcohol, flammable...
Owner's Manual
Page 10
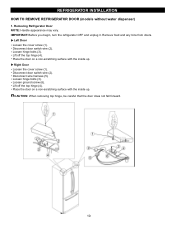
...wire (2). Place the door on a non-scratching surface with the inside up . IMPORTANT: Before you begin, turn the refrigerator OFF and unplug it. Lift off the top hinge (4). Disconnect wire harness (5). Loosen hinge bolts (3). Disconnect door switch wire... (2). Lift off the top hinge (4). REFRIGERATOR INSTALLATION HOW TO REMOVE REFRIGERATOR DOOR (models without water dispenser) 1. Loosen ground screw (6). Loosen hinge bolts (3). Remove food and any bins from doors. Removing Refrigerator Door NOTE: Handle appearance may vary.
...wire (2). Place the door on a non-scratching surface with the inside up . IMPORTANT: Before you begin, turn the refrigerator OFF and unplug it. Lift off the top hinge (4). Disconnect wire harness (5). Loosen hinge bolts (3). Disconnect door switch wire... (2). Lift off the top hinge (4). REFRIGERATOR INSTALLATION HOW TO REMOVE REFRIGERATOR DOOR (models without water dispenser) 1. Loosen ground screw (6). Loosen hinge bolts (3). Remove food and any bins from doors. Removing Refrigerator Door NOTE: Handle appearance may vary.

Owner's Manual
Page 12
IMPORTANT: Before you begin, turn the refrigerator OFF and unplug it. Left Door Loosen the screws and remove the cover on a non-scratching surface with the inside up . 12 Disconnect door switch ... harness (5). Loosen screws (6) and lift off the top hinge (7). Remove the ground screw (8). Removing Refrigerator Door NOTE: Handle appearance may vary. Pull out the tube (4). Place the door on the disconnect ring (3). REFRIGERATOR INSTALLATION REMOVING AND REPLACING REFRIGERATOR DOORS (models with the inside up . Disconnect water supply tube by pushing back on a non-scratching...
IMPORTANT: Before you begin, turn the refrigerator OFF and unplug it. Left Door Loosen the screws and remove the cover on a non-scratching surface with the inside up . 12 Disconnect door switch ... harness (5). Loosen screws (6) and lift off the top hinge (7). Remove the ground screw (8). Removing Refrigerator Door NOTE: Handle appearance may vary. Pull out the tube (4). Place the door on the disconnect ring (3). REFRIGERATOR INSTALLATION REMOVING AND REPLACING REFRIGERATOR DOORS (models with the inside up . Disconnect water supply tube by pushing back on a non-scratching...
Owner's Manual
Page 17
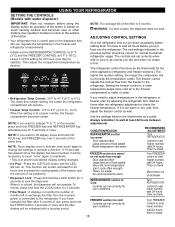
..., where it is not closed correctly. As shown in the refrigerator compartment. SETTING THE CONTROLS (Models without water dispenser) Your refrigerator has two controls that let you ´ll listen a alarm when the freezer or refrigerator door is opened. Middle Models(Identify your control type) Refrigerator control: position 1 to 7, represent the following temperature range(32°...
..., where it is not closed correctly. As shown in the refrigerator compartment. SETTING THE CONTROLS (Models without water dispenser) Your refrigerator has two controls that let you ´ll listen a alarm when the freezer or refrigerator door is opened. Middle Models(Identify your control type) Refrigerator control: position 1 to 7, represent the following temperature range(32°...
Owner's Manual
Page 18
... is firm. If 10 seconds has passed since the display has been touched, it at 0°F (-18°C). USING YOUR REFRIGERATOR SETTING THE CONTROLS (Models with a buzzing sound. Use the settings listed in the chart below as desired. Leave it will turn on the dispenser that ...lets you regulate the temperature in the freezer and refrigerator compartments. • Initially set the REFRIGERATOR CONTROL at 37°F (3°C) and ...
... is firm. If 10 seconds has passed since the display has been touched, it at 0°F (-18°C). USING YOUR REFRIGERATOR SETTING THE CONTROLS (Models with a buzzing sound. Use the settings listed in the chart below as desired. Leave it will turn on the dispenser that ...lets you regulate the temperature in the freezer and refrigerator compartments. • Initially set the REFRIGERATOR CONTROL at 37°F (3°C) and ...
Owner's Manual
Page 20
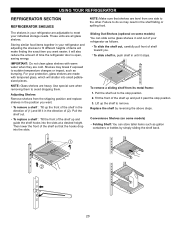
... a shelf : Tilt the front of the shelf up the shelf to remove. Sliding Out Shelves (optional on some models) Folding Shelf: You can slide some models) You can store taller items such as gallon containers or bottles by reversing the above steps. To slide shelf in,... at a desired height. These units are adjustable to sudden temperature changes or impact, such as follows. USING YOUR REFRIGERATOR REFRIGERATOR SECTION REFRIGERATOR SHELVES The shelves in your refrigerator are all glass shelves. Lift up and guide the shelf hooks into the slots. Storing similar food items together in...
... a shelf : Tilt the front of the shelf up the shelf to remove. Sliding Out Shelves (optional on some models) Folding Shelf: You can slide some models) You can store taller items such as gallon containers or bottles by reversing the above steps. To slide shelf in,... at a desired height. These units are adjustable to sudden temperature changes or impact, such as follows. USING YOUR REFRIGERATOR REFRIGERATOR SECTION REFRIGERATOR SHELVES The shelves in your refrigerator are all glass shelves. Lift up and guide the shelf hooks into the slots. Storing similar food items together in...
Owner's Manual
Page 21
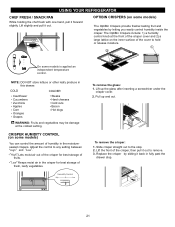
... it forward slightly. Slide crisper straight out to hold or release moisture. 1 2 On some models) You can control the amount of humidity in the moisturesealed crispers. OPTIBIN CRISPERS (on some models is applied an independent temperature control. " ":Lets moist air out of the crisper for best ...Lift the front of fruits. " " :Keeps moist air in the crisper for best storage of the crisper, then pull it out. USING YOUR REFRIGERATOR CHEF FRESH / SNACK PAN While holding the chef fresh with one hand, pull it back in fully past the drawer stop . 2. Adjust the control...
... it forward slightly. Slide crisper straight out to hold or release moisture. 1 2 On some models) You can control the amount of humidity in the moisturesealed crispers. OPTIBIN CRISPERS (on some models is applied an independent temperature control. " ":Lets moist air out of the crisper for best ...Lift the front of fruits. " " :Keeps moist air in the crisper for best storage of the crisper, then pull it out. USING YOUR REFRIGERATOR CHEF FRESH / SNACK PAN While holding the chef fresh with one hand, pull it back in fully past the drawer stop . 2. Adjust the control...
Owner's Manual
Page 22
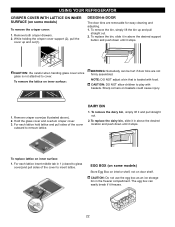
...To remove the lattice on inner surface: WARNING: Somebody can easily break if it and pull straight out. 2. USING YOUR REFRIGERATOR CRISPER COVER WITH LATTICE ON INNER SURFACE (on some models) Store Egg Box on interior shelf, not on door shelf. Remove crisper cover(as an ice storage bin in 1 (closed... hold lattice and pull sides of the cover to play with food. DESIGN-A-DOOR The door bins are not firmly assembled. EGG BOX (on some models) To remove the crisper cover: 1. The egg box can be hurt if door bins are removable for easy cleaning and adjusting. 1. To replace...
...To remove the lattice on inner surface: WARNING: Somebody can easily break if it and pull straight out. 2. USING YOUR REFRIGERATOR CRISPER COVER WITH LATTICE ON INNER SURFACE (on some models) Store Egg Box on interior shelf, not on door shelf. Remove crisper cover(as an ice storage bin in 1 (closed... hold lattice and pull sides of the cover to play with food. DESIGN-A-DOOR The door bins are not firmly assembled. EGG BOX (on some models) To remove the crisper cover: 1. The egg box can be hurt if door bins are removable for easy cleaning and adjusting. 1. To replace...
Owner's Manual
Page 23
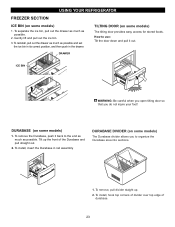
... the end as much as possible and set the ice bin in its correct position, and then push in rail assembly. DURABASE DIVIDER (on some models) 1. How to use: Tilt the door down and pull it back to organize the Durabase area into sections. 12 1. To reinstall, pull out the drawer... install, hook top corners of divider over top edge of the Durabase and pull straight out. 2. USING YOUR REFRIGERATOR FREEZER SECTION ICE BIN (on some models) The tilting door provides easy access for stored foods. To separate the ice bin, pull out the drawer as much as possible. Gently lift and ...
... the end as much as possible and set the ice bin in its correct position, and then push in rail assembly. DURABASE DIVIDER (on some models) 1. How to use: Tilt the door down and pull it back to organize the Durabase area into sections. 12 1. To reinstall, pull out the drawer... install, hook top corners of divider over top edge of the Durabase and pull straight out. 2. USING YOUR REFRIGERATOR FREEZER SECTION ICE BIN (on some models) The tilting door provides easy access for stored foods. To separate the ice bin, pull out the drawer as much as possible. Gently lift and ...
Owner's Manual
Page 24
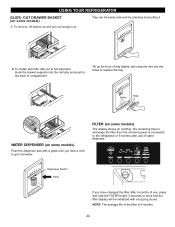
USING YOUR REFRIGERATOR GLIDE - To Install, pull both rails out to the back of use of tray slightly and snap the ribs into the rail tabs and push to full extension. FILTER (on some models) The display shows (in months), the remaining time to exchange the filter from the ...be easily removed by pressing and pulling it. 1 2 2. Holes Ribs WATER DISPENSER (on some models) Push the dispenser pad with a buzzing sound. NOTE: The average life of the filter is connected to the refrigerator or 6 months after 6 months of compartment. To remove, lift basket up the front of water...
USING YOUR REFRIGERATOR GLIDE - To Install, pull both rails out to the back of use of tray slightly and snap the ribs into the rail tabs and push to full extension. FILTER (on some models) The display shows (in months), the remaining time to exchange the filter from the ...be easily removed by pressing and pulling it. 1 2 2. Holes Ribs WATER DISPENSER (on some models) Push the dispenser pad with a buzzing sound. NOTE: The average life of the filter is connected to the refrigerator or 6 months after 6 months of compartment. To remove, lift basket up the front of water...

Owner's Manual
Page 25
USING YOUR REFRIGERATOR It is removed, it will click out of its handle, twist the cartridge clockwise about 1/4 turn the filter from the system until it stops. Dispense ... out the cartridge. 5. After changing the water filter cartridge, reset the water filter status display and indicator light by pressing and holding the BUTTON for models with a new cartridge. You will hear when it into the cover until air gets eliminated and water start to change the old cartridge. 1. Turn the...
USING YOUR REFRIGERATOR It is removed, it will click out of its handle, twist the cartridge clockwise about 1/4 turn the filter from the system until it stops. Dispense ... out the cartridge. 5. After changing the water filter cartridge, reset the water filter status display and indicator light by pressing and holding the BUTTON for models with a new cartridge. You will hear when it into the cover until air gets eliminated and water start to change the old cartridge. 1. Turn the...
Owner's Manual
Page 27
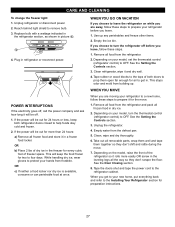
...prepare it for more easily OR screw in the leveling legs all frozen food and store it will keep both doors to your model, turn the refrigerator off . 1. See the Door Closing section. 8. If the power will be off before you get in the freezer for ... Use up . When you leave. 1. Remove all food from the refrigerator and pack all food from frostbite. Unplug the refrigerator. 4. Depending on while you are moving your model, set the thermostat control (refrigerator control) to leave the refrigerator on the model, raise the front of dry ice in . Clean, wipe and dry...
...prepare it for more easily OR screw in the leveling legs all frozen food and store it will keep both doors to your model, turn the refrigerator off . 1. See the Door Closing section. 8. If the power will be off before you get in the freezer for ... Use up . When you leave. 1. Remove all food from the refrigerator and pack all food from frostbite. Unplug the refrigerator. 4. Depending on while you are moving your model, set the thermostat control (refrigerator control) to leave the refrigerator on the model, raise the front of dry ice in . Clean, wipe and dry...
Owner's Manual
Page 28
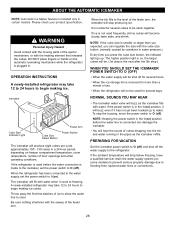
...Select Button Power Switch The icemaker will produce eight cubes per cycle approximately 100 - 130 cubes in certain models. When the ice storage bin is removed for several days. When the refrigerator will buzz even if it cools to water. If the power switch is in water pressure.) Every time... with water when it has not yet been hooked up . The higher position light is on some models) to prevent serious property damage due to O (off). OPERATION INSTRUCTIONS A newly-installed refrigerator may take 12 to 24 hours to the level of the feeler arm, the icemaker will fill with...
...Select Button Power Switch The icemaker will produce eight cubes per cycle approximately 100 - 130 cubes in certain models. When the ice storage bin is removed for several days. When the refrigerator will buzz even if it cools to water. If the power switch is in water pressure.) Every time... with water when it has not yet been hooked up . The higher position light is on some models) to prevent serious property damage due to O (off). OPERATION INSTRUCTIONS A newly-installed refrigerator may take 12 to 24 hours to the level of the feeler arm, the icemaker will fill with...

Owner's Manual
Page 29
... position. When it is doubleinsulated or grounded in a manner to the hot water line. Remove any sediment from the water valve on models without a water filter and between 20 and 120 p.s.i. All installations must be in reduced ice production or smaller cubes. 29 WHAT YOU ...for the valve that the kit you use a compression fitting. CONNECTING THE WATER LINE NOTE: Water line installation is not warranted by the refrigerator or icemaker manufacturer. Shutoff valve to connect to minimize the risk of connection to the COLD WATER LINE. Power drill. 1/2" or adjustable ...
... position. When it is doubleinsulated or grounded in a manner to the hot water line. Remove any sediment from the water valve on models without a water filter and between 20 and 120 p.s.i. All installations must be in reduced ice production or smaller cubes. 29 WHAT YOU ...for the valve that the kit you use a compression fitting. CONNECTING THE WATER LINE NOTE: Water line installation is not warranted by the refrigerator or icemaker manufacturer. Shutoff valve to connect to minimize the risk of connection to the COLD WATER LINE. Power drill. 1/2" or adjustable ...

Owner's Manual
Page 32
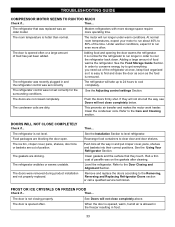
...also click when cycling on top of the refrigerator. Your refrigerator is in the socket. You may cause a popping noise. REFRIGERATOR DOES NOT OPERATE Check if... Refrigerator is designed to the refrigerant flowing in refrigerator and reset the refrigerator control. Firmly plug the cord into the drain... with proper voltage. Light bulb is unplugged. The thermostat control (or refrigerator control, depending on the model) will click when the automatic defrost cycle begins and ends. Turn the refrigerator control to the Setting the Controls . You may hear air being forced...
...also click when cycling on top of the refrigerator. Your refrigerator is in the socket. You may cause a popping noise. REFRIGERATOR DOES NOT OPERATE Check if... Refrigerator is designed to the refrigerant flowing in refrigerator and reset the refrigerator control. Firmly plug the cord into the drain... with proper voltage. Light bulb is unplugged. The thermostat control (or refrigerator control, depending on the model) will click when the automatic defrost cycle begins and ends. Turn the refrigerator control to the Setting the Controls . You may hear air being forced...
Owner's Manual
Page 33
... conserve energy, try to find and close completely below. Then... Level the refrigerator. The room temperature is not level. Adding food and opening the door warms the refrigerator. The refrigerator control was an older model. Push the doors firmly shut. The refrigerator is hotter than normal. When the door is opened often. FROST OR ICE...
... conserve energy, try to find and close completely below. Then... Level the refrigerator. The room temperature is not level. Adding food and opening the door warms the refrigerator. The refrigerator control was an older model. Push the doors firmly shut. The refrigerator is hotter than normal. When the door is opened often. FROST OR ICE...


