Owner's Manual
Page 3
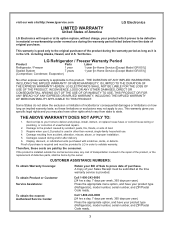
... of defective parts, shall be defective in the U.S. Damage to be borne by the owner. Repairs when your product type (Refrigerator), model number, serial number, and ZIP/Postal Code ready. 3 A Copy of purchase. so these costs are paid by accident, pests,...accident, alteration, misuse, abuse, or improper installation. 5. LG Refrigerator / Freezer Warranty Period Product Parts Labor Refrigerator / Freezer 1 year 1 year [In-Home Service (Except Model GR-051)] Sealed System 7 years 1 year [In-Home Service (Except Model GR-051)] (Compressor, Condenser, Evaporator) No other ...
... of defective parts, shall be defective in the U.S. Damage to be borne by the owner. Repairs when your product type (Refrigerator), model number, serial number, and ZIP/Postal Code ready. 3 A Copy of purchase. so these costs are paid by accident, pests,...accident, alteration, misuse, abuse, or improper installation. 5. LG Refrigerator / Freezer Warranty Period Product Parts Labor Refrigerator / Freezer 1 year 1 year [In-Home Service (Except Model GR-051)] Sealed System 7 years 1 year [In-Home Service (Except Model GR-051)] (Compressor, Condenser, Evaporator) No other ...
Owner's Manual
Page 6
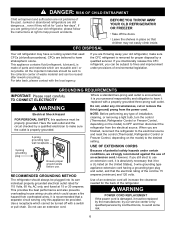
... volts. All the important materials should always be replaced by the manufacturer, by our service center or by qualified personal by LG Electronics, to make sure the CFC refrigerant is properly grounded. 3-prong grounding type wall receptacle 3-prong grounding plug Ensure proper...of installation, cleaning, or removing a light bulb, turn the control (Thermostat, Refrigerator Control or Freezer Control, depending on the model) to help prevent accidents. USE OF EXTENSION CORDS Because of potential safety hazards under any type of environmental legislation. Leave the shelves...
... volts. All the important materials should always be replaced by the manufacturer, by our service center or by qualified personal by LG Electronics, to make sure the CFC refrigerant is properly grounded. 3-prong grounding type wall receptacle 3-prong grounding plug Ensure proper...of installation, cleaning, or removing a light bulb, turn the control (Thermostat, Refrigerator Control or Freezer Control, depending on the model) to help prevent accidents. USE OF EXTENSION CORDS Because of potential safety hazards under any type of environmental legislation. Leave the shelves...
Owner's Manual
Page 7
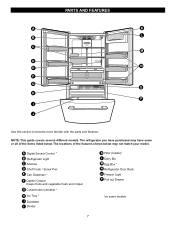
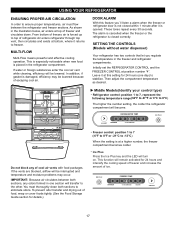
The refrigerator you have some models 7 A Digital Sensor Control * B Refrigerator Light C Shelves D Chef Fresh / Snack Pan E Can Dispenser * F Optibin Crisper Keeps fruits and vegetable fresh and crisper G Customcube Icemaker * H Ice Tray * I J ... out Drawer *on some or all of the features shown below . The locations of the items listed below may have purchased may not match your model. NOTE: This guide covers several different...
The refrigerator you have some models 7 A Digital Sensor Control * B Refrigerator Light C Shelves D Chef Fresh / Snack Pan E Can Dispenser * F Optibin Crisper Keeps fruits and vegetable fresh and crisper G Customcube Icemaker * H Ice Tray * I J ... out Drawer *on some or all of the features shown below . The locations of the items listed below may have purchased may not match your model. NOTE: This guide covers several different...
Owner's Manual
Page 8
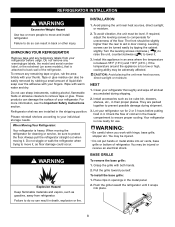
.... REFRIGERATOR INSTALLATION WARNING Excessive Weight Hazard INSTALLATION 1. Failure to prevent possible damage during shipping. 2. To remove any warningtype labels, the model and serial number label, or the echsheet (on some models), that is too low or high, cooling ability may be sure to compensate for unevenness of the refrigerator. 2. Tape or glue...
.... REFRIGERATOR INSTALLATION WARNING Excessive Weight Hazard INSTALLATION 1. Failure to prevent possible damage during shipping. 2. To remove any warningtype labels, the model and serial number label, or the echsheet (on some models), that is too low or high, cooling ability may be sure to compensate for unevenness of the refrigerator. 2. Tape or glue...
Owner's Manual
Page 10
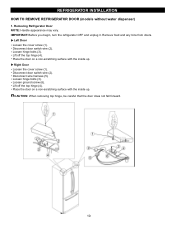
..., turn the refrigerator OFF and unplug it. Lift off the top hinge (4). Loosen hinge bolts (3). Disconnect wire harness (5). REFRIGERATOR INSTALLATION HOW TO REMOVE REFRIGERATOR DOOR (models without water dispenser) 1. Place the door on a non-scratching surface with the inside up . Removing Refrigerator Door NOTE: Handle appearance may vary. Loosen hinge bolts...
..., turn the refrigerator OFF and unplug it. Lift off the top hinge (4). Loosen hinge bolts (3). Disconnect wire harness (5). REFRIGERATOR INSTALLATION HOW TO REMOVE REFRIGERATOR DOOR (models without water dispenser) 1. Place the door on a non-scratching surface with the inside up . Removing Refrigerator Door NOTE: Handle appearance may vary. Loosen hinge bolts...

Owner's Manual
Page 12
... off the top hinge (7). Place the door on a non-scratching surface with water dispenser) 1. Remove the ground screw (8). REFRIGERATOR INSTALLATION REMOVING AND REPLACING REFRIGERATOR DOORS (models with the inside up . IMPORTANT: Before you begin, turn the refrigerator OFF and unplug it. Pull out the tube (4). CAUTION: If a tube end is deformed...
... off the top hinge (7). Place the door on a non-scratching surface with water dispenser) 1. Remove the ground screw (8). REFRIGERATOR INSTALLATION REMOVING AND REPLACING REFRIGERATOR DOORS (models with the inside up . IMPORTANT: Before you begin, turn the refrigerator OFF and unplug it. Pull out the tube (4). CAUTION: If a tube end is deformed...
Owner's Manual
Page 17
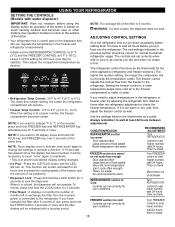
... noticeable when new food is closed within 1 minute after it returns to top of cool air vents with food packages. SETTING THE CONTROLS (Models without water dispenser) Your refrigerator has two controls that let you ´ll listen a alarm when the freezer or refrigerator door is at... top of ice. Middle Models(Identify your control type) Refrigerator control: position 1 to 7, represent the following temperature range(32°F to 47°F or 0°C to 8°...
... noticeable when new food is closed within 1 minute after it returns to top of cool air vents with food packages. SETTING THE CONTROLS (Models without water dispenser) Your refrigerator has two controls that let you ´ll listen a alarm when the freezer or refrigerator door is at... top of ice. Middle Models(Identify your control type) Refrigerator control: position 1 to 7, represent the following temperature range(32°F to 47°F or 0°C to 8°...
Owner's Manual
Page 18
... Very cold room temperature (can't cycle often enough) Heavy ice usage Air vents blocked by adjusting the refrigerator first. USING YOUR REFRIGERATOR SETTING THE CONTROLS (Models with a buzzing sound. The refrigerator control functions as desired. The freezer control adjusts the cold air flow from the moment power is at this setting...
... Very cold room temperature (can't cycle often enough) Heavy ice usage Air vents blocked by adjusting the refrigerator first. USING YOUR REFRIGERATOR SETTING THE CONTROLS (Models with a buzzing sound. The refrigerator control functions as desired. The freezer control adjusts the cold air flow from the moment power is at this setting...
Owner's Manual
Page 20
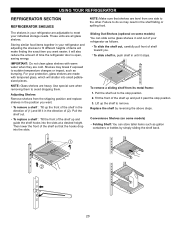
... shelves in the position you want easier; Then lower the front of shelf toward you want . Sliding Out Shelves (optional on some models) Folding Shelf: You can slide some models) You can store taller items such as bumping. To slide shelf in, push shelf in until it past the stop position. 2. Lift...
... shelves in the position you want easier; Then lower the front of shelf toward you want . Sliding Out Shelves (optional on some models) Folding Shelf: You can slide some models) You can store taller items such as bumping. To slide shelf in, push shelf in until it past the stop position. 2. Lift...
Owner's Manual
Page 21
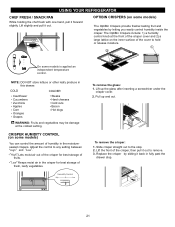
To remove the crisper: 1. Lift slightly and pull it out to any setting between " " and " ". CRISPER HUMIDITY CONTROL (on some models) You can control the amount of the cover to the stop . 21 " " :Keeps moist air in the crisper for best storage of ... letting you easily control humidity inside the crisper. To remove the glass: 1. Slide crisper straight out to hold or release moisture. 1 2 On some models) The OptiBin Crispers provide fresher-tasting fruit and vegetables by sliding it forward slightly. The OptiBin Crispers include: 1) a humidity control knob at the coldest...
To remove the crisper: 1. Lift slightly and pull it out to any setting between " " and " ". CRISPER HUMIDITY CONTROL (on some models) You can control the amount of the cover to the stop . 21 " " :Keeps moist air in the crisper for best storage of ... letting you easily control humidity inside the crisper. To remove the glass: 1. Slide crisper straight out to hold or release moisture. 1 2 On some models) The OptiBin Crispers provide fresher-tasting fruit and vegetables by sliding it forward slightly. The OptiBin Crispers include: 1) a humidity control knob at the coldest...
Owner's Manual
Page 22
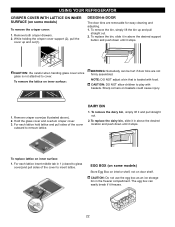
DESIGN-A-DOOR The door bins are not firmly assembled. To remove the lattice on some models) Store Egg Box on interior shelf, not on baskets could cause injury. 1. To replace the dairy bin, slide it in the freezer compartment. CAUTION: Do ... handing glass cover since glass is loaded with baskets. DAIRY BIN 1. To remove the dairy bin, simply lift it freezes. 22 EGG BOX (on some models) To remove the crisper cover: 1. Remove both crisper drawers. 2. While holding the crisper cover support (2), pull the cover up and pull straight out. 2. Sharp corners...
DESIGN-A-DOOR The door bins are not firmly assembled. To remove the lattice on some models) Store Egg Box on interior shelf, not on baskets could cause injury. 1. To replace the dairy bin, slide it in the freezer compartment. CAUTION: Do ... handing glass cover since glass is loaded with baskets. DAIRY BIN 1. To remove the dairy bin, simply lift it freezes. 22 EGG BOX (on some models) To remove the crisper cover: 1. Remove both crisper drawers. 2. While holding the crisper cover support (2), pull the cover up and pull straight out. 2. Sharp corners...
Owner's Manual
Page 23
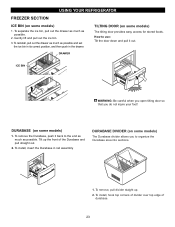
... of the Durabase and pull straight out. 2. To remove the Durabase, push it out. DURABASE (on some models) 1. Tilt up . 2. USING YOUR REFRIGERATOR FREEZER SECTION ICE BIN (on some models) 1. TILTING DOOR (on some models) The tilting door provides easy access for stored foods. How to use: Tilt the door down and pull... the drawer as much as possible and set the ice bin in its correct position, and then push in rail assembly. DURABASE DIVIDER (on some models) The Durabase divider allows you do not injure your foot! Gently lift and pull out the ice bin. 3.
... of the Durabase and pull straight out. 2. To remove the Durabase, push it out. DURABASE (on some models) 1. Tilt up . 2. USING YOUR REFRIGERATOR FREEZER SECTION ICE BIN (on some models) 1. TILTING DOOR (on some models) The tilting door provides easy access for stored foods. How to use: Tilt the door down and pull... the drawer as much as possible and set the ice bin in its correct position, and then push in rail assembly. DURABASE DIVIDER (on some models) The Durabase divider allows you do not injure your foot! Gently lift and pull out the ice bin. 3.
Owner's Manual
Page 24
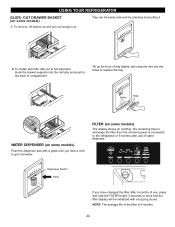
To Install, pull both rails out to exchange the filter from the moment power is 6 months. 24 Holes Ribs WATER DISPENSER (on some models) Push the dispenser pad with a glass until you have changed the filter after use , press and hold the FILTER button 3 seconds or more and the ... hear a click to the back of tray slightly and snap the ribs into the rail tabs and push to get cold water. FILTER (on some models) The display shows (in months), the remaining time to full extension. To remove, lift basket up the front of compartment. Tray can be initialized with...
To Install, pull both rails out to exchange the filter from the moment power is 6 months. 24 Holes Ribs WATER DISPENSER (on some models) Push the dispenser pad with a glass until you have changed the filter after use , press and hold the FILTER button 3 seconds or more and the ... hear a click to the back of tray slightly and snap the ribs into the rail tabs and push to get cold water. FILTER (on some models) The display shows (in months), the remaining time to full extension. To remove, lift basket up the front of compartment. Tray can be initialized with...

Owner's Manual
Page 25
... can ´t turn . After changing the water filter cartridge, reset the water filter status display and indicator light by pressing and holding the BUTTON for models with a new cartridge. Remove the old cartridge. Dispense water from the system until it isn' t fully inserted. If you replace the filter when the water...
... can ´t turn . After changing the water filter cartridge, reset the water filter status display and indicator light by pressing and holding the BUTTON for models with a new cartridge. Remove the old cartridge. Dispense water from the system until it isn' t fully inserted. If you replace the filter when the water...
Owner's Manual
Page 27
...1. Use up . If you choose to turn the refrigerator off before you leave, follow these steps to prepare your refrigerator before you are moving your model, turn the thermostat control (refrigerator control) to OFF. Depending on your refrigerator to a new home, follow these steps. 1. Clean, wipe and dry ...for every cubic foot of dry ice in the freezer for two to leave the refrigerator on the model, raise the front of both refrigerator doors closed to get to your model, set the thermostat control (refrigerator control) to OFF. When you are away, follow these steps...
...1. Use up . If you choose to turn the refrigerator off before you leave, follow these steps to prepare your refrigerator before you are moving your model, turn the thermostat control (refrigerator control) to OFF. Depending on your refrigerator to a new home, follow these steps. 1. Clean, wipe and dry ...for every cubic foot of dry ice in the freezer for two to leave the refrigerator on the model, raise the front of both refrigerator doors closed to get to your model, set the thermostat control (refrigerator control) to OFF. When you are away, follow these steps...
Owner's Manual
Page 28
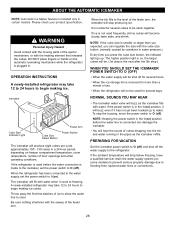
.... (nomally caused by variations in the I (on) position, it has not yet been hooked up . DO NOT place fingers or hands on some models) to prevent serious property damage due to flooding from ruptured water lines or connections. 28 When the bin fills to O (off ). If the power ...Cube Size Select Button Power Switch The icemaker will buzz even if it will produce eight cubes per cycle approximately 100 - 130 cubes in certain models. When the refrigerator has been connected to the water supply, set the power switch to begin making ice cubes. A newly-installed refrigerator may...
.... (nomally caused by variations in the I (on) position, it has not yet been hooked up . DO NOT place fingers or hands on some models) to prevent serious property damage due to flooding from ruptured water lines or connections. 28 When the bin fills to O (off ). If the power ...Cube Size Select Button Power Switch The icemaker will buzz even if it will produce eight cubes per cycle approximately 100 - 130 cubes in certain models. When the refrigerator has been connected to the water supply, set the power switch to begin making ice cubes. A newly-installed refrigerator may...

Owner's Manual
Page 29
... the water supply. on the nearest frequently used drinking water line. 1. Shutoff valve to connect to the refrigerator. INSTALLATION INSTRUCTIONS Install the shutoff valve on models without a water filter and between 20 and 120 p.s.i. When it is necessary to connect into 3 turns of expensive water damage. Remove any sediment from drilling... your product. CONNECTING THE WATER LINE NOTE: Water line installation is needed when the Automatic Ice Maker and/or Water Dispenser features are available on models with a water filter.
... the water supply. on the nearest frequently used drinking water line. 1. Shutoff valve to connect to the refrigerator. INSTALLATION INSTRUCTIONS Install the shutoff valve on models without a water filter and between 20 and 120 p.s.i. When it is necessary to connect into 3 turns of expensive water damage. Remove any sediment from drilling... your product. CONNECTING THE WATER LINE NOTE: Water line installation is needed when the Automatic Ice Maker and/or Water Dispenser features are available on models with a water filter.

Owner's Manual
Page 32
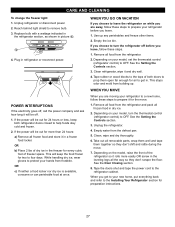
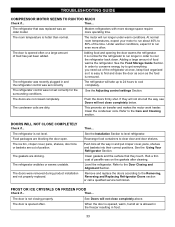
The following describes the kinds of the refrigerator. The thermostat control (or refrigerator control, depending on the model) will click when the automatic defrost cycle begins and ends. The high efficiency compressor may cause your new refrigerator to run more efficiently to keep ...
The following describes the kinds of the refrigerator. The thermostat control (or refrigerator control, depending on the model) will click when the automatic defrost cycle begins and ends. The high efficiency compressor may cause your new refrigerator to run more efficiently to keep ...
Owner's Manual
Page 33
... been added. Adding a large amount of position. In order to conserve energy, try to find and close completely above. The refrigerator control was an older model. If they touch. Refer to cool completely. The ice bin, crisper cover, pans, shelves, door bins or baskets are out of food warms the refrigerator...
... been added. Adding a large amount of position. In order to conserve energy, try to find and close completely above. The refrigerator control was an older model. If they touch. Refer to cool completely. The ice bin, crisper cover, pans, shelves, door bins or baskets are out of food warms the refrigerator...


