Owner's Manual
Page 2
... the product, or the replacement of defective parts, shall be borne by the owner. This warranty is good only to validate warranty. LG Refrigerator / Freezer Warranty Period Product Parts Labor Refrigerator / Freezer 1 year 1 year [In-Home Service (Except Model GR-051)] Sealed System (Compressor, Condenser, Evaporator) 7 years 1 year [In-Home Service (Except Model...
... the product, or the replacement of defective parts, shall be borne by the owner. This warranty is good only to validate warranty. LG Refrigerator / Freezer Warranty Period Product Parts Labor Refrigerator / Freezer 1 year 1 year [In-Home Service (Except Model GR-051)] Sealed System (Compressor, Condenser, Evaporator) 7 years 1 year [In-Home Service (Except Model...
Owner's Manual
Page 4
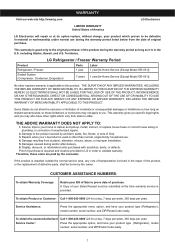
... Compartment Freezer Section 4-5 Ice Bin 5 DuraBase Durabase Divider Glide Out Drawer 6-7 Tilting Door Refrigerator Installation Unpacking Installation Installation of Base Grille How to remove and Install the Refrigerator Doors How to remove and Install Pull-Out Drawer Closing and Aligning the doors 8-14 8...the Controls Adjusting Control Settings Food Storage Guide Storing Frozen Food Refrigerator Section Refrigerator Shelves 15-20 15 15 15 15 16 16 16-17 17-20 17-18 Refrigerator Care and Cleaning Refrigerator Cleaning Outside Inside Walls Door Lining & Gaskets Plastic Parts (...
... Compartment Freezer Section 4-5 Ice Bin 5 DuraBase Durabase Divider Glide Out Drawer 6-7 Tilting Door Refrigerator Installation Unpacking Installation Installation of Base Grille How to remove and Install the Refrigerator Doors How to remove and Install Pull-Out Drawer Closing and Aligning the doors 8-14 8...the Controls Adjusting Control Settings Food Storage Guide Storing Frozen Food Refrigerator Section Refrigerator Shelves 15-20 15 15 15 15 16 16 16-17 17-20 17-18 Refrigerator Care and Cleaning Refrigerator Cleaning Outside Inside Walls Door Lining & Gaskets Plastic Parts (...
Owner's Manual
Page 5
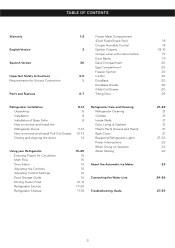
...alert symbol. Be careful closing the doors when children are cold and below 40 °F (4 °C)". • Unplug the refrigerator before utilizing the product. KEEP THESE INSTRUCTIONS 4 IMPORTANT SAFETY INSTRUCTIONS SAFETY MESSAGES This manual contains several important safety notices. Always read and... cables. The Department of Agriculture of the following precaution measures should not be dangerous to these surfaces. • In refrigerators with an automatic ice dispenser, avoid contact with moving your fingers away from the doors or shelves of injury and tell...
...alert symbol. Be careful closing the doors when children are cold and below 40 °F (4 °C)". • Unplug the refrigerator before utilizing the product. KEEP THESE INSTRUCTIONS 4 IMPORTANT SAFETY INSTRUCTIONS SAFETY MESSAGES This manual contains several important safety notices. Always read and... cables. The Department of Agriculture of the following precaution measures should not be dangerous to these surfaces. • In refrigerators with an automatic ice dispenser, avoid contact with moving your fingers away from the doors or shelves of injury and tell...
Owner's Manual
Page 6
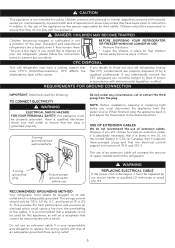
... However, if you must be replaced by our service center or qualified LG technician to replace two-prong outlets with that they do not recommend the use of space needed behind the refrigerator. 3 prong grounding plug Ensure proper ground exists before use WARNING REPLACING ELECTRICAL...the thermostat to assure that of an adequately grounded three-prong outlet. 5 and fused at 15 or 20 A. Discarded and abandoned refrigerators are properly disposed of by a qualified professional. Have a qualified electrician check your responsibility and obligation to avoid any circumstance, cut or...
... However, if you must be replaced by our service center or qualified LG technician to replace two-prong outlets with that they do not recommend the use of space needed behind the refrigerator. 3 prong grounding plug Ensure proper ground exists before use WARNING REPLACING ELECTRICAL...the thermostat to assure that of an adequately grounded three-prong outlet. 5 and fused at 15 or 20 A. Discarded and abandoned refrigerators are properly disposed of by a qualified professional. Have a qualified electrician check your responsibility and obligation to avoid any circumstance, cut or...
Owner's Manual
Page 7
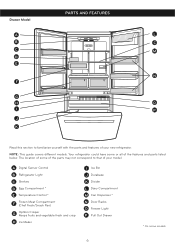
... Meat Compartment (Chef Fresh/Snack Pan) G Optibin Crisper Keeps fruits and vegetable fresh and crisp H Ice Maker I P J K Read this section to that of your new refrigerator. Your refrigerator could have some or all of the features and parts listed below. NOTE: This guide covers different models. Drawer Model PARTS AND FEATURES A L B C C M D E N F G H O I Ice...
... Meat Compartment (Chef Fresh/Snack Pan) G Optibin Crisper Keeps fruits and vegetable fresh and crisp H Ice Maker I P J K Read this section to that of your new refrigerator. Your refrigerator could have some or all of the features and parts listed below. NOTE: This guide covers different models. Drawer Model PARTS AND FEATURES A L B C C M D E N F G H O I Ice...
Owner's Manual
Page 8
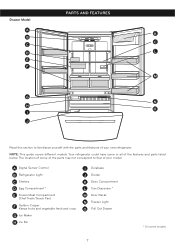
The location of some or all of the features and parts listed below. A Digital Sensor Control B Refrigerator Light C Shelves D Egg Compartment * E Frozen Meat Compartment (Chef Fresh/Snack Pan) F Optibin Crisper Keeps fruits and vegetable fresh and crisp G Ice Maker H Ice Bin I J Read ...this section to that of your model. NOTE: This guide covers different models. Your refrigerator could have some of the parts may not correspond to familiarize yourself with the parts and features of your new...
The location of some or all of the features and parts listed below. A Digital Sensor Control B Refrigerator Light C Shelves D Egg Compartment * E Frozen Meat Compartment (Chef Fresh/Snack Pan) F Optibin Crisper Keeps fruits and vegetable fresh and crisp G Ice Maker H Ice Bin I J Read ...this section to that of your model. NOTE: This guide covers different models. Your refrigerator could have some of the parts may not correspond to familiarize yourself with the parts and features of your new...
Owner's Manual
Page 9
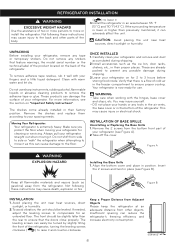
... taller than previously mentioned, it well with warm water and let dry. The shelves come already installed in position. Moving Your Refrigerator: Your refrigerator is lower or higher than the rear to ensure that there is now ready for cleaning or servicing. ONCE INSTALLED 1. This... objects. Align the bottom cover and place in their proper places. The front should be turned by slightly tilting the front of the refrigerator, turning the leveling screws clockwise ( ) to 3 hours before storing food inside. Clean with your hands or any possible damage during ...
... taller than previously mentioned, it well with warm water and let dry. The shelves come already installed in position. Moving Your Refrigerator: Your refrigerator is lower or higher than the rear to ensure that there is now ready for cleaning or servicing. ONCE INSTALLED 1. This... objects. Align the bottom cover and place in their proper places. The front should be turned by slightly tilting the front of the refrigerator, turning the leveling screws clockwise ( ) to 3 hours before storing food inside. Clean with your hands or any possible damage during ...
Owner's Manual
Page 10
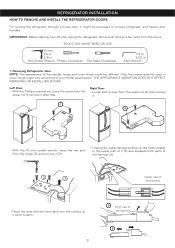
...mm 1/4 in 3/8 in Hex Socket Wrench Phillips Screwdriver Flat Head Screwdriver 1/4 in 3/32 in cover hinge might vary according to remove refrigerator and freezer door handles. Also the screws quantity used in Allen Wrench 1. Remove all food and the racks from the upper lid ... Front view of the harness • Place the door with the inner face over the surface so it after that. REFRIGERATOR INSTALLATION HOW TO REMOVE AND INSTALL THE REFRIGERATOR DOORS For moving the refrigerator through a house door, it might be different. IMPORTANT: Before starting, turn off and unplug the...
...mm 1/4 in 3/8 in Hex Socket Wrench Phillips Screwdriver Flat Head Screwdriver 1/4 in 3/32 in cover hinge might vary according to remove refrigerator and freezer door handles. Also the screws quantity used in Allen Wrench 1. Remove all food and the racks from the upper lid ... Front view of the harness • Place the door with the inner face over the surface so it after that. REFRIGERATOR INSTALLATION HOW TO REMOVE AND INSTALL THE REFRIGERATOR DOORS For moving the refrigerator through a house door, it might be different. IMPORTANT: Before starting, turn off and unplug the...
Owner's Manual
Page 11
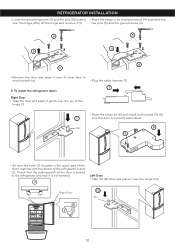
Pin 8 9 • Be sure the hook (2) (located in its inner face to the refrigerator and that it is correctly assembled. two pins (5) and the ground screw (6). 8 5 4 9 6 7 • Remove the door and place it over the hinge (10). Check ... (4) assembly the over the hinge, after, lift the hinge and remove it gently over the pin of the refrigerator's door (3). To install the refrigerator doors Right Door • Take the door and place it (9). REFRIGERATOR INSTALLATION • Loose the grounding screw (7) and the pins (8) located • Place the hinge in the upper ...
Pin 8 9 • Be sure the hook (2) (located in its inner face to the refrigerator and that it is correctly assembled. two pins (5) and the ground screw (6). 8 5 4 9 6 7 • Remove the door and place it over the hinge (10). Check ... (4) assembly the over the hinge, after, lift the hinge and remove it gently over the pin of the refrigerator's door (3). To install the refrigerator doors Right Door • Take the door and place it (9). REFRIGERATOR INSTALLATION • Loose the grounding screw (7) and the pins (8) located • Place the hinge in the upper ...
Owner's Manual
Page 12
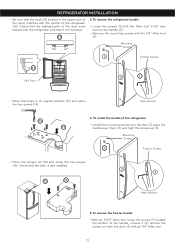
..., remove it isn't bended. 12 3. Mounting Screws 1 Fixation Screws • Place the hinge's lid (15) and screw the two screws (16). To remove the refrigerator handle • Loose the screws (1) with the Allen tool 3/32" and remove the handle (2). • Remove the mounting screws with the... that it (2) remove the screws on from the door (3) with the splitter of the door) matches with an 1/4" Allen tool. 11 REFRIGERATOR INSTALLATION • Be sure that the hook (11) located in its original position (13) and place the two screws (14). Mounting Screws 3 Fixation Screws ...
..., remove it isn't bended. 12 3. Mounting Screws 1 Fixation Screws • Place the hinge's lid (15) and screw the two screws (16). To remove the refrigerator handle • Loose the screws (1) with the Allen tool 3/32" and remove the handle (2). • Remove the mounting screws with the... that it (2) remove the screws on from the door (3) with the splitter of the door) matches with an 1/4" Allen tool. 11 REFRIGERATOR INSTALLATION • Be sure that the hook (11) located in its original position (13) and place the two screws (14). Mounting Screws 3 Fixation Screws ...
Owner's Manual
Page 13
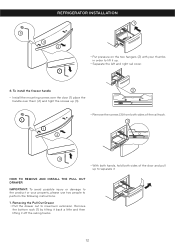
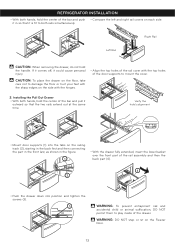
... of the rail track. 3 3 • With both hands, hold both sides of the door and pull up . • Separate the left and right rail cover. 1 6. REFRIGERATOR INSTALLATION 1 3 3 2 • Put pressure on the two hangers (2) with your property, please use two people to lift it off the railing tracks. 12 Remove the...
... of the rail track. 3 3 • With both hands, hold both sides of the door and pull up . • Separate the left and right rail cover. 1 6. REFRIGERATOR INSTALLATION 1 3 3 2 • Put pressure on the two hangers (2) with your property, please use two people to lift it off the railing tracks. 12 Remove the...
Owner's Manual
Page 14
... shown in so that the two rails extend out at the same time. Installing the Pull Out Drawer • With both hands, hold the handle. REFRIGERATOR INSTALLATION • With both rails simultaneously. Right Rail Left Rail CAUTION: When removing the drawer, do not hold the center of the bar and pull...
... shown in so that the two rails extend out at the same time. Installing the Pull Out Drawer • With both hands, hold the handle. REFRIGERATOR INSTALLATION • With both rails simultaneously. Right Rail Left Rail CAUTION: When removing the drawer, do not hold the center of the bar and pull...
Owner's Manual
Page 15
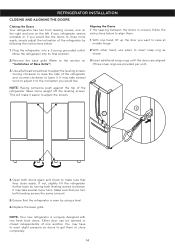
... pressure on the left. NOTE: Having someone push against the top of one another. It may take several turns to adjust it . NOTE: Your new refrigerator is uneven, follow the instructions below : Aligning the Doors If the spacing between the doors is uniquely designed with two fresh food doors. With one... hand, lift up the door you turn both leveling screws clockwise. Make sure that the refrigerator is even by using a level. 6.Replace the base grille. Ensure that you want to close more turns. If your...
... pressure on the left. NOTE: Having someone push against the top of one another. It may take several turns to adjust it . NOTE: Your new refrigerator is uneven, follow the instructions below : Aligning the Doors If the spacing between the doors is uniquely designed with two fresh food doors. With one... hand, lift up the door you turn both leveling screws clockwise. Make sure that the refrigerator is even by using a level. 6.Replace the base grille. Ensure that you want to close more turns. If your...
Owner's Manual
Page 16
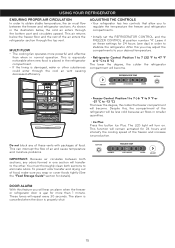
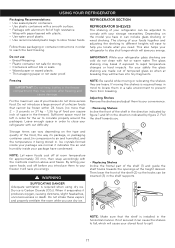
...other . Leave it on these vents with packages of food, make sure you to regulate the temperature the freezer and refrigerator compartments. • Initially set the REFRIGERATOR CONTROL and the FREEZER CONTROL at position number "4". These tones will be less cold because air flows in the...below , the cold air enters through the top vent. This function will hear an alarm when the freezer or refrigerator door is properly shut. 15 USING YOUR REFRIGERATOR ENSURING PROPER AIR CIRCULATION In order to obtain stable temperature, the air must thoroughly clean both sections, any of...
...other . Leave it on these vents with packages of food, make sure you to regulate the temperature the freezer and refrigerator compartments. • Initially set the REFRIGERATOR CONTROL and the FREEZER CONTROL at position number "4". These tones will be less cold because air flows in the...below , the cold air enters through the top vent. This function will hear an alarm when the freezer or refrigerator door is properly shut. 15 USING YOUR REFRIGERATOR ENSURING PROPER AIR CIRCULATION In order to obtain stable temperature, the air must thoroughly clean both sections, any of...
Owner's Manual
Page 17
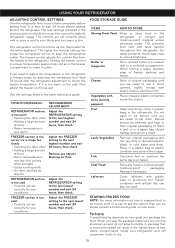
...(if there is too warm or too cold, then adjust the freezer control as well. When you seal the package make it colder. The refrigerator control functions as a guide. Use the settings listed in a paper bag closed compartment. Remove any dirty or discolored parts. Once opened butter in...begin by objects Adjust the FREEZER setting to keep the temperature colder. The higher the number setting, the longer the compressor will cause your refrigerator and will run to the next highest number and wait 24 hours, then check. If it . FOOD STORAGE GUIDE ITEMS HOW TO STORE...
...(if there is too warm or too cold, then adjust the freezer control as well. When you seal the package make it colder. The refrigerator control functions as a guide. Use the settings listed in a paper bag closed compartment. Remove any dirty or discolored parts. Once opened butter in...begin by objects Adjust the FREEZER setting to keep the temperature colder. The higher the number setting, the longer the compressor will cause your refrigerator and will run to the next highest number and wait 24 hours, then check. If it . FOOD STORAGE GUIDE ITEMS HOW TO STORE...
Owner's Manual
Page 18
...8226; Containers without lids or seals. • Waxed paper or waxed plastic. • Thin wrapping paper or not water proof. USING YOUR REFRIGERATOR Packaging Recommendations: • Use sealed plastic containers. • Use plastic containers with a smooth surface. • Package with aluminum foil of... layered with out difficulty. Leave enough space in order to stay shut longer which will fracture into tiny fragments. For your refrigerator with plastic. • Use water proof plastic. • Use recommended plastic bags to circulate properly around the packages. By...
...8226; Containers without lids or seals. • Waxed paper or waxed plastic. • Thin wrapping paper or not water proof. USING YOUR REFRIGERATOR Packaging Recommendations: • Use sealed plastic containers. • Use plastic containers with a smooth surface. • Package with aluminum foil of... layered with out difficulty. Leave enough space in order to stay shut longer which will fracture into tiny fragments. For your refrigerator with plastic. • Use water proof plastic. • Use recommended plastic bags to circulate properly around the packages. By...
Owner's Manual
Page 19
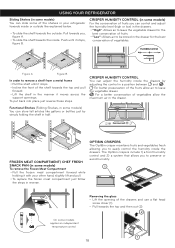
...conservation of fruits. • "Low": Allows air to remove a shelf from a metal frame • Pull the shelf until it with your refrigerator towards inside the drawers. For a better conservation of vegetables. CRISPER HUMIDITY CONTROL (in some models) For the conservation of fruits you to easily ...the best conservation of vegetables allow air to leave the vegetable drawer. To put back into place just reverse these steps. USING YOUR REFRIGERATOR Sliding Shelves (in some models) You can slide some models) You can store tall articles like explained below. • To slide...
...conservation of fruits. • "Low": Allows air to remove a shelf from a metal frame • Pull the shelf until it with your refrigerator towards inside the drawers. For a better conservation of vegetables. CRISPER HUMIDITY CONTROL (in some models) For the conservation of fruits you to easily ...the best conservation of vegetables allow air to leave the vegetable drawer. To put back into place just reverse these steps. USING YOUR REFRIGERATOR Sliding Shelves (in some models) You can slide some models) You can store tall articles like explained below. • To slide...
Owner's Manual
Page 20
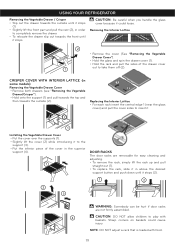
... it in above the desired support button and push down until it stops. NOTE: DO NOT adjust a rack that is loaded with baskets. USING YOUR REFRIGERATOR Removing the Vegetable Drawer / Crisper • Slip out the drawer towards the outside until it stops (1). • Slightly lift the front part and pull the...
... it in above the desired support button and push down until it stops. NOTE: DO NOT adjust a rack that is loaded with baskets. USING YOUR REFRIGERATOR Removing the Vegetable Drawer / Crisper • Slip out the drawer towards the outside until it stops (1). • Slightly lift the front part and pull the...
Owner's Manual
Page 21
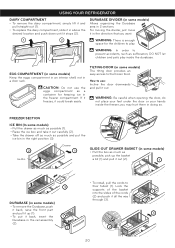
USING YOUR REFRIGERATOR DAIRY COMPARTMENT • To remove the dairy compartment, simply lift it and pull straight out (1). • To replace the dairy compartment, slide it in above ...
USING YOUR REFRIGERATOR DAIRY COMPARTMENT • To remove the dairy compartment, simply lift it and pull straight out (1). • To replace the dairy compartment, slide it in above ...
Owner's Manual
Page 22
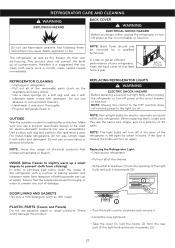
... of damage. • Pull out all of the shelves. • Slide a flat screwdriver (1) into the opening of water). For metal-made refrigerators, do their own de-freezing. Ensure that the powder dissolves thoroughly, in . In order to the light circuit. NOTE: Moving the control to ...once a month; When replacing them, make sure they are the same size, shape, and of a potency of contaminants, therefore it upwards (3). 21 The refrigerator, as well as the vegetable and dairy doors). • Use a clean sponge (or a soft rag) and use flammable cleaners. PLASTIC PARTS (Covers ...
... of damage. • Pull out all of the shelves. • Slide a flat screwdriver (1) into the opening of water). For metal-made refrigerators, do their own de-freezing. Ensure that the powder dissolves thoroughly, in . In order to the light circuit. NOTE: Moving the control to ...once a month; When replacing them, make sure they are the same size, shape, and of a potency of contaminants, therefore it upwards (3). 21 The refrigerator, as well as the vegetable and dairy doors). • Use a clean sponge (or a soft rag) and use flammable cleaners. PLASTIC PARTS (Covers ...


