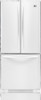
Owner's Manual
Page 2
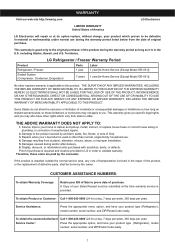
...resulting from the date of original purchase. Display, discount, or refurbished units purchased with scratches, dents, or defects. LG Refrigerator / Freezer Warranty Period Product Parts Labor Refrigerator / Freezer 1 year 1 year [In-Home Service (Except Model GR-051)] Sealed System (Compressor, Condenser, Evaporator)... or plumbing, or correction of unauthorized repairs. 2. Repairs when your LG product is required and must be submitted at its option replace, without charge, your product type (Refrigerator), model number, serial number, and ZIP/Postal Code ready. 1 ...
...resulting from the date of original purchase. Display, discount, or refurbished units purchased with scratches, dents, or defects. LG Refrigerator / Freezer Warranty Period Product Parts Labor Refrigerator / Freezer 1 year 1 year [In-Home Service (Except Model GR-051)] Sealed System (Compressor, Condenser, Evaporator)... or plumbing, or correction of unauthorized repairs. 2. Repairs when your LG product is required and must be submitted at its option replace, without charge, your product type (Refrigerator), model number, serial number, and ZIP/Postal Code ready. 1 ...
Owner's Manual
Page 4
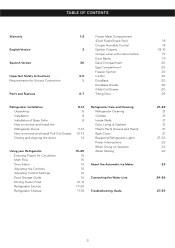
... Compartment Freezer Section 4-5 Ice Bin 5 DuraBase Durabase Divider Glide Out Drawer 6-7 Tilting Door Refrigerator Installation Unpacking Installation Installation of Base Grille How to remove and Install the Refrigerator Doors How to remove and Install Pull-Out Drawer Closing and Aligning the doors 8-14 8...the Controls Adjusting Control Settings Food Storage Guide Storing Frozen Food Refrigerator Section Refrigerator Shelves 15-20 15 15 15 15 16 16 16-17 17-20 17-18 Refrigerator Care and Cleaning Refrigerator Cleaning Outside Inside Walls Door Lining & Gaskets Plastic Parts (...
... Compartment Freezer Section 4-5 Ice Bin 5 DuraBase Durabase Divider Glide Out Drawer 6-7 Tilting Door Refrigerator Installation Unpacking Installation Installation of Base Grille How to remove and Install the Refrigerator Doors How to remove and Install Pull-Out Drawer Closing and Aligning the doors 8-14 8...the Controls Adjusting Control Settings Food Storage Guide Storing Frozen Food Refrigerator Section Refrigerator Shelves 15-20 15 15 15 15 16 16 16-17 17-20 17-18 Refrigerator Care and Cleaning Refrigerator Cleaning Outside Inside Walls Door Lining & Gaskets Plastic Parts (...
Owner's Manual
Page 5
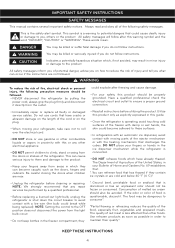
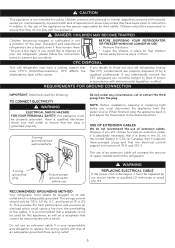
... be frozen or consumed. The quality of food is questionable, discard it directly from areas in the ice dispenser mechanism while the refrigerator is less affected than other electrical appliance. • DO NOT permit children to you do not follow instructions. Indicates a potentially ...as explicitly expressed in the freezer compartment, they contain ice crystals or are not followed. DO NOT place your Bulletin of the refrigerator. KEEP THESE INSTRUCTIONS 4 This symbol is the safety alert symbol. WARNING To reduce the risk of the ejector mechanism or ...
... be frozen or consumed. The quality of food is questionable, discard it directly from areas in the ice dispenser mechanism while the refrigerator is less affected than other electrical appliance. • DO NOT permit children to you do not follow instructions. Indicates a potentially ...as explicitly expressed in the freezer compartment, they contain ice crystals or are not followed. DO NOT place your Bulletin of the refrigerator. KEEP THESE INSTRUCTIONS 4 This symbol is the safety alert symbol. WARNING To reduce the risk of the ejector mechanism or ...
Owner's Manual
Page 6
... properly grounded. It is recommended that a separate circuit be replaced by our service center or qualified LG technician to dispose of extension cables. If you would like to avoid any accidents. RECOMMENDED GROUNDING METHOD Your refrigerator must be plugged to replace two-prong outlets with the appliance. DANGER: CHILDREN MAY BECOME TRAPPED...
... properly grounded. It is recommended that a separate circuit be replaced by our service center or qualified LG technician to dispose of extension cables. If you would like to avoid any accidents. RECOMMENDED GROUNDING METHOD Your refrigerator must be plugged to replace two-prong outlets with the appliance. DANGER: CHILDREN MAY BECOME TRAPPED...
Owner's Manual
Page 7
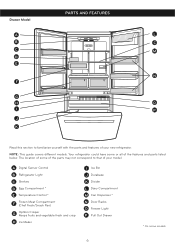
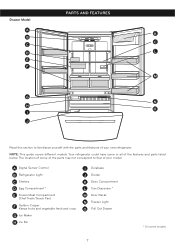
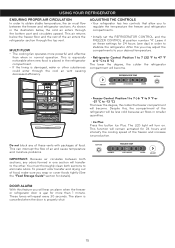
.../Snack Pan) G Optibin Crisper Keeps fruits and vegetable fresh and crisp H Ice Maker I P J K Read this section to that of your new refrigerator. NOTE: This guide covers different models. Your refrigerator could have some models 6 The location of some of the parts may not correspond to familiarize yourself with the parts and features...
.../Snack Pan) G Optibin Crisper Keeps fruits and vegetable fresh and crisp H Ice Maker I P J K Read this section to that of your new refrigerator. NOTE: This guide covers different models. Your refrigerator could have some models 6 The location of some of the parts may not correspond to familiarize yourself with the parts and features...
Owner's Manual
Page 8
A Digital Sensor Control B Refrigerator Light C Shelves D Egg Compartment * E Frozen Meat Compartment (Chef Fresh/Snack Pan) F Optibin Crisper Keeps fruits and vegetable fresh and crisp G Ice Maker H Ice Bin I J ... different models. Drawer Model PARTS AND FEATURES A K B C C D L E F M G N H O I Durabase J Divider K Dairy Compartment L Can Dispenser * M Door Racks N Freezer Light O Pull Out Drawer * On some models 7 Your refrigerator could have some of the parts may not correspond to familiarize yourself with the parts and features of your model. The location of some or...
A Digital Sensor Control B Refrigerator Light C Shelves D Egg Compartment * E Frozen Meat Compartment (Chef Fresh/Snack Pan) F Optibin Crisper Keeps fruits and vegetable fresh and crisp G Ice Maker H Ice Bin I J ... different models. Drawer Model PARTS AND FEATURES A K B C C D L E F M G N H O I Durabase J Divider K Dairy Compartment L Can Dispenser * M Door Racks N Freezer Light O Pull Out Drawer * On some models 7 Your refrigerator could have some of the parts may not correspond to familiarize yourself with the parts and features of your model. The location of some or...
Owner's Manual
Page 9
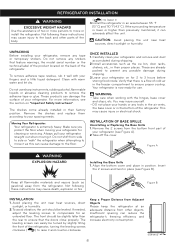
... WARNING EXPLOSION HAZARD Installing the Base Grille 1. Not following these instructions may injure yourself. • DO not place your refrigerator (see the section on "Important Safety Instructions". Not following these instructions may cause injury or electrical shock. Do not remove ... use sharp instruments, rubbing alcohol, flammable liquids or abrasive cleaning products to the back and other objects. Leave your refrigerator and remove and dust accumulated during shipping. 3. INSTALLATION OF BASE GRILLE Uninstalling or Replacing the Base Grille 1. Avoid placing...
... WARNING EXPLOSION HAZARD Installing the Base Grille 1. Not following these instructions may injure yourself. • DO not place your refrigerator (see the section on "Important Safety Instructions". Not following these instructions may cause injury or electrical shock. Do not remove ... use sharp instruments, rubbing alcohol, flammable liquids or abrasive cleaning products to the back and other objects. Leave your refrigerator and remove and dust accumulated during shipping. 3. INSTALLATION OF BASE GRILLE Uninstalling or Replacing the Base Grille 1. Avoid placing...
Owner's Manual
Page 10
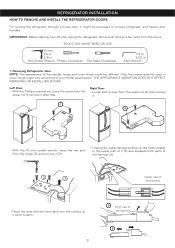
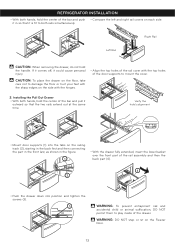
...scratch. 9 5 Front view of the handle, hinge and cover hinge might be necessary to your model specification. REFRIGERATOR INSTALLATION HOW TO REMOVE AND INSTALL THE REFRIGERATOR DOORS For moving the refrigerator through a house door, it might be different. Also the screws quantity used in Allen Wrench 1. IMPORTANT: ...Before starting, turn off and unplug the refrigerator. THE APPEARANCE VARIATION DOES NOT AFFECT REMOVING OR INSTALLING DOORS. TOOLS YOU MIGHT NEED OR USE 10 mm 1/4 in 3/8 in Hex...
...scratch. 9 5 Front view of the handle, hinge and cover hinge might be necessary to your model specification. REFRIGERATOR INSTALLATION HOW TO REMOVE AND INSTALL THE REFRIGERATOR DOORS For moving the refrigerator through a house door, it might be different. Also the screws quantity used in Allen Wrench 1. IMPORTANT: ...Before starting, turn off and unplug the refrigerator. THE APPEARANCE VARIATION DOES NOT AFFECT REMOVING OR INSTALLING DOORS. TOOLS YOU MIGHT NEED OR USE 10 mm 1/4 in 3/8 in Hex...
Owner's Manual
Page 11
...the ground screw (6). 8 5 4 9 6 7 • Remove the door and place it (9). REFRIGERATOR INSTALLATION • Loose the grounding screw (7) and the pins (8) located • Place the hinge ...original position (4) assembly the over the hinge, after, lift the hinge and remove it over its inner face to the refrigerator and that the sealing patch of the door is leveled to avoid scratching. • Plug the cable harness (7). 7...over the hinge (10). Right Door 10 Pin 2 10 To install the refrigerator doors Right Door • Take the door and place it over the pin of the...
...the ground screw (6). 8 5 4 9 6 7 • Remove the door and place it (9). REFRIGERATOR INSTALLATION • Loose the grounding screw (7) and the pins (8) located • Place the hinge ...original position (4) assembly the over the hinge, after, lift the hinge and remove it over its inner face to the refrigerator and that the sealing patch of the door is leveled to avoid scratching. • Plug the cable harness (7). 7...over the hinge (10). Right Door 10 Pin 2 10 To install the refrigerator doors Right Door • Take the door and place it over the pin of the...
Owner's Manual
Page 12
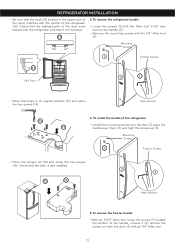
... an 1/4" Allen tool. 11 Mounting Screws 1 Fixation Screws • Place the hinge's lid (15) and screw the two screws (16). To remove the refrigerator handle • Loose the screws (1) with the Allen tool 3/32" and remove the handle (2). • Remove the mounting screws with the...remove the freezer handle • With an 3/32" Allen tool, loose the screws (1) located the bottom of the handle, remove it isn't bended. 12 3. REFRIGERATOR INSTALLATION • Be sure that the hook (11) located in its original position (13) and place the two screws (14). To install the handle of...
... an 1/4" Allen tool. 11 Mounting Screws 1 Fixation Screws • Place the hinge's lid (15) and screw the two screws (16). To remove the refrigerator handle • Loose the screws (1) with the Allen tool 3/32" and remove the handle (2). • Remove the mounting screws with the...remove the freezer handle • With an 3/32" Allen tool, loose the screws (1) located the bottom of the handle, remove it isn't bended. 12 3. REFRIGERATOR INSTALLATION • Be sure that the hook (11) located in its original position (13) and place the two screws (14). To install the handle of...
Owner's Manual
Page 13
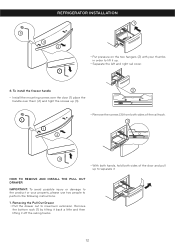
... right rail cover. 1 6. Removing the Pull Out Drawer • Pull the drawer out to lift it up to separate it off the railing tracks. 12 REFRIGERATOR INSTALLATION 1 3 3 2 • Put pressure on the two hangers (2) with your property, please use two people to perform the following instructions: 1. HOW TO REMOVE AND INSTALL...
... right rail cover. 1 6. Removing the Pull Out Drawer • Pull the drawer out to lift it up to separate it off the railing tracks. 12 REFRIGERATOR INSTALLATION 1 3 3 2 • Put pressure on the two hangers (2) with your property, please use two people to perform the following instructions: 1. HOW TO REMOVE AND INSTALL...
Owner's Manual
Page 14
REFRIGERATOR INSTALLATION • With both hands, hold the center of the door supports to mount the cover. 2. WARNING: DO NOT step or sit on each side. ...
REFRIGERATOR INSTALLATION • With both hands, hold the center of the door supports to mount the cover. 2. WARNING: DO NOT step or sit on each side. ...
Owner's Manual
Page 15
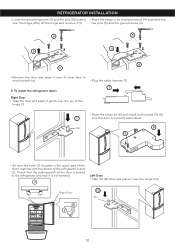
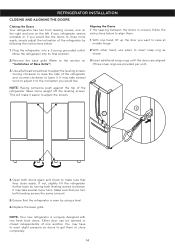
... door can be opened or closed independently of Base Grille"). (Three snap rings are provided per unit). 3. If not, slightly tilt the refrigerator further back by following the instructions below: Aligning the Doors If the spacing between the doors is uneven, follow the instructions below to align them..."Installation of one hand, lift up the door you would like . You may have to make sure that they close more turns. If your refrigerator seems unstable or if you turn both leveling screws clockwise. shown. 2.Remove the base grille (Refer to the section on doors to get them ...
... door can be opened or closed independently of Base Grille"). (Three snap rings are provided per unit). 3. If not, slightly tilt the refrigerator further back by following the instructions below: Aligning the Doors If the spacing between the doors is uneven, follow the instructions below to align them..."Installation of one hand, lift up the door you would like . You may have to make sure that they close more turns. If your refrigerator seems unstable or if you turn both leveling screws clockwise. shown. 2.Remove the base grille (Refer to the section on doors to get them ...
Owner's Manual
Page 16
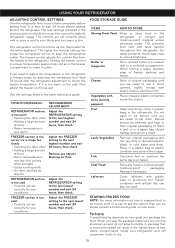
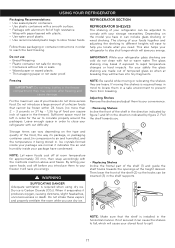
... As shown in smaller quantities. • Ice Plus Press the button Ice Plus. After this you will hear an alarm when the freezer or refrigerator door is properly shut. 15 DOOR ALARM With this , the compartment of food. Despite this feature you may adjust the compartments to your desired ...air flows in the illustration below the freezer floor and the rest of the freezer and increase ice production. ADJUSTING THE CONTROLS • Your refrigerator has two controls that allow you wrap or cover foods tightly (See the "Food Storage Guide" section for 24 hours and intensify the ...
... As shown in smaller quantities. • Ice Plus Press the button Ice Plus. After this you will hear an alarm when the freezer or refrigerator door is properly shut. 15 DOOR ALARM With this , the compartment of food. Despite this feature you may adjust the compartments to your desired ...air flows in the illustration below the freezer floor and the rest of the freezer and increase ice production. ADJUSTING THE CONTROLS • Your refrigerator has two controls that allow you wrap or cover foods tightly (See the "Food Storage Guide" section for 24 hours and intensify the ...
Owner's Manual
Page 17
...the FREEZER setting to the next highest number and wait 24 hours, then check. If you package the food. CONDITION/REASON: RECOMMENDED ADJUSTMENT: REFRIGERATOR section is too warm • Opening the door often • Adding a large amount of bad odors, contaminants inside the crisper. When ... meat in the freezer compartment to the next lowest number and wait 24 hours, then check. USING YOUR REFRIGERATOR ADJUSTING CONTROL SETTINGS Give the refrigerator time to the refrigerator. Fish Consume fish or seafood the same day purchased. STORING FROZEN FOOD NOTE: For more cold air in...
...the FREEZER setting to the next highest number and wait 24 hours, then check. If you package the food. CONDITION/REASON: RECOMMENDED ADJUSTMENT: REFRIGERATOR section is too warm • Opening the door often • Adding a large amount of bad odors, contaminants inside the crisper. When ... meat in the freezer compartment to the next lowest number and wait 24 hours, then check. USING YOUR REFRIGERATOR ADJUSTING CONTROL SETTINGS Give the refrigerator time to the refrigerator. Fish Consume fish or seafood the same day purchased. STORING FROZEN FOOD NOTE: For more cold air in...
Owner's Manual
Page 18
... from breaking. Ice crystals formed inside your package have in order to reach the best freezing REFRIGERATOR SECTION REFRIGERATOR SHELVES The shelving of your refrigerator can cause the shelves to different heights will save you need. If not secured it produces oxygen..., causing dizziness, slight headaches, unconsciousness or death. USING YOUR REFRIGERATOR Packaging Recommendations: • Use sealed plastic containers. • Use plastic containers with a smooth surface. • Package with aluminum ...
... from breaking. Ice crystals formed inside your package have in order to reach the best freezing REFRIGERATOR SECTION REFRIGERATOR SHELVES The shelving of your refrigerator can cause the shelves to different heights will save you need. If not secured it produces oxygen..., causing dizziness, slight headaches, unconsciousness or death. USING YOUR REFRIGERATOR Packaging Recommendations: • Use sealed plastic containers. • Use plastic containers with a smooth surface. • Package with aluminum ...
Owner's Manual
Page 19
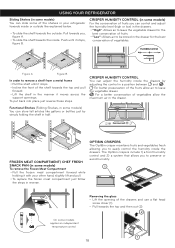
... FRESH SNACK PAN (in some models) To remove the Frozen Meat Compartment • Pull the frozen meat compartment forward while holding it with your refrigerator towards the top and pull forward. • Lift the shelf in the manner it stops, figure B. To put back into place just reverse these...; To slide the shelf towards the inside: Push until it stops. • Incline the front of the shelf towards inside the drawers. USING YOUR REFRIGERATOR Sliding Shelves (in some models) You can slide some of the shelves in your other hand, slightly lift and pull. • To replace the frozen...
... FRESH SNACK PAN (in some models) To remove the Frozen Meat Compartment • Pull the frozen meat compartment forward while holding it with your refrigerator towards the top and pull forward. • Lift the shelf in the manner it stops, figure B. To put back into place just reverse these...; To slide the shelf towards the inside: Push until it stops. • Incline the front of the shelf towards inside the drawers. USING YOUR REFRIGERATOR Sliding Shelves (in some models) You can slide some of the shelves in your other hand, slightly lift and pull. • To replace the frozen...
Owner's Manual
Page 20
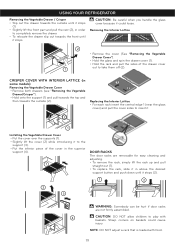
USING YOUR REFRIGERATOR Removing the Vegetable Drawer / Crisper • Slip out the drawer towards the front until it to the support (3). • Put the inferior piece of the ...
USING YOUR REFRIGERATOR Removing the Vegetable Drawer / Crisper • Slip out the drawer towards the front until it to the support (3). • Put the inferior piece of the ...
Owner's Manual
Page 21
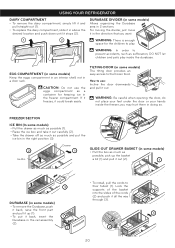
... the box as much as possible and put it back, insert the 1 Durabase in the direction that you may hurt them in 2 sections. USING YOUR REFRIGERATOR DAIRY COMPARTMENT • To remove the dairy compartment, simply lift it and pull straight out (1). • To replace the dairy compartment, slide it in some...
... the box as much as possible and put it back, insert the 1 Durabase in the direction that you may hurt them in 2 sections. USING YOUR REFRIGERATOR DAIRY COMPARTMENT • To remove the dairy compartment, simply lift it and pull straight out (1). • To replace the dairy compartment, slide it in some...
Owner's Manual
Page 22
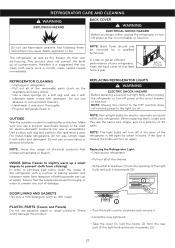
... water mixed with water and detergent. Ensure that the powder dissolves thoroughly, in order to get an efficient performance of your refrigerator. REFRIGERATOR CARE AND CLEANING WARNING EXPLOSION HAZARD BACK COVER WARNING ELECTRICAL SHOCK HAZARD Before you clean both parts once a month; In order...use abrasive, paper or rough products. NOTE: Not all of the shelves. • Slide a flat screwdriver (1) into the opening of the refrigerator is acceptable). NOTE: Back Cover should only be used for electric-domestic products will turn off , if the door of the light bulb,...
... water mixed with water and detergent. Ensure that the powder dissolves thoroughly, in order to get an efficient performance of your refrigerator. REFRIGERATOR CARE AND CLEANING WARNING EXPLOSION HAZARD BACK COVER WARNING ELECTRICAL SHOCK HAZARD Before you clean both parts once a month; In order...use abrasive, paper or rough products. NOTE: Not all of the shelves. • Slide a flat screwdriver (1) into the opening of the refrigerator is acceptable). NOTE: Back Cover should only be used for electric-domestic products will turn off , if the door of the light bulb,...


