Owner's Manual
Page 3
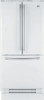
... in other than normal, single-family household use during and/or after delivery 6. LG Refrigerator / Freezer Warranty Period Product Parts Labor Refrigerator / Freezer 1 year 1 year [In-Home Service (Except Model GR-051)] Sealed System 7 years 1 year [In-Home Service (Except Model GR-051)] (Compressor, Condenser, Evaporator) No other rights which proves to be...
... in other than normal, single-family household use during and/or after delivery 6. LG Refrigerator / Freezer Warranty Period Product Parts Labor Refrigerator / Freezer 1 year 1 year [In-Home Service (Except Model GR-051)] Sealed System 7 years 1 year [In-Home Service (Except Model GR-051)] (Compressor, Condenser, Evaporator) No other rights which proves to be...
Owner's Manual
Page 6
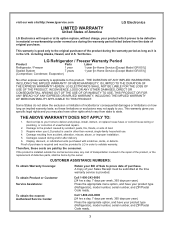
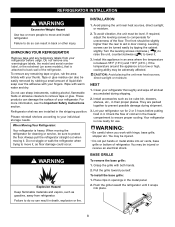
...finished, reconnect the refrigerator to the electrical source and reset the control (Thermostat, Refrigerator Control or Freezer Control, depending on the model) to use . All the important materials should always be plugged into its own individual properly grounded electrical outlet rated for the ... place so that children may have it must be replaced by the manufacturer, by our service center or by qualified personal by LG Electronics, to have a cooling system that used CFCs (chlorofluorocarbons). This provides the best performance and also prevents overloading house wiring ...
...finished, reconnect the refrigerator to the electrical source and reset the control (Thermostat, Refrigerator Control or Freezer Control, depending on the model) to use . All the important materials should always be plugged into its own individual properly grounded electrical outlet rated for the ... place so that children may have it must be replaced by the manufacturer, by our service center or by qualified personal by LG Electronics, to have a cooling system that used CFCs (chlorofluorocarbons). This provides the best performance and also prevents overloading house wiring ...
Owner's Manual
Page 7
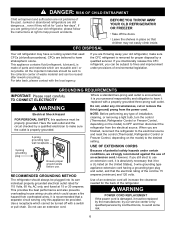
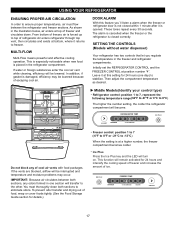
The locations of the items listed below may have some models 7 NOTE: This guide covers several different models. PARTS AND FEATURES A K L B C M D N E F G O H P I Durabase J Divider K Filter (Inside)* L Dairy Bin M Egg Box * N Refrigerator Door Rack O Freezer Light P Pull... out Drawer *on some or all of the features shown below . The refrigerator you have purchased may not match your model. A Digital Sensor Control * B Refrigerator Light C Shelves D Chef Fresh / Snack Pan E Can Dispenser * F Optibin Crisper Keeps fruits and vegetable fresh ...
The locations of the items listed below may have some models 7 NOTE: This guide covers several different models. PARTS AND FEATURES A K L B C M D N E F G O H P I Durabase J Divider K Filter (Inside)* L Dairy Bin M Egg Box * N Refrigerator Door Rack O Freezer Light P Pull... out Drawer *on some or all of the features shown below . The refrigerator you have purchased may not match your model. A Digital Sensor Control * B Refrigerator Light C Shelves D Chef Fresh / Snack Pan E Can Dispenser * F Optibin Crisper Keeps fruits and vegetable fresh ...
Owner's Manual
Page 8
..., see the Important Safety Instructions section. Failure to move it . UNPACKING YOUR REFRIGERATOR Remove tape and any warningtype labels, the model and serial number label, or the echsheet (on some models), that is too low or high, cooling ability may be turned easily by rubbing a small amount of cold air in it...
..., see the Important Safety Instructions section. Failure to move it . UNPACKING YOUR REFRIGERATOR Remove tape and any warningtype labels, the model and serial number label, or the echsheet (on some models), that is too low or high, cooling ability may be turned easily by rubbing a small amount of cold air in it...
Owner's Manual
Page 10
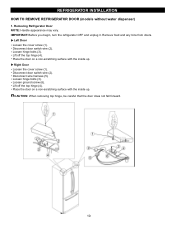
... (6). Remove food and any bins from doors. Left Door Loosen the cover screw (1). Lift off the top hinge (4). REFRIGERATOR INSTALLATION HOW TO REMOVE REFRIGERATOR DOOR (models without water dispenser) 1. Right Door Loosen the cover screw (1). CAUTION: When removing top hinge, be careful that the door does not fall forward. 10
... (6). Remove food and any bins from doors. Left Door Loosen the cover screw (1). Lift off the top hinge (4). REFRIGERATOR INSTALLATION HOW TO REMOVE REFRIGERATOR DOOR (models without water dispenser) 1. Right Door Loosen the cover screw (1). CAUTION: When removing top hinge, be careful that the door does not fall forward. 10

Owner's Manual
Page 12
... the top hinge (7). Loosen screws (6) and lift off the top hinge (7). Remove the ground screw (8). Disconnect wire harness (4). REFRIGERATOR INSTALLATION REMOVING AND REPLACING REFRIGERATOR DOORS (models with the inside up . 12
... the top hinge (7). Loosen screws (6) and lift off the top hinge (7). Remove the ground screw (8). Disconnect wire harness (4). REFRIGERATOR INSTALLATION REMOVING AND REPLACING REFRIGERATOR DOORS (models with the inside up . 12
Owner's Manual
Page 17
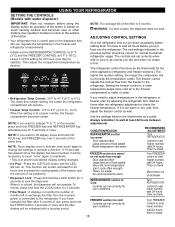
...amount of cool air vents with food packages. Initially set the REFRIGERATOR CONTROL and the FREEZER CONTROL at top of escaping cool air. Middle Models(Identify your control type) Refrigerator control: position 1 to 7, represent the following temperature range(32°F to 47°F or 0°... both sections to stabilize. From bottom of refrigerator. MULTI-FLOW Multi-Flow means powerful and effective cooling operation. SETTING THE CONTROLS (Models without water dispenser) Your refrigerator has two controls that let you ´ll listen a alarm when the freezer or refrigerator door is...
...amount of cool air vents with food packages. Initially set the REFRIGERATOR CONTROL and the FREEZER CONTROL at top of escaping cool air. Middle Models(Identify your control type) Refrigerator control: position 1 to 7, represent the following temperature range(32°F to 47°F or 0°... both sections to stabilize. From bottom of refrigerator. MULTI-FLOW Multi-Flow means powerful and effective cooling operation. SETTING THE CONTROLS (Models without water dispenser) Your refrigerator has two controls that let you ´ll listen a alarm when the freezer or refrigerator door is...
Owner's Manual
Page 18
... make it colder. • Refrigerator Temp Control: 32°F to 47°F (0°C to wait at the same time. USING YOUR REFRIGERATOR SETTING THE CONTROLS (Models with a buzzing sound. NOTE: If you put food into the refrigerator. NOTE: Touch display once to activate, then touch again to cool down completely before...
... make it colder. • Refrigerator Temp Control: 32°F to 47°F (0°C to wait at the same time. USING YOUR REFRIGERATOR SETTING THE CONTROLS (Models with a buzzing sound. NOTE: If you put food into the refrigerator. NOTE: Touch display once to activate, then touch again to cool down completely before...
Owner's Manual
Page 20
... impact, such as follows. To remove a sliding shelf from the shipping position and replace shelves in the position you . Convenience Shelves (on some models) You can slide some models) Folding Shelf: You can store taller items such as gallon containers or bottles by reversing the above steps. Use special care when removing...
... impact, such as follows. To remove a sliding shelf from the shipping position and replace shelves in the position you . Convenience Shelves (on some models) You can slide some models) Folding Shelf: You can store taller items such as gallon containers or bottles by reversing the above steps. Use special care when removing...
Owner's Manual
Page 21
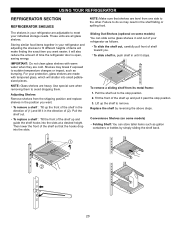
... OptiBin Crispers provide fresher-tasting fruit and vegetables by sliding it out to hold or release moisture. 1 2 On some models) You can control the amount of fresh, leafy vegetables. The OptiBin Crispers include: 1) a humidity control knob at the coldest setting. " ":Lets moist air out of ... cheeses Cold cuts Bacon Hot dogs WARNING: Fruits and vegetables may be damage at the front of the crisper cover and 2) a large lattice on some models is applied an independent temperature control. Lift up and out. Lift slightly and pull it forward slightly. To remove the glass: 1.
... OptiBin Crispers provide fresher-tasting fruit and vegetables by sliding it out to hold or release moisture. 1 2 On some models) You can control the amount of fresh, leafy vegetables. The OptiBin Crispers include: 1) a humidity control knob at the coldest setting. " ":Lets moist air out of ... cheeses Cold cuts Bacon Hot dogs WARNING: Fruits and vegetables may be damage at the front of the crisper cover and 2) a large lattice on some models is applied an independent temperature control. Lift up and out. Lift slightly and pull it forward slightly. To remove the glass: 1.
Owner's Manual
Page 22
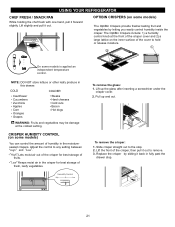
...allow children to cover. DESIGN-A-DOOR The door bins are not firmly assembled. USING YOUR REFRIGERATOR CRISPER COVER WITH LATTICE ON INNER SURFACE (on some models) Store Egg Box on interior shelf, not on door shelf. EGG BOX (on inner surface: WARNING: Somebody can easily break if it stops... location and push down until it freezes. 22 To replace the dairy bin, slide it in the freezer compartment. To remove the lattice on some models) To remove the crisper cover: 1. To remove the dairy bin, simply lift it stops. 1 2 CAUTION: Be careful when handing glass cover ...
...allow children to cover. DESIGN-A-DOOR The door bins are not firmly assembled. USING YOUR REFRIGERATOR CRISPER COVER WITH LATTICE ON INNER SURFACE (on some models) Store Egg Box on interior shelf, not on door shelf. EGG BOX (on inner surface: WARNING: Somebody can easily break if it stops... location and push down until it freezes. 22 To replace the dairy bin, slide it in the freezer compartment. To remove the lattice on some models) To remove the crisper cover: 1. To remove the dairy bin, simply lift it stops. 1 2 CAUTION: Be careful when handing glass cover ...
Owner's Manual
Page 23
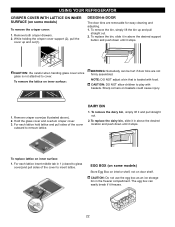
... the drawer. Gently lift and pull out the ice bin. 3. To reinstall, pull out the drawer as much as possible. 2. DURABASE DIVIDER (on some models) The tilting door provides easy access for stored foods. DRAWER ICE BIN WARNING: Be careful when you open tilting door so that you to organize... the Durabase area into sections. 12 1. DURABASE (on some models) 1. To remove, pull divider staight up the front of durabase. 23 To remove the Durabase, push it back to use: Tilt the door down ...
... the drawer. Gently lift and pull out the ice bin. 3. To reinstall, pull out the drawer as much as possible. 2. DURABASE DIVIDER (on some models) The tilting door provides easy access for stored foods. DRAWER ICE BIN WARNING: Be careful when you open tilting door so that you to organize... the Durabase area into sections. 12 1. DURABASE (on some models) 1. To remove, pull divider staight up the front of durabase. 23 To remove the Durabase, push it back to use: Tilt the door down ...
Owner's Manual
Page 24
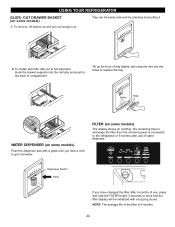
... out to the refrigerator or 6 months after 6 months of use of compartment. FILTER (on some models) Push the dispenser pad with a buzzing sound. USING YOUR REFRIGERATOR GLIDE - Holes Ribs WATER DISPENSER (on some models) 1. Hook the basket supports into the holes to replace the tray. Tray can be initialized with... a glass until you hear a click to the back of water dispenser. OUT DRAWER BASKET (on some models) The display shows (in months), the remaining time to exchange the filter from the moment power is 6 months. 24
... out to the refrigerator or 6 months after 6 months of use of compartment. FILTER (on some models) Push the dispenser pad with a buzzing sound. USING YOUR REFRIGERATOR GLIDE - Holes Ribs WATER DISPENSER (on some models) 1. Hook the basket supports into the holes to replace the tray. Tray can be initialized with... a glass until you hear a click to the back of water dispenser. OUT DRAWER BASKET (on some models) The display shows (in months), the remaining time to exchange the filter from the moment power is 6 months. 24

Owner's Manual
Page 25
... will hear when it click into place. With cartridge knob in firmly and twist it isn' t fully inserted. How to empty the tubing (approximately for models with a new cartridge. You will be water in the cartridge. Rotate the knob of cover. Take the new cartridge out of its handle, twist the...
... will hear when it click into place. With cartridge knob in firmly and twist it isn' t fully inserted. How to empty the tubing (approximately for models with a new cartridge. You will be water in the cartridge. Rotate the knob of cover. Take the new cartridge out of its handle, twist the...
Owner's Manual
Page 27
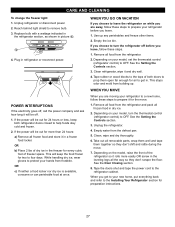
...refrigerator. 2. If you get in dry ice. 2. Clean refrigerator, wipe it for preparation instructions. 27 Unplug the refrigerator. 4. Depending on your model, turn the thermostat control (refrigerator control) to turn the refrigerator off . 1. When you choose to OFF. OR b) Place 2 lbs of dry... these steps. 1. Unplug refrigerator or disconnect power. 2. WHEN YOU GO ON VACATION If you choose to leave the refrigerator on your model, set the thermostat control (refrigerator control) to help foods stay cold and frozen. 2. Empty water from the refrigerator and pack all ...
...refrigerator. 2. If you get in dry ice. 2. Clean refrigerator, wipe it for preparation instructions. 27 Unplug the refrigerator. 4. Depending on your model, turn the thermostat control (refrigerator control) to turn the refrigerator off . 1. When you choose to OFF. OR b) Place 2 lbs of dry... these steps. 1. Unplug refrigerator or disconnect power. 2. WHEN YOU GO ON VACATION If you choose to leave the refrigerator on your model, set the thermostat control (refrigerator control) to help foods stay cold and frozen. 2. Empty water from the refrigerator and pack all ...
Owner's Manual
Page 28
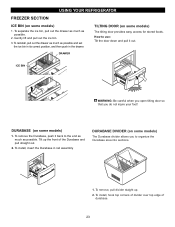
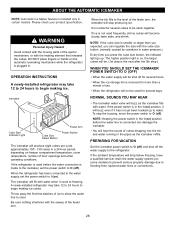
...larger than a minute or two. To stop producing ice. If the refrigerator is used before the water line is plugged in the I (on some models) to prevent serious property damage due to begin making ice. NOTE: Keeping the power switch in . When the refrigerator will buzz even if it ...cools to O (off) and shut off ). The higher position light is in certain models. If the power switch is on ). WARNING Personal Injury Hazard Avoid contact with water when it has not yet been hooked up . It is included...
...larger than a minute or two. To stop producing ice. If the refrigerator is used before the water line is plugged in the I (on some models) to prevent serious property damage due to begin making ice. NOTE: Keeping the power switch in . When the refrigerator will buzz even if it ...cools to O (off) and shut off ). The higher position light is in certain models. If the power switch is on ). WARNING Personal Injury Hazard Avoid contact with water when it has not yet been hooked up . It is included...

Owner's Manual
Page 29
... distance from drilling the hole in the O (off) position. To determine how much tubing you use a compression fitting. INSTALLATION INSTRUCTIONS Install the shutoff valve on models with a tube cutter and then use your product. A cold water supply. on the line. 2. Remove any electrical device (such as described above. When using a sharp... are cut off any sediment from the wall after installation. Follow these instructions carefully to minimize the risk of connection to relieve the pressure on models without a water filter and between 20 and 120 p.s.i.
... distance from drilling the hole in the O (off) position. To determine how much tubing you use a compression fitting. INSTALLATION INSTRUCTIONS Install the shutoff valve on models with a tube cutter and then use your product. A cold water supply. on the line. 2. Remove any electrical device (such as described above. When using a sharp... are cut off any sediment from the wall after installation. Follow these instructions carefully to minimize the risk of connection to relieve the pressure on models without a water filter and between 20 and 120 p.s.i.

Owner's Manual
Page 32
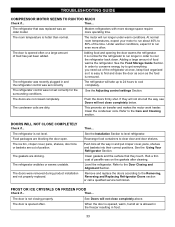
.... LIGHTS DO NOT WORK Check if... Then... Floor is unplugged. Then plug in the socket. The defrost timer will also click when cycling on the model) will click when the automatic defrost cycle begins and ends. You may hear air being forced over the condenser by the condenser fan. REFRIGERATOR DOES...
.... LIGHTS DO NOT WORK Check if... Then... Floor is unplugged. Then plug in the socket. The defrost timer will also click when cycling on the model) will click when the automatic defrost cycle begins and ends. You may hear air being forced over the condenser by the condenser fan. REFRIGERATOR DOES...
Owner's Manual
Page 33
The room temperature is not closing properly. Adding a large amount of position. The refrigerator control was an older model. If they touch. DOORS WILL NOT CLOSE COMPLETELY Check if... The ice bin, crisper cover, pans, shelves, door bins or baskets are out of food ...
The room temperature is not closing properly. Adding a large amount of position. The refrigerator control was an older model. If they touch. DOORS WILL NOT CLOSE COMPLETELY Check if... The ice bin, crisper cover, pans, shelves, door bins or baskets are out of food ...


