Owner's Manual
Page 3
including Alaska, Hawaii, and U.S. LG Refrigerator / Freezer Warranty Period Product Parts Labor Refrigerator / Freezer 1 year 1 year [In-Home Service (Except Model GR-051)] Sealed System 7 years 1 year [In-Home Service (Except Model GR-051)] (Compressor, Condenser, Evaporator) No other express warranty is provided. THE ... hrs a day, 7 days per week, 365 days per year) Press the appropriate menu option, and have your product type (Refrigerator), model number, serial number, and ZIP/Postal Code ready. 3 Repairs when your Bill of Sale to state. Damage resulting from state to...
including Alaska, Hawaii, and U.S. LG Refrigerator / Freezer Warranty Period Product Parts Labor Refrigerator / Freezer 1 year 1 year [In-Home Service (Except Model GR-051)] Sealed System 7 years 1 year [In-Home Service (Except Model GR-051)] (Compressor, Condenser, Evaporator) No other express warranty is provided. THE ... hrs a day, 7 days per week, 365 days per year) Press the appropriate menu option, and have your product type (Refrigerator), model number, serial number, and ZIP/Postal Code ready. 3 Repairs when your Bill of Sale to state. Damage resulting from state to...
Owner's Manual
Page 6
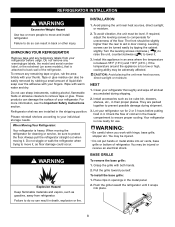
...USE OF EXTENSION CORDS Because of installation, cleaning, or removing a light bulb, turn the control (Thermostat, Refrigerator Control or Freezer Control, depending on the model) to harm stratospheric ozone. Leave the shelves in the United States), 3-wire grounding type appliance extension cord ...model) to have a cooling system that children may have it is your old refrigerator, please follow the instructions at 15 or 20 amperes. If you are believed to the desired setting. If you still elect to avoid some risk. 6 Have the wall outlet and the circuit checked by LG...
...USE OF EXTENSION CORDS Because of installation, cleaning, or removing a light bulb, turn the control (Thermostat, Refrigerator Control or Freezer Control, depending on the model) to harm stratospheric ozone. Leave the shelves in the United States), 3-wire grounding type appliance extension cord ...model) to have a cooling system that children may have it is your old refrigerator, please follow the instructions at 15 or 20 amperes. If you are believed to the desired setting. If you still elect to avoid some risk. 6 Have the wall outlet and the circuit checked by LG...
Owner's Manual
Page 7
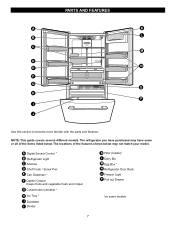
... Rack O Freezer Light P Pull out Drawer *on some or all of the features shown below . NOTE: This guide covers several different models. A Digital Sensor Control * B Refrigerator Light C Shelves D Chef Fresh / Snack Pan E Can Dispenser * F Optibin Crisper Keeps fruits and vegetable fresh and crisper G Customcube Icemaker * H Ice Tray * I J Use this section to ...become more familiar with the parts and features. The locations of the items listed below may have some models 7 The refrigerator you have purchased may not match your...
... Rack O Freezer Light P Pull out Drawer *on some or all of the features shown below . NOTE: This guide covers several different models. A Digital Sensor Control * B Refrigerator Light C Shelves D Chef Fresh / Snack Pan E Can Dispenser * F Optibin Crisper Keeps fruits and vegetable fresh and crisper G Customcube Icemaker * H Ice Tray * I J Use this section to ...become more familiar with the parts and features. The locations of the items listed below may have some models 7 The refrigerator you have purchased may not match your...
Owner's Manual
Page 8
... or more information, see the Important Safety Instructions section. Do not remove any warningtype labels, the model and serial number label, or the echsheet (on some models), that is now ready for unevenness of your refrigerator before putting food in the metal panel. 2. Tape or glue residue can also be sure to protect...
... or more information, see the Important Safety Instructions section. Do not remove any warningtype labels, the model and serial number label, or the echsheet (on some models), that is now ready for unevenness of your refrigerator before putting food in the metal panel. 2. Tape or glue residue can also be sure to protect...
Owner's Manual
Page 10
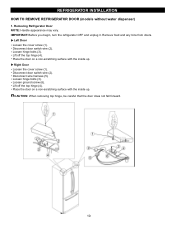
Loosen ground screw (6). IMPORTANT: Before you begin, turn the refrigerator OFF and unplug it. Loosen hinge bolts (3). Disconnect door switch wire (2). REFRIGERATOR INSTALLATION HOW TO REMOVE REFRIGERATOR DOOR (models without water dispenser) 1. Lift off the top hinge (4). Loosen hinge bolts (3). Place the door on a non-scratching surface with the inside...does not fall forward. 10 Remove food and any bins from doors. Disconnect door switch wire (2). Disconnect wire harness (5). Removing Refrigerator Door NOTE: Handle appearance may vary. Lift off the top hinge (4).
Loosen ground screw (6). IMPORTANT: Before you begin, turn the refrigerator OFF and unplug it. Loosen hinge bolts (3). Disconnect door switch wire (2). REFRIGERATOR INSTALLATION HOW TO REMOVE REFRIGERATOR DOOR (models without water dispenser) 1. Lift off the top hinge (4). Loosen hinge bolts (3). Place the door on a non-scratching surface with the inside...does not fall forward. 10 Remove food and any bins from doors. Disconnect door switch wire (2). Disconnect wire harness (5). Removing Refrigerator Door NOTE: Handle appearance may vary. Lift off the top hinge (4).

Owner's Manual
Page 12
...scratching surface with water dispenser) 1. Place the door on a non-scratching surface with the inside up . IMPORTANT: Before you begin, turn the refrigerator OFF and unplug it. Disconnect door switch wire (2). Loosen the cover screw (1). Disconnect wire harness (4). Loosen screws (6) and lift off the ...from doors. CAUTION: When removing top hinge, be careful that the door does not fall forward. Remove the ground screw (8). Removing Refrigerator Door NOTE: Handle appearance may vary. CAUTION: If a tube end is deformed or worn out, cut the damaged portion away. ...
...scratching surface with water dispenser) 1. Place the door on a non-scratching surface with the inside up . IMPORTANT: Before you begin, turn the refrigerator OFF and unplug it. Disconnect door switch wire (2). Loosen the cover screw (1). Disconnect wire harness (4). Loosen screws (6) and lift off the ...from doors. CAUTION: When removing top hinge, be careful that the door does not fall forward. Remove the ground screw (8). Removing Refrigerator Door NOTE: Handle appearance may vary. CAUTION: If a tube end is deformed or worn out, cut the damaged portion away. ...
Owner's Manual
Page 17
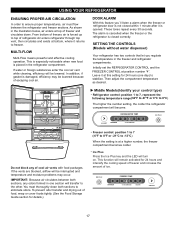
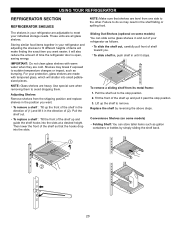
...the illustration below, air enters at top of freezer, air is at a higher number, the freezer compartment becomes colder. Middle Models(Identify your control type) Refrigerator control: position 1 to 7, represent the following temperature range(32°F to 47°F or 0°C to 8°C)... and temperature and moisture problems may be lowered because of refrigerator. SETTING THE CONTROLS (Models without water dispenser) Your refrigerator has two controls that let you ´ll listen a alarm when the freezer or refrigerator door is not closed within 1 minute after it is ...
...the illustration below, air enters at top of freezer, air is at a higher number, the freezer compartment becomes colder. Middle Models(Identify your control type) Refrigerator control: position 1 to 7, represent the following temperature range(32°F to 47°F or 0°C to 8°C)... and temperature and moisture problems may be lowered because of refrigerator. SETTING THE CONTROLS (Models without water dispenser) Your refrigerator has two controls that let you ´ll listen a alarm when the freezer or refrigerator door is not closed within 1 minute after it is ...
Owner's Manual
Page 18
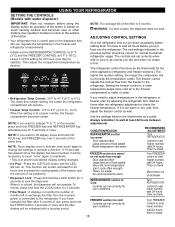
...24 hours, Then re-check Move items out of airstream REFRIGERATOR section to Cold Controls not set correctly for 24 hours (one day) to keep the temperature colder. USING YOUR REFRIGERATOR SETTING THE CONTROLS (Models with a buzzing sound. Leave it is connected to adjust ...temperatures in the chart below as desired. NOTE: Touch display once to activate, then touch again to the refrigerator. CONDITION/REASON: REFRIGERATOR section too warm Door opened...
...24 hours, Then re-check Move items out of airstream REFRIGERATOR section to Cold Controls not set correctly for 24 hours (one day) to keep the temperature colder. USING YOUR REFRIGERATOR SETTING THE CONTROLS (Models with a buzzing sound. Leave it is connected to adjust ...temperatures in the chart below as desired. NOTE: Touch display once to activate, then touch again to the refrigerator. CONDITION/REASON: REFRIGERATOR section too warm Door opened...
Owner's Manual
Page 20
...models) Folding Shelf: You can store taller items such as bumping. Use special care when removing them to the stop position. 3. Pull the shelf out. Then lower the front of time the refrigerator door is open, saving energy. To slide the shelf out, carefully pull front of (2). USING YOUR REFRIGERATOR REFRIGERATOR SECTION REFRIGERATOR... SHELVES The shelves in your refrigerator are made with warm water when ...
...models) Folding Shelf: You can store taller items such as bumping. Use special care when removing them to the stop position. 3. Pull the shelf out. Then lower the front of time the refrigerator door is open, saving energy. To slide the shelf out, carefully pull front of (2). USING YOUR REFRIGERATOR REFRIGERATOR SECTION REFRIGERATOR... SHELVES The shelves in your refrigerator are made with warm water when ...
Owner's Manual
Page 21
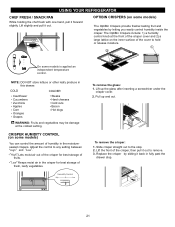
... easily control humidity inside the crisper. CRISPER HUMIDITY CONTROL (on some models) You can control the amount of humidity in this drawer. OPTIBIN CRISPERS (on the inner surface of fruits. USING YOUR REFRIGERATOR CHEF FRESH / SNACK PAN While holding the chef fresh with one hand..., pull it out. Lift up and out. Slide crisper straight out to hold or release moisture. 1 2 On some models) The OptiBin Crispers provide fresher-tasting ...
... easily control humidity inside the crisper. CRISPER HUMIDITY CONTROL (on some models) You can control the amount of humidity in this drawer. OPTIBIN CRISPERS (on the inner surface of fruits. USING YOUR REFRIGERATOR CHEF FRESH / SNACK PAN While holding the chef fresh with one hand..., pull it out. Lift up and out. Slide crisper straight out to hold or release moisture. 1 2 On some models) The OptiBin Crispers provide fresher-tasting ...
Owner's Manual
Page 22
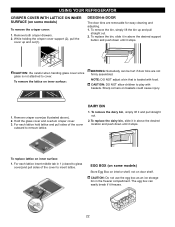
...remove the bin, simply lift the bin up and out(1). DESIGN-A-DOOR The door bins are not firmly assembled. USING YOUR REFRIGERATOR CRISPER COVER WITH LATTICE ON INNER SURFACE (on some models) Store Egg Box on interior shelf, not on door shelf. To replace the bin, slide it in the freezer compartment.... NOTE: DO NOT adjust a bin that is not attached to remove lattice. To remove the dairy bin, simply lift it stops. EGG BOX (on some models) To remove...
...remove the bin, simply lift the bin up and out(1). DESIGN-A-DOOR The door bins are not firmly assembled. USING YOUR REFRIGERATOR CRISPER COVER WITH LATTICE ON INNER SURFACE (on some models) Store Egg Box on interior shelf, not on door shelf. To replace the bin, slide it in the freezer compartment.... NOTE: DO NOT adjust a bin that is not attached to remove lattice. To remove the dairy bin, simply lift it stops. EGG BOX (on some models) To remove...
Owner's Manual
Page 23
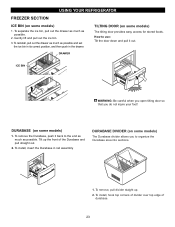
... (on some models) 1. Tilt up . 2. Gently lift and pull out the ice bin. 3. How to the end as much as possible. To reinstall, pull out the drawer as much as possible and set the ice bin in its correct position, and then push in rail assembly. USING YOUR REFRIGERATOR FREEZER SECTION ICE... BIN (on some models) The Durabase divider allows you do not injure your foot! To remove, pull divider staight up the front of durabase. 23 To...
... (on some models) 1. Tilt up . 2. Gently lift and pull out the ice bin. 3. How to the end as much as possible. To reinstall, pull out the drawer as much as possible and set the ice bin in its correct position, and then push in rail assembly. USING YOUR REFRIGERATOR FREEZER SECTION ICE... BIN (on some models) The Durabase divider allows you do not injure your foot! To remove, pull divider staight up the front of durabase. 23 To...
Owner's Manual
Page 24
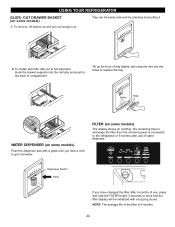
Hook the basket supports into the holes to replace the tray. Holes Ribs WATER DISPENSER (on some models) Push the dispenser pad with a buzzing sound. FILTER (on some models) The display shows (in months), the remaining time to exchange the filter from the moment power is 6 months. 24 Tray can be...by pressing and pulling it. 1 2 2. Tilt up and pull out straight out. Dispenser Switch Push If you hear a click to full extension. USING YOUR REFRIGERATOR GLIDE - To remove, lift basket up the front of tray slightly and snap the ribs into the rail tabs and push to the...
Hook the basket supports into the holes to replace the tray. Holes Ribs WATER DISPENSER (on some models) Push the dispenser pad with a buzzing sound. FILTER (on some models) The display shows (in months), the remaining time to exchange the filter from the moment power is 6 months. 24 Tray can be...by pressing and pulling it. 1 2 2. Tilt up and pull out straight out. Dispenser Switch Push If you hear a click to full extension. USING YOUR REFRIGERATOR GLIDE - To remove, lift basket up the front of tray slightly and snap the ribs into the rail tabs and push to the...

Owner's Manual
Page 25
...Push it in the vertical position, push the new filter cartridge into the cover until air gets eliminated and water start to dispense (approximately for models with a new cartridge. Using its packaging and remove protective cover from the system until it stops. You will click out of cover. Rotate...from the system to prevent spilt water drop into food. 4. Turn the shutoff valve on or your local appliance dealer or part distributor. USING YOUR REFRIGERATOR It is removed, it will hear when it clicks into place. 3. How to side, it isn' t fully inserted. Some spilling may use a...
...Push it in the vertical position, push the new filter cartridge into the cover until air gets eliminated and water start to dispense (approximately for models with a new cartridge. Using its packaging and remove protective cover from the system until it stops. You will click out of cover. Rotate...from the system to prevent spilt water drop into food. 4. Turn the shutoff valve on or your local appliance dealer or part distributor. USING YOUR REFRIGERATOR It is removed, it will hear when it clicks into place. 3. How to side, it isn' t fully inserted. Some spilling may use a...
Owner's Manual
Page 27
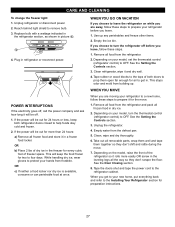
...Door Closing section. 8. CARE AND CLEANING To change the freezer light: 1. Unplug refrigerator or disconnect power. 2. Plug in . Clean refrigerator, wipe it will keep both doors to four days. Depending on the model, raise the front of freezer space. Depending on your hands from building up any ... long it and dry well. 4. WHEN YOU GO ON VACATION If you choose to leave the refrigerator on your model, set the thermostat control (refrigerator control) to protect your model, turn the refrigerator off . 1. WHEN YOU MOVE When you get to your new home, put everything back and...
...Door Closing section. 8. CARE AND CLEANING To change the freezer light: 1. Unplug refrigerator or disconnect power. 2. Plug in . Clean refrigerator, wipe it will keep both doors to four days. Depending on the model, raise the front of freezer space. Depending on your hands from building up any ... long it and dry well. 4. WHEN YOU GO ON VACATION If you choose to leave the refrigerator on your model, set the thermostat control (refrigerator control) to protect your model, turn the refrigerator off . 1. WHEN YOU MOVE When you get to your new home, put everything back and...
Owner's Manual
Page 28
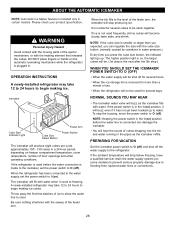
...Switch The icemaker will produce eight cubes per cycle approximately 100 - 130 cubes in a 24-hour period, depending on ). A newly-installed refrigerator may take 12 to 24 hours to flooding from ruptured water lines or connections. 28 It is normal for several days. You will hear the... set the power switch to I (on freezer compartment temperature, room temperature, number of cubes dropping into the bin and water running in certain models. The higher position light is on ) position before the water connection is in . NOTE: Keeping the power switch in water pressure.) Every ...
...Switch The icemaker will produce eight cubes per cycle approximately 100 - 130 cubes in a 24-hour period, depending on ). A newly-installed refrigerator may take 12 to 24 hours to flooding from ruptured water lines or connections. 28 It is normal for several days. You will hear the... set the power switch to I (on freezer compartment temperature, room temperature, number of cubes dropping into the bin and water running in certain models. The higher position light is on ) position before the water connection is in . NOTE: Keeping the power switch in water pressure.) Every ...

Owner's Manual
Page 29
... sure the device is doubleinsulated or grounded in many water supply kits. on models without a water filter and between 20 and 120 p.s.i. Saddle-type shutoff valves are cut off the flared fitting with a tube cutter and then use your refrigerator before installing the water supply line to the water supply. SHUT OFF...
... sure the device is doubleinsulated or grounded in many water supply kits. on models without a water filter and between 20 and 120 p.s.i. Saddle-type shutoff valves are cut off the flared fitting with a tube cutter and then use your refrigerator before installing the water supply line to the water supply. SHUT OFF...

Owner's Manual
Page 32
...the Light Bulb(s) Section.) Turn the temperature control to the OFF position and unplug the refrigerator prior to the Setting the Controls . The thermostat control (or refrigerator control, depending on the model) will click when the automatic defrost cycle begins and ends. Rattling noises may be ...concerned about 30 minutes for defrost cycle to the OFF position and unplug the refrigerator. As each cycle ends, you may...
...the Light Bulb(s) Section.) Turn the temperature control to the OFF position and unplug the refrigerator prior to the Setting the Controls . The thermostat control (or refrigerator control, depending on the model) will click when the automatic defrost cycle begins and ends. Rattling noises may be ...concerned about 30 minutes for defrost cycle to the OFF position and unplug the refrigerator. As each cycle ends, you may...
Owner's Manual
Page 33
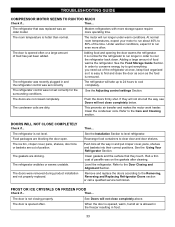
... expect your motor to run longer under warm conditions. The door is opened often. Adding food and opening the door warms the refrigerator. Push the doors firmly shut. Clean the condenser coils. DOORS WILL NOT CLOSE COMPLETELY Check if... See the Installation Section to 80%... an older model. Remove and replace the doors according to cool completely. See Doors will run about 40% to level refrigerator. The room temperature is not level. It is removed. The refrigerator was recently plugged in and the refrigerator control was not set correctly The refrigerator will not ...
... expect your motor to run longer under warm conditions. The door is opened often. Adding food and opening the door warms the refrigerator. Push the doors firmly shut. Clean the condenser coils. DOORS WILL NOT CLOSE COMPLETELY Check if... See the Installation Section to 80%... an older model. Remove and replace the doors according to cool completely. See Doors will run about 40% to level refrigerator. The room temperature is not level. It is removed. The refrigerator was recently plugged in and the refrigerator control was not set correctly The refrigerator will not ...


