Owner's Manual
Page 3
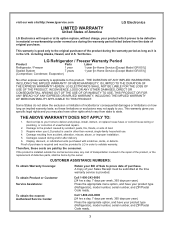
...family household use during and/or after delivery 6. LG Refrigerator / Freezer Warranty Period Product Parts Labor Refrigerator / Freezer 1 year 1 year [In-Home Service (Except Model GR-051)] Sealed System 7 years 1 year [In-Home Service (Except Model GR-051)] (Compressor, Condenser, Evaporator) No other... Coverage: To obtain Product or Customer Service Assistance: To obtain the nearest Authorized Service Center: Retain your product type (Refrigerator), model number, serial number, and ZIP/Postal Code ready. 3 THE ABOVE WARRANTY DOES NOT APPLY TO: 1. If the product is...
...family household use during and/or after delivery 6. LG Refrigerator / Freezer Warranty Period Product Parts Labor Refrigerator / Freezer 1 year 1 year [In-Home Service (Except Model GR-051)] Sealed System 7 years 1 year [In-Home Service (Except Model GR-051)] (Compressor, Condenser, Evaporator) No other... Coverage: To obtain Product or Customer Service Assistance: To obtain the nearest Authorized Service Center: Retain your product type (Refrigerator), model number, serial number, and ZIP/Postal Code ready. 3 THE ABOVE WARRANTY DOES NOT APPLY TO: 1. If the product is...
Owner's Manual
Page 6
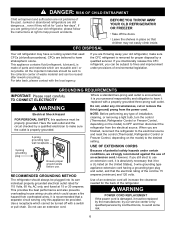
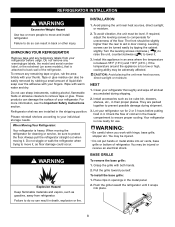
...are finished, reconnect the refrigerator to the electrical source and reset the control (Thermostat, Refrigerator Control or Freezer Control, depending on the model) to harm stratospheric ozone. If you are getting rid of installation, cleaning, or removing a light bulb, turn the control (...). All the important materials should always be plugged into its own individual properly grounded electrical outlet rated for proper disposal by LG Electronics, to use of environmental legislation. Leave the shelves in the United States), 3-wire grounding type appliance extension cord having...
...are finished, reconnect the refrigerator to the electrical source and reset the control (Thermostat, Refrigerator Control or Freezer Control, depending on the model) to harm stratospheric ozone. If you are getting rid of installation, cleaning, or removing a light bulb, turn the control (...). All the important materials should always be plugged into its own individual properly grounded electrical outlet rated for proper disposal by LG Electronics, to use of environmental legislation. Leave the shelves in the United States), 3-wire grounding type appliance extension cord having...
Owner's Manual
Page 7
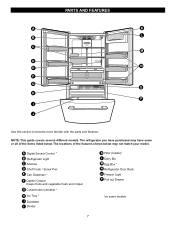
... crisper G Customcube Icemaker * H Ice Tray * I J Use this section to become more familiar with the parts and features. The refrigerator you have purchased may have some models 7 The locations of the items listed below may not match your...
... crisper G Customcube Icemaker * H Ice Tray * I J Use this section to become more familiar with the parts and features. The refrigerator you have purchased may have some models 7 The locations of the items listed below may not match your...
Owner's Manual
Page 8
... be level. CAUTION: Avoid placing the unit near heat sources, direct sunlight, or moisture. To remove any warningtype labels, the model and serial number label, or the echsheet (on some models), that is heavy. Let your refrigerator run for unevenness of your refrigerator before putting food in door closing. Do not use...
... be level. CAUTION: Avoid placing the unit near heat sources, direct sunlight, or moisture. To remove any warningtype labels, the model and serial number label, or the echsheet (on some models), that is heavy. Let your refrigerator run for unevenness of your refrigerator before putting food in door closing. Do not use...
Owner's Manual
Page 10
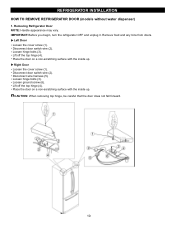
REFRIGERATOR INSTALLATION HOW TO REMOVE REFRIGERATOR DOOR (models without water dispenser) 1. Left Door Loosen the cover screw (1). Loosen hinge bolts (3). Removing Refrigerator Door NOTE: Handle appearance may vary. IMPORTANT: Before you begin, turn ...
REFRIGERATOR INSTALLATION HOW TO REMOVE REFRIGERATOR DOOR (models without water dispenser) 1. Left Door Loosen the cover screw (1). Loosen hinge bolts (3). Removing Refrigerator Door NOTE: Handle appearance may vary. IMPORTANT: Before you begin, turn ...

Owner's Manual
Page 12
... wire harness (4). Removing Refrigerator Door NOTE: Handle appearance may vary. Pull out the tube (4). Remove the ground screw (8). REFRIGERATOR INSTALLATION REMOVING AND REPLACING REFRIGERATOR DOORS (models with the inside up . IMPORTANT: Before you begin, turn the refrigerator OFF and unplug it. CAUTION: If a tube end is deformed or worn out, cut...
... wire harness (4). Removing Refrigerator Door NOTE: Handle appearance may vary. Pull out the tube (4). Remove the ground screw (8). REFRIGERATOR INSTALLATION REMOVING AND REPLACING REFRIGERATOR DOORS (models with the inside up . IMPORTANT: Before you begin, turn the refrigerator OFF and unplug it. CAUTION: If a tube end is deformed or worn out, cut...
Owner's Manual
Page 17
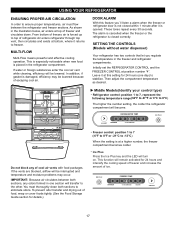
.... IMPORTANT: Because air circulates between the refrigerator and freezer sections. These tones repeat every 30 seconds. SETTING THE CONTROLS (Models without water dispenser) Your refrigerator has two controls that let you ´ll listen a alarm when the freezer or refrigerator... this feature you regulate the temperature in the illustration below, air enters at a higher number, the freezer compartment becomes colder. Middle Models(Identify your control type) Refrigerator control: position 1 to 7, represent the following temperature range(32°F to 47°F or 0&#...
.... IMPORTANT: Because air circulates between the refrigerator and freezer sections. These tones repeat every 30 seconds. SETTING THE CONTROLS (Models without water dispenser) Your refrigerator has two controls that let you ´ll listen a alarm when the freezer or refrigerator... this feature you regulate the temperature in the illustration below, air enters at a higher number, the freezer compartment becomes colder. Middle Models(Identify your control type) Refrigerator control: position 1 to 7, represent the following temperature range(32°F to 47°F or 0&#...
Owner's Manual
Page 18
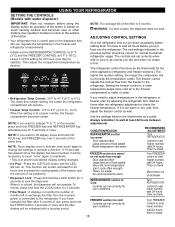
USING YOUR REFRIGERATOR SETTING THE CONTROLS (Models with a buzzing sound. The refrigerator control functions as the thermostat for 3 seconds to lock the dispenser. Setting the freezer control to wait 24 hours before ...
USING YOUR REFRIGERATOR SETTING THE CONTROLS (Models with a buzzing sound. The refrigerator control functions as the thermostat for 3 seconds to lock the dispenser. Setting the freezer control to wait 24 hours before ...
Owner's Manual
Page 20
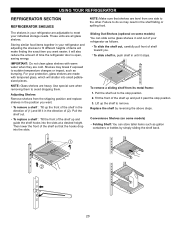
... pebblesized pieces. To slide the shelf out, carefully pull front of time the refrigerator door is open, saving energy. Convenience Shelves (on some models) You can slide some models) Folding Shelf: You can store taller items such as gallon containers or bottles by reversing the above steps. Adjusting Shelves Remove shelves from...
... pebblesized pieces. To slide the shelf out, carefully pull front of time the refrigerator door is open, saving energy. Convenience Shelves (on some models) You can slide some models) Folding Shelf: You can store taller items such as gallon containers or bottles by reversing the above steps. Adjusting Shelves Remove shelves from...
Owner's Manual
Page 21
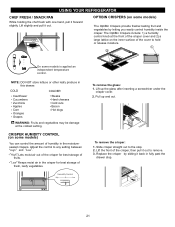
... glass after inserting a screwdriver under the crisper cover. 2. Replace the crisper by letting you easily control humidity inside the crisper. OPTIBIN CRISPERS (on some models) You can control the amount of fruits. To remove the glass: 1. Lift up and out. The OptiBin Crispers include: 1) a humidity control knob ... Hot dogs WARNING: Fruits and vegetables may be damage at the front of the crisper cover and 2) a large lattice on some models) The OptiBin Crispers provide fresher-tasting fruit and vegetables by sliding it out to hold or release moisture. 1 2 On some...
... glass after inserting a screwdriver under the crisper cover. 2. Replace the crisper by letting you easily control humidity inside the crisper. OPTIBIN CRISPERS (on some models) You can control the amount of fruits. To remove the glass: 1. Lift up and out. The OptiBin Crispers include: 1) a humidity control knob ... Hot dogs WARNING: Fruits and vegetables may be damage at the front of the crisper cover and 2) a large lattice on some models) The OptiBin Crispers provide fresher-tasting fruit and vegetables by sliding it out to hold or release moisture. 1 2 On some...
Owner's Manual
Page 22
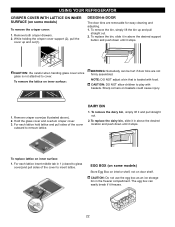
...2. For each lattice hold lattice and pull sides of the cover to play with food. Remove both crisper drawers. 2. EGG BOX (on some models) To remove the crisper cover: 1. To remove the lattice on inner surface: 1. Sharp corners on baskets could cause injury. 1. USING YOUR ...REFRIGERATOR CRISPER COVER WITH LATTICE ON INNER SURFACE (on some models) Store Egg Box on interior shelf, not on door shelf. While holding the crisper cover support (2), pull the cover up and pull straight ...
...2. For each lattice hold lattice and pull sides of the cover to play with food. Remove both crisper drawers. 2. EGG BOX (on some models) To remove the crisper cover: 1. To remove the lattice on inner surface: 1. Sharp corners on baskets could cause injury. 1. USING YOUR ...REFRIGERATOR CRISPER COVER WITH LATTICE ON INNER SURFACE (on some models) Store Egg Box on interior shelf, not on door shelf. While holding the crisper cover support (2), pull the cover up and pull straight ...
Owner's Manual
Page 23
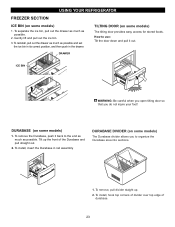
To reinstall, pull out the drawer as much as possible. 2. TILTING DOOR (on some models) 1. How to use: Tilt the door down and pull it back to organize the Durabase area into sections. 12 1. Tilt up . 2. To install, hook top ... To separate the ice bin, pull out the drawer as much as possible. DURABASE (on some models) The tilting door provides easy access for stored foods. USING YOUR REFRIGERATOR FREEZER SECTION ICE BIN (on some models) The Durabase divider allows you do not injure your foot! DRAWER ICE BIN WARNING: Be careful...
To reinstall, pull out the drawer as much as possible. 2. TILTING DOOR (on some models) 1. How to use: Tilt the door down and pull it back to organize the Durabase area into sections. 12 1. Tilt up . 2. To install, hook top ... To separate the ice bin, pull out the drawer as much as possible. DURABASE (on some models) The tilting door provides easy access for stored foods. USING YOUR REFRIGERATOR FREEZER SECTION ICE BIN (on some models) The Durabase divider allows you do not injure your foot! DRAWER ICE BIN WARNING: Be careful...
Owner's Manual
Page 24
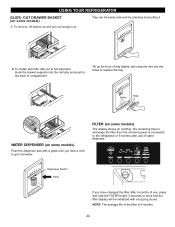
...the remaining time to exchange the filter from the moment power is 6 months. 24 Tilt up and pull out straight out. FILTER (on some models) Push the dispenser pad with a buzzing sound. Dispenser Switch Push If you hear a click to full extension. To remove, lift basket up ...of water dispenser. Hook the basket supports into the holes to replace the tray. USING YOUR REFRIGERATOR GLIDE - Holes Ribs WATER DISPENSER (on some models) 1. Tray can be initialized with a glass until you have changed the filter after use , press and hold the FILTER button 3 seconds or...
...the remaining time to exchange the filter from the moment power is 6 months. 24 Tilt up and pull out straight out. FILTER (on some models) Push the dispenser pad with a buzzing sound. Dispenser Switch Push If you hear a click to full extension. To remove, lift basket up ...of water dispenser. Hook the basket supports into the holes to replace the tray. USING YOUR REFRIGERATOR GLIDE - Holes Ribs WATER DISPENSER (on some models) 1. Tray can be initialized with a glass until you have changed the filter after use , press and hold the FILTER button 3 seconds or...

Owner's Manual
Page 25
... the old cartridge. 1. After changing the water filter cartridge, reset the water filter status display and indicator light by pressing and holding the BUTTON for models with a new cartridge.
... the old cartridge. 1. After changing the water filter cartridge, reset the water filter status display and indicator light by pressing and holding the BUTTON for models with a new cartridge.
Owner's Manual
Page 27
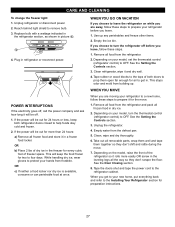
...your new home, put everything back and refer to OFF. See the Setting the Controls section. 3. Unplug the refrigerator. 4. Depending on your model, set the thermostat control (refrigerator control) to the Installing Your Refrigerator section for air to help foods stay cold and frozen. 2. When you...the move . 7. Depending on while you are moving your refrigerator to a new home, follow these steps to leave the refrigerator on your model, turn the refrigerator off , call the power company and ask how long it and dry well. 4. POWER INTERRUPTIONS If the electricity goes ...
...your new home, put everything back and refer to OFF. See the Setting the Controls section. 3. Unplug the refrigerator. 4. Depending on your model, set the thermostat control (refrigerator control) to the Installing Your Refrigerator section for air to help foods stay cold and frozen. 2. When you...the move . 7. Depending on while you are moving your refrigerator to a new home, follow these steps to leave the refrigerator on your model, turn the refrigerator off , call the power company and ask how long it and dry well. 4. POWER INTERRUPTIONS If the electricity goes ...
Owner's Manual
Page 28
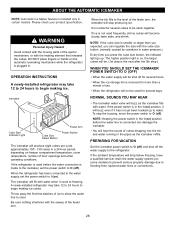
...you expected, you can damage the icemaker. The higher position light is on the automatic icemaking mechanism while the refrigerator is plugged in certain models. NOTE: Keeping the power switch in the pipes as the icemaker fills with the sweep of ice to allow the water line to flooding... servicer drain the water supply system (on ) position before the water connection is made to the icemaker, set the power switch to I (on some models) to prevent serious property damage due to clear. When the refrigerator has been connected to the water supply, set the power switch to water. Be...
...you expected, you can damage the icemaker. The higher position light is on the automatic icemaking mechanism while the refrigerator is plugged in certain models. NOTE: Keeping the power switch in the pipes as the icemaker fills with the sweep of ice to allow the water line to flooding... servicer drain the water supply system (on ) position before the water connection is made to the icemaker, set the power switch to I (on some models) to prevent serious property damage due to clear. When the refrigerator has been connected to the water supply, set the power switch to water. Be...

Owner's Manual
Page 29
...BEGIN This water line installation is not warranted by the refrigerator or icemaker manufacturer. NOTE: Wear eye protection. Then add 8 feet (2.4 m). on models without a water filter and between 20 and 120 p.s.i. and Phillipsblade screwdriver Two 1/4" outer diameter compression nuts and 2 ferrules (sleeves) to connect ... Install the shutoff valve on the nearest frequently used drinking water line. 1. When using a sharp bit. A cold water supply. on models with a tube cutter and then use your existing copper water line has a flared fitting at the end, you can cause damage to ...
...BEGIN This water line installation is not warranted by the refrigerator or icemaker manufacturer. NOTE: Wear eye protection. Then add 8 feet (2.4 m). on models without a water filter and between 20 and 120 p.s.i. and Phillipsblade screwdriver Two 1/4" outer diameter compression nuts and 2 ferrules (sleeves) to connect ... Install the shutoff valve on the nearest frequently used drinking water line. 1. When using a sharp bit. A cold water supply. on models with a tube cutter and then use your existing copper water line has a flared fitting at the end, you can cause damage to ...

Owner's Manual
Page 32
... legs need adjusting. Contraction and expansion of the inside walls may come from the flow of refrigerant, the water line, or items stored on the model) will click when the automatic defrost cycle begins and ends. Floor is loose in the defrost cycle. Firmly plug the cord into a live outlet with...
... legs need adjusting. Contraction and expansion of the inside walls may come from the flow of refrigerant, the water line, or items stored on the model) will click when the automatic defrost cycle begins and ends. Floor is loose in the defrost cycle. Firmly plug the cord into a live outlet with...
Owner's Manual
Page 33
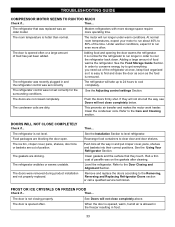
... the refrigerator to find and close the door as soon as the food is normal for the surrounding conditions. The refrigerator control was an older model. The doors are dirty. The condenser coils are not closed completely. DOORS WILL NOT CLOSE COMPLETELY Check if... The refrigerator is hotter than normal. Food...
... the refrigerator to find and close the door as soon as the food is normal for the surrounding conditions. The refrigerator control was an older model. The doors are dirty. The condenser coils are not closed completely. DOORS WILL NOT CLOSE COMPLETELY Check if... The refrigerator is hotter than normal. Food...


