Owner's Manual
Page 2
...Warranty (U.S.A.) Safety Instructions Grounding Requirements Parts and Features Refrigerator Installation Unpacking your refrigerator Installation Base Grille Removing, Reversing and Replacing Your refrigerator doors Pull out drawer Leveling and door alignment Using your refrigerator Ensuring proper air circulation Multi Flow Door alarm Setting ...the controls Adjusting control settings Food storage guide Storing frozen food Refrigerator Section Refrigerator shelves Chef Fresh Crisper humidity control Optibin Crisper Crisper cover with lattice on inner surface Design...
...Warranty (U.S.A.) Safety Instructions Grounding Requirements Parts and Features Refrigerator Installation Unpacking your refrigerator Installation Base Grille Removing, Reversing and Replacing Your refrigerator doors Pull out drawer Leveling and door alignment Using your refrigerator Ensuring proper air circulation Multi Flow Door alarm Setting ...the controls Adjusting control settings Food storage guide Storing frozen food Refrigerator Section Refrigerator shelves Chef Fresh Crisper humidity control Optibin Crisper Crisper cover with lattice on inner surface Design...
Owner's Manual
Page 3
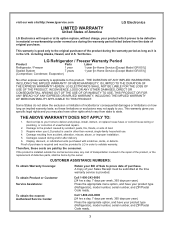
..., serial number, and ZIP/Postal Code ready. 3 including Alaska, Hawaii, and U.S. Display, discount, or refurbished units purchased with scratches, dents, or defects. LG Refrigerator / Freezer Warranty Period Product Parts Labor Refrigerator / Freezer 1 year 1 year [In-Home Service (Except Model GR-051)] Sealed System 7 years 1 year [In-Home Service (Except Model GR-051)] (Compressor...
..., serial number, and ZIP/Postal Code ready. 3 including Alaska, Hawaii, and U.S. Display, discount, or refurbished units purchased with scratches, dents, or defects. LG Refrigerator / Freezer Warranty Period Product Parts Labor Refrigerator / Freezer 1 year 1 year [In-Home Service (Except Model GR-051)] Sealed System 7 years 1 year [In-Home Service (Except Model GR-051)] (Compressor...
Owner's Manual
Page 5
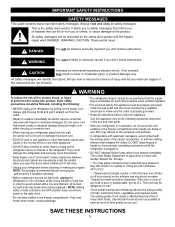
...below 40°F (4°C)." Repair or replace immediately all safety messages. DO NOT allow children to the product. they are in the refrigerator. For personal safety, this appliance. All safety messages will be so positioned that any repairs. Be careful when you what can happen ... DO NOT refreeze frozen foods which , if not avoided, may adhere to safety messages that inform you don't follow instructions. Unplug your refrigerator is the safety alert symbol. Always grip the plug firmly and pull it . This is in operation, do not touch the cold surfaces...
...below 40°F (4°C)." Repair or replace immediately all safety messages. DO NOT allow children to the product. they are in the refrigerator. For personal safety, this appliance. All safety messages will be so positioned that any repairs. Be careful when you what can happen ... DO NOT refreeze frozen foods which , if not avoided, may adhere to safety messages that inform you don't follow instructions. Unplug your refrigerator is the safety alert symbol. Always grip the plug firmly and pull it . This is in operation, do not touch the cold surfaces...
Owner's Manual
Page 6
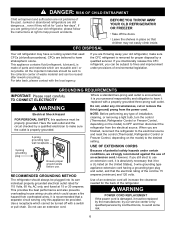
.... This appliance contains fluid (refrigerant, lubricant), is removed for "just a few days". For take back, please contact with a switch or pull chain. GROUNDING REQUIREMENTS IMPORTANT: Please read carefully. Have the wall outlet and the circuit checked by LG Electronics, to avoid some risk.... 6 Use a receptacle which could cause a fire hazard from overheated wires. Use of installation, cleaning, or removing a light bulb, turn the control (Thermostat, Refrigerator Control or Freezer Control, depending on ...
.... This appliance contains fluid (refrigerant, lubricant), is removed for "just a few days". For take back, please contact with a switch or pull chain. GROUNDING REQUIREMENTS IMPORTANT: Please read carefully. Have the wall outlet and the circuit checked by LG Electronics, to avoid some risk.... 6 Use a receptacle which could cause a fire hazard from overheated wires. Use of installation, cleaning, or removing a light bulb, turn the control (Thermostat, Refrigerator Control or Freezer Control, depending on ...
Owner's Manual
Page 7
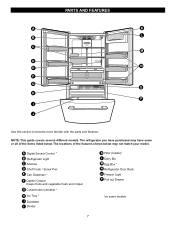
... covers several different models. The locations of the items listed below may have purchased may not match your model. The refrigerator you have some models 7 A Digital Sensor Control * B Refrigerator Light C Shelves D Chef Fresh / Snack Pan E Can Dispenser * F Optibin Crisper Keeps fruits and vegetable fresh ... more familiar with the parts and features. PARTS AND FEATURES A K L B C M D N E F G O H P I Durabase J Divider K Filter (Inside)* L Dairy Bin M Egg Box * N Refrigerator Door Rack O Freezer Light P Pull out Drawer *on some or all of the features shown below .
... covers several different models. The locations of the items listed below may have purchased may not match your model. The refrigerator you have some models 7 A Digital Sensor Control * B Refrigerator Light C Shelves D Chef Fresh / Snack Pan E Can Dispenser * F Optibin Crisper Keeps fruits and vegetable fresh ... more familiar with the parts and features. PARTS AND FEATURES A K L B C M D N E F G O H P I Durabase J Divider K Filter (Inside)* L Dairy Bin M Egg Box * N Refrigerator Door Rack O Freezer Light P Pull out Drawer *on some or all of the features shown below .
Owner's Manual
Page 8
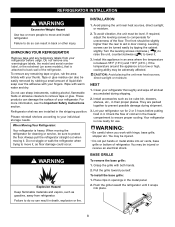
...Install accessories such as ice cube bin, drawers, shelves, etc., in it. They are installed in the metal panel. 2. Let your refrigerator before putting food in their proper places. Failure to prevent possible damage during shipping. 2. Push the grille toward yourself. If required, adjust ...be level. BASE GRILLE WARNING Explosion Hazard Keep flammable materials and vapors, such as floor damage could occur. Pull the grille toward the refrigerator until it . 3. Wipe with hinge, base grille, stopper etc. To install the base grille: 1. To avoid vibration, the unit...
...Install accessories such as ice cube bin, drawers, shelves, etc., in it. They are installed in the metal panel. 2. Let your refrigerator before putting food in their proper places. Failure to prevent possible damage during shipping. 2. Push the grille toward yourself. If required, adjust ...be level. BASE GRILLE WARNING Explosion Hazard Keep flammable materials and vapors, such as floor damage could occur. Pull the grille toward the refrigerator until it . 3. Wipe with hinge, base grille, stopper etc. To install the base grille: 1. To avoid vibration, the unit...
Owner's Manual
Page 9
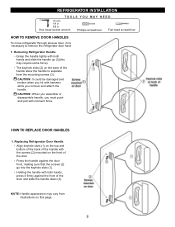
... on the top and bottom of the back of the handle allow the handle to remove the refrigerator door handles. 1. Holding the handle with hammer while you remove and attach the handle. REFRIGERATOR INSTALLATION TOOLS YOU MAY NEED 10 mm 1/4 in 3/8 in Hex head socket wrench Phillips screwdriver ...slide the handle up (1)(this page. HOW TO REPLACE DOOR HANDLES 1. Press the handle against the front of the door. Removing Refrigerator Handle Grasp the handle tightly with both hands, press it may require some force). NOTE: Handle appearance may vary from the mounting screws (3).
... on the top and bottom of the back of the handle allow the handle to remove the refrigerator door handles. 1. Holding the handle with hammer while you remove and attach the handle. REFRIGERATOR INSTALLATION TOOLS YOU MAY NEED 10 mm 1/4 in 3/8 in Hex head socket wrench Phillips screwdriver ...slide the handle up (1)(this page. HOW TO REPLACE DOOR HANDLES 1. Press the handle against the front of the door. Removing Refrigerator Handle Grasp the handle tightly with both hands, press it may require some force). NOTE: Handle appearance may vary from the mounting screws (3).
Owner's Manual
Page 10
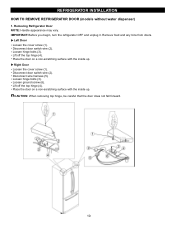
...the door on a non-scratching surface with the inside up . Right Door Loosen the cover screw (1). Loosen hinge bolts (3). Removing Refrigerator Door NOTE: Handle appearance may vary. CAUTION: When removing top hinge, be careful that the door does not fall forward. 10 ...IMPORTANT: Before you begin, turn the refrigerator OFF and unplug it. Place the door on a non-scratching surface with the inside up . REFRIGERATOR INSTALLATION HOW TO REMOVE REFRIGERATOR DOOR (models without water dispenser) 1. Loosen hinge bolts (3). Disconnect door ...
...the door on a non-scratching surface with the inside up . Right Door Loosen the cover screw (1). Loosen hinge bolts (3). Removing Refrigerator Door NOTE: Handle appearance may vary. CAUTION: When removing top hinge, be careful that the door does not fall forward. 10 ...IMPORTANT: Before you begin, turn the refrigerator OFF and unplug it. Place the door on a non-scratching surface with the inside up . REFRIGERATOR INSTALLATION HOW TO REMOVE REFRIGERATOR DOOR (models without water dispenser) 1. Loosen hinge bolts (3). Disconnect door ...
Owner's Manual
Page 11
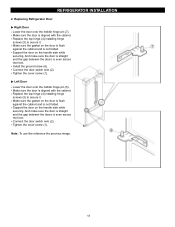
.... Tighten the cover screw (1). Make sure the door is not folded. Install the ground screw (6). Note: To use like reference the previous image. 11 Replacing Refrigerator Door Right Door Lower the door onto the middle hinge pin (7). Replace the top hinge (4) installing hinge screws (3) to secure it . Connect the door switch...door on the handle side while securing. And make sure the door is straight and the gap between the doors is even across the front. REFRIGERATOR INSTALLATION 2. Make sure the door is not folded. Support the door on the handle side while securing.
.... Tighten the cover screw (1). Make sure the door is not folded. Install the ground screw (6). Note: To use like reference the previous image. 11 Replacing Refrigerator Door Right Door Lower the door onto the middle hinge pin (7). Replace the top hinge (4) installing hinge screws (3) to secure it . Connect the door switch...door on the handle side while securing. And make sure the door is straight and the gap between the doors is even across the front. REFRIGERATOR INSTALLATION 2. Make sure the door is not folded. Support the door on the handle side while securing.

Owner's Manual
Page 12
...is deformed or worn out, cut the damaged portion away. Disconnect door switch wire (2). IMPORTANT: Before you begin, turn the refrigerator OFF and unplug it. Disconnect wire harness (4). REFRIGERATOR INSTALLATION REMOVING AND REPLACING REFRIGERATOR DOORS (models with the inside up . Disconnect water supply tube by pushing back on back side (see figure A). Loosen... (1). Disconnect wire harness (5). Place the door on a non-scratching surface with the inside up . 12 Disconnect door switch wire (2). Pull out the tube (4). Removing Refrigerator Door NOTE: Handle appearance may vary.
...is deformed or worn out, cut the damaged portion away. Disconnect door switch wire (2). IMPORTANT: Before you begin, turn the refrigerator OFF and unplug it. Disconnect wire harness (4). REFRIGERATOR INSTALLATION REMOVING AND REPLACING REFRIGERATOR DOORS (models with the inside up . Disconnect water supply tube by pushing back on back side (see figure A). Loosen... (1). Disconnect wire harness (5). Place the door on a non-scratching surface with the inside up . 12 Disconnect door switch wire (2). Pull out the tube (4). Removing Refrigerator Door NOTE: Handle appearance may vary.
Owner's Manual
Page 13
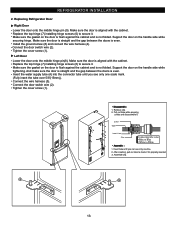
... sure the door is even. And make sure the door is straight and the gap between the doors is aligned with the cabinet. Replacing Refrigerator Door Right Door Lower the door onto the middle hinge pin (9). Make sure the gasket on the door is flush against the cabinet and ...not folded. Insert the water supply tube (4) into the connector tube until you see only one scale mark. (Fully insert the tube over 5/8"(15mm)). REFRIGERATOR INSTALLATION 2. Connect the door switch wire (2). Make sure the gasket on the door is flush against the cabinet and is not folded. Support the ...
... sure the door is even. And make sure the door is straight and the gap between the doors is aligned with the cabinet. Replacing Refrigerator Door Right Door Lower the door onto the middle hinge pin (9). Make sure the gasket on the door is flush against the cabinet and ...not folded. Insert the water supply tube (4) into the connector tube until you see only one scale mark. (Fully insert the tube over 5/8"(15mm)). REFRIGERATOR INSTALLATION 2. Connect the door switch wire (2). Make sure the gasket on the door is flush against the cabinet and is not folded. Support the ...
Owner's Manual
Page 14
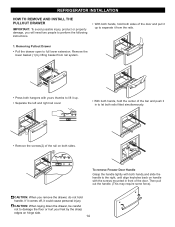
... remove Freezer Door Handle Grasp the handle tightly with the screws mounted in front of the bar and push it up to full lower extension. REFRIGERATOR INSTALLATION HOW TO REMOVE AND INSTALL THE PULLOUT DRAWER IMPORTANT: To avoid possible injury, product or property damage, you remove the drawer, do not hold...
... remove Freezer Door Handle Grasp the handle tightly with the screws mounted in front of the bar and push it up to full lower extension. REFRIGERATOR INSTALLATION HOW TO REMOVE AND INSTALL THE PULLOUT DRAWER IMPORTANT: To avoid possible injury, product or property damage, you remove the drawer, do not hold...

Owner's Manual
Page 15
... (1) into rail tabes (2) . 1 • With the drawer pulled out to perform the following instructions. • Make sure you have a right rail cover for each side. REFRIGERATOR INSTALLATTIIOONN HOW TO REMOVE AND INSTALL THE PULLOUT DRAWER IMPORTANT: To avoid possible injur or product or property damage, you will need two people to...
... (1) into rail tabes (2) . 1 • With the drawer pulled out to perform the following instructions. • Make sure you have a right rail cover for each side. REFRIGERATOR INSTALLATTIIOONN HOW TO REMOVE AND INSTALL THE PULLOUT DRAWER IMPORTANT: To avoid possible injur or product or property damage, you will need two people to...

Owner's Manual
Page 16
... doors are aligned. (Three snap rings are provided with two fresh food doors. Either door can be opened or closed independently of the refrigerator or counterclockwise to close easily. If your doors is uniquely designed with unit.) 3. Turn the leveling screw clockwise to raise that they close...1. With one hand, lift up the door you should turn both leveling screws clockwise. NOTE: Having someone push against the top of the refrigerator. This makes it . With other hand, use pliers to adjust the screws. Open both doors again and check to the rear by turning ...
... doors are aligned. (Three snap rings are provided with two fresh food doors. Either door can be opened or closed independently of the refrigerator or counterclockwise to close easily. If your doors is uniquely designed with unit.) 3. Turn the leveling screw clockwise to raise that they close...1. With one hand, lift up the door you should turn both leveling screws clockwise. NOTE: Having someone push against the top of the refrigerator. This makes it . With other hand, use pliers to adjust the screws. Open both doors again and check to the rear by turning ...
Owner's Manual
Page 17
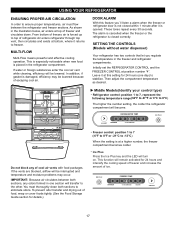
... and moisture problems may be lowered because of freezer and circulates down. If the vents are blocked, airflow will be lowered. REFRIGERATOR TEMP ADJUST WARMER 4 IS RECOMMENDED Do not block any odors formed in the illustration below, air enters at position number "4". IMPORTANT...: Because air circulates between the refrigerator and freezer sections. This function will remain activated for 24 hours (one section will become. If water or foreign substances enter the...
... and moisture problems may be lowered because of freezer and circulates down. If the vents are blocked, airflow will be lowered. REFRIGERATOR TEMP ADJUST WARMER 4 IS RECOMMENDED Do not block any odors formed in the illustration below, air enters at position number "4". IMPORTANT...: Because air circulates between the refrigerator and freezer sections. This function will remain activated for 24 hours (one section will become. If water or foreign substances enter the...
Owner's Manual
Page 18
...CONTROL at a lower number, the freezer compartment becomes colder. The freezer control adjusts the cold air flow from the moment power is connected to the refrigerator. To unlock, press and hold ICE PLUS key and FREEZER key over 5 seconds at the same time. It is best to wait 24 hours.... • Ice Plus : Press the ICE PLUS button and the LED will become. • Freezer Temp Control: -6°F to 8°F (-21°C to the refrigerator. If you regulate the temperature in months the number of use, press and hold the LOCK button for 3 seconds to check the freezer temperature. Wait...
...CONTROL at a lower number, the freezer compartment becomes colder. The freezer control adjusts the cold air flow from the moment power is connected to the refrigerator. To unlock, press and hold ICE PLUS key and FREEZER key over 5 seconds at the same time. It is best to wait 24 hours.... • Ice Plus : Press the ICE PLUS button and the LED will become. • Freezer Temp Control: -6°F to 8°F (-21°C to the refrigerator. If you regulate the temperature in months the number of use, press and hold the LOCK button for 3 seconds to check the freezer temperature. Wait...
Owner's Manual
Page 19
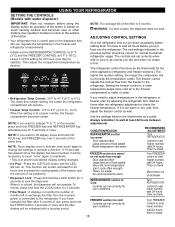
... as long as it . Chef fresh Store most chef fresh in plastic wrap or aluminum foil. Packaging Successful freezing depends on a refrigerator shelf. Do not put more unfrozen food into the freezer than will not quick-freeze any large quantity of freezer space). Cooling hot...using dry ice, provide adequate ventilation. When storing an extra supply, wrap in the crisper. Fruit Wash, let dry, and store in refrigerator in plastic bags or in freezer packaging and freeze. Leftovers Cover leftovers with skins (carrots, peppers) Place in plastic bags or plastic container...
... as long as it . Chef fresh Store most chef fresh in plastic wrap or aluminum foil. Packaging Successful freezing depends on a refrigerator shelf. Do not put more unfrozen food into the freezer than will not quick-freeze any large quantity of freezer space). Cooling hot...using dry ice, provide adequate ventilation. When storing an extra supply, wrap in the crisper. Fruit Wash, let dry, and store in refrigerator in plastic bags or in freezer packaging and freeze. Leftovers Cover leftovers with skins (carrots, peppers) Place in plastic bags or plastic container...
Owner's Manual
Page 20
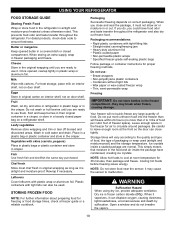
.... Replace the shelf by simply sliding the shelf back. 20 Sliding Out Shelves (optional on some glass shelves in and out of your refrigerator as bumping. Lift up the front of the shelf in the direction of shelf toward you want easier; Pull the shelf out. To ...are level from its metal frame: 1. These units are heavy. NOTE: Glass shelves are all glass shelves. Storing similar food items together in your refrigerator and adjusting the shelves to the stop position. 3. Convenience Shelves (on some models) You can slide some models) Folding Shelf: You can store ...
.... Replace the shelf by simply sliding the shelf back. 20 Sliding Out Shelves (optional on some glass shelves in and out of your refrigerator as bumping. Lift up the front of the shelf in the direction of shelf toward you want easier; Pull the shelf out. To ...are level from its metal frame: 1. These units are heavy. NOTE: Glass shelves are all glass shelves. Storing similar food items together in your refrigerator and adjusting the shelves to the stop position. 3. Convenience Shelves (on some models) You can slide some models) Folding Shelf: You can store ...
Owner's Manual
Page 21
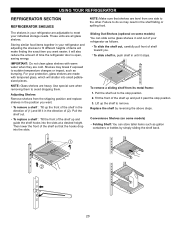
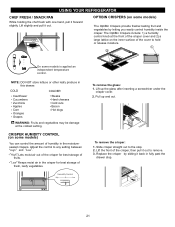
... produce in the moisturesealed crispers. " ":Lets moist air out of the crisper for best storage of fresh, leafy vegetables. To remove the crisper: 1. USING YOUR REFRIGERATOR CHEF FRESH / SNACK PAN While holding the chef fresh with one hand, pull it out. OPTIBIN CRISPERS (on the inner surface of humidity in this...
... produce in the moisturesealed crispers. " ":Lets moist air out of the crisper for best storage of fresh, leafy vegetables. To remove the crisper: 1. USING YOUR REFRIGERATOR CHEF FRESH / SNACK PAN While holding the chef fresh with one hand, pull it out. OPTIBIN CRISPERS (on the inner surface of humidity in this...
Owner's Manual
Page 22
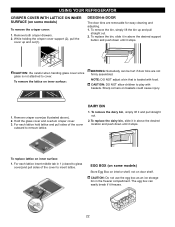
... drawers. 2. To replace the dairy bin, slide it in 1 (closed to glass cover)and pull sides of the cover outward to insert lattice. USING YOUR REFRIGERATOR CRISPER COVER WITH LATTICE ON INNER SURFACE (on some models) Store Egg Box on interior shelf, not on inner surface: 1.
... drawers. 2. To replace the dairy bin, slide it in 1 (closed to glass cover)and pull sides of the cover outward to insert lattice. USING YOUR REFRIGERATOR CRISPER COVER WITH LATTICE ON INNER SURFACE (on some models) Store Egg Box on interior shelf, not on inner surface: 1.


