
Owner's Manual (English)
Page 16
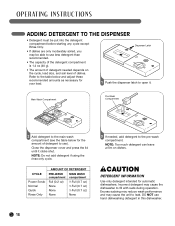
Close the dispenser cover and press the lid until it . Incorrect detergent may cause the dishwasher to leak. DO NOT use ). NOTE: Too much detergent can leave a film on the cycle, load size, and soil level of dishes. Excess ... the table below and adjust these recommended amounts as necessary for automatic dishwashers. CYCLE Power Scrub Normal Quick Rinse Only AMOUNT OF DETERGENT PRE-WASH MAIN WASH compartment compartment Full (0.2 oz) None None None 1⁄2 Full (0.7 oz) 1⁄2 Full (0.7 oz) 1⁄2 Full (0.7 oz) None 3 If needed depends on dishes. wCAUTION DETERGENT ...
Close the dispenser cover and press the lid until it . Incorrect detergent may cause the dishwasher to leak. DO NOT use ). NOTE: Too much detergent can leave a film on the cycle, load size, and soil level of dishes. Excess ... the table below and adjust these recommended amounts as necessary for automatic dishwashers. CYCLE Power Scrub Normal Quick Rinse Only AMOUNT OF DETERGENT PRE-WASH MAIN WASH compartment compartment Full (0.2 oz) None None None 1⁄2 Full (0.7 oz) 1⁄2 Full (0.7 oz) 1⁄2 Full (0.7 oz) None 3 If needed depends on dishes. wCAUTION DETERGENT ...
Service Manual
Page 20
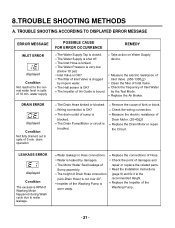
... the wiring connection. Measure the electric resistance of kink or block. Water is shut off. Replace the connections of Sump assembly. The Water Supply is leaked by damages. The drain outlet of the Washing Pump is bound. The Drain Pump/Motor or circuit is blocked. LEAKAGE ERROR displayed Condition The excessive...
... the wiring connection. Measure the electric resistance of kink or block. Water is shut off. Replace the connections of Sump assembly. The Water Supply is leaked by damages. The drain outlet of the Washing Pump is bound. The Drain Pump/Motor or circuit is blocked. LEAKAGE ERROR displayed Condition The excessive...
Service Manual
Page 28
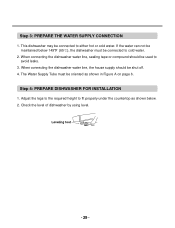
...fit properly under the countertop as shown in Figure A on page 6. Step 4: PREPARE DISHWASHER FOR INSTALLATION 1. Adjust the legs to the required height to avoid leaks. 3. When connecting the dishwasher water line, sealing tape or compound should be connected to either hot or cold water.... Check the level of dishwasher by using level. - 29 - When connecting the dishwasher water line, the house supply should be ...
...fit properly under the countertop as shown in Figure A on page 6. Step 4: PREPARE DISHWASHER FOR INSTALLATION 1. Adjust the legs to the required height to avoid leaks. 3. When connecting the dishwasher water line, sealing tape or compound should be connected to either hot or cold water.... Check the level of dishwasher by using level. - 29 - When connecting the dishwasher water line, the house supply should be ...

Service Manual
Page 31
... Cover 4. Check again and make sure that all wires are connected correctly, black to black, white to white, green to green (ground to avoid water leaks. 2. Inlet Valve Elbow Water Supply Tube 4. Wrap each connection with Electrical tape. Step 7: WATER SUPPLY CONNECTION 1. Wire Connector Junction Case Strain Relief - 32 - Step 8: ELECTRICAL...
... Cover 4. Check again and make sure that all wires are connected correctly, black to black, white to white, green to green (ground to avoid water leaks. 2. Inlet Valve Elbow Water Supply Tube 4. Wrap each connection with Electrical tape. Step 7: WATER SUPPLY CONNECTION 1. Wire Connector Junction Case Strain Relief - 32 - Step 8: ELECTRICAL...
Service Manual
Page 32
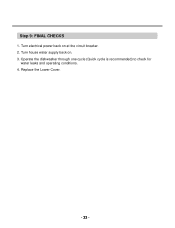
Operate the dishwasher through one cycle (Quick cycle is recommended) to check for water leaks and operating conditions. 4. Turn house water supply back on at the circuit breaker. 2. Turn electrical power back on . 3. Replace the Lower Cover. - 33 - Step 9: FINAL CHECKS 1.
Operate the dishwasher through one cycle (Quick cycle is recommended) to check for water leaks and operating conditions. 4. Turn house water supply back on at the circuit breaker. 2. Turn electrical power back on . 3. Replace the Lower Cover. - 33 - Step 9: FINAL CHECKS 1.


