

Owners Manual
Page 2
... FEATURES 4 SAFETY INSTRUCTIONS 4 IMPORTANT SAFETY INSTRUCTIONS 9 PRODUCT OVERVIEW 9 Exterior Parts 10 Interior Parts 10 Accessories 11 INSTALLATION 11 Installation Parts and Tools 12 Installation Overview 12 Product Dimensions 12 Product Specifications 13 Preparing Cabinet Opening 14 Preparing Electrical Wiring 14 Preparing Water Supply Connection 15...the Upper Rack 33 Loading the Cutlery Rack (On Some Models) 35 Adding Cleaning Agents 37 SMART FUNCTIONS 37 Application Installation 37 Product Registration 37 Using the Tag On Function 38 Using the Wi-Fi Function 40 Using Smart Diagnosis™...
... FEATURES 4 SAFETY INSTRUCTIONS 4 IMPORTANT SAFETY INSTRUCTIONS 9 PRODUCT OVERVIEW 9 Exterior Parts 10 Interior Parts 10 Accessories 11 INSTALLATION 11 Installation Parts and Tools 12 Installation Overview 12 Product Dimensions 12 Product Specifications 13 Preparing Cabinet Opening 14 Preparing Electrical Wiring 14 Preparing Water Supply Connection 15...the Upper Rack 33 Loading the Cutlery Rack (On Some Models) 35 Adding Cleaning Agents 37 SMART FUNCTIONS 37 Application Installation 37 Product Registration 37 Using the Tag On Function 38 Using the Wi-Fi Function 40 Using Smart Diagnosis™...

Owners Manual
Page 4
...fire, death, electric shock, scalding or injury to the state of children. There is a risk of suffocation. ••Moving or installation of others . These words mean: WARNING You may happen if the instructions are very important. 4 SAFETY INSTRUCTIONS SAFETY INSTRUCTIONS READ ALL INSTRUCTIONS ...;•This product contains chemicals known to persons when using this manual and on your appliance. CAUTION You may be dangerous for installation and service. ••Keep packing materials out of the reach of California to avoid electrical overload. ••To reduce...
...fire, death, electric shock, scalding or injury to the state of children. There is a risk of suffocation. ••Moving or installation of others . These words mean: WARNING You may happen if the instructions are very important. 4 SAFETY INSTRUCTIONS SAFETY INSTRUCTIONS READ ALL INSTRUCTIONS ...;•This product contains chemicals known to persons when using this manual and on your appliance. CAUTION You may be dangerous for installation and service. ••Keep packing materials out of the reach of California to avoid electrical overload. ••To reduce...

Owners Manual
Page 5
... or damage the power supply line. ••Do not install the appliance in the vicinity of this or any circumstances, cut or remove the ground from the appliance, unplug it immediately, and contact an LG Electronics customer information center. ••Never unplug the appliance by... pulling on the power supply line of the appliance. Do not reuse old hoses. ••After installing, check the hose connection for leaks. ••...
... or damage the power supply line. ••Do not install the appliance in the vicinity of this or any circumstances, cut or remove the ground from the appliance, unplug it immediately, and contact an LG Electronics customer information center. ••Never unplug the appliance by... pulling on the power supply line of the appliance. Do not reuse old hoses. ••After installing, check the hose connection for leaks. ••...
Owners Manual
Page 6
... the dishwasher near children. ••Do not tamper with controls. ••In the event of the dishwasher. ••Do not install or store the dishwasher where it will release any other flammable materials. ••When cleaning, do not smoke or use solvent-based detergent. ...••Do not come into a damaged outlet. ••Do not install or keep them out of the reach of small children. Turn on all ENCLOSURE panels are properly in place. ••Do not abuse, sit...
... the dishwasher near children. ••Do not tamper with controls. ••In the event of the dishwasher. ••Do not install or store the dishwasher where it will release any other flammable materials. ••When cleaning, do not smoke or use solvent-based detergent. ...••Do not come into a damaged outlet. ••Do not install or keep them out of the reach of small children. Turn on all ENCLOSURE panels are properly in place. ••Do not abuse, sit...
Owners Manual
Page 7
TIP OVER HAZARD ••Do not use the dishwasher until completely installed. ••Do not push down on the open dishwasher door. ••Failure to the green ground connector in the terminal box. Turning the ...
TIP OVER HAZARD ••Do not use the dishwasher until completely installed. ••Do not push down on the open dishwasher door. ••Failure to the green ground connector in the terminal box. Turning the ...

Owners Manual
Page 8
... hose and the water supply hose are frozen in winter, defrost before using this product, follow basic precautions, including the following: INSTALLATION ••Install the product on a firm and level floor. ••This dishwasher must be connected to dishes. ••Do not ...put the drain hose under the dishwasher during installation. This temperature range provides the best washing results and shortest cycle time. 8 SAFETY INSTRUCTIONS CAUTION To reduce the risk of minor injury ...
... hose and the water supply hose are frozen in winter, defrost before using this product, follow basic precautions, including the following: INSTALLATION ••Install the product on a firm and level floor. ••This dishwasher must be connected to dishes. ••Do not ...put the drain hose under the dishwasher during installation. This temperature range provides the best washing results and shortest cycle time. 8 SAFETY INSTRUCTIONS CAUTION To reduce the risk of minor injury ...
Owners Manual
Page 10
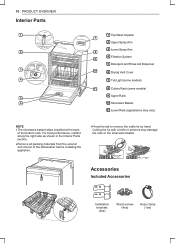
... scissors may vary) NOTE ••The silverware basket ships installed at the back of the dishwasher before installing the appliance. ••Press the tab to remove the cable tie by hand. Accessories Included Accessories 23 Installation brackets (2ea) Wood screws (4ea) Hose clamp (1ea)... For best performance, install it along the right side as shown in the Interior Parts section. ••Remove all...
... scissors may vary) NOTE ••The silverware basket ships installed at the back of the dishwasher before installing the appliance. ••Press the tab to remove the cable tie by hand. Accessories Included Accessories 23 Installation brackets (2ea) Wood screws (4ea) Hose clamp (1ea)... For best performance, install it along the right side as shown in the Interior Parts section. ••Remove all...

Owners Manual
Page 11
ENGLISH INSTALLATION Installation Parts and Tools Parts not Provided INSTALLATION 11 Electrical cable Water supply tube Fittings for tube Coupler Teflon™ tape Air gap Wire nuts for 16-gauge wiring Tools Needed Hose clamp ⅞" UL approved strain relief Electrical tape Flat-blade screwdriver Phillips screwdriver Hole saw min. 2½" bit Electrical drill Gloves Safety glasses Adjustable wrench Tape measure Utility knife Level Tubing cutter Nipper Pliers Wire stripper ¼" Square drive wrench
ENGLISH INSTALLATION Installation Parts and Tools Parts not Provided INSTALLATION 11 Electrical cable Water supply tube Fittings for tube Coupler Teflon™ tape Air gap Wire nuts for 16-gauge wiring Tools Needed Hose clamp ⅞" UL approved strain relief Electrical tape Flat-blade screwdriver Phillips screwdriver Hole saw min. 2½" bit Electrical drill Gloves Safety glasses Adjustable wrench Tape measure Utility knife Level Tubing cutter Nipper Pliers Wire stripper ¼" Square drive wrench

Owners Manual
Page 12
... °C) minimum, 149 °F (65 °C) maximum 72 - 89 lbs. (33 - 40 kg) NOTE ••For easiest installation, see marked areas above for water and electrical clearances in this area. 12 INSTALLATION Installation Overview Preparing Cabinet Opening Preparing Electrical Wiring Preparing Water Supply Connection Preparing the Dishwasher Removing Lower Cover Sliding the...
... °C) minimum, 149 °F (65 °C) maximum 72 - 89 lbs. (33 - 40 kg) NOTE ••For easiest installation, see marked areas above for water and electrical clearances in this area. 12 INSTALLATION Installation Overview Preparing Cabinet Opening Preparing Electrical Wiring Preparing Water Supply Connection Preparing the Dishwasher Removing Lower Cover Sliding the...

Owners Manual
Page 13
...the target area as possible for easy connections to water and drain lines. 2 To ensure proper drainage, install the dishwasher no more than 12 ft. (3.65 m) from installing flush with the literature to properly locate the hole for proper clearance of plumbing and electrical, use existing...;•Don't use the template included with the cabinets and could result in the target area. For flush installations only, you may prevent the dishwasher from the sink. 3 If installing the dishwasher in property damage. Otherwise, the water supply and drain hose may result in a corner, leave...
...the target area as possible for easy connections to water and drain lines. 2 To ensure proper drainage, install the dishwasher no more than 12 ft. (3.65 m) from installing flush with the literature to properly locate the hole for proper clearance of plumbing and electrical, use existing...;•Don't use the template included with the cabinets and could result in the target area. For flush installations only, you may prevent the dishwasher from the sink. 3 If installing the dishwasher in property damage. Otherwise, the water supply and drain hose may result in a corner, leave...

Owners Manual
Page 14
... supply with this dishwasher. Tape or compound should not be used on pipe threads to a dedicated, properly grounded branch circuit which is turned off before installation. ••Do not use an extension cable or adapter with a temperature range between 120 °F (49 °C) and 149 °F (65 ... it checked by a time delay fuse. Preparing Water Supply Connection Make sure the house water supply is protected by a qualified electrician. 14 INSTALLATION Preparing Electrical Wiring 1 Operate this appliance with the correct voltage as shown in 16AWG should be used.
... supply with this dishwasher. Tape or compound should not be used on pipe threads to a dedicated, properly grounded branch circuit which is turned off before installation. ••Do not use an extension cable or adapter with a temperature range between 120 °F (49 °C) and 149 °F (65 ... it checked by a time delay fuse. Preparing Water Supply Connection Make sure the house water supply is protected by a qualified electrician. 14 INSTALLATION Preparing Electrical Wiring 1 Operate this appliance with the correct voltage as shown in 16AWG should be used.

Owners Manual
Page 15
INSTALLATION 15 Removing Lower Cover 1 Remove the two screws attaching the lower cover to damage the drain hose. Preparing Dishwasher Removable Rear Plastic Shipping Brace The ... not push the door of the tub to move or lift the dishwasher. CAUTION ••If at any time the dishwasher is needed when installing the dishwasher under a low countertop.
INSTALLATION 15 Removing Lower Cover 1 Remove the two screws attaching the lower cover to damage the drain hose. Preparing Dishwasher Removable Rear Plastic Shipping Brace The ... not push the door of the tub to move or lift the dishwasher. CAUTION ••If at any time the dishwasher is needed when installing the dishwasher under a low countertop.

Owners Manual
Page 16
... the dishwasher. For countertops made of wood or other materials that will not be damaged by drilling, use the metal installation brackets. 1 Insert the installation brackets into the slots in Securing Dishwasher to the cabinet. Cap Screw Sliding Dishwasher into Cabinet 1 Slide the dishwasher carefully...the dishwasher into the cabinet opening. 2 Make sure the drain hose inside the cabinet is a potential cause of water leaks. 16 INSTALLATION Attaching Mounting Hardware For countertops made of granite, marble, or other material that could be damaged by drilling, use the wood screws...
... the dishwasher. For countertops made of wood or other materials that will not be damaged by drilling, use the metal installation brackets. 1 Insert the installation brackets into the slots in Securing Dishwasher to the cabinet. Cap Screw Sliding Dishwasher into Cabinet 1 Slide the dishwasher carefully...the dishwasher into the cabinet opening. 2 Make sure the drain hose inside the cabinet is a potential cause of water leaks. 16 INSTALLATION Attaching Mounting Hardware For countertops made of granite, marble, or other material that could be damaged by drilling, use the wood screws...

Owners Manual
Page 17
INSTALLATION 17 Adjusting the Legs Adjusting the Front Legs ••Use a flat-blade screwdriver or a pliers to turn the front legs and adjust the front ...
INSTALLATION 17 Adjusting the Legs Adjusting the Front Legs ••Use a flat-blade screwdriver or a pliers to turn the front legs and adjust the front ...

Owners Manual
Page 18
...connecting the two hose ends. Hose clamp Coupler Hose clamp NOTE ••For drain hose installation, use a heat and detergent resistant adapter (not supplied). 18 INSTALLATION Securing Dishwasher to Countertop For countertops made of granite, marble, or other materials that will ...For countertops made of the following connections should be used. 5/8" 3/4" 1" (16 mm) (19 mm) (25 mm) Screw Installation bracket NOTE ••Installation brackets and screws can be found in the silverware basket. To prevent siphoning, one of wood or other devices to the dishwasher ...
...connecting the two hose ends. Hose clamp Coupler Hose clamp NOTE ••For drain hose installation, use a heat and detergent resistant adapter (not supplied). 18 INSTALLATION Securing Dishwasher to Countertop For countertops made of granite, marble, or other materials that will ...For countertops made of the following connections should be used. 5/8" 3/4" 1" (16 mm) (19 mm) (25 mm) Screw Installation bracket NOTE ••Installation brackets and screws can be found in the silverware basket. To prevent siphoning, one of wood or other devices to the dishwasher ...

Owners Manual
Page 19
... with a hammer and screwdriver. 2 Connect end of the appliance to avoid water being siphoned from the tub. 40" (1016 mm) max. 12" (305 mm) min. INSTALLATION 19 Connecting to Disposal or Waste Tee with Air Gap 1 Remove the knockout plug with hose clamp provided. Move into position and tighten the hose...
... with a hammer and screwdriver. 2 Connect end of the appliance to avoid water being siphoned from the tub. 40" (1016 mm) max. 12" (305 mm) min. INSTALLATION 19 Connecting to Disposal or Waste Tee with Air Gap 1 Remove the knockout plug with hose clamp provided. Move into position and tighten the hose...

Owners Manual
Page 20
...the back wall. 1 Before beginning, turn off electrical power to the unit at the circuit breaker. 2 Remove the junction box cover and then install the strain relief. 1 2 3 Twist the wire nuts tightly onto the wires; WARNING ••Verify that the black wire is on the .... 1 2 3 4 4 Check again and make sure that the line is centered on before calling for the electrical conduit is hot (120 V). 20 INSTALLATION Connecting Water Supply 1 Before connecting, turn off the water supply. 2 Slide the flexible stainless-steel water line or copper tube into the elbow. 3 Tighten...
...the back wall. 1 Before beginning, turn off electrical power to the unit at the circuit breaker. 2 Remove the junction box cover and then install the strain relief. 1 2 3 Twist the wire nuts tightly onto the wires; WARNING ••Verify that the black wire is on the .... 1 2 3 4 4 Check again and make sure that the line is centered on before calling for the electrical conduit is hot (120 V). 20 INSTALLATION Connecting Water Supply 1 Before connecting, turn off the water supply. 2 Slide the flexible stainless-steel water line or copper tube into the elbow. 3 Tighten...

Owners Manual
Page 21
... kinking the hoses or trapping them beneath the dishwasher. Final Check 1 Turn on electrical power. 2 Turn on . Lower cover Cabinet baseboard INSTALLATION 21 Error Code OE Error IE Error Possible Cause and Solution Drain hose kinked or pinched. Water supply line kinked under the sink. House water... not turned on a Turbo cycle to disposal. Drain hose connected to verify proper operation and check for leaks. CAUTION ••Only install the lower cover provided with the machine. Feed the drainage and supply hoses through the hole under the sink to take up any slack....
... kinking the hoses or trapping them beneath the dishwasher. Final Check 1 Turn on electrical power. 2 Turn on . Lower cover Cabinet baseboard INSTALLATION 21 Error Code OE Error IE Error Possible Cause and Solution Drain hose kinked or pinched. Water supply line kinked under the sink. House water... not turned on a Turbo cycle to disposal. Drain hose connected to verify proper operation and check for leaks. CAUTION ••Only install the lower cover provided with the machine. Feed the drainage and supply hoses through the hole under the sink to take up any slack....

Owners Manual
Page 28
Case 1 Loading Pots & Bowls Case 2 Loading Dishes & Pots NOTE ••The silverware basket ships installed at the back of the bottom rack. pull tines back up to fit larger dishes; For best performance, install it along the right side as shown. 28 OPERATION Folding Down the Lower Tines Fold tines down to fit smaller dishes.
Case 1 Loading Pots & Bowls Case 2 Loading Dishes & Pots NOTE ••The silverware basket ships installed at the back of the bottom rack. pull tines back up to fit larger dishes; For best performance, install it along the right side as shown. 28 OPERATION Folding Down the Lower Tines Fold tines down to fit smaller dishes.

Owners Manual
Page 37
.... Conveniently use the smart functions. Using the Application 1 Select the appliance from the Dashboard to use the smart features to download and install the application. Only one cycle can download a variety of a NFC-enabled smart phone. NOTE ••Hold the back of the...the appliance at least a certain level of specialty cycles specific to run the Machine Clean cycle. ENGLISH SMART FUNCTIONS Application Installation Search for the LG Smart ThinQ application from the Google Play Store on the phone, transmission will not be good. Follow instructions to communicate ...
.... Conveniently use the smart functions. Using the Application 1 Select the appliance from the Dashboard to use the smart features to download and install the application. Only one cycle can download a variety of a NFC-enabled smart phone. NOTE ••Hold the back of the...the appliance at least a certain level of specialty cycles specific to run the Machine Clean cycle. ENGLISH SMART FUNCTIONS Application Installation Search for the LG Smart ThinQ application from the Google Play Store on the phone, transmission will not be good. Follow instructions to communicate ...


