

Owners Manual
Page 2
2 TABLE OF CONTENTS 3 PRODUCT FEATURES 4 SAFETY INSTRUCTIONS 4 IMPORTANT SAFETY INSTRUCTIONS 9 PRODUCT OVERVIEW 9 Exterior Parts 10 Interior Parts 10 Accessories 11 INSTALLATION 11 Installation Parts and Tools 12 Installation Overview 12 Product Dimensions 12 Product Specifications 13 Preparing Cabinet Opening 14 Preparing Electrical Wiring 14 Preparing Water Supply Connection 15 ...
2 TABLE OF CONTENTS 3 PRODUCT FEATURES 4 SAFETY INSTRUCTIONS 4 IMPORTANT SAFETY INSTRUCTIONS 9 PRODUCT OVERVIEW 9 Exterior Parts 10 Interior Parts 10 Accessories 11 INSTALLATION 11 Installation Parts and Tools 12 Installation Overview 12 Product Dimensions 12 Product Specifications 13 Preparing Cabinet Opening 14 Preparing Electrical Wiring 14 Preparing Water Supply Connection 15 ...

Owners Manual
Page 5
...in the vicinity of this or any circumstances, cut or remove the ground from the appliance, unplug it immediately, and contact an LG Electronics customer information center. ••Never unplug the appliance by pulling on the door of the appliance. OPERATION ••Repair...plastic bag, and other flammable vapors and liquids. ••This appliance is damaged, malfunctioning, partially disassembled, or has missing or broken parts, including a damaged power supply line. ••Adhere to all instructions before resuming use. ••Do not store or use ...
...in the vicinity of this or any circumstances, cut or remove the ground from the appliance, unplug it immediately, and contact an LG Electronics customer information center. ••Never unplug the appliance by pulling on the door of the appliance. OPERATION ••Repair...plastic bag, and other flammable vapors and liquids. ••This appliance is damaged, malfunctioning, partially disassembled, or has missing or broken parts, including a damaged power supply line. ••Adhere to all instructions before resuming use. ••Do not store or use ...
Owners Manual
Page 6
... small children if removed from each for use solvent-based detergent. ••Do not come into contact with the steam outlet. ••Small parts, such as an awl or pin. ••Do not use in a hot-water system that they are not likely to play on, in place...
... small children if removed from each for use solvent-based detergent. ••Do not come into contact with the steam outlet. ••Small parts, such as an awl or pin. ••Do not use in a hot-water system that they are not likely to play on, in place...
Owners Manual
Page 7
Use only authorized factory parts. ••Do not disassemble or repair the appliance by qualified service personnel unless specifically recommended in this Owner's Manual. TIP OVER HAZARD ••... service or discarded to avoid the danger of children or small animals getting trapped inside. ••Unplug the appliance before cleaning and attempting any part of electric shock. ••Before discarding the appliance, cut off the power supply line and destroy the appliance's control panel. SAVE THESE INSTRUCTIONS GROUNDING...
Use only authorized factory parts. ••Do not disassemble or repair the appliance by qualified service personnel unless specifically recommended in this Owner's Manual. TIP OVER HAZARD ••... service or discarded to avoid the danger of children or small animals getting trapped inside. ••Unplug the appliance before cleaning and attempting any part of electric shock. ••Before discarding the appliance, cut off the power supply line and destroy the appliance's control panel. SAVE THESE INSTRUCTIONS GROUNDING...

Owners Manual
Page 9
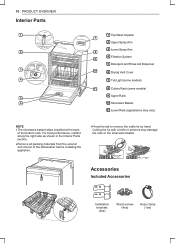
... remembers this setting until OFF or On appears in pause mode, the machine turns off.) ••Green: Cycle finished normally. ENGLISH PRODUCT OVERVIEW Exterior Parts 4 1 5 1 6 2 PRODUCT OVERVIEW 9 5 6 7 2 3 7 8 3 4 8 9 1 Control Panel & Door Handle 2 Front Cover 3 Lower Cover 4 Shipping Brace 5 Safety Cover 6 Signal Light (some models) 7 Base 8 Leveling Feet 1 Control Panel 2 Door Handle...
... remembers this setting until OFF or On appears in pause mode, the machine turns off.) ••Green: Cycle finished normally. ENGLISH PRODUCT OVERVIEW Exterior Parts 4 1 5 1 6 2 PRODUCT OVERVIEW 9 5 6 7 2 3 7 8 3 4 8 9 1 Control Panel & Door Handle 2 Front Cover 3 Lower Cover 4 Shipping Brace 5 Safety Cover 6 Signal Light (some models) 7 Base 8 Leveling Feet 1 Control Panel 2 Door Handle...
Owners Manual
Page 10
For best performance, install it along the right side as shown in the Interior Parts section. ••Remove all packing materials from the exterior and interior of the bottom rack. Cutting the tie with a knife or scissors may vary) ... the back of the dishwasher before installing the appliance. ••Press the tab to remove the cable tie by hand. 10 PRODUCT OVERVIEW Interior Parts 1 2 3 4 5 6 1 Top Wash Impeller 7 2 Upper Spray Arm 3 Lower Spray Arm 8 4 Filtration System 9 5 Detergent and Rinse Aid Dispenser 10 6 Drying Vent Cover 7 Tub Light (some models) 11...
For best performance, install it along the right side as shown in the Interior Parts section. ••Remove all packing materials from the exterior and interior of the bottom rack. Cutting the tie with a knife or scissors may vary) ... the back of the dishwasher before installing the appliance. ••Press the tab to remove the cable tie by hand. 10 PRODUCT OVERVIEW Interior Parts 1 2 3 4 5 6 1 Top Wash Impeller 7 2 Upper Spray Arm 3 Lower Spray Arm 8 4 Filtration System 9 5 Detergent and Rinse Aid Dispenser 10 6 Drying Vent Cover 7 Tub Light (some models) 11...

Owners Manual
Page 11
ENGLISH INSTALLATION Installation Parts and Tools Parts not Provided INSTALLATION 11 Electrical cable Water supply tube Fittings for tube Coupler Teflon™ tape Air gap Wire nuts for 16-gauge wiring Tools Needed Hose clamp ⅞" UL approved strain relief Electrical tape Flat-blade screwdriver Phillips screwdriver Hole saw min. 2½" bit Electrical drill Gloves Safety glasses Adjustable wrench Tape measure Utility knife Level Tubing cutter Nipper Pliers Wire stripper ¼" Square drive wrench
ENGLISH INSTALLATION Installation Parts and Tools Parts not Provided INSTALLATION 11 Electrical cable Water supply tube Fittings for tube Coupler Teflon™ tape Air gap Wire nuts for 16-gauge wiring Tools Needed Hose clamp ⅞" UL approved strain relief Electrical tape Flat-blade screwdriver Phillips screwdriver Hole saw min. 2½" bit Electrical drill Gloves Safety glasses Adjustable wrench Tape measure Utility knife Level Tubing cutter Nipper Pliers Wire stripper ¼" Square drive wrench
Owners Manual
Page 32
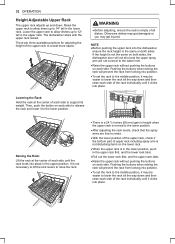
... rack to the middle position, it may be easier to rotate. ••With the lower position of the upper rack, check if the bottom part of the rack individually until the rack locks into the dishwasher, ensure the rack height is not the same on both sides, the dishwasher door...
... rack to the middle position, it may be easier to rotate. ••With the lower position of the upper rack, check if the bottom part of the rack individually until the rack locks into the dishwasher, ensure the rack height is not the same on both sides, the dishwasher door...

Owners Manual
Page 39
... distance 20 cm (7.8 inches) between the equipment and the receiver. ••Connect the equipment to an outlet on , the user is subject to Part 15 of the FCC Rules. However, there is connected. ••Consult the dealer or an experienced radio/TV technician for a Class B digital device...off and on a circuit different from that to which can radiate radio frequency energy and, if not installed and used in accordance with part 15 of this equipment does cause harmful interference to radio communications. Any changes or modifications in a particular installation.
... distance 20 cm (7.8 inches) between the equipment and the receiver. ••Connect the equipment to an outlet on , the user is subject to Part 15 of the FCC Rules. However, there is connected. ••Consult the dealer or an experienced radio/TV technician for a Class B digital device...off and on a circuit different from that to which can radiate radio frequency energy and, if not installed and used in accordance with part 15 of this equipment does cause harmful interference to radio communications. Any changes or modifications in a particular installation.
Owners Manual
Page 42
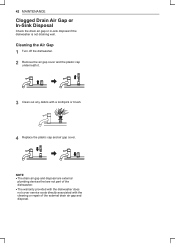
NOTE ••The drain air gap and disposal are external plumbing devices that are not part of the external drain air gap and disposal. Cleaning the Air Gap 1 Turn off the dishwasher. 2 Remove the air gap cover and the plastic cap ...
NOTE ••The drain air gap and disposal are external plumbing devices that are not part of the external drain air gap and disposal. Cleaning the Air Gap 1 Turn off the dishwasher. 2 Remove the air gap cover and the plastic cap ...
Owners Manual
Page 46
... be louder, so it may be necessary to adjust the water valve to lower the pressure if the noise is too high, it happens (what part of dishes can be placed in the door by the dishes and the tub during a cycle or right after the cycle has finished? The air...
... be louder, so it may be necessary to adjust the water valve to lower the pressure if the noise is too high, it happens (what part of dishes can be placed in the door by the dishes and the tub during a cycle or right after the cycle has finished? The air...

Owners Manual
Page 52
...will at its option repair or replace the product. Customer will also provide, free of Warranty Labor / Parts Electronics / Racks Direct Drive Motor Tub HOW SERVICE IS HANDLED LG will be new or remanufactured. NEITHER THE MANUFACTURER NOR ITS U.S. Warranty Period One (1) year from date... water supply or inadequate supply of incidental or consequential damages or limitations on -site service to replace the defective part. 52 WARRANTY WARRANTY Should your LG Dishwasher fail due to a defect in materials or workmanship under this limited warranty. This limited warranty is used ...
...will at its option repair or replace the product. Customer will also provide, free of Warranty Labor / Parts Electronics / Racks Direct Drive Motor Tub HOW SERVICE IS HANDLED LG will be new or remanufactured. NEITHER THE MANUFACTURER NOR ITS U.S. Warranty Period One (1) year from date... water supply or inadequate supply of incidental or consequential damages or limitations on -site service to replace the defective part. 52 WARRANTY WARRANTY Should your LG Dishwasher fail due to a defect in materials or workmanship under this limited warranty. This limited warranty is used ...

