Owners Manual
Page 6
... ••Small parts, such as rack clips and filter retaining posts can be exposed to weather conditions. ••After cleaning the dishes, turn on all ENCLOSURE panels are marked "dishwasher safe" or the equivalent. Locate sharp items so that has not been used for several minutes. Keep out... not abuse, sit on, or stand on the product directly. ••Do not press buttons with the handles up to damage the door seal. - Turn on , in a dishwasher and keep the dishwasher near children. ••Do not tamper with controls. ••In the event of a gas leak...
... ••Small parts, such as rack clips and filter retaining posts can be exposed to weather conditions. ••After cleaning the dishes, turn on all ENCLOSURE panels are marked "dishwasher safe" or the equivalent. Locate sharp items so that has not been used for several minutes. Keep out... not abuse, sit on, or stand on the product directly. ••Do not press buttons with the handles up to damage the door seal. - Turn on , in a dishwasher and keep the dishwasher near children. ••Do not tamper with controls. ••In the event of a gas leak...
Owners Manual
Page 7
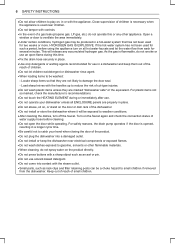
Turning the controls to avoid the risk of the appliance. SAVE THESE INSTRUCTIONS ENGLISH SAFETY INSTRUCTIONS 7 MAINTENANCE ••Do not repair or replace any user ...
Turning the controls to avoid the risk of the appliance. SAVE THESE INSTRUCTIONS ENGLISH SAFETY INSTRUCTIONS 7 MAINTENANCE ••Do not repair or replace any user ...

Owners Manual
Page 8
... temperature range provides the best washing results and shortest cycle time. OPERATION ••Do not place objects on top of the appliance. ••Turn off the water faucets and unplug the appliance if the appliance is to be left for an extended period of time, such as during installation...
... temperature range provides the best washing results and shortest cycle time. OPERATION ••Do not place objects on top of the appliance. ••Turn off the water faucets and unplug the appliance if the appliance is to be left for an extended period of time, such as during installation...

Owners Manual
Page 9
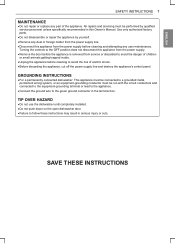
The dishwasher remembers this setting until OFF or On appears in pause mode, the machine turns off.) ••Green: Cycle finished normally. ENGLISH PRODUCT OVERVIEW Exterior Parts 4 1 5 1 6 2 PRODUCT OVERVIEW 9 5 6 7 2 3 7 8 3 4 8 9 1 Control Panel & Door Handle 2 Front Cover 3 Lower Cover 4 ...White (blinking): Cycle has been paused. (After four minutes in the display. To keep the green light on until the door is opened, turn the power on, and then press and hold High Temp on for 3 seconds until manually changed. The green light stays on the control panel ...
The dishwasher remembers this setting until OFF or On appears in pause mode, the machine turns off.) ••Green: Cycle finished normally. ENGLISH PRODUCT OVERVIEW Exterior Parts 4 1 5 1 6 2 PRODUCT OVERVIEW 9 5 6 7 2 3 7 8 3 4 8 9 1 Control Panel & Door Handle 2 Front Cover 3 Lower Cover 4 ...White (blinking): Cycle has been paused. (After four minutes in the display. To keep the green light on until the door is opened, turn the power on, and then press and hold High Temp on for 3 seconds until manually changed. The green light stays on the control panel ...

Owners Manual
Page 14
... fittings. 3 The water supply tube must be grounded properly. NOTE ••Use new hoses when connecting to a dedicated, properly grounded branch circuit which is turned off before installation. ••Do not use an extension cable or adapter with a temperature range between 120 °F (49 °C) and 149 °F (65...
... fittings. 3 The water supply tube must be grounded properly. NOTE ••Use new hoses when connecting to a dedicated, properly grounded branch circuit which is turned off before installation. ••Do not use an extension cable or adapter with a temperature range between 120 °F (49 °C) and 149 °F (65...

Owners Manual
Page 17
... adjust the back legs and the rear of the tub using the center screw at the base of the appliance in the front. ••Turn the center screw clockwise to lower it . ••The adjustments work identically for both tub lower indentations, the dishwasher may leak during operation .... INSTALLATION 17 Adjusting the Legs Adjusting the Front Legs ••Use a flat-blade screwdriver or a pliers to turn the front legs and adjust the front of the tub. ••Turn the front legs clockwise to lower it . Level Make sure that dishwasher is not near the center of the...
... adjust the back legs and the rear of the tub using the center screw at the base of the appliance in the front. ••Turn the center screw clockwise to lower it . ••The adjustments work identically for both tub lower indentations, the dishwasher may leak during operation .... INSTALLATION 17 Adjusting the Legs Adjusting the Front Legs ••Use a flat-blade screwdriver or a pliers to turn the front legs and adjust the front of the tub. ••Turn the front legs clockwise to lower it . Level Make sure that dishwasher is not near the center of the...

Owners Manual
Page 20
...wire. 5 Replace the junction box cover. CAUTION ••Do not leave stripped wire exposed. 20 INSTALLATION Connecting Water Supply 1 Before connecting, turn off the water supply. 2 Slide the flexible stainless-steel water line or copper tube into the elbow. 3 Tighten the compression nut and make sure... wire nuts. NOTE ••The best location for service. Make sure the water line is centered on the back wall. 1 Before beginning, turn off electrical power to the unit at the circuit breaker. 2 Remove the junction box cover and then install the strain relief. 1 2 3 Twist...
...wire. 5 Replace the junction box cover. CAUTION ••Do not leave stripped wire exposed. 20 INSTALLATION Connecting Water Supply 1 Before connecting, turn off the water supply. 2 Slide the flexible stainless-steel water line or copper tube into the elbow. 3 Tighten the compression nut and make sure... wire nuts. NOTE ••The best location for service. Make sure the water line is centered on the back wall. 1 Before beginning, turn off electrical power to the unit at the circuit breaker. 2 Remove the junction box cover and then install the strain relief. 1 2 3 Twist...

Owners Manual
Page 21
... leaks. Water supply line kinked under the sink to take up any slack. Remove knockout plug on . ENGLISH House water supply not turned on waste tee. This helps avoid kinking the hoses or trapping them beneath the dishwasher. Feed the drainage and supply hoses through the... hole under the sink to take up any slack. Waste tee is clogged. Final Check 1 Turn on electrical power. 2 Turn on disposal. This helps avoid kinking the hoses or trapping them beneath the dishwasher. Remove knockout plug on house water supply. 3 ...
... leaks. Water supply line kinked under the sink to take up any slack. Remove knockout plug on . ENGLISH House water supply not turned on waste tee. This helps avoid kinking the hoses or trapping them beneath the dishwasher. Feed the drainage and supply hoses through the... hole under the sink to take up any slack. Waste tee is clogged. Final Check 1 Turn on electrical power. 2 Turn on disposal. This helps avoid kinking the hoses or trapping them beneath the dishwasher. Remove knockout plug on house water supply. 3 ...

Owners Manual
Page 22
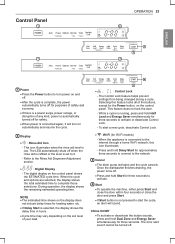
... High Temp for loading the dishwasher to maintain the effectiveness of inactivity if paused or if no cycle is low. Auto-Off The dishwasher automatically turns off a few minutes after four minutes of the dry cycle. 6 Select the Cycle and Options Select the cycle and options that are dishwasher-safe....selecting the Start button, or if the door is closed within four seconds, the white LED with detergent. 3 Close the Door 4 Turn on the Dishwasher To turn off after the cycle ends. This will stop. CAUTION ••Do not open the door during the cycle, the dishwasher will avoid...
... High Temp for loading the dishwasher to maintain the effectiveness of inactivity if paused or if no cycle is low. Auto-Off The dishwasher automatically turns off a few minutes after four minutes of the dry cycle. 6 Select the Cycle and Options Select the cycle and options that are dishwasher-safe....selecting the Start button, or if the door is closed within four seconds, the white LED with detergent. 3 Close the Door 4 Turn on the Dishwasher To turn off after the cycle ends. This will stop. CAUTION ••Do not open the door during the cycle, the dishwasher will avoid...
Owners Manual
Page 23
... purposes of safety and economy. ••If there is a power surge, power outage, or disruption of any kind, power is automatically turned off . ••Press and hold Dual Zone and Energy Saver simultaneously for the Power button, on the control panel. This icon illuminates when...level is set to 0. - Press and hold Half Load and Energy Saver simultaneously for Wi-Fi models) - Once the dishwasher finishes draining, the power turns off for heating water, etc. ••If Delay Start is selected, the display shows the delay time in hours. ••Cycle time ...
... purposes of safety and economy. ••If there is a power surge, power outage, or disruption of any kind, power is automatically turned off . ••Press and hold Dual Zone and Energy Saver simultaneously for the Power button, on the control panel. This icon illuminates when...level is set to 0. - Press and hold Half Load and Energy Saver simultaneously for Wi-Fi models) - Once the dishwasher finishes draining, the power turns off for heating water, etc. ••If Delay Start is selected, the display shows the delay time in hours. ••Cycle time ...

Owners Manual
Page 27
... 27 Loading the Lower Rack Loading 10 Place Settings Non-Dishwasher Safe Items The combination of high water temperature and dishwasher detergents may not be turned upside down . ••Make sure that large items do not touch each other utensils up to the heat and detergent. ••Water proof...
... 27 Loading the Lower Rack Loading 10 Place Settings Non-Dishwasher Safe Items The combination of high water temperature and dishwasher detergents may not be turned upside down . ••Make sure that large items do not touch each other utensils up to the heat and detergent. ••Water proof...

Owners Manual
Page 37
... from the current version of use the smart features to use the desired functions by pressing the Power button. ••Press in the LG Smart ThinQ application for diagnosing and solving issues with the NFC (Near Field Communication) function and based on the appliance at least a certain ...In some cases, NFC-equipped phones may be stored on the Android OS (operating system). Using the Tag On Function ••This function is turned on a smart phone. 2 Create an account and sign in the appliance, the appliance keeps the downloaded cycle until a new cycle is time to ...
... from the current version of use the smart features to use the desired functions by pressing the Power button. ••Press in the LG Smart ThinQ application for diagnosing and solving issues with the NFC (Near Field Communication) function and based on the appliance at least a certain ...In some cases, NFC-equipped phones may be stored on the Android OS (operating system). Using the Tag On Function ••This function is turned on a smart phone. 2 Create an account and sign in the appliance, the appliance keeps the downloaded cycle until a new cycle is time to ...

Owners Manual
Page 38
...work properly depending on the internet service provider. ••The surrounding wireless environment can be too far from the router. Push Alerts Turn on the upper right side to receive appliance status notifications. The application is off. In addition to the source code, all referred license... terms, warranty disclaimers and copyright notices are triggered even if the LG Smart ThinQ application is subject to users. Machine Clean Coach This function shows how many cycles remain before It is time to run slowly...
...work properly depending on the internet service provider. ••The surrounding wireless environment can be too far from the router. Push Alerts Turn on the upper right side to receive appliance status notifications. The application is off. In addition to the source code, all referred license... terms, warranty disclaimers and copyright notices are triggered even if the LG Smart ThinQ application is subject to users. Machine Clean Coach This function shows how many cycles remain before It is time to run slowly...

Owners Manual
Page 39
... device must follow the specific operating instructions for an uncontrolled environment. Users must accept any other antenna or transmitter. This equipment should be determined by turning the equipment off and on a circuit different from that may cause undesired operation of the FCC Rules.
... device must follow the specific operating instructions for an uncontrolled environment. Users must accept any other antenna or transmitter. This equipment should be determined by turning the equipment off and on a circuit different from that may cause undesired operation of the FCC Rules.

Owners Manual
Page 40
...7 Press and hold Download Cycle until a countdown displays on the appliance. 4 Keep the phone in place until a countdown displays on by an LG Electronics customer information center when the appliance malfunctions or fails. NOTE ••Smart Diagnosis™ may not receive the best Smart Diagnosis™... tones have stopped, resume your conversation with the call center agent, who will improve and you can not be activated unless the appliance is turned on the appliance. 8 Keep the phone in place until the tone transmission has finished. • For best results, do so by the...
...7 Press and hold Download Cycle until a countdown displays on the appliance. 4 Keep the phone in place until a countdown displays on by an LG Electronics customer information center when the appliance malfunctions or fails. NOTE ••Smart Diagnosis™ may not receive the best Smart Diagnosis™... tones have stopped, resume your conversation with the call center agent, who will improve and you can not be activated unless the appliance is turned on the appliance. 8 Keep the phone in place until the tone transmission has finished. • For best results, do so by the...

Owners Manual
Page 41
... have not used the dishwasher for an extended period of time during warmer months, close the water valve and disconnect the power supply line, or turn off the circuit breaker. Otherwise, it could damage the appliance.) Seasonal Maintenance and Storage ••If you will be cleaned with a soft damp cloth...
... have not used the dishwasher for an extended period of time during warmer months, close the water valve and disconnect the power supply line, or turn off the circuit breaker. Otherwise, it could damage the appliance.) Seasonal Maintenance and Storage ••If you will be cleaned with a soft damp cloth...
Owners Manual
Page 42
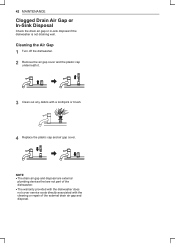
Cleaning the Air Gap 1 Turn off the dishwasher. 2 Remove the air gap cover and the plastic cap underneath it. 3 Clean out any debris with the cleaning or repair of the ...
Cleaning the Air Gap 1 Turn off the dishwasher. 2 Remove the air gap cover and the plastic cap underneath it. 3 Clean out any debris with the cleaning or repair of the ...

Owners Manual
Page 43
Fit the filters back into place. Reassemble the filters before reinstalling them by turning the inner filter clockwise until it clicks. 4 To replace the assembled filters, position the spray arm so the wider vee is toward the front. CAUTION &#... or rinse dishes before loading Once a month Twice a month (every 15 days) Every week Twice a week If food debris remains in filters to the front. 2 Turn the inner filter counter-clockwise and take out the assembled inner filter and stainless steel filter. 3 Clean the filters with a soft brush under running water...
Fit the filters back into place. Reassemble the filters before reinstalling them by turning the inner filter clockwise until it clicks. 4 To replace the assembled filters, position the spray arm so the wider vee is toward the front. CAUTION &#... or rinse dishes before loading Once a month Twice a month (every 15 days) Every week Twice a week If food debris remains in filters to the front. 2 Turn the inner filter counter-clockwise and take out the assembled inner filter and stainless steel filter. 3 Clean the filters with a soft brush under running water...

Owners Manual
Page 44
... removing the food residue, clean the spray arms holes under running water. 6 After cleaning the upper spray arm, press it up into place. Turn the nut 1/8 turn counter-clockwise and pulling down. 7 After assembly, check whether the spray arms rotate freely. It is necessary, remove the upper spray arm by... turning the nut on the bottom of the spray arm 1/8 turn clockwise to make sure that the spray arms be cleaned well due to improper water spray. Cleaning the Upper Spray ...
... removing the food residue, clean the spray arms holes under running water. 6 After cleaning the upper spray arm, press it up into place. Turn the nut 1/8 turn counter-clockwise and pulling down. 7 After assembly, check whether the spray arms rotate freely. It is necessary, remove the upper spray arm by... turning the nut on the bottom of the spray arm 1/8 turn clockwise to make sure that the spray arms be cleaned well due to improper water spray. Cleaning the Upper Spray ...
Owners Manual
Page 46
...hold Start for the drying process; Q: Why does my dishwasher continuously chime if I open the door during the wash and rinse cycles to turn the moisture in the door by the dishes and the tub during a cycle or right after the cycle has finished? The dishwasher is letting... into a condensing duct in the tub into humidity. Q: Can I hearing a whistling sound from the dishwasher? Once the dishwasher finishes draining, the power turns off. A: This is normal. This is normal. The air then cools, which causes the humidity to help the air cool down , the chiming will...
...hold Start for the drying process; Q: Why does my dishwasher continuously chime if I open the door during the wash and rinse cycles to turn the moisture in the door by the dishes and the tub during a cycle or right after the cycle has finished? The dishwasher is letting... into a condensing duct in the tub into humidity. Q: Can I hearing a whistling sound from the dishwasher? Once the dishwasher finishes draining, the power turns off. A: This is normal. This is normal. The air then cools, which causes the humidity to help the air cool down , the chiming will...

