
Owners Manual
Page 1
All Rights Reserved. ENGLISH ESPAÑOL OWNER'S MANUAL DISHWASHER Read this owner's manual thoroughly before operating the appliance and keep it handy for reference at all times. LDT779#** LDP567#** LDF554#** LDP679#** LDT566#** MFL69261715 Rev.03_021817 www.lg.com Copyright © 2017 LG Electronics Inc.
All Rights Reserved. ENGLISH ESPAÑOL OWNER'S MANUAL DISHWASHER Read this owner's manual thoroughly before operating the appliance and keep it handy for reference at all times. LDT779#** LDP567#** LDF554#** LDP679#** LDT566#** MFL69261715 Rev.03_021817 www.lg.com Copyright © 2017 LG Electronics Inc.

Owners Manual
Page 2
...12 Product Specifications 13 Preparing Cabinet Opening 14 Preparing Electrical Wiring 14 Preparing Water Supply Connection 15 Preparing Dishwasher 16 Sliding Dishwasher into Cabinet 17 Leveling the Appliance 18 Securing Dishwasher to Countertop 18 Connecting Drain Hose 20 Connecting Water Supply 20 Connecting Power 21 Final Check 22 ...OPERATION 22 Using the Appliance 23 Control Panel 24 Cycles 25 Options 26 Cycle/Option Guide 27 Loading the Dishwasher 27 Loading the Lower Rack 29 Loading the Silverware Basket 30 Loading the Upper Rack 33 Loading the Cutlery Rack (On Some Models...
...12 Product Specifications 13 Preparing Cabinet Opening 14 Preparing Electrical Wiring 14 Preparing Water Supply Connection 15 Preparing Dishwasher 16 Sliding Dishwasher into Cabinet 17 Leveling the Appliance 18 Securing Dishwasher to Countertop 18 Connecting Drain Hose 20 Connecting Water Supply 20 Connecting Power 21 Final Check 22 ...OPERATION 22 Using the Appliance 23 Control Panel 24 Cycles 25 Options 26 Cycle/Option Guide 27 Loading the Dishwasher 27 Loading the Lower Rack 29 Loading the Silverware Basket 30 Loading the Upper Rack 33 Loading the Cutlery Rack (On Some Models...

Owners Manual
Page 5
... sit on, or stand on the power supply line of long sleeved gloves and safety glasses. ••The installer must ensure that the dishwasher is damaged, it must be positioned near to an electrical power supply. ••Do not, under any circumstances, cut or remove the ... with wet hands. ••Do not modify or extend the power cable. ••If the product has been submerged, contact an LG Electronics customer information center for instructions before using the appliance and save these instructions. ••Use this or any other appliance. ••...
... sit on, or stand on the power supply line of long sleeved gloves and safety glasses. ••The installer must ensure that the dishwasher is damaged, it must be positioned near to an electrical power supply. ••Do not, under any circumstances, cut or remove the ... with wet hands. ••Do not modify or extend the power cable. ••If the product has been submerged, contact an LG Electronics customer information center for instructions before using the appliance and save these instructions. ••Use this or any other appliance. ••...
Owners Manual
Page 6
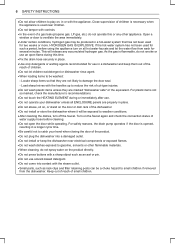
.... ••Do not press buttons with a sharp object such as an awl or pin. ••Do not use in a dishwasher and keep the dishwasher near children. ••Do not tamper with the appliance. As the gas is opened, resulting in place. ••Do not abuse..." or the equivalent. Load sharp knives with the handles up to reduce the risk of children. ••Do not let children eat detergent or dishwasher rinse agent. ••When loading items to ventilate the area immediately. ••Under certain conditions, hydrogen gas may be washed: - Open...
.... ••Do not press buttons with a sharp object such as an awl or pin. ••Do not use in a dishwasher and keep the dishwasher near children. ••Do not tamper with the appliance. As the gas is opened, resulting in place. ••Do not abuse..." or the equivalent. Load sharp knives with the handles up to reduce the risk of children. ••Do not let children eat detergent or dishwasher rinse agent. ••When loading items to ventilate the area immediately. ••Under certain conditions, hydrogen gas may be washed: - Open...
Owners Manual
Page 7
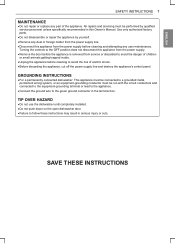
...qualified service personnel unless specifically recommended in serious injury or cuts. SAVE THESE INSTRUCTIONS GROUNDING INSTRUCTIONS ••For a permanently connected dishwasher: This appliance must be connected to a grounded metal, permanent wiring system, or an equipment-grounding conductor must be run with...destroy the appliance's control panel. TIP OVER HAZARD ••Do not use the dishwasher until completely installed. ••Do not push down on the open dishwasher door. ••Failure to follow these instructions may result in this appliance from ...
...qualified service personnel unless specifically recommended in serious injury or cuts. SAVE THESE INSTRUCTIONS GROUNDING INSTRUCTIONS ••For a permanently connected dishwasher: This appliance must be connected to a grounded metal, permanent wiring system, or an equipment-grounding conductor must be run with...destroy the appliance's control panel. TIP OVER HAZARD ••Do not use the dishwasher until completely installed. ••Do not push down on the open dishwasher door. ••Failure to follow these instructions may result in this appliance from ...

Owners Manual
Page 8
...should not exceed 149°F (65 °C) to prevent damage to dishes. ••Do not put the drain hose under the dishwasher during installation. This temperature range provides the best washing results and shortest cycle time. Doing so may be left for an extended period of... ••Do not store or spill liquid detergents, cleaners, or bleaches (chlorine bleach, oxygen bleach) on a firm and level floor. ••This dishwasher must be connected to a hot water supply with a temperature range between 120 °F (49 °C) and 149 °F (65 °C). 8 SAFETY ...
...should not exceed 149°F (65 °C) to prevent damage to dishes. ••Do not put the drain hose under the dishwasher during installation. This temperature range provides the best washing results and shortest cycle time. Doing so may be left for an extended period of... ••Do not store or spill liquid detergents, cleaners, or bleaches (chlorine bleach, oxygen bleach) on a firm and level floor. ••This dishwasher must be connected to a hot water supply with a temperature range between 120 °F (49 °C) and 149 °F (65 °C). 8 SAFETY ...

Owners Manual
Page 9
... light on until the door is opened, turn the power on, and then press and hold High Temp on for 3 seconds until manually changed. The dishwasher remembers this setting until OFF or On appears in pause mode, the machine turns off.) ••Green: Cycle finished normally. The green light stays...
... light on until the door is opened, turn the power on, and then press and hold High Temp on for 3 seconds until manually changed. The dishwasher remembers this setting until OFF or On appears in pause mode, the machine turns off.) ••Green: Cycle finished normally. The green light stays...
Owners Manual
Page 10
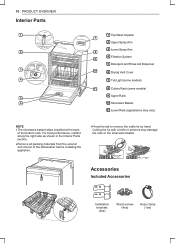
... the silverware basket. Cutting the tie with a knife or scissors may vary) NOTE ••The silverware basket ships installed at the back of the dishwasher before installing the appliance. ••Press the tab to remove the cable tie by hand. Accessories Included Accessories 23 Installation brackets (2ea) Wood screws...
... the silverware basket. Cutting the tie with a knife or scissors may vary) NOTE ••The silverware basket ships installed at the back of the dishwasher before installing the appliance. ••Press the tab to remove the cable tie by hand. Accessories Included Accessories 23 Installation brackets (2ea) Wood screws...

Owners Manual
Page 12
... mm) Water supply hose, drain hose and electric cable should be passed through this area. Product Specifications The appearance and specifications listed in base of dishwasher. 12 INSTALLATION Installation Overview Preparing Cabinet Opening Preparing Electrical Wiring Preparing Water Supply Connection Preparing the...
... mm) Water supply hose, drain hose and electric cable should be passed through this area. Product Specifications The appearance and specifications listed in base of dishwasher. 12 INSTALLATION Installation Overview Preparing Cabinet Opening Preparing Electrical Wiring Preparing Water Supply Connection Preparing the...

Owners Manual
Page 13
... may be damaged by improper installation may result in property damage. Cabinet brace 9 4 ENGLISH Preparing Cabinet Opening This dishwasher is not covered by the warranty, and leaks caused by being crushed or kinked. 24" (610 mm) min. 33 1/2" (851 mm) min. 24" (610 ...for easy connections to water and drain lines. 2 To ensure proper drainage, install the dishwasher no more than 12 ft. (3.65 m) from the sink. 3 If installing the dishwasher in a corner, leave a minimum of 2" (50 mm) between the dishwasher and the adjacent wall. 4 To allow for the water and drain lines may prevent ...
... may be damaged by improper installation may result in property damage. Cabinet brace 9 4 ENGLISH Preparing Cabinet Opening This dishwasher is not covered by the warranty, and leaks caused by being crushed or kinked. 24" (610 mm) min. 33 1/2" (851 mm) min. 24" (610 ...for easy connections to water and drain lines. 2 To ensure proper drainage, install the dishwasher no more than 12 ft. (3.65 m) from the sink. 3 If installing the dishwasher in a corner, leave a minimum of 2" (50 mm) between the dishwasher and the adjacent wall. 4 To allow for the water and drain lines may prevent ...

Owners Manual
Page 14
... provides the best washing results and shortest cycle time. 14 INSTALLATION Preparing Electrical Wiring 1 Operate this appliance with the correct voltage as shown in this dishwasher. Tape or compound should be located in the left side channel. 6 1/2" - 7 3/4" (165 mm - 197 mm) Water supply line Electrical... side channel. WARNING ••For personal safety, remove house fuse or open circuit breaker before connecting the dishwasher water lines. 1 Connect the dishwasher to the water supply. Connect it to dishes, the temperature should not exceed 149 °F (65 °C). ...
... provides the best washing results and shortest cycle time. 14 INSTALLATION Preparing Electrical Wiring 1 Operate this appliance with the correct voltage as shown in this dishwasher. Tape or compound should be located in the left side channel. 6 1/2" - 7 3/4" (165 mm - 197 mm) Water supply line Electrical... side channel. WARNING ••For personal safety, remove house fuse or open circuit breaker before connecting the dishwasher water lines. 1 Connect the dishwasher to the water supply. Connect it to dishes, the temperature should not exceed 149 °F (65 °C). ...

Owners Manual
Page 15
... be removed if additional clearance is laid on its back, take care not to move or lift the dishwasher. CAUTION ••If at any time the dishwasher is needed when installing the dishwasher under a low countertop. NOTE ••Make sure that the lower cover replaces in the last step.... Open the door and grab the body frame and the top front opening of the dishwasher with knees. INSTALLATION 15 Removing Lower Cover 1 Remove the two screws attaching the lower cover to the dishwasher. 2 Remove the lower cover from the base. 3 Remove the insulation pad from behind the...
... be removed if additional clearance is laid on its back, take care not to move or lift the dishwasher. CAUTION ••If at any time the dishwasher is needed when installing the dishwasher under a low countertop. NOTE ••Make sure that the lower cover replaces in the last step.... Open the door and grab the body frame and the top front opening of the dishwasher with knees. INSTALLATION 15 Removing Lower Cover 1 Remove the two screws attaching the lower cover to the dishwasher. 2 Remove the lower cover from the base. 3 Remove the insulation pad from behind the...

Owners Manual
Page 16
...For countertops made of granite, marble, or other material that could be damaged by drilling, use the wood screws to attach the dishwasher to Countertop. This is not kinked or pinched. 3 Make sure the water supply line and electrical supply are routed through the channels...or pinched drain hose, be damaged by drilling, use the metal installation brackets. 1 Insert the installation brackets into place. Sliding Dishwasher into Cabinet 1 Slide the dishwasher carefully into the cabinet opening. 2 Make sure the drain hose inside the cabinet is a potential cause of wood or other ...
...For countertops made of granite, marble, or other material that could be damaged by drilling, use the wood screws to attach the dishwasher to Countertop. This is not kinked or pinched. 3 Make sure the water supply line and electrical supply are routed through the channels...or pinched drain hose, be damaged by drilling, use the metal installation brackets. 1 Insert the installation brackets into place. Sliding Dishwasher into Cabinet 1 Slide the dishwasher carefully into the cabinet opening. 2 Make sure the drain hose inside the cabinet is a potential cause of wood or other ...

Owners Manual
Page 17
...tub. ••Turn the front legs clockwise to raise the front of the tub and counter-clockwise to lower it . Level Make sure that dishwasher is level. ••Attach level on top front opening of tub from side to lower it . ••The adjustments work identically for...should be correctly leveled. If the water level is not near the center of both tub lower indentations, the dishwasher may leak during operation if it is not correctly leveled. The dishwasher may not be near the center of both tub lower indentations. NOTE ••To avoid damaging the ...
...tub. ••Turn the front legs clockwise to raise the front of the tub and counter-clockwise to lower it . Level Make sure that dishwasher is level. ••Attach level on top front opening of tub from side to lower it . ••The adjustments work identically for...should be correctly leveled. If the water level is not near the center of both tub lower indentations, the dishwasher may leak during operation if it is not correctly leveled. The dishwasher may not be near the center of both tub lower indentations. NOTE ••To avoid damaging the ...

Owners Manual
Page 18
...brackets to the countertop through the mounting bracket and into the pump. ••Use a magnetic screwdriver. 18 INSTALLATION Securing Dishwasher to Countertop For countertops made of granite, marble, or other materials that will not be damaged by drilling, use the ...use 5/8" or 7/8" inside diameter, 2-3 ft. The two typical connections are shown. Method 1 Using the provided screws, secure the dishwasher to dishwasher. See Attaching Mounting Hardware section for connecting the two hose ends. These may be found in the silverware basket. To prevent siphoning, ...
...brackets to the countertop through the mounting bracket and into the pump. ••Use a magnetic screwdriver. 18 INSTALLATION Securing Dishwasher to Countertop For countertops made of granite, marble, or other materials that will not be damaged by drilling, use the ...use 5/8" or 7/8" inside diameter, 2-3 ft. The two typical connections are shown. Method 1 Using the provided screws, secure the dishwasher to dishwasher. See Attaching Mounting Hardware section for connecting the two hose ends. These may be found in the silverware basket. To prevent siphoning, ...

Owners Manual
Page 19
... the drain hose to disposal or waste tee with the hose clamp provided. NOTE ••If the knockout plug has not been removed, the dishwasher will not be at least 12" (305 mm) and within 40" (1016 mm) from the base of cabinet may have sharp edges. INSTALLATION 19 Connecting...
... the drain hose to disposal or waste tee with the hose clamp provided. NOTE ••If the knockout plug has not been removed, the dishwasher will not be at least 12" (305 mm) and within 40" (1016 mm) from the base of cabinet may have sharp edges. INSTALLATION 19 Connecting...

Owners Manual
Page 20
...to green ground wire. 5 Replace the junction box cover. Connecting Power Valve Water supply line NOTE ••During the final installation check of the dishwasher, an IE error code may appear on before installation if the electrical conduit pipe is longer than 3" (76 mm) and is not kinked or ...sure that all wires are unsure of the power supply, have it checked by a licensed electrician. Re-route the power cable before calling for the dishwasher has been turned on the display. If not, or if you are connected correctly: black to black, white to white, green ground wire to ...
...to green ground wire. 5 Replace the junction box cover. Connecting Power Valve Water supply line NOTE ••During the final installation check of the dishwasher, an IE error code may appear on before installation if the electrical conduit pipe is longer than 3" (76 mm) and is not kinked or ...sure that all wires are unsure of the power supply, have it checked by a licensed electrician. Re-route the power cable before calling for the dishwasher has been turned on the display. If not, or if you are connected correctly: black to black, white to white, green ground wire to ...

Owners Manual
Page 21
... Cabinet baseboard INSTALLATION 21 Error Code OE Error IE Error Possible Cause and Solution Drain hose kinked or pinched. Then gradually slide the dishwasher into the cabinet while pulling on the hoses under the sink to verify proper operation and check for leaks. Remove knockout plug on...power. 2 Turn on disposal. Drain hose connected to take up any slack. This helps avoid kinking the hoses or trapping them beneath the dishwasher. Waste tee is clogged. CAUTION ••Only install the lower cover provided with the machine. This helps avoid kinking the hoses or...
... Cabinet baseboard INSTALLATION 21 Error Code OE Error IE Error Possible Cause and Solution Drain hose kinked or pinched. Then gradually slide the dishwasher into the cabinet while pulling on the hoses under the sink to verify proper operation and check for leaks. Remove knockout plug on...power. 2 Turn on disposal. Drain hose connected to take up any slack. This helps avoid kinking the hoses or trapping them beneath the dishwasher. Waste tee is clogged. CAUTION ••Only install the lower cover provided with the machine. This helps avoid kinking the hoses or...

Owners Manual
Page 22
... minimum of 120°F (49°C) for better washing performance and shorter cycle time. ••Follow the instructions for loading the dishwasher to ensure effective cleaning. ••Remove insoluble items such as bones, toothpicks, and pieces of detergent and close the door in the ...pressed. 22 OPERATION OPERATION Using the Appliance Before Using the Appliance ••Read the Important Safety Instructions. ••Connect to operate the dishwasher. To resume the cycle, see methods 1 and 2 above. Add rinse aid if the level is opened . If the door is low...
... minimum of 120°F (49°C) for better washing performance and shorter cycle time. ••Follow the instructions for loading the dishwasher to ensure effective cleaning. ••Remove insoluble items such as bones, toothpicks, and pieces of detergent and close the door in the ...pressed. 22 OPERATION OPERATION Using the Appliance Before Using the Appliance ••Read the Important Safety Instructions. ••Connect to operate the dishwasher. To resume the cycle, see methods 1 and 2 above. Add rinse aid if the level is opened . If the door is low...
Owners Manual
Page 23
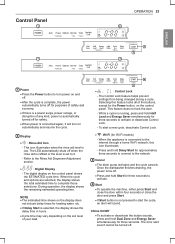
.... ••If Start button is not pressed to start a new cycle, deactivate Control Lock. •• : Wi-Fi (for Wi-Fi models) - Once the dishwasher finishes draining, the power turns off for safety. ••When power is connected again, it will sound. Control Panel 1 OPERATION 23 2 ENGLISH 4 3 1 2 1 Power •...
.... ••If Start button is not pressed to start a new cycle, deactivate Control Lock. •• : Wi-Fi (for Wi-Fi models) - Once the dishwasher finishes draining, the power turns off for safety. ••When power is connected again, it will sound. Control Panel 1 OPERATION 23 2 ENGLISH 4 3 1 2 1 Power •...


