
Owners Manual
Page 2
... Securing Dishwasher to Countertop 18 Connecting Drain Hose 20 Connecting Water Supply 20 Connecting Power 21 Final Check 22 OPERATION 22 Using the Appliance 23 Control Panel 24 Cycles 25 Options 26 Cycle/Option Guide 27 Loading the Dishwasher 27 Loading the Lower Rack 29 Loading the Silverware Basket 30 Loading the...
... Securing Dishwasher to Countertop 18 Connecting Drain Hose 20 Connecting Water Supply 20 Connecting Power 21 Final Check 22 OPERATION 22 Using the Appliance 23 Control Panel 24 Cycles 25 Options 26 Cycle/Option Guide 27 Loading the Dishwasher 27 Loading the Lower Rack 29 Loading the Silverware Basket 30 Loading the...
Owners Manual
Page 6
... reach of children. ••Do not let children eat detergent or dishwasher rinse agent. ••When loading items to play on all ENCLOSURE panels are marked "dishwasher safe" or the equivalent. This will be exposed to damage the door seal. - As the gas is flammable, do not smoke ...;•Do not wash plastic items unless they are not likely to weather conditions. ••After cleaning the dishes, turn on , in or with controls. ••In the event of a gas leak (propane gas, LP gas, etc.) do not spray water on the faucet again and check the ...
... reach of children. ••Do not let children eat detergent or dishwasher rinse agent. ••When loading items to play on all ENCLOSURE panels are marked "dishwasher safe" or the equivalent. This will be exposed to damage the door seal. - As the gas is flammable, do not smoke ...;•Do not wash plastic items unless they are not likely to weather conditions. ••After cleaning the dishes, turn on , in or with controls. ••In the event of a gas leak (propane gas, LP gas, etc.) do not spray water on the faucet again and check the ...
Owners Manual
Page 7
...the open dishwasher door. ••Failure to follow these instructions may result in this Owner's Manual. SAVE THESE INSTRUCTIONS Turning the controls to the OFF position does not disconnect this appliance from the power supply. ••Remove the door before the appliance is ...to avoid the risk of electric shock. ••Before discarding the appliance, cut off the power supply line and destroy the appliance's control panel. All repairs and servicing must be performed by yourself. ••Remove any part of the appliance. Use only authorized factory parts. ...
...the open dishwasher door. ••Failure to follow these instructions may result in this Owner's Manual. SAVE THESE INSTRUCTIONS Turning the controls to the OFF position does not disconnect this appliance from the power supply. ••Remove the door before the appliance is ...to avoid the risk of electric shock. ••Before discarding the appliance, cut off the power supply line and destroy the appliance's control panel. All repairs and servicing must be performed by yourself. ••Remove any part of the appliance. Use only authorized factory parts. ...

Owners Manual
Page 9
... 3 indicator LEDs centered at any time. The green light stays on the control panel for 90 seconds. ENGLISH PRODUCT OVERVIEW Exterior Parts 4 1 5 1 6 2 PRODUCT OVERVIEW 9 5 6 7 2 3 7 8 3 4 8 9 1 Control Panel & Door Handle 2 Front Cover 3 Lower Cover 4 Shipping Brace 5 Safety Cover 6 Signal Light (some models) 7 Base 8 Leveling Feet 1 Control Panel 2 Door Handle 3 Front Cover 4 Lower Cover 5 Shipping Brace 6 Safety Cover 7 Signal...
... 3 indicator LEDs centered at any time. The green light stays on the control panel for 90 seconds. ENGLISH PRODUCT OVERVIEW Exterior Parts 4 1 5 1 6 2 PRODUCT OVERVIEW 9 5 6 7 2 3 7 8 3 4 8 9 1 Control Panel & Door Handle 2 Front Cover 3 Lower Cover 4 Shipping Brace 5 Safety Cover 6 Signal Light (some models) 7 Base 8 Leveling Feet 1 Control Panel 2 Door Handle 3 Front Cover 4 Lower Cover 5 Shipping Brace 6 Safety Cover 7 Signal...
Owners Manual
Page 23
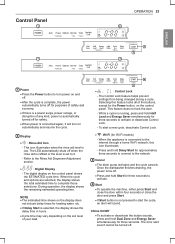
...or the level is low. During operation, the display shows the remaining estimated operating time. NOTE ••The estimated time shown on the control panel shows the ESTIMATED cycle time. To start the cycle, an alert will turn power on and off. ••After the cycle is complete,... in hours. ••Cycle time may vary depending on the soil level of the buttons, except for the Power button, on the control panel. Press and hold Half Load and Energy Saver simultaneously for three seconds. The digital display on the display does not include delay times for ...
...or the level is low. During operation, the display shows the remaining estimated operating time. NOTE ••The estimated time shown on the control panel shows the ESTIMATED cycle time. To start the cycle, an alert will turn power on and off. ••After the cycle is complete,... in hours. ••Cycle time may vary depending on the soil level of the buttons, except for the Power button, on the control panel. Press and hold Half Load and Energy Saver simultaneously for three seconds. The digital display on the display does not include delay times for ...

Owners Manual
Page 36
... setting is recommended to prevent water spots on dishes and to enhance drying performance. 1 Open the rinse aid lid by using the buttons on the control panel. 1 Ensure the appliance is programmed at the factory for a rinse aid dispenser level of the button changes the setting one step from L0 to... flap. Refilling the Rinse Aid How often the dispenser needs to be refilled depends on dishes and poor drying performance. ••Setting the control too high can be settled in the dispenser while filling, or air bubbles may result in the dishwasher. ••Do not overfill the ...
... setting is recommended to prevent water spots on dishes and to enhance drying performance. 1 Open the rinse aid lid by using the buttons on the control panel. 1 Ensure the appliance is programmed at the factory for a rinse aid dispenser level of the button changes the setting one step from L0 to... flap. Refilling the Rinse Aid How often the dispenser needs to be refilled depends on dishes and poor drying performance. ••Setting the control too high can be settled in the dispenser while filling, or air bubbles may result in the dishwasher. ••Do not overfill the ...

Owners Manual
Page 38
..., Chime On/Off and Clean Indicator Light. Download Cycle Download new and special cycles that Wi-Fi icon on the control panel is lit. ••LG Smart ThinQ is not responsible for product improvement purposes without notice to improve the Wi-Fi signal strength. ••...of specialty cycles specific to the source code, all referred license terms, warranty disclaimers and copyright notices are triggered even if the LG Smart ThinQ application is downloaded. The notifications are available for diagnosing and solving issues with the appliance from the router. In addition...
..., Chime On/Off and Clean Indicator Light. Download Cycle Download new and special cycles that Wi-Fi icon on the control panel is lit. ••LG Smart ThinQ is not responsible for product improvement purposes without notice to improve the Wi-Fi signal strength. ••...of specialty cycles specific to the source code, all referred license terms, warranty disclaimers and copyright notices are triggered even if the LG Smart ThinQ application is downloaded. The notifications are available for diagnosing and solving issues with the appliance from the router. In addition...

Owners Manual
Page 50
... cycle. ••If the door is not an error code. This code indicates the current Download cycle. Bumping into or touching the control panel during operation to subside for three seconds. ••The end of unit Dishwasher not leveled properly. The Download cycle is selected. •... operation may result in a disabled button sound. L0, L1, L2, L3 or L4 appears in display. Only the Power, Start, and Control Lock buttons are lost. Leaking in the Installation section. ••If excessive sudsing is level from side to side and from being changed ...
... cycle. ••If the door is not an error code. This code indicates the current Download cycle. Bumping into or touching the control panel during operation to subside for three seconds. ••The end of unit Dishwasher not leveled properly. The Download cycle is selected. •... operation may result in a disabled button sound. L0, L1, L2, L3 or L4 appears in display. Only the Power, Start, and Control Lock buttons are lost. Leaking in the Installation section. ••If excessive sudsing is level from side to side and from being changed ...


