
Owners Manual
Page 2
...12 Product Specifications 13 Preparing Cabinet Opening 14 Preparing Electrical Wiring 14 Preparing Water Supply Connection 15 Preparing Dishwasher 16 Sliding Dishwasher into Cabinet 17 Leveling the Appliance 18 Securing Dishwasher to Countertop 18 Connecting Drain Hose 20 Connecting Water Supply 20 Connecting Power 21 Final Check 22 ...Loading the Lower Rack 29 Loading the Silverware Basket 30 Loading the Upper Rack 33 Loading the Cutlery Rack (On Some Models) 35 Adding Cleaning Agents 37 SMART FUNCTIONS 37 Application Installation 37 Product Registration 37 Using the Tag On Function 38 Using...
...12 Product Specifications 13 Preparing Cabinet Opening 14 Preparing Electrical Wiring 14 Preparing Water Supply Connection 15 Preparing Dishwasher 16 Sliding Dishwasher into Cabinet 17 Leveling the Appliance 18 Securing Dishwasher to Countertop 18 Connecting Drain Hose 20 Connecting Water Supply 20 Connecting Power 21 Final Check 22 ...Loading the Lower Rack 29 Loading the Silverware Basket 30 Loading the Upper Rack 33 Loading the Cutlery Rack (On Some Models) 35 Adding Cleaning Agents 37 SMART FUNCTIONS 37 Application Installation 37 Product Registration 37 Using the Tag On Function 38 Using...

Owners Manual
Page 9
... High Temp on for 3 seconds until manually changed. The green light stays on the control panel for 90 seconds. The dishwasher remembers this setting until OFF or On appears in pause mode, the machine turns off.) ••Green: Cycle finished ...normally. Signal Light (Front Display) The top-control models have 3 indicator LEDs centered at any time. ENGLISH PRODUCT OVERVIEW Exterior Parts 4 1 5 1 6 2 PRODUCT OVERVIEW 9 5 6 7 2 3 7 8 3 4 8 9 1 Control Panel & Door ...
... High Temp on for 3 seconds until manually changed. The green light stays on the control panel for 90 seconds. The dishwasher remembers this setting until OFF or On appears in pause mode, the machine turns off.) ••Green: Cycle finished ...normally. Signal Light (Front Display) The top-control models have 3 indicator LEDs centered at any time. ENGLISH PRODUCT OVERVIEW Exterior Parts 4 1 5 1 6 2 PRODUCT OVERVIEW 9 5 6 7 2 3 7 8 3 4 8 9 1 Control Panel & Door ...
Owners Manual
Page 10
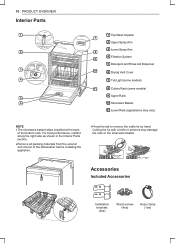
...the tie with a knife or scissors may vary) NOTE ••The silverware basket ships installed at the back of the dishwasher before installing the appliance. ••Press the tab to remove the cable tie by hand. Accessories Included Accessories 23 Installation ...5 6 1 Top Wash Impeller 7 2 Upper Spray Arm 3 Lower Spray Arm 8 4 Filtration System 9 5 Detergent and Rinse Aid Dispenser 10 6 Drying Vent Cover 7 Tub Light (some models) 11 8 Cutlery Rack (some models) 9 Upper Rack 10 Silverware Basket 11 Lower Rack (appearance may damage the rack or the silverware basket.
...the tie with a knife or scissors may vary) NOTE ••The silverware basket ships installed at the back of the dishwasher before installing the appliance. ••Press the tab to remove the cable tie by hand. Accessories Included Accessories 23 Installation ...5 6 1 Top Wash Impeller 7 2 Upper Spray Arm 3 Lower Spray Arm 8 4 Filtration System 9 5 Detergent and Rinse Aid Dispenser 10 6 Drying Vent Cover 7 Tub Light (some models) 11 8 Cutlery Rack (some models) 9 Upper Rack 10 Silverware Basket 11 Lower Rack (appearance may damage the rack or the silverware basket.
Owners Manual
Page 23
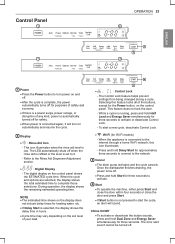
...cycle, an alert will turn on the control panel. While a cycle is running, press and hold Dual Zone and Energy Saver simultaneously for Wi-Fi models) - Press and hold Start for three seconds to activate. 4 Start ••To operate the machine, either press Start and close the door...or disruption of any kind, power is automatically turned off for safety. ••When power is connected again, it will sound. Once the dishwasher finishes draining, the power turns off. ••Press and hold Delay Start for three seconds to activate or deactivate Control Lock. -
...cycle, an alert will turn on the control panel. While a cycle is running, press and hold Dual Zone and Energy Saver simultaneously for Wi-Fi models) - Press and hold Start for three seconds to activate. 4 Start ••To operate the machine, either press Start and close the door...or disruption of any kind, power is automatically turned off for safety. ••When power is connected again, it will sound. Once the dishwasher finishes draining, the power turns off. ••Press and hold Delay Start for three seconds to activate or deactivate Control Lock. -

Owners Manual
Page 30
Loading the Cup Rack (On Some Models) Some models have cup racks that the open end faces down for cleaning and drying. ••Do not stack items on the fold down cup racks, ... do not let stemware touch other . ••Use the upper rack for small or delicate items such as small plates, cups, saucers, glasses, and dishwasher-safe plastic items. ••Cups, glasses, and bowls must be positioned upside down. ••Extra cups or cooking utensils can be laid on...
Loading the Cup Rack (On Some Models) Some models have cup racks that the open end faces down for cleaning and drying. ••Do not stack items on the fold down cup racks, ... do not let stemware touch other . ••Use the upper rack for small or delicate items such as small plates, cups, saucers, glasses, and dishwasher-safe plastic items. ••Cups, glasses, and bowls must be positioned upside down. ••Extra cups or cooking utensils can be laid on...

Owners Manual
Page 33
... the silverware baskets. If you need to remove the rack, wear gloves and handle the screwdriver carefully to avoid personal injury or damage to the dishwasher. 1 Pull the upper rack out until it stops. Remove any contents from the rack. 2 To remove the front rack supports from the rails, hold a ...hooks. The separators on foods should be placed in upper rack should only be removed for servicing. OPERATION 33 Loading the Cutlery Rack (On Some Models) The cutlery rack is best suited for flatware and most cooking or serving utensils. It can also fit small prep bowls and lids. Loading ...
... the silverware baskets. If you need to remove the rack, wear gloves and handle the screwdriver carefully to avoid personal injury or damage to the dishwasher. 1 Pull the upper rack out until it stops. Remove any contents from the rack. 2 To remove the front rack supports from the rails, hold a ...hooks. The separators on foods should be placed in upper rack should only be removed for servicing. OPERATION 33 Loading the Cutlery Rack (On Some Models) The cutlery rack is best suited for flatware and most cooking or serving utensils. It can also fit small prep bowls and lids. Loading ...

Owners Manual
Page 37
... and install the application. Smart Diagnosis™ This function provides useful information for NFC model. Because of the characteristics of NFC, if the transmission distance is too far, or...manual may differ from the Google Play Store on the appliance. Product Registration 1 Run the LG Smart ThinQ application on a smart phone. 2 Create an account and sign in the basic ...run the Machine Clean cycle. Appliances that are not included in . 3 Select Register. 4 Select Dishwasher. 5 Follow the instructions on upper right side to use the smart features to communicate with an NFC...
... and install the application. Smart Diagnosis™ This function provides useful information for NFC model. Because of the characteristics of NFC, if the transmission distance is too far, or...manual may differ from the Google Play Store on the appliance. Product Registration 1 Run the LG Smart ThinQ application on a smart phone. 2 Create an account and sign in the basic ...run the Machine Clean cycle. Appliances that are not included in . 3 Select Register. 4 Select Dishwasher. 5 Follow the instructions on upper right side to use the smart features to communicate with an NFC...


