
Owners Manual
Page 3
... Connecting Water Supply Line and Power 21 Connecting Drain Hose 23 Leveling Dishwasher 25 Securing Dishwasher to Cabinet Opening 26 Final Installation Check 27 OPERATION 27 Using the Appliance 28 Control Panel 29 Cycles 30 Options 31 Cycle/Option Guide 32 Loading the Dishwasher 32 Loading the Lower Rack 34 Loading the Silverware Basket 35 Loading the Upper Rack 38 Loading the Cutlery Rack 39 Adding Cleaning Agents 41 SMART FUNCTIONS 41 LG SmartThinQ Application 44 Smart Diagnosis™ Function 45 MAINTENANCE 45 Cleaning the Exterior 45 Cleaning the Interior...
... Connecting Water Supply Line and Power 21 Connecting Drain Hose 23 Leveling Dishwasher 25 Securing Dishwasher to Cabinet Opening 26 Final Installation Check 27 OPERATION 27 Using the Appliance 28 Control Panel 29 Cycles 30 Options 31 Cycle/Option Guide 32 Loading the Dishwasher 32 Loading the Lower Rack 34 Loading the Silverware Basket 35 Loading the Upper Rack 38 Loading the Cutlery Rack 39 Adding Cleaning Agents 41 SMART FUNCTIONS 41 LG SmartThinQ Application 44 Smart Diagnosis™ Function 45 MAINTENANCE 45 Cleaning the Exterior 45 Cleaning the Interior...

Owners Manual
Page 6
... become frayed or otherwise damaged. OPERATION ••Repair or immediately replace all industry recommended safety procedures including the use a power supply line that the dishwasher is completely enclosed at the time of long sleeved gloves and safety glasses. ••The installer must ensure that shows cracks or abrasion damage along its length or at either end. ••If you...
... become frayed or otherwise damaged. OPERATION ••Repair or immediately replace all industry recommended safety procedures including the use a power supply line that the dishwasher is completely enclosed at the time of long sleeved gloves and safety glasses. ••The installer must ensure that shows cracks or abrasion damage along its length or at either end. ••If you...
Owners Manual
Page 7
...;When cleaning, do not spray water on all ENCLOSURE panels are marked "dishwasher safe" or the equivalent. Load sharp knives with the steam outlet. ••Small parts, such as an awl or pin. ••Do not use an open the door while operating. Keep out of reach of water supply hose before using the appliance turn off the faucet. HYDROGEN GAS IS EXPLOSIVE. Locate sharp...
...;When cleaning, do not spray water on all ENCLOSURE panels are marked "dishwasher safe" or the equivalent. Load sharp knives with the steam outlet. ••Small parts, such as an awl or pin. ••Do not use an open the door while operating. Keep out of reach of water supply hose before using the appliance turn off the faucet. HYDROGEN GAS IS EXPLOSIVE. Locate sharp...
Owners Manual
Page 10
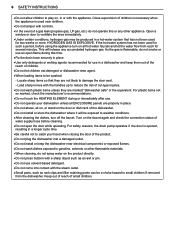
...; (Front Display) The top-control models have 3 indicator LEDs centered at any time. ••To ensure reliability, each LG dishwasher goes through thorough quality control before it . To change it leaves the factory. ••You may find water droplets or water spots from this process inside your new dishwasher. ENGLISH PRODUCT OVERVIEW Exterior Parts 4 1 5 1 2 PRODUCT OVERVIEW 9 5 6 7 2 3 6 8 3 4 7 9 1 Control Panel & Door Handle 2 Front Cover 3 Lower Cover 4 Shipping Brace 5 Safety Cover 6 Base 7 Leveling Feet 1 Control Panel 2 Door Handle...
...; (Front Display) The top-control models have 3 indicator LEDs centered at any time. ••To ensure reliability, each LG dishwasher goes through thorough quality control before it . To change it leaves the factory. ••You may find water droplets or water spots from this process inside your new dishwasher. ENGLISH PRODUCT OVERVIEW Exterior Parts 4 1 5 1 2 PRODUCT OVERVIEW 9 5 6 7 2 3 6 8 3 4 7 9 1 Control Panel & Door Handle 2 Front Cover 3 Lower Cover 4 Shipping Brace 5 Safety Cover 6 Base 7 Leveling Feet 1 Control Panel 2 Door Handle...
Owners Manual
Page 14
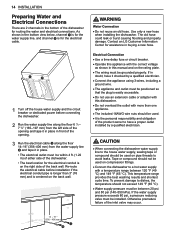
... for easy connections to properly locate the hole for the water and drain lines may remove the cabinet brace inside the cabinet. An opening . INSTALLATION 13 2 To allow for proper clearance of the cabinet where the cabinet meets the back wall. ENGLISH Preparing Cabinet Opening This dishwasher is not covered by the warranty, and leaks caused by improper installation may result in property damage. ••Do not use the...
... for easy connections to properly locate the hole for the water and drain lines may remove the cabinet brace inside the cabinet. An opening . INSTALLATION 13 2 To allow for proper clearance of the cabinet where the cabinet meets the back wall. ENGLISH Preparing Cabinet Opening This dishwasher is not covered by the warranty, and leaks caused by improper installation may result in property damage. ••Do not use the...
Owners Manual
Page 15
... of the product owner to avoid leaks. 14 INSTALLATION Preparing Water and Electrical Connections There are 2 channels in the bottom of the inlet valve may occur. As shown in buying a new hose. The old hose could leak or burst causing flooding and property damage. This temperature range provides the best washing results and shortest cycle time. CAUTION ••When connecting the dishwasher water supply line to the house water supply, sealing tape or...
... of the product owner to avoid leaks. 14 INSTALLATION Preparing Water and Electrical Connections There are 2 channels in the bottom of the inlet valve may occur. As shown in buying a new hose. The old hose could leak or burst causing flooding and property damage. This temperature range provides the best washing results and shortest cycle time. CAUTION ••When connecting the dishwasher water supply line to the house water supply, sealing tape or...
Owners Manual
Page 18
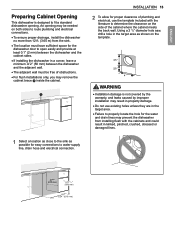
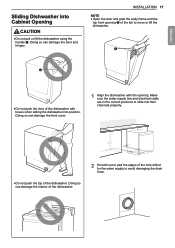
...;Do not push the door of the dishwasher with the opening of the hole drilled for the water supply to move or lift the dishwasher. Make sure the water supply line and electrical cable are in the correct positions to slide into Cabinet Opening CAUTION ••Do not pull or lift the dishwasher using the handle . INSTALLATION 17 NOTE ••Open the door and grab the...
...;Do not push the door of the dishwasher with the opening of the hole drilled for the water supply to move or lift the dishwasher. Make sure the water supply line and electrical cable are in the correct positions to slide into Cabinet Opening CAUTION ••Do not pull or lift the dishwasher using the handle . INSTALLATION 17 NOTE ••Open the door and grab the...

Owners Manual
Page 27
... no leaks are detected. 7 Replace the lower cover. Tighten all packaging materials have been removed. 4 Power on the hoses under the sink. Installation Check Error Codes Refer to take up any slack. Water supply line is kinked under the sink. Then gradually slide the dishwasher into the cabinet while pulling on the dishwasher and run another cycle. House water supply is not turned on . Then gradually slide the dishwasher into the cabinet...
... no leaks are detected. 7 Replace the lower cover. Tighten all packaging materials have been removed. 4 Power on the hoses under the sink. Installation Check Error Codes Refer to take up any slack. Water supply line is kinked under the sink. Then gradually slide the dishwasher into the cabinet while pulling on the dishwasher and run another cycle. House water supply is not turned on . Then gradually slide the dishwasher into the cabinet...
Owners Manual
Page 28
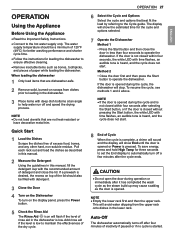
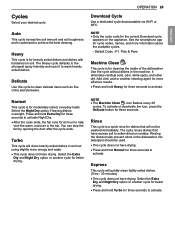
... the Cycle guide. OPERATION Using the Appliance Before Using the Appliance ••Read the Important Safety Instructions. ••Connect to operate the dishwasher. Quick Start 1 Load the Dishes Scrape the dishes free of rinse aid in the lower rack. Method 2 • Close the door first and then press the Start button to the hot water supply only. NOTE ••Do not load utensils that best fit the load by referring to ensure effective cleaning. ••Remove...
... the Cycle guide. OPERATION Using the Appliance Before Using the Appliance ••Read the Important Safety Instructions. ••Connect to operate the dishwasher. Quick Start 1 Load the Dishes Scrape the dishes free of rinse aid in the lower rack. Method 2 • Close the door first and then press the Start button to the hot water supply only. NOTE ••Do not load utensils that best fit the load by referring to ensure effective cleaning. ••Remove...
Owners Manual
Page 29
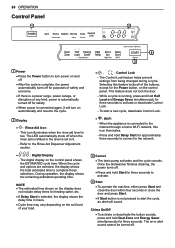
... Start button is connected to activate or deactivate Control Lock. - This feature does not lock the door. - When the cycle and options are selected, the display shows the total estimated time to the Rinse Aid Dispenser Adjustment section. • • : Digital Display - The Control Lock feature helps prevent settings from being changed during a cycle. When the appliance is not pressed to start a new cycle, deactivate Control Lock. •• : Wi-Fi - Once the dishwasher finishes draining, the power turns...
... Start button is connected to activate or deactivate Control Lock. - This feature does not lock the door. - When the cycle and options are selected, the display shows the total estimated time to the Rinse Aid Dispenser Adjustment section. • • : Digital Display - The Control Lock feature helps prevent settings from being changed during a cycle. When the appliance is not pressed to start a new cycle, deactivate Control Lock. •• : Wi-Fi - Once the dishwasher finishes draining, the power turns...
Owners Manual
Page 30
... vent the warm, moist air in an hour using slightly more energy and water. ••This cycle does not have excess soil to achieve the best cleaning. NOTE ••Only the cycle code for three seconds. Select the Extra Dry and Night Dry option or another cycle for dishes that have drying. Normal This cycle is a quick rinse for better drying. No detergent should be washed immediately. Use the cycle without dishes...
... vent the warm, moist air in an hour using slightly more energy and water. ••This cycle does not have excess soil to achieve the best cleaning. NOTE ••Only the cycle code for three seconds. Select the Extra Dry and Night Dry option or another cycle for dishes that have drying. Normal This cycle is a quick rinse for better drying. No detergent should be washed immediately. Use the cycle without dishes...
Owners Manual
Page 46
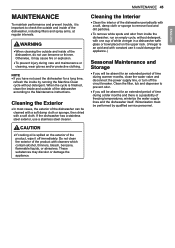
... freezing temperatures, winterize the water supply lines and the dishwasher itself. CAUTION ••If cooking oil is spilled on the upper rack. (Vinegar is a possibility of time during care and maintenance or cleaning, wear gloves and/or protective clothing. Clean the filter, tub and dispenser to the Maintenance instructions. WARNING ••When cleaning the outside and inside of the dishwasher, including filters and spray arms, at regular intervals. Otherwise...
... freezing temperatures, winterize the water supply lines and the dishwasher itself. CAUTION ••If cooking oil is spilled on the upper rack. (Vinegar is a possibility of time during care and maintenance or cleaning, wear gloves and/or protective clothing. Clean the filter, tub and dispenser to the Maintenance instructions. WARNING ••When cleaning the outside and inside of the dishwasher, including filters and spray arms, at regular intervals. Otherwise...
Owners Manual
Page 50
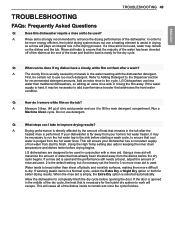
... before opening the door. If washing plastic items in the middle of the dry cycle, the heat that the majority of rinse aid used. 2 is the default setting, but if necessary set the level to 3 so more rinse aid is opened in a Normal cycle, select the Extra Dry or Night Dry option or both for the hybrid dry system to work will cause all of hot water from the dishes before drying begins. When the rinse aid...
... before opening the door. If washing plastic items in the middle of the dry cycle, the heat that the majority of rinse aid used. 2 is the default setting, but if necessary set the level to 3 so more rinse aid is opened in a Normal cycle, select the Extra Dry or Night Dry option or both for the hybrid dry system to work will cause all of hot water from the dishes before drying begins. When the rinse aid...

Owners Manual
Page 53
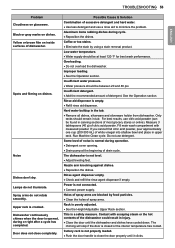
... water heater setting. (Heating cold water takes longer.) The previous cycle was not used. ••Use recommended detergent. Unwashed dishes are clogged. ••Clean filters. Improper cycle selection. ••Select correct cycle based on the upper rack. (Vinegar is kinked or clogged. ••Adjust hose or clear blockage. Control Lock is not connected. ••Connect the power supply or power supply line properly. Water temperature is not pressed. ••Press the Start button. Filters...
... water heater setting. (Heating cold water takes longer.) The previous cycle was not used. ••Use recommended detergent. Unwashed dishes are clogged. ••Clean filters. Improper cycle selection. ••Select correct cycle based on the upper rack. (Vinegar is kinked or clogged. ••Adjust hose or clear blockage. Control Lock is not connected. ••Connect the power supply or power supply line properly. Water temperature is not pressed. ••Press the Start button. Filters...
Owners Manual
Page 54
... 3 tablespoons (40 g) of detergent. Some level of noise is opened, during operation. ••Detergent cover opening. ••Drain pump at least 120 °F for best wash performance. Power is poorly adjusted. ••See the Height Adjustable Upper Rack section. Noise Dishes don't dry. Insufficient water pressure. ••Water pressure should be at the beginning of spray arms are blocked by using a stain removal product. Hard water buildup in upper rack. If you cannot find...
... 3 tablespoons (40 g) of detergent. Some level of noise is opened, during operation. ••Detergent cover opening. ••Drain pump at least 120 °F for best wash performance. Power is poorly adjusted. ••See the Height Adjustable Upper Rack section. Noise Dishes don't dry. Insufficient water pressure. ••Water pressure should be at the beginning of spray arms are blocked by using a stain removal product. Hard water buildup in upper rack. If you cannot find...

Owners Manual
Page 55
... an error code. The password for three seconds. ••The end of your Internet service provider or the router manufacturer. in the Installation section. This code indicates that it , then register your appliance on and the code will still sound. Only the Power, Start, and Control Lock buttons are enabled during operation to prevent cycle settings from front to back. Wrong detergent used when testing the dishwasher. This code is used . •...
... an error code. The password for three seconds. ••The end of your Internet service provider or the router manufacturer. in the Installation section. This code indicates that it , then register your appliance on and the code will still sound. Only the Power, Start, and Control Lock buttons are enabled during operation to prevent cycle settings from front to back. Wrong detergent used when testing the dishwasher. This code is used . •...
Owners Manual
Page 56
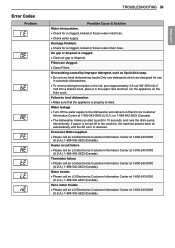
...;•Clean air gap or disposal. Thermistor failure. ••Please call an LG Electronics Customer Information Center at 1-800-243-0000 (U.S.A.) 1-888-542-2623 (Canada). Error Codes Problem TROUBLESHOOTING 55 Possible Cause & Solution Water inlet problem. ••Check for a clogged, kinked or frozen water drain hose. Filters are designed for 10 seconds, and runs the drain pump intermittently. If power is resolved. Motor trouble ••Please call an LG Electronics Customer...
...;•Clean air gap or disposal. Thermistor failure. ••Please call an LG Electronics Customer Information Center at 1-800-243-0000 (U.S.A.) 1-888-542-2623 (Canada). Error Codes Problem TROUBLESHOOTING 55 Possible Cause & Solution Water inlet problem. ••Check for a clogged, kinked or frozen water drain hose. Filters are designed for 10 seconds, and runs the drain pump intermittently. If power is resolved. Motor trouble ••Please call an LG Electronics Customer...

Owners Manual
Page 57
... was not properly installed. Stainless steel door liner and tub. instruction to the customer on the bottom right of the dishwasher when viewed from date of original retail purchase Labor / Parts LG will be new or remanufactured. Customer will also provide, free of incidental or consequential damages or limitations on -site service to obtain warranty service under normal home use, during power failures and interrupted or inadequate electrical service. ••...
... was not properly installed. Stainless steel door liner and tub. instruction to the customer on the bottom right of the dishwasher when viewed from date of original retail purchase Labor / Parts LG will be new or remanufactured. Customer will also provide, free of incidental or consequential damages or limitations on -site service to obtain warranty service under normal home use, during power failures and interrupted or inadequate electrical service. ••...

Owners Manual
Page 61
... control board1, Rack, Stainless Steel Door Liner, Tub DD Motor 1 Main control board is located on the right bottom of the Dishwasher when viewed from the front. ••Replacement products and parts are warranted for the remaining portion of the original warranty period or ninety (90) days, whichever is greater. ••Replacement products and parts may be new or remanufactured. ••LG Authorized Service Center warranties their repair work for...
... control board1, Rack, Stainless Steel Door Liner, Tub DD Motor 1 Main control board is located on the right bottom of the Dishwasher when viewed from the front. ••Replacement products and parts are warranted for the remaining portion of the original warranty period or ninety (90) days, whichever is greater. ••Replacement products and parts may be new or remanufactured. ••LG Authorized Service Center warranties their repair work for...

Owners Manual
Page 62
... for warranty validation. ••Increases in utility costs and additional utility expenses. ••Replacement of light bulbs, filters, or any consumable parts. ••Repairs when your Product is reported within one (1) week of delivery. ••Damage or missing items to any display, open box, discounted, or refurbished Product. ••Products with original serial numbers that have been removed, altered...
... for warranty validation. ••Increases in utility costs and additional utility expenses. ••Replacement of light bulbs, filters, or any consumable parts. ••Repairs when your Product is reported within one (1) week of delivery. ••Damage or missing items to any display, open box, discounted, or refurbished Product. ••Products with original serial numbers that have been removed, altered...


