Owners Manual - English
Page 1
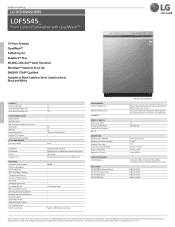
..., features and specifications are approximate. HOME APPLIANCES LG DISHWASHERS LDF5545_ Front Control Dishwasher with Door Open Carton Dimensions (WxHxD) Clearances (WxHxD) Weight (Unit / Carton) LIMITED WARRANTY Limited Warranty UPC CODES LDF5545BD Black Stainless Steel LDF5545ST Stainless Steel LDF5545WW White ....75" x 33.6" x 24.6" 27 1/8" 50.5" 28" x 34.7" x 29.6" 24" x 33.5" x 24" 75 lbs / 88.2 lbs 1 Year Labor & Parts, 5 Years Control Board/Rack, 10 Year Motor, Lifetime on Display PERFORMANCE Number of Wash Cycles Number of Wash Options QuadWash™ ENERGY / WATER Water Factor...
..., features and specifications are approximate. HOME APPLIANCES LG DISHWASHERS LDF5545_ Front Control Dishwasher with Door Open Carton Dimensions (WxHxD) Clearances (WxHxD) Weight (Unit / Carton) LIMITED WARRANTY Limited Warranty UPC CODES LDF5545BD Black Stainless Steel LDF5545ST Stainless Steel LDF5545WW White ....75" x 33.6" x 24.6" 27 1/8" 50.5" 28" x 34.7" x 29.6" 24" x 33.5" x 24" 75 lbs / 88.2 lbs 1 Year Labor & Parts, 5 Years Control Board/Rack, 10 Year Motor, Lifetime on Display PERFORMANCE Number of Wash Cycles Number of Wash Options QuadWash™ ENERGY / WATER Water Factor...
Additional Link - Owner s Manual
Page 3
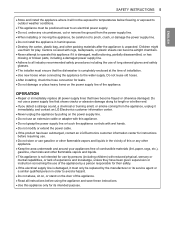
2 TABLE OF CONTENTS 3 PRODUCT FEATURES 4 SAFETY INSTRUCTIONS 4 IMPORTANT SAFETY INSTRUCTIONS 9 PRODUCT OVERVIEW 9 Exterior Parts 10 Interior Parts 10 Accessories 11 INSTALLATION 11 Installation Parts and Tools 12 Installation Overview 12 Product Dimensions 12 Product Specifications 13 Preparing Cabinet Opening 14 Preparing Electrical Wiring 14 Preparing Water Supply Connection 15 ...
2 TABLE OF CONTENTS 3 PRODUCT FEATURES 4 SAFETY INSTRUCTIONS 4 IMPORTANT SAFETY INSTRUCTIONS 9 PRODUCT OVERVIEW 9 Exterior Parts 10 Interior Parts 10 Accessories 11 INSTALLATION 11 Installation Parts and Tools 12 Installation Overview 12 Product Dimensions 12 Product Specifications 13 Preparing Cabinet Opening 14 Preparing Electrical Wiring 14 Preparing Water Supply Connection 15 ...
Additional Link - Owner s Manual
Page 6
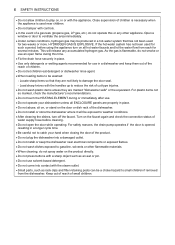
... chambers. ••Never attempt to operate this appliance if it is damaged, malfunctioning, partially disassembled, or has missing or broken parts, including a damaged power supply line. ••Adhere to all power supply lines that have been given supervision or instruction concerning ...after the appliance is unpacked. ENGLISH SAFETY INSTRUCTIONS 5 ••Store and install the appliance where it immediately, and contact an LG Electronics customer information center. ••Never unplug the appliance by pulling on the power supply line. ••Do not use...
... chambers. ••Never attempt to operate this appliance if it is damaged, malfunctioning, partially disassembled, or has missing or broken parts, including a damaged power supply line. ••Adhere to all power supply lines that have been given supervision or instruction concerning ...after the appliance is unpacked. ENGLISH SAFETY INSTRUCTIONS 5 ••Store and install the appliance where it immediately, and contact an LG Electronics customer information center. ••Never unplug the appliance by pulling on the power supply line. ••Do not use...
Additional Link - Owner s Manual
Page 7
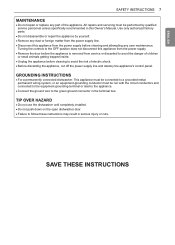
... gasoline, solvents or other appliance. If the hot-water system has not been used for use in or with the steam outlet. ••Small parts, such as an awl or pin. ••Do not use . ••Do not operate your hand when closing the door of water supply...
... gasoline, solvents or other appliance. If the hot-water system has not been used for use in or with the steam outlet. ••Small parts, such as an awl or pin. ••Do not use . ••Do not operate your hand when closing the door of water supply...
Additional Link - Owner s Manual
Page 8
... avoid the danger of children or small animals getting trapped inside. ••Unplug the appliance before cleaning and attempting any part of electric shock. ••Before discarding the appliance, cut off the power supply line and destroy the appliance's control panel.... SAVE THESE INSTRUCTIONS Use only authorized factory parts. ••Do not disassemble or repair the appliance by qualified service personnel unless specifically recommended in this appliance from the power...
... avoid the danger of children or small animals getting trapped inside. ••Unplug the appliance before cleaning and attempting any part of electric shock. ••Before discarding the appliance, cut off the power supply line and destroy the appliance's control panel.... SAVE THESE INSTRUCTIONS Use only authorized factory parts. ••Do not disassemble or repair the appliance by qualified service personnel unless specifically recommended in this appliance from the power...
Additional Link - Owner s Manual
Page 10
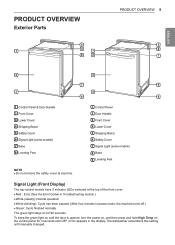
... top-control models have 3 indicator LEDs centered at any time. The green light stays on the control panel for 90 seconds. ENGLISH PRODUCT OVERVIEW Exterior Parts 4 1 5 1 6 2 PRODUCT OVERVIEW 9 5 6 7 2 3 7 8 3 4 8 9 1 Control Panel & Door Handle 2 Front Cover 3 Lower Cover 4 Shipping Brace 5 Safety Cover 6 Signal Light (some models) 7 Base 8 Leveling Feet 1 Control Panel 2 Door Handle...
... top-control models have 3 indicator LEDs centered at any time. The green light stays on the control panel for 90 seconds. ENGLISH PRODUCT OVERVIEW Exterior Parts 4 1 5 1 6 2 PRODUCT OVERVIEW 9 5 6 7 2 3 7 8 3 4 8 9 1 Control Panel & Door Handle 2 Front Cover 3 Lower Cover 4 Shipping Brace 5 Safety Cover 6 Signal Light (some models) 7 Base 8 Leveling Feet 1 Control Panel 2 Door Handle...
Additional Link - Owner s Manual
Page 11
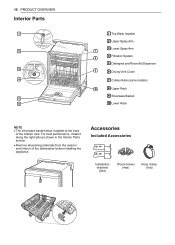
Accessories Included Accessories Installation brackets (2ea) Wood screws (4ea) Hose clamp (1ea) 23 10 PRODUCT OVERVIEW Interior Parts 1 2 3 4 5 6 1 Top Wash Impeller 2 Upper Spray Arm 3 Lower Spray Arm 7 4 Filtration System 8 5 Detergent and Rinse Aid Dispenser 9 6 Drying Vent Cover 7 Cutlery Rack (some models) 10 8 Upper... at the back of the dishwasher before installing the appliance. For best performance, install it along the right side as shown in the Interior Parts section. ••Remove all packing materials from the exterior and interior of the bottom rack.
Accessories Included Accessories Installation brackets (2ea) Wood screws (4ea) Hose clamp (1ea) 23 10 PRODUCT OVERVIEW Interior Parts 1 2 3 4 5 6 1 Top Wash Impeller 2 Upper Spray Arm 3 Lower Spray Arm 7 4 Filtration System 8 5 Detergent and Rinse Aid Dispenser 9 6 Drying Vent Cover 7 Cutlery Rack (some models) 10 8 Upper... at the back of the dishwasher before installing the appliance. For best performance, install it along the right side as shown in the Interior Parts section. ••Remove all packing materials from the exterior and interior of the bottom rack.

Additional Link - Owner s Manual
Page 12
ENGLISH INSTALLATION Installation Parts and Tools Parts not Provided INSTALLATION 11 Electrical cable Water supply tube Fittings for tube Coupler Teflon™ tape Air gap Wire nuts for 16-gauge wiring Tools Needed Hose clamp ⅞" UL approved strain relief Electrical tape Flat-blade screwdriver Phillips screwdriver Hole saw min. 2½" bit Electrical drill Gloves Safety glasses Adjustable wrench Tape measure Utility knife Level Tubing cutter Nipper Pliers Wire stripper ¼" Square drive wrench
ENGLISH INSTALLATION Installation Parts and Tools Parts not Provided INSTALLATION 11 Electrical cable Water supply tube Fittings for tube Coupler Teflon™ tape Air gap Wire nuts for 16-gauge wiring Tools Needed Hose clamp ⅞" UL approved strain relief Electrical tape Flat-blade screwdriver Phillips screwdriver Hole saw min. 2½" bit Electrical drill Gloves Safety glasses Adjustable wrench Tape measure Utility knife Level Tubing cutter Nipper Pliers Wire stripper ¼" Square drive wrench
Additional Link - Owner s Manual
Page 33
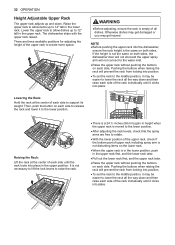
... to lower the rack all dishes. There are free to rotate. ••With the lower position of the upper rack, check if the bottom part of the upper rack to the middle position, it clicks into the dishwasher, ensure the rack height is in the lower position, push in height...
... to lower the rack all dishes. There are free to rotate. ••With the lower position of the upper rack, check if the bottom part of the upper rack to the middle position, it clicks into the dishwasher, ensure the rack height is in the lower position, push in height...

Additional Link - Owner s Manual
Page 40
This equipment should be installed and operated with part 15 of the FCC Rules. If this equipment does cause harmful interference to radio or television reception, which can radiate radio frequency energy and, if ... to operate the equipment. However, there is connected. ••Consult the dealer or an experienced radio/TV technician for a Class B digital device, pursuant to Part 15 of the following two conditions: 1) this device may not cause harmful interference and 2) this device must accept any other antenna or transmitter. This device...
This equipment should be installed and operated with part 15 of the FCC Rules. If this equipment does cause harmful interference to radio or television reception, which can radiate radio frequency energy and, if ... to operate the equipment. However, there is connected. ••Consult the dealer or an experienced radio/TV technician for a Class B digital device, pursuant to Part 15 of the following two conditions: 1) this device may not cause harmful interference and 2) this device must accept any other antenna or transmitter. This device...
Additional Link - Owner s Manual
Page 43
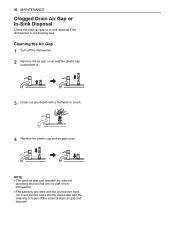
... repair of the external drain air gap and disposal. NOTE ••The drain air gap and disposal are external plumbing devices that are not part of the dishwasher. ••The warranty provided with the dishwasher does not cover service costs directly associated with a toothpick or brush. 4 Replace the plastic...
... repair of the external drain air gap and disposal. NOTE ••The drain air gap and disposal are external plumbing devices that are not part of the dishwasher. ••The warranty provided with the dishwasher does not cover service costs directly associated with a toothpick or brush. 4 Replace the plastic...

Additional Link - Owner s Manual
Page 47
instead, it may be placed in the dishwasher is also drawn into a liquid, it happens (what part of the cycle). NOTE ••Rinse aid is normal. Plastic cups and dishes may remain on the dishes and the tub. Once the dishwasher ...
instead, it may be placed in the dishwasher is also drawn into a liquid, it happens (what part of the cycle). NOTE ••Rinse aid is normal. Plastic cups and dishes may remain on the dishes and the tub. Once the dishwasher ...
Additional Link - Owner s Manual
Page 52
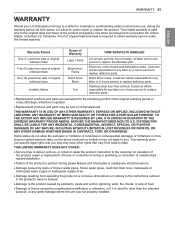
...of original retail purchase Ten (10) years from date of original retail purchase Limited Lifetime Scope of Warranty Labor / Parts Electronics / Racks Direct Drive Motor Tub HOW SERVICE IS HANDLED LG will also provide, free of charge, all labor and on how long an implied warranty lasts, so the above exclusion... or limitation may not apply to you may be responsible for any labor or in -home service to replace defective parts. Electronic control board and...
...of original retail purchase Ten (10) years from date of original retail purchase Limited Lifetime Scope of Warranty Labor / Parts Electronics / Racks Direct Drive Motor Tub HOW SERVICE IS HANDLED LG will also provide, free of charge, all labor and on how long an implied warranty lasts, so the above exclusion... or limitation may not apply to you may be responsible for any labor or in -home service to replace defective parts. Electronic control board and...

