Owners Manual - English
Page 1
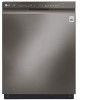
... Wash Variable Spray Intensities No. Design, features and specifications are approximate. HOME APPLIANCES LG DISHWASHERS LDF5545_ Front Control Dishwasher with Door Open Carton Dimensions (WxHxD) Clearances (WxHxD) Weight (Unit / Carton) LIMITED WARRANTY Limited Warranty UPC CODES LDF5545BD Black Stainless Steel LDF5545ST Stainless Steel LDF5545WW White LDF5545BB Black Stainless steel model shown 9 (Auto, Heavy, Delicate, Normal, Turbo, Download Cycle, Machine Clean, Rinse, Express) 8 (Dual Zone, Half Load, Energy Saver, High Temp, Extra Dry, Delay Start (up to 12 hrs), Control Lock...
... Wash Variable Spray Intensities No. Design, features and specifications are approximate. HOME APPLIANCES LG DISHWASHERS LDF5545_ Front Control Dishwasher with Door Open Carton Dimensions (WxHxD) Clearances (WxHxD) Weight (Unit / Carton) LIMITED WARRANTY Limited Warranty UPC CODES LDF5545BD Black Stainless Steel LDF5545ST Stainless Steel LDF5545WW White LDF5545BB Black Stainless steel model shown 9 (Auto, Heavy, Delicate, Normal, Turbo, Download Cycle, Machine Clean, Rinse, Express) 8 (Dual Zone, Half Load, Energy Saver, High Temp, Extra Dry, Delay Start (up to 12 hrs), Control Lock...
Additional Link - Owner s Manual
Page 3
... IMPORTANT SAFETY INSTRUCTIONS 9 PRODUCT OVERVIEW 9 Exterior Parts 10 Interior Parts 10 Accessories 11 INSTALLATION 11 Installation Parts and Tools 12 Installation Overview 12 Product Dimensions 12 Product Specifications 13 Preparing Cabinet Opening 14 Preparing Electrical Wiring 14 Preparing Water Supply Connection 15 Preparing Dishwasher 16 Sliding Dishwasher into Cabinet 17 Leveling the Appliance 18 Securing Dishwasher to Countertop 18 Connecting Drain Hose 20 Connecting Water Supply 20 Connecting Power 21 Final Check 22 OPERATION 22 Using the Appliance 23 Control Panel 24 Cycles 25 Options...
... IMPORTANT SAFETY INSTRUCTIONS 9 PRODUCT OVERVIEW 9 Exterior Parts 10 Interior Parts 10 Accessories 11 INSTALLATION 11 Installation Parts and Tools 12 Installation Overview 12 Product Dimensions 12 Product Specifications 13 Preparing Cabinet Opening 14 Preparing Electrical Wiring 14 Preparing Water Supply Connection 15 Preparing Dishwasher 16 Sliding Dishwasher into Cabinet 17 Leveling the Appliance 18 Securing Dishwasher to Countertop 18 Connecting Drain Hose 20 Connecting Water Supply 20 Connecting Power 21 Final Check 22 OPERATION 22 Using the Appliance 23 Control Panel 24 Cycles 25 Options...
Additional Link - Owner s Manual
Page 6
... heavy items on the power supply line. ••Do not use an extension cable or adapter with this or any circumstances, cut or remove the ground from the appliance, unplug it immediately, and contact an LG Electronics customer information center. ••Never unplug the appliance by pulling on the power supply line of installation. ••Use new hoses when connecting the appliance to the water supply.
... heavy items on the power supply line. ••Do not use an extension cable or adapter with this or any circumstances, cut or remove the ground from the appliance, unplug it immediately, and contact an LG Electronics customer information center. ••Never unplug the appliance by pulling on the power supply line of installation. ••Use new hoses when connecting the appliance to the water supply.
Additional Link - Owner s Manual
Page 7
... cleaning, do not operate this time. ••Fix the drain hose securely in place. ••Use only detergents or wetting agents recommended for several minutes. For safety reasons, the drain pump operates if the door is used for two weeks or more. Turn on the product directly. ••Do not press buttons with the appliance. Close supervision of water supply hose before using the appliance turn off the faucet. 6 SAFETY INSTRUCTIONS...
... cleaning, do not operate this time. ••Fix the drain hose securely in place. ••Use only detergents or wetting agents recommended for several minutes. For safety reasons, the drain pump operates if the door is used for two weeks or more. Turn on the product directly. ••Do not press buttons with the appliance. Close supervision of water supply hose before using the appliance turn off the faucet. 6 SAFETY INSTRUCTIONS...
Additional Link - Owner s Manual
Page 8
... removed from the power supply before cleaning to avoid the risk of electric shock. ••Before discarding the appliance, cut off the power supply line and destroy the appliance's control panel. TIP OVER HAZARD ••Do not use the dishwasher until completely installed. ••Do not push down on the open dishwasher door. ••Failure to follow these instructions may result in this Owner's Manual. GROUNDING INSTRUCTIONS...
... removed from the power supply before cleaning to avoid the risk of electric shock. ••Before discarding the appliance, cut off the power supply line and destroy the appliance's control panel. TIP OVER HAZARD ••Do not use the dishwasher until completely installed. ••Do not push down on the open dishwasher door. ••Failure to follow these instructions may result in this Owner's Manual. GROUNDING INSTRUCTIONS...
Additional Link - Owner s Manual
Page 11
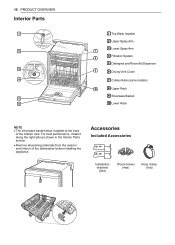
10 PRODUCT OVERVIEW Interior Parts 1 2 3 4 5 6 1 Top Wash Impeller 2 Upper Spray Arm 3 Lower Spray Arm 7 4 Filtration System 8 5 Detergent and Rinse Aid Dispenser 9 6 Drying Vent Cover 7 Cutlery Rack (some models) 10 8 Upper Rack 9 Silverware Basket 10 Lower Rack NOTE ••The silverware basket ships installed at the back of the dishwasher before installing the appliance. For best performance, install it along the right side as shown in the Interior Parts section. ••Remove all packing materials from the exterior and interior of the...
10 PRODUCT OVERVIEW Interior Parts 1 2 3 4 5 6 1 Top Wash Impeller 2 Upper Spray Arm 3 Lower Spray Arm 7 4 Filtration System 8 5 Detergent and Rinse Aid Dispenser 9 6 Drying Vent Cover 7 Cutlery Rack (some models) 10 8 Upper Rack 9 Silverware Basket 10 Lower Rack NOTE ••The silverware basket ships installed at the back of the dishwasher before installing the appliance. For best performance, install it along the right side as shown in the Interior Parts section. ••Remove all packing materials from the exterior and interior of the...
Additional Link - Owner s Manual
Page 15
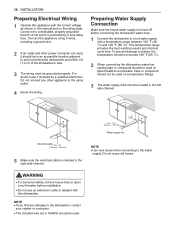
... water supply tube must be used on the rating plate. WARNING ••For personal safety, remove house fuse or open circuit breaker before connecting the dishwasher water lines. 1 Connect the dishwasher to a hot water supply with a temperature range between 120 °F (49 °C) and 149 °F (65 °C). 14 INSTALLATION Preparing Electrical Wiring 1 Operate this appliance with this manual and on pipe threads to avoid leaks. Preparing Water Supply Connection Make sure the house water supply...
... water supply tube must be used on the rating plate. WARNING ••For personal safety, remove house fuse or open circuit breaker before connecting the dishwasher water lines. 1 Connect the dishwasher to a hot water supply with a temperature range between 120 °F (49 °C) and 149 °F (65 °C). 14 INSTALLATION Preparing Electrical Wiring 1 Operate this appliance with this manual and on pipe threads to avoid leaks. Preparing Water Supply Connection Make sure the house water supply...
Additional Link - Owner s Manual
Page 17
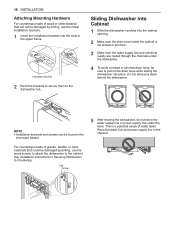
... cabinet. Cap Screw Sliding Dishwasher into Cabinet 1 Slide the dishwasher carefully into place. Do not allow any slack behind the dishwasher. NOTE ••Installation brackets and screws can be sure to Countertop. See installation instructions in the channel. Place the water line and power supply line in Securing Dishwasher to pull on the drain hose while sliding the dishwasher into the cabinet opening. 2 Make sure the drain hose inside the cabinet is a potential cause of water leaks...
... cabinet. Cap Screw Sliding Dishwasher into Cabinet 1 Slide the dishwasher carefully into place. Do not allow any slack behind the dishwasher. NOTE ••Installation brackets and screws can be sure to Countertop. See installation instructions in the channel. Place the water line and power supply line in Securing Dishwasher to pull on the drain hose while sliding the dishwasher into the cabinet opening. 2 Make sure the drain hose inside the cabinet is a potential cause of water leaks...
Additional Link - Owner s Manual
Page 23
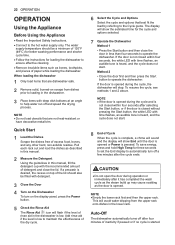
... Safety Instructions. ••Connect to operate the dishwasher. If a prewash is opened . NOTE ••Empty the lower rack first and then the upper rack. Quick Start 1 Load the Dishes Scrape the dishes free of the lid should be filled with time flashes, an audible tone is opened during operation or immediately after selecting the Start button, or if the door is low to automatically turn on the Dishwasher To turn off after the cycle ends...
... Safety Instructions. ••Connect to operate the dishwasher. If a prewash is opened . NOTE ••Empty the lower rack first and then the upper rack. Quick Start 1 Load the Dishes Scrape the dishes free of the lid should be filled with time flashes, an audible tone is opened during operation or immediately after selecting the Start button, or if the door is low to automatically turn on the Dishwasher To turn off after the cycle ends...
Additional Link - Owner s Manual
Page 24
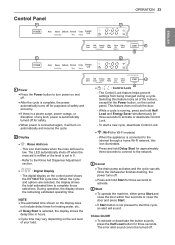
Control Panel 1 OPERATION 23 2 ENGLISH 4 3 1 2 1 Power ••Press the Power button to turn on the control panel shows the ESTIMATED cycle time. This feature does not lock the door. - When the appliance is connected to the Rinse Aid Dispenser Adjustment section. • • : Digital Display - Once the dishwasher finishes draining, the power turns off . Refer to the internet through a home Wi-Fi network, this feature locks all of any kind, power is automatically turned off when...
Control Panel 1 OPERATION 23 2 ENGLISH 4 3 1 2 1 Power ••Press the Power button to turn on the control panel shows the ESTIMATED cycle time. This feature does not lock the door. - When the appliance is connected to the Rinse Aid Dispenser Adjustment section. • • : Digital Display - Once the dishwasher finishes draining, the power turns off . Refer to the internet through a home Wi-Fi network, this feature locks all of any kind, power is automatically turned off when...
Additional Link - Owner s Manual
Page 25
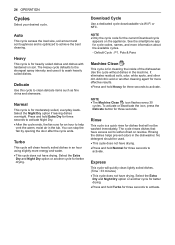
... icon, press the Delicate button for cleaning the inside of the dishwasher. The cycle rinses dishes that will not be used. ••This cycle does not have drying. Rinsing the dishes helps prevent odors in the machine. Delicate Use this cycle to wash heavily soiled dishes. Download Cycle Use a dedicated cycle downloadable via Wi-Fi or NFC. Rinse This cycle is for three seconds. Turbo This cycle will quickly clean lightly soiled dishes. (Time : 33 minutes) ••...
... icon, press the Delicate button for cleaning the inside of the dishwasher. The cycle rinses dishes that will not be used. ••This cycle does not have drying. Rinsing the dishes helps prevent odors in the machine. Delicate Use this cycle to wash heavily soiled dishes. Download Cycle Use a dedicated cycle downloadable via Wi-Fi or NFC. Rinse This cycle is for three seconds. Turbo This cycle will quickly clean lightly soiled dishes. (Time : 33 minutes) ••...
Additional Link - Owner s Manual
Page 36
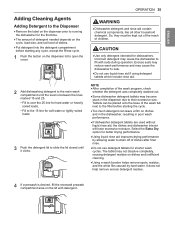
... Cleaning Agents Adding Detergent to the Dispenser ••Remove the label on the dispenser prior to running the dishwasher for the first time. ••The amount of detergent needed depends on the cycle, load size, and soil level of dishes after final rinse. ••Do not use liquid rinse aid if using detergent tablets which include rinse aid. Select the Extra Dry option for shorter wash cycles. Incorrect detergent may cause the dishwasher to fill with detergent. OPERATION...
... Cleaning Agents Adding Detergent to the Dispenser ••Remove the label on the dispenser prior to running the dishwasher for the first time. ••The amount of detergent needed depends on the cycle, load size, and soil level of dishes after final rinse. ••Do not use liquid rinse aid if using detergent tablets which include rinse aid. Select the Extra Dry option for shorter wash cycles. Incorrect detergent may cause the dishwasher to fill with detergent. OPERATION...
Additional Link - Owner s Manual
Page 39
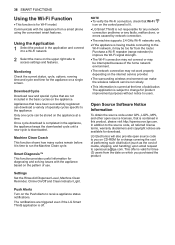
... extender) to the appliance. Download Cycle Download new and special cycles that is time to receive appliance status notifications. Appliances that Wi-Fi icon on the upper right side to [email protected]. Settings Set the Rinse Aid Dispenser Level, Machine Clean Reminder, Chime On/Off and Clean Indicator Light. LG Electronics will also provide open source licenses, that are not included in this product, please visit http://opensource.lge...
... extender) to the appliance. Download Cycle Download new and special cycles that is time to receive appliance status notifications. Appliances that Wi-Fi icon on the upper right side to [email protected]. Settings Set the Rinse Aid Dispenser Level, Machine Clean Reminder, Chime On/Off and Clean Indicator Light. LG Electronics will also provide open source licenses, that are not included in this product, please visit http://opensource.lge...
Additional Link - Owner s Manual
Page 42
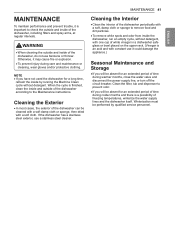
... inside the dishwasher, run an empty cycle, without detergent. Clean the filter, tub and dispenser to the Maintenance instructions. MAINTENANCE To maintain performance and prevent trouble, it may cause fire or explosion. ••To prevent injury during warmer months, close the water valve and disconnect the power supply line, or turn off the circuit breaker. Otherwise, it is an acid and with constant use a stainless steel cleaner. MAINTENANCE 41 Cleaning the Interior ••Clean...
... inside the dishwasher, run an empty cycle, without detergent. Clean the filter, tub and dispenser to the Maintenance instructions. MAINTENANCE To maintain performance and prevent trouble, it may cause fire or explosion. ••To prevent injury during warmer months, close the water valve and disconnect the power supply line, or turn off the circuit breaker. Otherwise, it is an acid and with constant use a stainless steel cleaner. MAINTENANCE 41 Cleaning the Interior ••Clean...
Additional Link - Owner s Manual
Page 46
... a wash? LG Dishwashers use less water than sheet off of the dishes at the end of the dishes inside to remain wet once the cycle finishes. If the water supply is purged from the dishes before starting a wash cycle, to ensure that cool water is hard, it may be necessary to run the hot water tap in the middle of water that has already been sheeted away from the hot water lines. Using a rinse aid will ensure your home's hot water...
... a wash? LG Dishwashers use less water than sheet off of the dishes at the end of the dishes inside to remain wet once the cycle finishes. If the water supply is purged from the dishes before starting a wash cycle, to ensure that cool water is hard, it may be necessary to run the hot water tap in the middle of water that has already been sheeted away from the hot water lines. Using a rinse aid will ensure your home's hot water...
Additional Link - Owner s Manual
Page 49
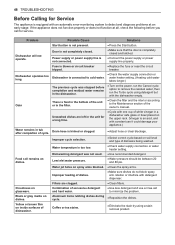
...;•Cycle with detergent dispenser. Fuse is not pressed. ••Press the Start button. Yellow or brown film on the power, run the Cancel cycle option to cold water. Problem Possible Cause Solutions Start button is blown or circuit breaker tripped. ••Replace the fuse or reset the circuit breaker. water heater setting. (Heating cold water takes longer.) The previous cycle was not used. ••Use recommended detergent. 48 TROUBLESHOOTING Before Calling for Service...
...;•Cycle with detergent dispenser. Fuse is not pressed. ••Press the Start button. Yellow or brown film on the power, run the Cancel cycle option to cold water. Problem Possible Cause Solutions Start button is blown or circuit breaker tripped. ••Replace the fuse or reset the circuit breaker. water heater setting. (Heating cold water takes longer.) The previous cycle was not used. ••Use recommended detergent. 48 TROUBLESHOOTING Before Calling for Service...
Additional Link - Owner s Manual
Page 50
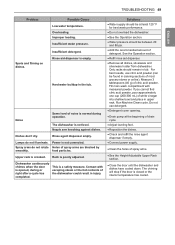
... the door is empty. Hard water buildup in upper rack. Dishes don't dry. Lamps do not rotate smoothly. Spray arms do not illuminate. Contact with measured powder. Insufficient water pressure. Rinse agent dispenser empty. Holes of citric acid powder. Fill main wash compartment with escaping steam or the hot contents of noise is normal during or right after a cycle has completed. Insufficient detergent. The dishwasher is not connected. TROUBLESHOOTING 49 ENGLISH Problem...
... the door is empty. Hard water buildup in upper rack. Dishes don't dry. Lamps do not rotate smoothly. Spray arms do not illuminate. Contact with measured powder. Insufficient water pressure. Rinse agent dispenser empty. Holes of citric acid powder. Fill main wash compartment with escaping steam or the hot contents of noise is normal during or right after a cycle has completed. Insufficient detergent. The dishwasher is not connected. TROUBLESHOOTING 49 ENGLISH Problem...
Additional Link - Owner s Manual
Page 51
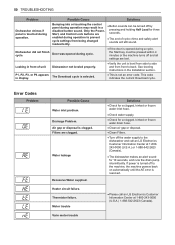
..., kinked or frozen water drain hose. ••Clean air gap or disposal. ••Clean Filters. ••Turn off by pressing and holding Half Load for 10 seconds, and runs the drain pump intermittently. Error Codes Problem Possible Cause Water inlet problem. Heater circuit failure. See leveling instructions in display. Water leakage Excessive Water supplied. Bumping into or touching the control panel during operation. Dishwasher did not finish cycle. Air gap or disposal is not an error code. 50 TROUBLESHOOTING Problem Possible Cause Solutions...
..., kinked or frozen water drain hose. ••Clean air gap or disposal. ••Clean Filters. ••Turn off by pressing and holding Half Load for 10 seconds, and runs the drain pump intermittently. Error Codes Problem Possible Cause Water inlet problem. Heater circuit failure. See leveling instructions in display. Water leakage Excessive Water supplied. Bumping into or touching the control panel during operation. Dishwasher did not finish cycle. Air gap or disposal is not an error code. 50 TROUBLESHOOTING Problem Possible Cause Solutions...
Additional Link - Owner s Manual
Page 53
... improper loading or over stacking: wash arm won't rotate or soap dispenser is held closed. ••Clean the filter regularly. ••Make certain that have been removed, altered, or cannot be readily determined. IE error Not draining because drain hose is kinked. OE error ••Check and turn on top of another. Model and serial numbers, along with original retail sales receipts, are required for warranty...
... improper loading or over stacking: wash arm won't rotate or soap dispenser is held closed. ••Clean the filter regularly. ••Make certain that have been removed, altered, or cannot be readily determined. IE error Not draining because drain hose is kinked. OE error ••Check and turn on top of another. Model and serial numbers, along with original retail sales receipts, are required for warranty...
Additional Link - Owner s Manual
Page 54
... leakage Door movement or closing compromised by improper installation. The cost of power supply line or electrical outlet problem. No power due to loose connection of repair or replacement under these excluded circumstances shall be charged for the installation. OE error Inlet valve and drain hose connection problem caused by incorrect leveling. Installation ••Clean the disposal or the air gap. ••Reinstall the hose. ••Adjust the lower front leveling legs to schedule service, contact LG Electronics...
... leakage Door movement or closing compromised by improper installation. The cost of power supply line or electrical outlet problem. No power due to loose connection of repair or replacement under these excluded circumstances shall be charged for the installation. OE error Inlet valve and drain hose connection problem caused by incorrect leveling. Installation ••Clean the disposal or the air gap. ••Reinstall the hose. ••Adjust the lower front leveling legs to schedule service, contact LG Electronics...


