Owners Manual - English
Page 1
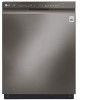
... respective owners. Non-metric weights and measurements are trademarks or registered trademarks of LG Corp. HOME APPLIANCES LG DISHWASHERS LDF5545_ Front Control Dishwasher with Door Open Carton Dimensions (WxHxD) Clearances (WxHxD) Weight (Unit / Carton) LIMITED WARRANTY Limited Warranty UPC CODES LDF5545BD Black Stainless Steel LDF5545ST Stainless Steel LDF5545WW White LDF5545BB Black Stainless steel model shown...
... respective owners. Non-metric weights and measurements are trademarks or registered trademarks of LG Corp. HOME APPLIANCES LG DISHWASHERS LDF5545_ Front Control Dishwasher with Door Open Carton Dimensions (WxHxD) Clearances (WxHxD) Weight (Unit / Carton) LIMITED WARRANTY Limited Warranty UPC CODES LDF5545BD Black Stainless Steel LDF5545ST Stainless Steel LDF5545WW White LDF5545BB Black Stainless steel model shown...

Additional Link - Owner s Manual
Page 1
... I T L 16.11.30 16.11.30 16.11.30 16.12.01 E PDF ILLUSTRATOR DR COMPLETED 16.05.16 MANUAL,OWNER'S DISHWASHER 1/1 LG Electronics Inc. No. MFL69261715 RELATED DWG. REVISION DESCRIPTION REF. Printing, text size and line are refer to work tables. 2. DATE PREPARED APPROVED... DUA315H* DUA315H* DUA414T* DUA513F* SUFFIX LANGUAGE PAGE REMARK A***EUS ENG / SPA 116 257 182 182 1 2 3 4 5 REV. WORK BRAND 15 LG MODEL LDT779#** LDP679#** LDP567#** LDT566#** LDF554#** P/NO. DWG. Material, printing and exterier size are based on the drawing is cutting line. 4. should comply ...
... I T L 16.11.30 16.11.30 16.11.30 16.12.01 E PDF ILLUSTRATOR DR COMPLETED 16.05.16 MANUAL,OWNER'S DISHWASHER 1/1 LG Electronics Inc. No. MFL69261715 RELATED DWG. REVISION DESCRIPTION REF. Printing, text size and line are refer to work tables. 2. DATE PREPARED APPROVED... DUA315H* DUA315H* DUA414T* DUA513F* SUFFIX LANGUAGE PAGE REMARK A***EUS ENG / SPA 116 257 182 182 1 2 3 4 5 REV. WORK BRAND 15 LG MODEL LDT779#** LDP679#** LDP567#** LDT566#** LDF554#** P/NO. DWG. Material, printing and exterier size are based on the drawing is cutting line. 4. should comply ...

Additional Link - Owner s Manual
Page 2
ENGLISH ESPAÑOL OWNER'S MANUAL DISHWASHER Read this owner's manual thoroughly before operating the appliance and keep it handy for reference at all times. LDT779#** LDP567#** LDF554#** LDP679#** LDT566#** MFL69261715 Rev.00_112816 www.lg.com
ENGLISH ESPAÑOL OWNER'S MANUAL DISHWASHER Read this owner's manual thoroughly before operating the appliance and keep it handy for reference at all times. LDT779#** LDP567#** LDF554#** LDP679#** LDT566#** MFL69261715 Rev.00_112816 www.lg.com
Additional Link - Owner s Manual
Page 3
...12 Product Specifications 13 Preparing Cabinet Opening 14 Preparing Electrical Wiring 14 Preparing Water Supply Connection 15 Preparing Dishwasher 16 Sliding Dishwasher into Cabinet 17 Leveling the Appliance 18 Securing Dishwasher to Countertop 18 Connecting Drain Hose 20 Connecting Water Supply 20 Connecting Power 21 Final Check 22 ...OPERATION 22 Using the Appliance 23 Control Panel 24 Cycles 25 Options 26 Cycle/Option Guide 27 Loading the Dishwasher 27 Loading the Lower Rack 29 Loading the Silverware Basket 30 Loading the Upper Rack 33 Loading the Cutlery Rack (On Some Models...
...12 Product Specifications 13 Preparing Cabinet Opening 14 Preparing Electrical Wiring 14 Preparing Water Supply Connection 15 Preparing Dishwasher 16 Sliding Dishwasher into Cabinet 17 Leveling the Appliance 18 Securing Dishwasher to Countertop 18 Connecting Drain Hose 20 Connecting Water Supply 20 Connecting Power 21 Final Check 22 ...OPERATION 22 Using the Appliance 23 Control Panel 24 Cycles 25 Options 26 Cycle/Option Guide 27 Loading the Dishwasher 27 Loading the Lower Rack 29 Loading the Silverware Basket 30 Loading the Upper Rack 33 Loading the Cutlery Rack (On Some Models...
Additional Link - Owner s Manual
Page 6
...all industry recommended safety procedures including the use of long sleeved gloves and safety glasses. ••The installer must ensure that the dishwasher is not intended for use by persons (including children) with rugs, bedspreads, or plastic sheets can become frayed or otherwise damaged. Children...hands. ••Do not modify or extend the power cable. ••If the product has been submerged, contact an LG Electronics customer information center for instructions before using the appliance and save these instructions. ••Use this appliance only for its ...
...all industry recommended safety procedures including the use of long sleeved gloves and safety glasses. ••The installer must ensure that the dishwasher is not intended for use by persons (including children) with rugs, bedspreads, or plastic sheets can become frayed or otherwise damaged. Children...hands. ••Do not modify or extend the power cable. ••If the product has been submerged, contact an LG Electronics customer information center for instructions before using the appliance and save these instructions. ••Use this appliance only for its ...
Additional Link - Owner s Manual
Page 7
...damaged outlet. ••Do not install or keep them out of the reach of children. ••Do not let children eat detergent or dishwasher rinse agent. ••When loading items to small children if removed from each for several minutes. Keep out of reach of the product. &#... not allow children to reduce the risk of cut-type injuries. ••Do not wash plastic items unless they are properly in a dishwasher and keep the dishwasher near children. ••Do not tamper with a sharp object such as rack clips and filter retaining posts can be a choke hazard...
...damaged outlet. ••Do not install or keep them out of the reach of children. ••Do not let children eat detergent or dishwasher rinse agent. ••When loading items to small children if removed from each for several minutes. Keep out of reach of the product. &#... not allow children to reduce the risk of cut-type injuries. ••Do not wash plastic items unless they are properly in a dishwasher and keep the dishwasher near children. ••Do not tamper with a sharp object such as rack clips and filter retaining posts can be a choke hazard...
Additional Link - Owner s Manual
Page 8
...is removed from the power supply before cleaning to avoid the risk of the appliance. GROUNDING INSTRUCTIONS ••For a permanently connected dishwasher: This appliance must be connected to avoid the danger of children or small animals getting trapped inside. ••Unplug the appliance ... power supply line. ••Disconnect this Owner's Manual. TIP OVER HAZARD ••Do not use the dishwasher until completely installed. ••Do not push down on the open dishwasher door. ••Failure to the green ground connector in serious injury or cuts.
...is removed from the power supply before cleaning to avoid the risk of the appliance. GROUNDING INSTRUCTIONS ••For a permanently connected dishwasher: This appliance must be connected to avoid the danger of children or small animals getting trapped inside. ••Unplug the appliance ... power supply line. ••Disconnect this Owner's Manual. TIP OVER HAZARD ••Do not use the dishwasher until completely installed. ••Do not push down on the open dishwasher door. ••Failure to the green ground connector in serious injury or cuts.

Additional Link - Owner s Manual
Page 9
... product, follow basic precautions, including the following: INSTALLATION ••Install the product on a firm and level floor. ••This dishwasher must be left for an extended period of time, such as during vacations. ••Do not store or spill liquid detergents, cleaners...should not exceed 149°F (65 °C) to prevent damage to dishes. ••Do not put the drain hose under the dishwasher during installation. This temperature range provides the best washing results and shortest cycle time. OPERATION ••Do not place objects on the ...
... product, follow basic precautions, including the following: INSTALLATION ••Install the product on a firm and level floor. ••This dishwasher must be left for an extended period of time, such as during vacations. ••Do not store or spill liquid detergents, cleaners...should not exceed 149°F (65 °C) to prevent damage to dishes. ••Do not put the drain hose under the dishwasher during installation. This temperature range provides the best washing results and shortest cycle time. OPERATION ••Do not place objects on the ...
Additional Link - Owner s Manual
Page 10
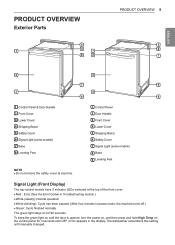
... Codes in Troubleshooting section.) ••White (steady): Normal operation ••White (blinking): Cycle has been paused. (After four minutes in the display. The dishwasher remembers this setting until OFF or On appears in pause mode, the machine turns off.) ••Green: Cycle finished normally. Signal Light (Front Display...
... Codes in Troubleshooting section.) ••White (steady): Normal operation ••White (blinking): Cycle has been paused. (After four minutes in the display. The dishwasher remembers this setting until OFF or On appears in pause mode, the machine turns off.) ••Green: Cycle finished normally. Signal Light (Front Display...
Additional Link - Owner s Manual
Page 11
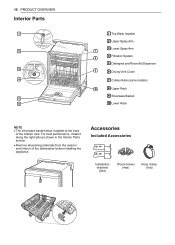
... 7 Cutlery Rack (some models) 10 8 Upper Rack 9 Silverware Basket 10 Lower Rack NOTE ••The silverware basket ships installed at the back of the dishwasher before installing the appliance. Accessories Included Accessories Installation brackets (2ea) Wood screws (4ea) Hose clamp (1ea) 23
... 7 Cutlery Rack (some models) 10 8 Upper Rack 9 Silverware Basket 10 Lower Rack NOTE ••The silverware basket ships installed at the back of the dishwasher before installing the appliance. Accessories Included Accessories Installation brackets (2ea) Wood screws (4ea) Hose clamp (1ea) 23
Additional Link - Owner s Manual
Page 13
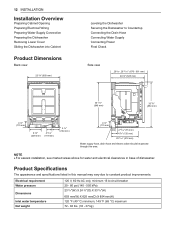
... INSTALLATION Installation Overview Preparing Cabinet Opening Preparing Electrical Wiring Preparing Water Supply Connection Preparing the Dishwasher Removing Lower Cover Sliding the Dishwasher into Cabinet Product Dimensions Back view 23 3/4" (603 mm) Leveling the Dishwasher Securing the Dishwasher to Countertop Connecting the Drain Hose Connecting Water Supply Connecting Power Final Check Side view 26 5/8 - 26...
... INSTALLATION Installation Overview Preparing Cabinet Opening Preparing Electrical Wiring Preparing Water Supply Connection Preparing the Dishwasher Removing Lower Cover Sliding the Dishwasher into Cabinet Product Dimensions Back view 23 3/4" (603 mm) Leveling the Dishwasher Securing the Dishwasher to Countertop Connecting the Drain Hose Connecting Water Supply Connecting Power Final Check Side view 26 5/8 - 26...
Additional Link - Owner s Manual
Page 14
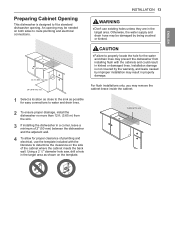
...the cabinets and could result in property damage. Installation damage is designed to fit a standard dishwasher opening may be damaged by improper installation may prevent the dishwasher from the sink. 3 If installing the dishwasher in the target area. An opening . Cabinet brace 9 4 Using a 2 1/2" diameter ... to route plumbing and electrical connections. For flush installations only, you may be needed on the template. ENGLISH Preparing Cabinet Opening This dishwasher is not covered by the warranty, and leaks caused by being crushed or kinked. 24" (610 mm) min. 33 1/2" (...
...the cabinets and could result in property damage. Installation damage is designed to fit a standard dishwasher opening may be damaged by improper installation may prevent the dishwasher from the sink. 3 If installing the dishwasher in the target area. An opening . Cabinet brace 9 4 Using a 2 1/2" diameter ... to route plumbing and electrical connections. For flush installations only, you may be needed on the template. ENGLISH Preparing Cabinet Opening This dishwasher is not covered by the warranty, and leaks caused by being crushed or kinked. 24" (610 mm) min. 33 1/2" (...
Additional Link - Owner s Manual
Page 15
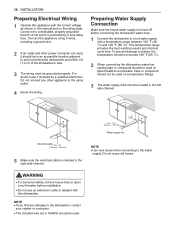
...4 Route the wiring. NOTE ••Use new hoses when connecting to the water supply. Do not connect any damage to the dishwasher, contact your retailer or contractor. ••The included wire nut in 16AWG should be grounded properly. Do not reuse old hoses.... cycle time. WARNING ••For personal safety, remove house fuse or open circuit breaker before connecting the dishwasher water lines. 1 Connect the dishwasher to a hot water supply with this dishwasher. To prevent damage to dishes, the temperature should not exceed 149 °F (65 °C). 2 When...
...4 Route the wiring. NOTE ••Use new hoses when connecting to the water supply. Do not connect any damage to the dishwasher, contact your retailer or contractor. ••The included wire nut in 16AWG should be grounded properly. Do not reuse old hoses.... cycle time. WARNING ••For personal safety, remove house fuse or open circuit breaker before connecting the dishwasher water lines. 1 Connect the dishwasher to a hot water supply with this dishwasher. To prevent damage to dishes, the temperature should not exceed 149 °F (65 °C). 2 When...

Additional Link - Owner s Manual
Page 16
... laid on its back, take care not to damage the drain hose. NOTE ••Do not push the door of the tub to the dishwasher. 2 Remove the lower cover from the base. 3 Remove the insulation pad from behind the access panel. NOTE ••Make sure that the lower cover... replaces in the last step. Preparing Dishwasher Removable Rear Plastic Shipping Brace The rear shipping brace can damage the door and hinges. CAUTION ••If at any time the...
... laid on its back, take care not to damage the drain hose. NOTE ••Do not push the door of the tub to the dishwasher. 2 Remove the lower cover from the base. 3 Remove the insulation pad from behind the access panel. NOTE ••Make sure that the lower cover... replaces in the last step. Preparing Dishwasher Removable Rear Plastic Shipping Brace The rear shipping brace can damage the door and hinges. CAUTION ••If at any time the...
Additional Link - Owner s Manual
Page 17
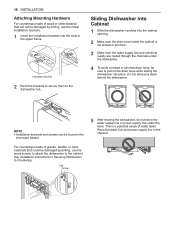
...power supply line under the base. NOTE ••Installation brackets and screws can be sure to pull on the drain hose while sliding the dishwasher into the cabinet opening. 2 Make sure the drain hose inside the cabinet is a potential cause of granite, marble, or other material that... could be damaged by drilling, use the wood screws to attach the dishwasher to the dishwasher tub. Do not allow any slack behind the dishwasher. For countertops made of wood or other materials that will not be damaged by drilling, use the metal ...
...power supply line under the base. NOTE ••Installation brackets and screws can be sure to pull on the drain hose while sliding the dishwasher into the cabinet opening. 2 Make sure the drain hose inside the cabinet is a potential cause of granite, marble, or other material that... could be damaged by drilling, use the wood screws to attach the dishwasher to the dishwasher tub. Do not allow any slack behind the dishwasher. For countertops made of wood or other materials that will not be damaged by drilling, use the metal ...

Additional Link - Owner s Manual
Page 18
...level is not correctly leveled. Water level should be correctly leveled. The water level should be near the center of both tub lower indentations, the dishwasher may leak during operation if it is not near the center of tub from side to lower it . Adjusting the Rear Legs ••...level on front side of the tub and counter-clockwise to lower it . ••The adjustments work identically for both front legs. The dishwasher may not be checked after the initial fill on the Normal cycle. ENGLISH Leveling the Appliance Check that the gap between the door and the...
...level is not correctly leveled. Water level should be correctly leveled. The water level should be near the center of both tub lower indentations, the dishwasher may leak during operation if it is not near the center of tub from side to lower it . Adjusting the Rear Legs ••...level on front side of the tub and counter-clockwise to lower it . ••The adjustments work identically for both front legs. The dishwasher may not be checked after the initial fill on the Normal cycle. ENGLISH Leveling the Appliance Check that the gap between the door and the...

Additional Link - Owner s Manual
Page 19
... the two hose ends. The two typical connections are shown. length hose and a coupler for more information on attaching installation brackets to dishwasher. For countertops made of wood or other materials that will not be damaged by drilling, use Method 2. If the end of the ...2 1 Remove the plastic caps from falling down into the cabinet frame. 3 Reinstall the plastic caps. These may be obtained from other devices to the dishwasher drain hose. ••If an extension drain hose is required, use 5/8" or 7/8" inside diameter, 2-3 ft. Cap Screw For disposal or waste...
... the two hose ends. The two typical connections are shown. length hose and a coupler for more information on attaching installation brackets to dishwasher. For countertops made of wood or other materials that will not be damaged by drilling, use Method 2. If the end of the ...2 1 Remove the plastic caps from falling down into the cabinet frame. 3 Reinstall the plastic caps. These may be obtained from other devices to the dishwasher drain hose. ••If an extension drain hose is required, use 5/8" or 7/8" inside diameter, 2-3 ft. Cap Screw For disposal or waste...

Additional Link - Owner s Manual
Page 20
NOTE ••If the knockout plug has not been removed, the dishwasher will not be at least 12" (305 mm) and within 40" (1016 mm) from the tub. INSTALLATION 19 Connecting to Disposal or Waste Tee with ...
NOTE ••If the knockout plug has not been removed, the dishwasher will not be at least 12" (305 mm) and within 40" (1016 mm) from the tub. INSTALLATION 19 Connecting to Disposal or Waste Tee with ...

Additional Link - Owner s Manual
Page 21
...;•Verify that all wires are unsure of the back wall. Make sure the water line is not kinked and the water supply for the dishwasher has been turned on before installation if the electrical conduit pipe is longer than 3" (76 mm) and is on the display. Connecting Power Valve Water... supply line NOTE ••During the final installation check of the dishwasher, an IE error code may appear on the right side of the power supply, have it checked by a licensed electrician.
...;•Verify that all wires are unsure of the back wall. Make sure the water line is not kinked and the water supply for the dishwasher has been turned on before installation if the electrical conduit pipe is longer than 3" (76 mm) and is on the display. Connecting Power Valve Water... supply line NOTE ••During the final installation check of the dishwasher, an IE error code may appear on the right side of the power supply, have it checked by a licensed electrician.

Additional Link - Owner s Manual
Page 22
Do not install cabinet baseboard as it may cause noise and leakage. This helps avoid kinking the hoses or trapping them beneath the dishwasher. Lower cover Cabinet baseboard INSTALLATION 21 Error Code OE Error IE Error Possible Cause and Solution Drain hose kinked or pinched. House ...Feed the drainage and supply hoses through the hole under the sink. This helps avoid kinking the hoses or trapping them beneath the dishwasher. Then gradually slide the dishwasher into the cabinet while pulling on a Turbo cycle to disposal. Turn water on waste tee. If necessary, level the...
Do not install cabinet baseboard as it may cause noise and leakage. This helps avoid kinking the hoses or trapping them beneath the dishwasher. Lower cover Cabinet baseboard INSTALLATION 21 Error Code OE Error IE Error Possible Cause and Solution Drain hose kinked or pinched. House ...Feed the drainage and supply hoses through the hole under the sink. This helps avoid kinking the hoses or trapping them beneath the dishwasher. Then gradually slide the dishwasher into the cabinet while pulling on a Turbo cycle to disposal. Turn water on waste tee. If necessary, level the...


