Owners Manual - English
Page 1
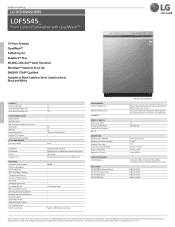
...3 (Top, Upper, Lower) Beeper + END Indication on Stainless Steel Door Liner or Tub 048231022224 048231015097 048231015073 048231015080 © 2017 LG Electronics USA, Inc. Some features may vary by product and are subject to 12 hrs), Control Lock, Night Dry) • ... No. HOME APPLIANCES LG DISHWASHERS LDF5545_ Front Control Dishwasher with Door Open Carton Dimensions (WxHxD) Clearances (WxHxD) Weight (Unit / Carton) LIMITED WARRANTY Limited Warranty UPC CODES LDF5545BD Black Stainless Steel LDF5545ST Stainless Steel LDF5545WW White LDF5545BB Black Stainless steel model shown 9 (Auto,...
...3 (Top, Upper, Lower) Beeper + END Indication on Stainless Steel Door Liner or Tub 048231022224 048231015097 048231015073 048231015080 © 2017 LG Electronics USA, Inc. Some features may vary by product and are subject to 12 hrs), Control Lock, Night Dry) • ... No. HOME APPLIANCES LG DISHWASHERS LDF5545_ Front Control Dishwasher with Door Open Carton Dimensions (WxHxD) Clearances (WxHxD) Weight (Unit / Carton) LIMITED WARRANTY Limited Warranty UPC CODES LDF5545BD Black Stainless Steel LDF5545ST Stainless Steel LDF5545WW White LDF5545BB Black Stainless steel model shown 9 (Auto,...

Additional Link - Owner s Manual
Page 1
... CHECKED APPROVED I T L 16.11.30 16.11.30 16.11.30 16.12.01 E PDF ILLUSTRATOR DR COMPLETED 16.05.16 MANUAL,OWNER'S DISHWASHER 1/1 LG Electronics Inc. WORK BRAND 15 LG MODEL LDT779#** LDP679#** LDP567#** LDT566#** LDF554#** P/NO. DATE PREPARED APPROVED 1. NO. NO. Printing, text size and line are refer to work tables. 2. REVISION...
... CHECKED APPROVED I T L 16.11.30 16.11.30 16.11.30 16.12.01 E PDF ILLUSTRATOR DR COMPLETED 16.05.16 MANUAL,OWNER'S DISHWASHER 1/1 LG Electronics Inc. WORK BRAND 15 LG MODEL LDT779#** LDP679#** LDP567#** LDT566#** LDF554#** P/NO. DATE PREPARED APPROVED 1. NO. NO. Printing, text size and line are refer to work tables. 2. REVISION...
Additional Link - Owner s Manual
Page 3
...12 Product Specifications 13 Preparing Cabinet Opening 14 Preparing Electrical Wiring 14 Preparing Water Supply Connection 15 Preparing Dishwasher 16 Sliding Dishwasher into Cabinet 17 Leveling the Appliance 18 Securing Dishwasher to Countertop 18 Connecting Drain Hose 20 Connecting Water Supply 20 Connecting Power 21 Final Check 22 ...Loading the Lower Rack 29 Loading the Silverware Basket 30 Loading the Upper Rack 33 Loading the Cutlery Rack (On Some Models) 35 Adding Cleaning Agents 37 SMART FUNCTIONS 37 Application Installation 37 Product Registration 37 Using the Tag On Function 38 Using...
...12 Product Specifications 13 Preparing Cabinet Opening 14 Preparing Electrical Wiring 14 Preparing Water Supply Connection 15 Preparing Dishwasher 16 Sliding Dishwasher into Cabinet 17 Leveling the Appliance 18 Securing Dishwasher to Countertop 18 Connecting Drain Hose 20 Connecting Water Supply 20 Connecting Power 21 Final Check 22 ...Loading the Lower Rack 29 Loading the Silverware Basket 30 Loading the Upper Rack 33 Loading the Cutlery Rack (On Some Models) 35 Adding Cleaning Agents 37 SMART FUNCTIONS 37 Application Installation 37 Product Registration 37 Using the Tag On Function 38 Using...
Additional Link - Owner s Manual
Page 10
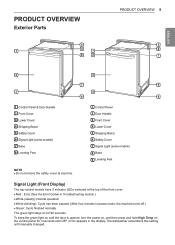
...seconds. To keep the green light on until manually changed. Signal Light (Front Display) The top-control models have 3 indicator LEDs centered at any time. The dishwasher remembers this setting until the door is opened, turn the power on, and then press and hold ... Parts 4 1 5 1 6 2 PRODUCT OVERVIEW 9 5 6 7 2 3 7 8 3 4 8 9 1 Control Panel & Door Handle 2 Front Cover 3 Lower Cover 4 Shipping Brace 5 Safety Cover 6 Signal Light (some models) 7 Base 8 Leveling Feet 1 Control Panel 2 Door Handle 3 Front Cover 4 Lower Cover 5 Shipping Brace 6 Safety Cover 7 Signal Light (some...
...seconds. To keep the green light on until manually changed. Signal Light (Front Display) The top-control models have 3 indicator LEDs centered at any time. The dishwasher remembers this setting until the door is opened, turn the power on, and then press and hold ... Parts 4 1 5 1 6 2 PRODUCT OVERVIEW 9 5 6 7 2 3 7 8 3 4 8 9 1 Control Panel & Door Handle 2 Front Cover 3 Lower Cover 4 Shipping Brace 5 Safety Cover 6 Signal Light (some models) 7 Base 8 Leveling Feet 1 Control Panel 2 Door Handle 3 Front Cover 4 Lower Cover 5 Shipping Brace 6 Safety Cover 7 Signal Light (some...
Additional Link - Owner s Manual
Page 11
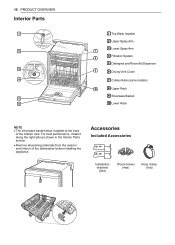
... OVERVIEW Interior Parts 1 2 3 4 5 6 1 Top Wash Impeller 2 Upper Spray Arm 3 Lower Spray Arm 7 4 Filtration System 8 5 Detergent and Rinse Aid Dispenser 9 6 Drying Vent Cover 7 Cutlery Rack (some models) 10 8 Upper Rack 9 Silverware Basket 10 Lower Rack NOTE ••The silverware basket ships installed at the back of the...
... OVERVIEW Interior Parts 1 2 3 4 5 6 1 Top Wash Impeller 2 Upper Spray Arm 3 Lower Spray Arm 7 4 Filtration System 8 5 Detergent and Rinse Aid Dispenser 9 6 Drying Vent Cover 7 Cutlery Rack (some models) 10 8 Upper Rack 9 Silverware Basket 10 Lower Rack NOTE ••The silverware basket ships installed at the back of the...
Additional Link - Owner s Manual
Page 24
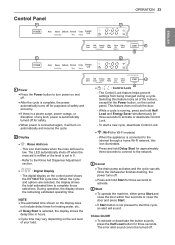
...your load. 4 •• , 3 : Control Lock - Refer to complete those selections. This feature does not lock the door. - Once the dishwasher finishes draining, the power turns off . Selecting this icon illuminates. - Chime On/Off ••To activate or deactivate the button sounds, press the... Half Load button for Wi-Fi models) - When the appliance is not pressed to start a new cycle, deactivate Control Lock. •• : Wi-Fi (for three seconds. ...
...your load. 4 •• , 3 : Control Lock - Refer to complete those selections. This feature does not lock the door. - Once the dishwasher finishes draining, the power turns off . Selecting this icon illuminates. - Chime On/Off ••To activate or deactivate the button sounds, press the... Half Load button for Wi-Fi models) - When the appliance is not pressed to start a new cycle, deactivate Control Lock. •• : Wi-Fi (for three seconds. ...
Additional Link - Owner s Manual
Page 31
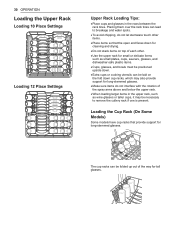
... 12 Place Settings Upper Rack Loading Tips: ••Place cups and glasses in the upper rack, such as small plates, cups, saucers, glasses, and dishwasher-safe plastic items. ••Cups, glasses, and bowls must be positioned upside down. ••Extra cups or cooking utensils can be laid on... the rack tines. The cup racks can be necessary to remove the cutlery rack if one is present. Loading the Cup Rack (On Some Models) Some models have cup racks that the open end faces down for cleaning and drying. ••Do not stack items on the fold down cup racks...
... 12 Place Settings Upper Rack Loading Tips: ••Place cups and glasses in the upper rack, such as small plates, cups, saucers, glasses, and dishwasher-safe plastic items. ••Cups, glasses, and bowls must be positioned upside down. ••Extra cups or cooking utensils can be laid on... the rack tines. The cup racks can be necessary to remove the cutlery rack if one is present. Loading the Cup Rack (On Some Models) Some models have cup racks that the open end faces down for cleaning and drying. ••Do not stack items on the fold down cup racks...
Additional Link - Owner s Manual
Page 34
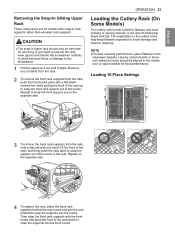
...rack, and firmly push the rack back to snap the support out of the rack up to the dishwasher. 1 Pull the upper rack out until it stops. Repeat on the cutlery racks help keep flatware ...the rack forward to avoid damage and improve cleaning. OPERATION 33 Loading the Cutlery Rack (On Some Models) The cutlery rack is best suited for best performance. Heavily soiled utensils or items with baked on ...with snap-in the rear. CAUTION ••The snap-in upper rack should be removed for models with the front hooks and push the front of the hooks. It can also fit small prep bowls...
...rack, and firmly push the rack back to snap the support out of the rack up to the dishwasher. 1 Pull the upper rack out until it stops. Repeat on the cutlery racks help keep flatware ...the rack forward to avoid damage and improve cleaning. OPERATION 33 Loading the Cutlery Rack (On Some Models) The cutlery rack is best suited for best performance. Heavily soiled utensils or items with baked on ...with snap-in the rear. CAUTION ••The snap-in upper rack should be removed for models with the front hooks and push the front of the hooks. It can also fit small prep bowls...

Additional Link - Owner s Manual
Page 38
... diagnosing and solving issues with the appliance based on the pattern of use. Appliances that are not included in the LG Smart ThinQ application for NFC model. Using the Tag On Function ••This function is completed in this appliance requires a smart phone which has... at a time. Product Registration 1 Run the LG Smart ThinQ application on a smart phone. 2 Create an account and sign in. 3 Select Register. 4 Select Dishwasher. 5 Follow...
... diagnosing and solving issues with the appliance based on the pattern of use. Appliances that are not included in the LG Smart ThinQ application for NFC model. Using the Tag On Function ••This function is completed in this appliance requires a smart phone which has... at a time. Product Registration 1 Run the LG Smart ThinQ application on a smart phone. 2 Create an account and sign in. 3 Select Register. 4 Select Dishwasher. 5 Follow...


