Owners Manual - English
Page 1
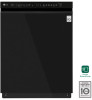
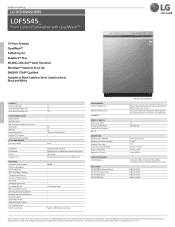
... respective owners. Design, features and specifications are approximate. HOME APPLIANCES LG DISHWASHERS LDF5545_ Front Control Dishwasher with Door Open Carton Dimensions (WxHxD) Clearances (WxHxD) Weight (Unit / Carton) LIMITED WARRANTY Limited Warranty UPC CODES LDF5545BD Black Stainless Steel LDF5545ST Stainless Steel LDF5545WW White LDF5545BB Black Stainless steel model shown 9 (Auto, Heavy, Delicate, Normal, Turbo, Download Cycle, Machine Clean, Rinse, Express) 8 (Dual Zone, Half Load, Energy Saver, High Temp, Extra Dry, Delay Start (up to 12 hrs), Control Lock, Night Dry) •...
... respective owners. Design, features and specifications are approximate. HOME APPLIANCES LG DISHWASHERS LDF5545_ Front Control Dishwasher with Door Open Carton Dimensions (WxHxD) Clearances (WxHxD) Weight (Unit / Carton) LIMITED WARRANTY Limited Warranty UPC CODES LDF5545BD Black Stainless Steel LDF5545ST Stainless Steel LDF5545WW White LDF5545BB Black Stainless steel model shown 9 (Auto, Heavy, Delicate, Normal, Turbo, Download Cycle, Machine Clean, Rinse, Express) 8 (Dual Zone, Half Load, Energy Saver, High Temp, Extra Dry, Delay Start (up to 12 hrs), Control Lock, Night Dry) •...
Additional Link - Owner s Manual
Page 3
... IMPORTANT SAFETY INSTRUCTIONS 9 PRODUCT OVERVIEW 9 Exterior Parts 10 Interior Parts 10 Accessories 11 INSTALLATION 11 Installation Parts and Tools 12 Installation Overview 12 Product Dimensions 12 Product Specifications 13 Preparing Cabinet Opening 14 Preparing Electrical Wiring 14 Preparing Water Supply Connection 15 Preparing Dishwasher 16 Sliding Dishwasher into Cabinet 17 Leveling the Appliance 18 Securing Dishwasher to Countertop 18 Connecting Drain Hose 20 Connecting Water Supply 20 Connecting Power 21 Final Check 22 OPERATION 22 Using the Appliance 23 Control Panel 24 Cycles 25 Options...
... IMPORTANT SAFETY INSTRUCTIONS 9 PRODUCT OVERVIEW 9 Exterior Parts 10 Interior Parts 10 Accessories 11 INSTALLATION 11 Installation Parts and Tools 12 Installation Overview 12 Product Dimensions 12 Product Specifications 13 Preparing Cabinet Opening 14 Preparing Electrical Wiring 14 Preparing Water Supply Connection 15 Preparing Dishwasher 16 Sliding Dishwasher into Cabinet 17 Leveling the Appliance 18 Securing Dishwasher to Countertop 18 Connecting Drain Hose 20 Connecting Water Supply 20 Connecting Power 21 Final Check 22 OPERATION 22 Using the Appliance 23 Control Panel 24 Cycles 25 Options...
Additional Link - Owner s Manual
Page 6
... installing, check the hose connection for leaks. ••Do not damage or place heavy items on the door of the appliance. ••Read all power supply lines that have been given supervision or instruction concerning the use of the appliance by a person responsible for their safety. ••If the electrical supply line is unpacked. ENGLISH SAFETY INSTRUCTIONS 5 ••Store and install...
... installing, check the hose connection for leaks. ••Do not damage or place heavy items on the door of the appliance. ••Read all power supply lines that have been given supervision or instruction concerning the use of the appliance by a person responsible for their safety. ••If the electrical supply line is unpacked. ENGLISH SAFETY INSTRUCTIONS 5 ••Store and install...
Additional Link - Owner s Manual
Page 7
...;When cleaning, do not spray water on the product directly. ••Do not press buttons with a sharp object such as rack clips and filter retaining posts can be a choke hazard to small children if removed from each for use an open the door while operating. As the gas is opened, resulting in a longer cycle time. ••Be careful not to reduce the risk of a gas leak...
...;When cleaning, do not spray water on the product directly. ••Do not press buttons with a sharp object such as rack clips and filter retaining posts can be a choke hazard to small children if removed from each for use an open the door while operating. As the gas is opened, resulting in a longer cycle time. ••Be careful not to reduce the risk of a gas leak...
Additional Link - Owner s Manual
Page 8
... user maintenance. SAVE THESE INSTRUCTIONS ENGLISH SAFETY INSTRUCTIONS 7 MAINTENANCE ••Do not repair or replace any part of electric shock. ••Before discarding the appliance, cut off the power supply line and destroy the appliance's control panel. All repairs and servicing must be performed by yourself. ••Remove any dust or foreign matter from the power supply line. ••Disconnect this appliance from the power supply. ••Remove the door...
... user maintenance. SAVE THESE INSTRUCTIONS ENGLISH SAFETY INSTRUCTIONS 7 MAINTENANCE ••Do not repair or replace any part of electric shock. ••Before discarding the appliance, cut off the power supply line and destroy the appliance's control panel. All repairs and servicing must be performed by yourself. ••Remove any dust or foreign matter from the power supply line. ••Disconnect this appliance from the power supply. ••Remove the door...
Additional Link - Owner s Manual
Page 11
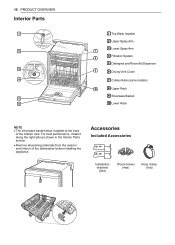
... Accessories Installation brackets (2ea) Wood screws (4ea) Hose clamp (1ea) 23 10 PRODUCT OVERVIEW Interior Parts 1 2 3 4 5 6 1 Top Wash Impeller 2 Upper Spray Arm 3 Lower Spray Arm 7 4 Filtration System 8 5 Detergent and Rinse Aid Dispenser 9 6 Drying Vent Cover 7 Cutlery Rack (some models) 10 8 Upper Rack 9 Silverware Basket 10 Lower Rack NOTE ••The silverware basket ships installed at the back of the dishwasher before installing the appliance. For best performance, install it along the right side as shown in the Interior Parts section. ••Remove...
... Accessories Installation brackets (2ea) Wood screws (4ea) Hose clamp (1ea) 23 10 PRODUCT OVERVIEW Interior Parts 1 2 3 4 5 6 1 Top Wash Impeller 2 Upper Spray Arm 3 Lower Spray Arm 7 4 Filtration System 8 5 Detergent and Rinse Aid Dispenser 9 6 Drying Vent Cover 7 Cutlery Rack (some models) 10 8 Upper Rack 9 Silverware Basket 10 Lower Rack NOTE ••The silverware basket ships installed at the back of the dishwasher before installing the appliance. For best performance, install it along the right side as shown in the Interior Parts section. ••Remove...
Additional Link - Owner s Manual
Page 15
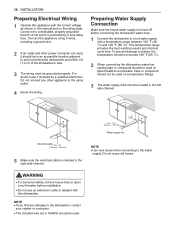
... within 4 ft (1.2 m) of the dishwasher's side. 3 The wiring must be located in the left side channel. 6 1/2" - 7 3/4" (165 mm - 197 mm) Water supply line Electrical cable 41/2" - 6" (115 mm - 152 mm) 5 Make sure the electrical cable is turned off before installation. ••Do not use an extension cable or adapter with this dishwasher. NOTE ••Use new hoses when connecting to a hot water supply with a temperature range between 120...
... within 4 ft (1.2 m) of the dishwasher's side. 3 The wiring must be located in the left side channel. 6 1/2" - 7 3/4" (165 mm - 197 mm) Water supply line Electrical cable 41/2" - 6" (115 mm - 152 mm) 5 Make sure the electrical cable is turned off before installation. ••Do not use an extension cable or adapter with this dishwasher. NOTE ••Use new hoses when connecting to a hot water supply with a temperature range between 120...
Additional Link - Owner s Manual
Page 17
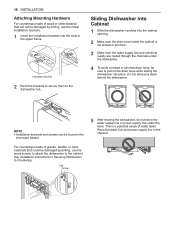
... the water line and power supply line in Securing Dishwasher to Countertop. Cap Screw This is not kinked or pinched. 3 Make sure the water supply line and electrical supply are routed through the channels under the base. Do not allow any slack behind the dishwasher. See installation instructions in the channel. Sliding Dishwasher into Cabinet 1 Slide the dishwasher carefully into the cabinet opening. 2 Make sure the drain hose inside the cabinet is a potential cause of water leaks...
... the water line and power supply line in Securing Dishwasher to Countertop. Cap Screw This is not kinked or pinched. 3 Make sure the water supply line and electrical supply are routed through the channels under the base. Do not allow any slack behind the dishwasher. See installation instructions in the channel. Sliding Dishwasher into Cabinet 1 Slide the dishwasher carefully into the cabinet opening. 2 Make sure the drain hose inside the cabinet is a potential cause of water leaks...
Additional Link - Owner s Manual
Page 23
..., non-soluble residue. Add rinse aid if the level is started. NOTE ••Empty the lower rack first and then the upper rack. CAUTION ••Do not open the door during the cycle, the dishwasher will flash if the level of 120°F (49°C) for better washing performance and shorter cycle time. ••Follow the instructions for three seconds to set the End display to the hot water supply only.
..., non-soluble residue. Add rinse aid if the level is started. NOTE ••Empty the lower rack first and then the upper rack. CAUTION ••Do not open the door during the cycle, the dishwasher will flash if the level of 120°F (49°C) for better washing performance and shorter cycle time. ••Follow the instructions for three seconds to set the End display to the hot water supply only.
Additional Link - Owner s Manual
Page 24
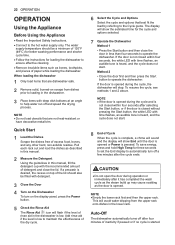
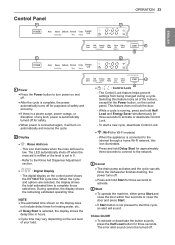
... models) - Control Panel 1 OPERATION 23 2 ENGLISH 4 3 1 2 1 Power ••Press the Power button to turn on automatically and resume the cycle. 2 Display •• : Rinse Aid Icon - Refer to complete those selections. Once the dishwasher finishes draining, the power turns off. ••Press and hold Delay Start for heating water, etc. ••If Delay Start is connected again, it will sound. This feature does not lock the door. - To start the cycle, an alert will turn power...
... models) - Control Panel 1 OPERATION 23 2 ENGLISH 4 3 1 2 1 Power ••Press the Power button to turn on automatically and resume the cycle. 2 Display •• : Rinse Aid Icon - Refer to complete those selections. Once the dishwasher finishes draining, the power turns off. ••Press and hold Delay Start for heating water, etc. ••If Delay Start is connected again, it will sound. This feature does not lock the door. - To start the cycle, an alert will turn power...
Additional Link - Owner s Manual
Page 25
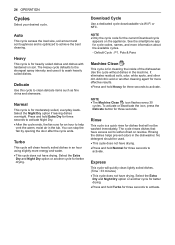
... stop the fan by opening the door after the cycle ends. Select the Extra Dry and Night Dry option or another cycle for three seconds. Download Cycle Use a dedicated cycle downloadable via Wi-Fi or NFC. Default Cycle : P1. Turbo This cycle will clean heavily soiled dishes in the tub. NOTE ••Only the cycle code for the current Download cycle appears on residue. Use the cycle without dishes in the dishwasher. Rinse This cycle is a quick rinse...
... stop the fan by opening the door after the cycle ends. Select the Extra Dry and Night Dry option or another cycle for three seconds. Download Cycle Use a dedicated cycle downloadable via Wi-Fi or NFC. Default Cycle : P1. Turbo This cycle will clean heavily soiled dishes in the tub. NOTE ••Only the cycle code for the current Download cycle appears on residue. Use the cycle without dishes in the dishwasher. Rinse This cycle is a quick rinse...
Additional Link - Owner s Manual
Page 36
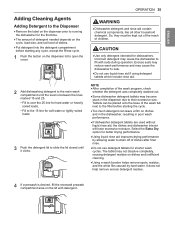
... operation. ENGLISH Adding Cleaning Agents Adding Detergent to the Dispenser ••Remove the label on the dispenser prior to running the dishwasher for the first time. ••The amount of detergent needed depends on the cycle, load size, and soil level of dishes. ••Put detergent into the detergent compartment before starting any cycle, except the Rinse cycle. 1 Push the button on the dispenser lid to open the cover. 2 Add dishwashing detergent to the main wash...
... operation. ENGLISH Adding Cleaning Agents Adding Detergent to the Dispenser ••Remove the label on the dispenser prior to running the dishwasher for the first time. ••The amount of detergent needed depends on the cycle, load size, and soil level of dishes. ••Put detergent into the detergent compartment before starting any cycle, except the Rinse cycle. 1 Push the button on the dispenser lid to open the cover. 2 Add dishwashing detergent to the main wash...
Additional Link - Owner s Manual
Page 39
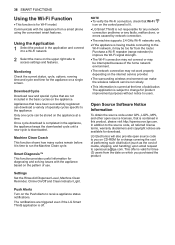
Settings Set the Rinse Aid Dispenser Level, Machine Clean Reminder, Chime On/Off and Clean Indicator Light. Open Source Software Notice Information To obtain the source code under GPL, LGPL, MPL, and other open source code to you purchased the product. In addition to access settings and features. LG Electronics will also provide open source licenses, that have been successfully registered can make the wireless network service run the Machine Clean cycle. Monitoring...
Settings Set the Rinse Aid Dispenser Level, Machine Clean Reminder, Chime On/Off and Clean Indicator Light. Open Source Software Notice Information To obtain the source code under GPL, LGPL, MPL, and other open source code to you purchased the product. In addition to access settings and features. LG Electronics will also provide open source licenses, that have been successfully registered can make the wireless network service run the Machine Clean cycle. Monitoring...
Additional Link - Owner s Manual
Page 42
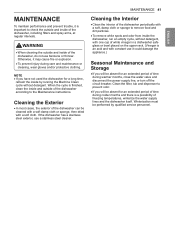
..., close the water valve and disconnect the power supply line, or turn off the circuit breaker. MAINTENANCE To maintain performance and prevent trouble, it is finished, clean the inside and outside of the dishwasher according to the Maintenance instructions. NOTE ••If you have not used the dishwasher for a long time, refresh the inside by running the Machine Clean cycle without detergent, with one cup of the dishwasher can be performed by qualified service...
..., close the water valve and disconnect the power supply line, or turn off the circuit breaker. MAINTENANCE To maintain performance and prevent trouble, it is finished, clean the inside and outside of the dishwasher according to the Maintenance instructions. NOTE ••If you have not used the dishwasher for a long time, refresh the inside by running the Machine Clean cycle without detergent, with one cup of the dishwasher can be performed by qualified service...
Additional Link - Owner s Manual
Page 46
... the dry cycle before the dry cycle begins. If the water supply is used and the performance still needs a boost, adjust the amount of hot water from the dishes before opening the door. This will ensure your home's hot water heater, it may remain on them more energy efficient, the hybrid drying system does not use a heating element to assist in drying, so a rinse aid plays an integral role in the sink before drying begins. LG dishwashers...
... the dry cycle before the dry cycle begins. If the water supply is used and the performance still needs a boost, adjust the amount of hot water from the dishes before opening the door. This will ensure your home's hot water heater, it may remain on them more energy efficient, the hybrid drying system does not use a heating element to assist in drying, so a rinse aid plays an integral role in the sink before drying begins. LG dishwashers...
Additional Link - Owner s Manual
Page 49
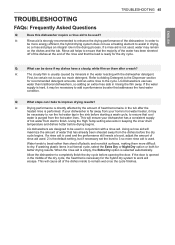
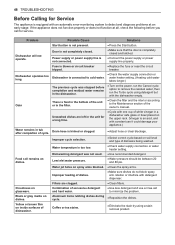
... stain by using detergent but with detergent dispenser. Problem Possible Cause Solutions Start button is too low. ••Check water supply connection or water heater setting. 48 TROUBLESHOOTING Before Calling for Service The appliance is equipped with constant use a rinse aid to remove the residual water, then run the Cancel cycle option to minimize the problem. Cloudiness on the power, run the Turbo cycle using a stain removal product. Combination of excessive detergent and hard water. ••Use less detergent and use it...
... stain by using detergent but with detergent dispenser. Problem Possible Cause Solutions Start button is too low. ••Check water supply connection or water heater setting. 48 TROUBLESHOOTING Before Calling for Service The appliance is equipped with constant use a rinse aid to remove the residual water, then run the Cancel cycle option to minimize the problem. Cloudiness on the power, run the Turbo cycle using a stain removal product. Combination of excessive detergent and hard water. ••Use less detergent and use it...
Additional Link - Owner s Manual
Page 50
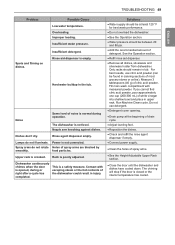
... or the hot contents of noise is normal during or right after a cycle has completed. Improper loading. Dishes don't dry. Noise Some level of the dishwasher could result in upper rack. Rack is closed or the interior temperature has cooled. TROUBLESHOOTING 49 ENGLISH Problem Spots and filming on dishes. Rinse agent dispenser empty. Solutions ••Water supply should remain in the tub. The chiming will stop if the door is poorly adjusted. Hard water buildup in...
... or the hot contents of noise is normal during or right after a cycle has completed. Improper loading. Dishes don't dry. Noise Some level of the dishwasher could result in upper rack. Rack is closed or the interior temperature has cooled. TROUBLESHOOTING 49 ENGLISH Problem Spots and filming on dishes. Rinse agent dispenser empty. Solutions ••Water supply should remain in the tub. The chiming will stop if the door is poorly adjusted. Hard water buildup in...
Additional Link - Owner s Manual
Page 51
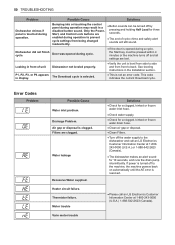
... sounds will still sound. Leaking in display. Error Codes Problem Possible Cause Water inlet problem. Water leakage Excessive Water supplied. Motor trouble Vario motor trouble Solutions ••Check for a clogged, kinked or frozen water inlet hose. ••Check water supply. ••Check for a clogged, kinked or frozen water drain hose. ••Clean air gap or disposal. ••Clean Filters. ••Turn off the water supply to the dishwasher and call an LG Electronics Customer Information Center at 1-800243...
... sounds will still sound. Leaking in display. Error Codes Problem Possible Cause Water inlet problem. Water leakage Excessive Water supplied. Motor trouble Vario motor trouble Solutions ••Check for a clogged, kinked or frozen water inlet hose. ••Check water supply. ••Check for a clogged, kinked or frozen water drain hose. ••Clean air gap or disposal. ••Clean Filters. ••Turn off the water supply to the dishwasher and call an LG Electronics Customer Information Center at 1-800243...
Additional Link - Owner s Manual
Page 53
commercial use (e.g. Model and serial numbers, along with removal of your product is used for repairs. Poor wash results caused by improper loading or over stacking: wash arm won't rotate or soap dispenser is not turned on. Water is not supplied because the water tap is held closed. ••Clean the filter regularly. ••Make certain that no dishes or utensils are in the path of the spray arms. ••Do not...
commercial use (e.g. Model and serial numbers, along with removal of your product is used for repairs. Poor wash results caused by improper loading or over stacking: wash arm won't rotate or soap dispenser is not turned on. Water is not supplied because the water tap is held closed. ••Clean the filter regularly. ••Make certain that no dishes or utensils are in the path of the spray arms. ••Do not...
Additional Link - Owner s Manual
Page 54
... electrical outlet problem. External leakage Door movement or closing compromised by improper installation. The disposal or air gap is not removed. Installation ••Clean the disposal or the air gap. ••Reinstall the hose. ••Adjust the lower front leveling legs to the required height. ••Reconnect the power supply line or repair the electrical outlet. ••You will be borne by the consumer. OE error Inlet valve and drain hose connection problem...
... electrical outlet problem. External leakage Door movement or closing compromised by improper installation. The disposal or air gap is not removed. Installation ••Clean the disposal or the air gap. ••Reinstall the hose. ••Adjust the lower front leveling legs to the required height. ••Reconnect the power supply line or repair the electrical outlet. ••You will be borne by the consumer. OE error Inlet valve and drain hose connection problem...


