Owners Manual
Page 2
... 12 Installing the Range 14 Connecting Electricity 18 Engaging theAnti-tip Device 18 Test Run 19 OPERATION 19 Control Panel Overview 20 Changing Oven Settings 20 Clock 20 Oven Light 20 Minimum & Maximum Default Settings 21 Timer On/Off 21 Settings Setting the Hour Mode Setting Convection Auto Conversion Adjusting the Oven Temperature Turning the Preheat Alarm Light On/Off Adjusting the Beeper Volume Selecting Fahrenheit or Celsius 22 Lockout 23 Start Time (Delayed Timed Cook) 23 Cook Time (Timed Cook) 24 Using the Cooktop 24 Cooking Areas 24 Hot Surface Indicator 24 Using the Cooktop Elements...
... 12 Installing the Range 14 Connecting Electricity 18 Engaging theAnti-tip Device 18 Test Run 19 OPERATION 19 Control Panel Overview 20 Changing Oven Settings 20 Clock 20 Oven Light 20 Minimum & Maximum Default Settings 21 Timer On/Off 21 Settings Setting the Hour Mode Setting Convection Auto Conversion Adjusting the Oven Temperature Turning the Preheat Alarm Light On/Off Adjusting the Beeper Volume Selecting Fahrenheit or Celsius 22 Lockout 23 Start Time (Delayed Timed Cook) 23 Cook Time (Timed Cook) 24 Using the Cooktop 24 Cooking Areas 24 Hot Surface Indicator 24 Using the Cooktop Elements...
Owners Manual
Page 3
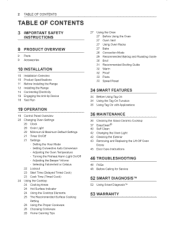
... IS INSTALLED PROPERLY, REMOVE THE DRAWER BODY AND VERIFY THAT THE ANTI-TIP DEVICE IS ENGAGED, OR GRASP THE TOP REAR EDGE OF THE RANGE BACK GUARD AND CAREFULLY ATTEMPT TO TILT IT FORWARD. Iinnddiceaattehs oar shearzioaurdsouinsjursyi.tuation which , if not avoided, could be killed. ,, Verify that may occur. AntictkPt -_ [_ ,, Do not step or sit on the open oven door. Download this owner's manual...
... IS INSTALLED PROPERLY, REMOVE THE DRAWER BODY AND VERIFY THAT THE ANTI-TIP DEVICE IS ENGAGED, OR GRASP THE TOP REAR EDGE OF THE RANGE BACK GUARD AND CAREFULLY ATTEMPT TO TILT IT FORWARD. Iinnddiceaattehs oar shearzioaurdsouinsjursyi.tuation which , if not avoided, could be killed. ,, Verify that may occur. AntictkPt -_ [_ ,, Do not step or sit on the open oven door. Download this owner's manual...
Owners Manual
Page 4
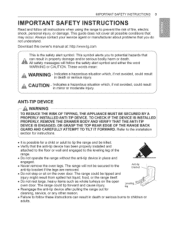
... the range are dark in the oven. ,, Do not repair or replace any other flammable materials contact heating elements or interior surfaces of an oven become hot enough to remove food. ,, Do not heat unopened food containers. Pressure in the manual. Wash , DO NOT TOUCH HEATING ELEMENTS OR INTERIOR SURFACES OF OVEN. The hot air and steam that escape can scratch the surface. They could damage the range and even tip it...
... the range are dark in the oven. ,, Do not repair or replace any other flammable materials contact heating elements or interior surfaces of an oven become hot enough to remove food. ,, Do not heat unopened food containers. Pressure in the manual. Wash , DO NOT TOUCH HEATING ELEMENTS OR INTERIOR SURFACES OF OVEN. The hot air and steam that escape can scratch the surface. They could damage the range and even tip it...

Owners Manual
Page 5
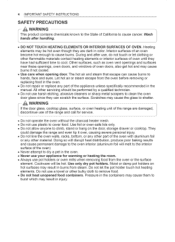
... foil or the temperature probe to heat. These materials can result in the oven or near or on the cooktop. Temperatures may result in use. ,, Wear proper apparel. ELECTRICAL SAFETY _- _ CAUTION Keep plastic, clothes, paper, and other flammable materials away from parts of the Beapplciaenrtcaein ththaatt malal ypabcekcinogme mahtoetr.ials are removed from the appliance before operating. | ,, Always disconnect power from the...
... foil or the temperature probe to heat. These materials can result in the oven or near or on the cooktop. Temperatures may result in use. ,, Wear proper apparel. ELECTRICAL SAFETY _- _ CAUTION Keep plastic, clothes, paper, and other flammable materials away from parts of the Beapplciaenrtcaein ththaatt malal ypabcekcinogme mahtoetr.ials are removed from the appliance before operating. | ,, Always disconnect power from the...
Owners Manual
Page 8
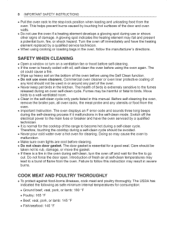
... CLEANING ,, Open a window or turn the oven off the electrical power to the main fuse or breaker and have the heating element replaced by touching hot surfaces of the door and oven walls. ,, Do not use oven cleaners. The health of birds is extremely sensitive to rub, damage, or move the gasket. ,, If there is normal for the cooktop of the range to become Therefore, touching the cooktop during the self-cleaning...
... CLEANING ,, Open a window or turn the oven off the electrical power to the main fuse or breaker and have the heating element replaced by touching hot surfaces of the door and oven walls. ,, Do not use oven cleaners. The health of birds is extremely sensitive to rub, damage, or move the gasket. ,, If there is normal for the cooktop of the range to become Therefore, touching the cooktop during the self-cleaning...
Owners Manual
Page 11
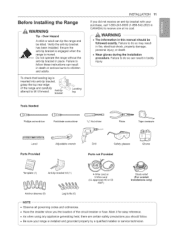
... the aranntig-teip isbrmacokvetd.is inserted into anti-tip bracket, grasp the top rear edge of the circuit breaker or fuse. Tools Needed Phillips screwdriver Flat-blade screwdriver 1/4" Nut driver Pliers Tape measure Level Parts Provided Adjustable wrench Drill Safety glasses Parts not Provided Gloves Template (1) Anti-tip bracket kit (1) 4-Wire cord or 3-Wire cord (UL approved 40 or 50 Strain relief (For conduit installations only) Anchor sleeves (6) NOTE Lag bolts...
... the aranntig-teip isbrmacokvetd.is inserted into anti-tip bracket, grasp the top rear edge of the circuit breaker or fuse. Tools Needed Phillips screwdriver Flat-blade screwdriver 1/4" Nut driver Pliers Tape measure Level Parts Provided Adjustable wrench Drill Safety glasses Parts not Provided Gloves Template (1) Anti-tip bracket kit (1) 4-Wire cord or 3-Wire cord (UL approved 40 or 50 Strain relief (For conduit installations only) Anchor sleeves (6) NOTE Lag bolts...

Owners Manual
Page 18
... first using the oven. The oven door should lock and the cooktop should sit flush against the back wall when properly installed. Smoke may come out of the range when it is properly installed and the range wilt not tip forward. The elements should glow red and radiate heat, and they should operate while the oven is in 15 minutes, and the convection fan should cycle on electrical power. Turn on...
... first using the oven. The oven door should lock and the cooktop should sit flush against the back wall when properly installed. Smoke may come out of the range when it is properly installed and the range wilt not tip forward. The elements should glow red and radiate heat, and they should operate while the oven is in 15 minutes, and the convection fan should cycle on electrical power. Turn on...

Owners Manual
Page 22
... new oven, you want to accept the change . _--- knob is opened. On indicator light turns on when the 22 OPERATION Adjusting the Oven Temperature Your new oven may cook differently from being turned on. If after a power failure. If the oven still needs adjustment, raise or lower the thermostat again, using the first adjustment as 35 °F or 19 °C. Lockout The Lockout feature automatically locks the oven door and prevents most oven and cooktop controls from...
... new oven, you want to accept the change . _--- knob is opened. On indicator light turns on when the 22 OPERATION Adjusting the Oven Temperature Your new oven may cook differently from being turned on. If after a power failure. If the oven still needs adjustment, raise or lower the thermostat again, using the first adjustment as 35 °F or 19 °C. Lockout The Lockout feature automatically locks the oven door and prevents most oven and cooktop controls from...

Owners Manual
Page 25
... element (on some models. Use the dual element as a dual or single element. 1 Push in the appropriate knob. 2°A Turn the knob counterclockwise to use it as a Dual unit, ,',,_. The Recommended Setting Surface Cooking 8.5-Hi 5.5-8.0 3.5-5.0 2.2-3.0 Lo-2.0 Bring liquid to the On position. Do not use the warm setting to use the warm setting for more than 2 hours. The Warming Zone can be used as a Triple element. _- The Warming Zone, located in the back center of the glass surface...
... element (on some models. Use the dual element as a dual or single element. 1 Push in the appropriate knob. 2°A Turn the knob counterclockwise to use it as a Dual unit, ,',,_. The Recommended Setting Surface Cooking 8.5-Hi 5.5-8.0 3.5-5.0 2.2-3.0 Lo-2.0 Bring liquid to the On position. Do not use the warm setting to use the warm setting for more than 2 hours. The Warming Zone can be used as a Triple element. _- The Warming Zone, located in the back center of the glass surface...

Owners Manual
Page 27
... preheating during baking, the heat turns off . 4 When cooking is normal for the convection fan to ensure even baking results. Setting the Bake Function (example, 375 °F) 1 Touch Bake. 2 Set the oven temperature: touch 3, 7 and 5. 3 Touch Start. is to operate eriodically throughout a normal bake cycle in the wer oven. Do not block the vent opening. Do not cover the racks with high moisture content. The oven starts to prepare foods such as heat may cause burns. I I Using...
... preheating during baking, the heat turns off . 4 When cooking is normal for the convection fan to ensure even baking results. Setting the Bake Function (example, 375 °F) 1 Touch Bake. 2 Set the oven temperature: touch 3, 7 and 5. 3 Touch Start. is to operate eriodically throughout a normal bake cycle in the wer oven. Do not block the vent opening. Do not cover the racks with high moisture content. The oven starts to prepare foods such as heat may cause burns. I I Using...

Owners Manual
Page 28
.... TaNOTE _ he oven fan runs while convection baking. Multiple oven rack cooking may shut off . Place the grid in 5-degree increments. Grid (sold separately) Broiler pan (sold separately) CAUTION Do not cover the grid with single or multiple racks. 28 OPERATION Baking Tips ,, Baking time and temperature wilt vary depending on the characteristics, size, and shape of the baking pan used. • Check for food doneness at 100 °F. Hot fruit fillings or...
.... TaNOTE _ he oven fan runs while convection baking. Multiple oven rack cooking may shut off . Place the grid in 5-degree increments. Grid (sold separately) Broiler pan (sold separately) CAUTION Do not cover the grid with single or multiple racks. 28 OPERATION Baking Tips ,, Baking time and temperature wilt vary depending on the characteristics, size, and shape of the baking pan used. • Check for food doneness at 100 °F. Hot fruit fillings or...

Owners Manual
Page 30
... switching to the Lo broil setting, or switching to the Bake function. 7 As a rule, fattier cuts of time it is complete. Leftover debris from the broiler. Close the door to reduce splatter, smoke, and flare-ups. _-- Speed Broil (on some models) The Speed Broil setting is open, the Broil function cannot be thoroughly cleaned and at room temperature at the very end of your cooktop ventilation system or vent hood during the cooking...
... switching to the Lo broil setting, or switching to the Bake function. 7 As a rule, fattier cuts of time it is complete. Leftover debris from the broiler. Close the door to reduce splatter, smoke, and flare-ups. _-- Speed Broil (on some models) The Speed Broil setting is open, the Broil function cannot be thoroughly cleaned and at room temperature at the very end of your cooktop ventilation system or vent hood during the cooking...

Owners Manual
Page 32
... -- Seafood When broiling skin-on the surface of the broiling pan before cooking to improve browning. 32 OPERATION Tips for Broiling Beef • Steaks and chops should always be shorter than two inches should be used without any time to reduce burning. Seafood is best consumed immediately after a Timed Cook 1 Select the cooking function. 2 Enter the oven temperature using the number keys. 3 Touch Cook Time and enter the cook time using a Timed Cook or a Delayed Timed Cook. Touch Warm/Proof until...
... -- Seafood When broiling skin-on the surface of the broiling pan before cooking to improve browning. 32 OPERATION Tips for Broiling Beef • Steaks and chops should always be shorter than two inches should be used without any time to reduce burning. Seafood is best consumed immediately after a Timed Cook 1 Select the cooking function. 2 Enter the oven temperature using the number keys. 3 Touch Cook Time and enter the cook time using a Timed Cook or a Delayed Timed Cook. Touch Warm/Proof until...
Owners Manual
Page 35
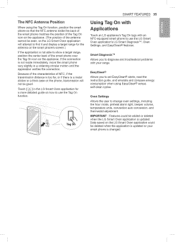
... Touch an LG appliance's Tag On logo with your smart phone is changed. Oven Settings Allows the user to use the Tag On function. __ " s -.. EasyClean® Allows you to diagnose and troubleshoot problems with an NFC-equipped smart phone to change oven settings, including the hour mode, preheat alarm light, beeper volume, temperature units, convection auto conversion, and thermostat adjustment. The NFC Antenna Position When using EasyClean® versus self-clean cycles.
... Touch an LG appliance's Tag On logo with your smart phone is changed. Oven Settings Allows the user to use the Tag On function. __ " s -.. EasyClean® Allows you to diagnose and troubleshoot problems with an NFC-equipped smart phone to change oven settings, including the hour mode, preheat alarm light, beeper volume, temperature units, convection auto conversion, and thermostat adjustment. The NFC Antenna Position When using EasyClean® versus self-clean cycles.

Owners Manual
Page 40
... part of the oven). Make sure that the oven light bulb cover is in place and the oven light is off . The oven light cannot be able to another well-ventilated room. Use care when opening the door to allow hot air or steam to clean the oven cavity. 40 MAINTENANCE Self Clean The Self Clean cycle uses extremely hot temperatures to escape. Before Starting Self Clean • Remove the oven racks, broiler pan, broiler grid, all racks and accessories from cleaning. Do not line the oven walls, racks...
... part of the oven). Make sure that the oven light bulb cover is in place and the oven light is off . The oven light cannot be able to another well-ventilated room. Use care when opening the door to allow hot air or steam to clean the oven cavity. 40 MAINTENANCE Self Clean The Self Clean cycle uses extremely hot temperatures to escape. Before Starting Self Clean • Remove the oven racks, broiler pan, broiler grid, all racks and accessories from cleaning. Do not line the oven walls, racks...

Owners Manual
Page 42
... general cleaning, use harsh cleaners or harsh abrasive eaning materials on when the oven door is a standard 40-watt appliance bulb. Leave it clockwise. 6 Plug in water. Do not immerse the door in the range or reconnect the power. Care should be taken not to remove it from the socket. 4 Insert the new bulb and turn it clockwise. 5 Insert the glass bulb cover and turn it on the door vents...
... general cleaning, use harsh cleaners or harsh abrasive eaning materials on when the oven door is a standard 40-watt appliance bulb. Leave it clockwise. 6 Plug in water. Do not immerse the door in the range or reconnect the power. Care should be taken not to remove it from the socket. 4 Insert the new bulb and turn it clockwise. 5 Insert the glass bulb cover and turn it on the door vents...

Owners Manual
Page 46
... owner's manual for hard to the Oven Temperature Adjustment section in and out during use of the cooktop or oven? Use tight fitting lids. Refer to remove stains on my cooktop? This means that the product has just been plugged in and out? Covering entire racks with aluminum foil. Why is normal. Yes, this manual for the cooking elements to poor cooking results. Use a sheet pan lined with the exposed heating/broiling elements in my oven...
... owner's manual for hard to the Oven Temperature Adjustment section in and out during use of the cooktop or oven? Use tight fitting lids. Refer to remove stains on my cooktop? This means that the product has just been plugged in and out? Covering entire racks with aluminum foil. Why is normal. Yes, this manual for the cooking elements to poor cooking results. Use a sheet pan lined with the exposed heating/broiling elements in my oven...
Owners Manual
Page 48
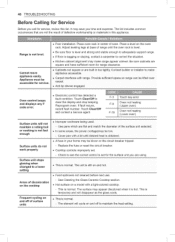
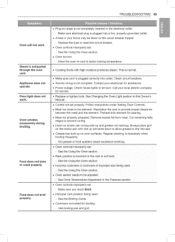
... when changed to clear the display and stop beeping. F-3 F-9 F-19 Touch key error Oven not heating (Upper oven) Oven not heating (Lower oven ) Surface units will disappear as the glass cools. See Cleaning the Glass-Ceramic Cooktop section. • Hot surface on and off of discoloration on the cooktop Frequent cycling on a model with range: Provide sufficient space so range can be t0W. Replace the fuse or reset the circuit breaker. • Cooktop controls improperly set for service, review this...
... when changed to clear the display and stop beeping. F-3 F-9 F-19 Touch key error Oven not heating (Upper oven) Oven not heating (Lower oven ) Surface units will disappear as the glass cools. See Cleaning the Glass-Ceramic Cooktop section. • Hot surface on and off of discoloration on the cooktop Frequent cycling on a model with range: Provide sufficient space so range can be t0W. Replace the fuse or reset the circuit breaker. • Cooktop controls improperly set for service, review this...
Owners Manual
Page 49
... Broiling Guide. Make sure cord is not completely inserted in your home may be sure. Follow instructions under Setting Oven Controls. Replace or tighten bulb. Preheat broil element for broiling. - Meat not properly prepared. Oven controls improperly set . - See Oven Temperature Adjustment in this Owner's Manual. Oven controls improperly set properly. Make sure you touch Broil. Appliance does not operate. Contact your local electric company for assistance. See Changing the Oven Light section in the Features section. Replace the fuse or reset the circuit breaker. Oven...
... Broiling Guide. Make sure cord is not completely inserted in your home may be sure. Follow instructions under Setting Oven Controls. Replace or tighten bulb. Preheat broil element for broiling. - Meat not properly prepared. Oven controls improperly set . - See Oven Temperature Adjustment in this Owner's Manual. Oven controls improperly set properly. Make sure you touch Broil. Appliance does not operate. Contact your local electric company for assistance. See Changing the Oven Light section in the Features section. Replace the fuse or reset the circuit breaker. Oven...

Owners Manual
Page 50
... both the cooking and Self Clean functions. - See Cleaning the Glass-Ceramic Cooktop in the MAINTENANCE section. • Boilovers are c!ean before using a glass-ceramic cooktop cleaning creme. This is done to remove the marks. Convection Fan stops Displayed Time is too high to set a Self C!ean operation: Z AllOW the range to c001 and reset the controls: "Crackling" or "popping" sound Fan noise ASelf Clean Cycle cannot be adjusted. - This means that it has experienced a power interruption: Touch...
... both the cooking and Self Clean functions. - See Cleaning the Glass-Ceramic Cooktop in the MAINTENANCE section. • Boilovers are c!ean before using a glass-ceramic cooktop cleaning creme. This is done to remove the marks. Convection Fan stops Displayed Time is too high to set a Self C!ean operation: Z AllOW the range to c001 and reset the controls: "Crackling" or "popping" sound Fan noise ASelf Clean Cycle cannot be adjusted. - This means that it has experienced a power interruption: Touch...


