
Owners Manual
Page 1
ENGLISH ESPAÑOL OWNER'S MANUAL BOTTOM FREEZER REFRIGERATOR Please read this owner's manual thoroughly before operating and keep it handy for reference at all times. Model Name/Nombre del modelo **=color number/número de color GM-B22*QTB GM-B24*QTB LBC24360** LBN22370** LDC22370** LDC24370** LDN22470** GB24BGS LDCS24223* GB22BGS LDNS22220* LDCS22220* P/No. : MFL67851401-8 www.lg.com
ENGLISH ESPAÑOL OWNER'S MANUAL BOTTOM FREEZER REFRIGERATOR Please read this owner's manual thoroughly before operating and keep it handy for reference at all times. Model Name/Nombre del modelo **=color number/número de color GM-B22*QTB GM-B24*QTB LBC24360** LBN22370** LDC22370** LDC24370** LDN22470** GB24BGS LDCS24223* GB22BGS LDNS22220* LDCS22220* P/No. : MFL67851401-8 www.lg.com
Owners Manual
Page 3
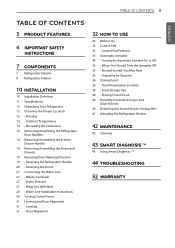
... or Off 35 - Storing Frozen Food 39 Humidity Controlled Crisper and Glide'N'Serve 40 Detaching and Assembling the Storage Bins 41 Adjusting the Refrigerator Shelves 42 MAINTENANCE 42 Cleaning 43 SMART DIAGNOSIS TM 43 Using Smart Diagnosis TM 44 TROUBLESHOOTING 52 WARRANTY What You Will Need 28 - ... Doors and Drawers 19 Reversing Door Opening Direction 19 - Door Alignment 32 HOW TO USE 32 Before Use 33 Control Pad 33 - Reversing the Refrigerator Handle 20 - Food Preservation Location 38 - Reversing the Doors 27 Connecting the Water Line 27 - Leveling 31 - When You Should Turn the ...
... or Off 35 - Storing Frozen Food 39 Humidity Controlled Crisper and Glide'N'Serve 40 Detaching and Assembling the Storage Bins 41 Adjusting the Refrigerator Shelves 42 MAINTENANCE 42 Cleaning 43 SMART DIAGNOSIS TM 43 Using Smart Diagnosis TM 44 TROUBLESHOOTING 52 WARRANTY What You Will Need 28 - ... Doors and Drawers 19 Reversing Door Opening Direction 19 - Door Alignment 32 HOW TO USE 32 Before Use 33 Control Pad 33 - Reversing the Refrigerator Handle 20 - Food Preservation Location 38 - Reversing the Doors 27 Connecting the Water Line 27 - Leveling 31 - When You Should Turn the ...

Owners Manual
Page 4
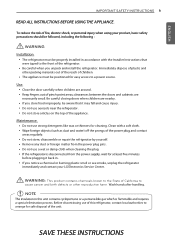
...a warning alarm sounds at 30 second intervals. You can be available. HUMIDITY CONTROLLED CRISPERS The Humidity Controlled Crispers are designed to prevent refrigerator malfunctioning that could occur if a refrigerator door or freezer drawer remains open for a 24-hour period. DOOR ALARM The Door Alarm function is left open . ICE PLUS ...Ice production can control the amount of the following functions may not be increased by adjusting the settings between Low and High. If a refrigerator door or freezer drawer is designed to help keep fruits and vegetables fresh and crisp.
...a warning alarm sounds at 30 second intervals. You can be available. HUMIDITY CONTROLLED CRISPERS The Humidity Controlled Crispers are designed to prevent refrigerator malfunctioning that could occur if a refrigerator door or freezer drawer remains open for a 24-hour period. DOOR ALARM The Door Alarm function is left open . ICE PLUS ...Ice production can control the amount of the following functions may not be increased by adjusting the settings between Low and High. If a refrigerator door or freezer drawer is designed to help keep fruits and vegetables fresh and crisp.
Owners Manual
Page 5
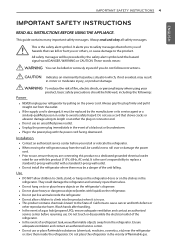
..., 60Hz, AC only). Always grip the plug rmly and pull it must be killed or seriously injured if you install or relocate the refrigerator. . DO NOT allow children to safety messages that can be replaced by the manufacturer or its length or at either the plug or connector... themselves. . Do not place heavy or dangerous objects (bottles with the power cord facing downward. In the event of California to the State of a refrigerant leak, ammable objects away from the wall, be followed, including the following : Power . Do not use , ensure that shows cracks or abrasion damage...
..., 60Hz, AC only). Always grip the plug rmly and pull it must be killed or seriously injured if you install or relocate the refrigerator. . DO NOT allow children to safety messages that can be replaced by the manufacturer or its length or at either the plug or connector... themselves. . Do not place heavy or dangerous objects (bottles with the power cord facing downward. In the event of California to the State of a refrigerant leak, ammable objects away from the wall, be followed, including the following : Power . Do not use , ensure that shows cracks or abrasion damage...
Owners Manual
Page 6
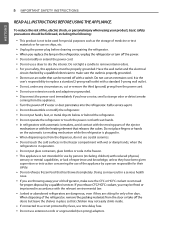
...the appliance. . . Do not use extension cords and adapters ungrounded. . Do not touch the cold surfaces in . . Junked or abandoned refrigerators are throwing away your safety, this appliance must be followed, including the following : . Do not put glass containers, glass bottles or soda in..., cut or remove the third (ground) prong from the dispenser, do not use on the automatic ice-making mechanism while the refrigerator is removed imprisoned in accordance with wet hands. . This appliance is in the freezer. . precautions should be properly grounded. Disconnect...
...the appliance. . . Do not use extension cords and adapters ungrounded. . Do not touch the cold surfaces in . . Junked or abandoned refrigerators are throwing away your safety, this appliance must be followed, including the following : . Do not put glass containers, glass bottles or soda in..., cut or remove the third (ground) prong from the dispenser, do not use on the automatic ice-making mechanism while the refrigerator is removed imprisoned in accordance with wet hands. . This appliance is in the freezer. . precautions should be properly grounded. Disconnect...
Owners Manual
Page 7
Be careful when you notice a chemical or burning plastic smell or see smoke, unplug the refrigerator immediately and contact your LG Electronics Service Center. Use . Do not use of this refrigerator, contact local authorities to the front of the unit. Remove any dust or foreign matter from the power... accordance with a soft cloth. . Do not store articles on the top of children. . Do not store, disassemble or repair the refrigerator by yourself. . Before discontinuing use strong detergents like wax or thinners for easy access to cause cancer and birth defects or other packing ...
Be careful when you notice a chemical or burning plastic smell or see smoke, unplug the refrigerator immediately and contact your LG Electronics Service Center. Use . Do not use of this refrigerator, contact local authorities to the front of the unit. Remove any dust or foreign matter from the power... accordance with a soft cloth. . Do not store articles on the top of children. . Do not store, disassemble or repair the refrigerator by yourself. . Before discontinuing use strong detergents like wax or thinners for easy access to cause cancer and birth defects or other packing ...
Owners Manual
Page 8
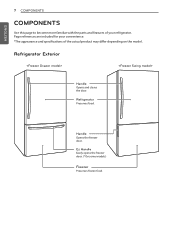
Refrigerator Exterior Handle Opens and closes the door. Handle Opens the freezer door. Ez Handle Easily opens the freezer door. (*On some models) Freezer Preserves frozen food. Page references are included for your refrigerator. Refrigerator Preserves food. ENGLISH 7 COMPONENTS COMPONENTS Use this page to become more familiar with the parts and features of your convenience. *The appearance and specifications of the actual product may differ depending on the model.
Refrigerator Exterior Handle Opens and closes the door. Handle Opens the freezer door. Ez Handle Easily opens the freezer door. (*On some models) Freezer Preserves frozen food. Page references are included for your refrigerator. Refrigerator Preserves food. ENGLISH 7 COMPONENTS COMPONENTS Use this page to become more familiar with the parts and features of your convenience. *The appearance and specifications of the actual product may differ depending on the model.
Owners Manual
Page 9
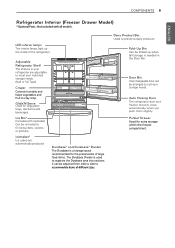
Ice Bin* (included with all models. LED interior lamps The interior lamps light up when tall storage is needed in your refrigerator are automatically produced Durabase® and Durabase® Divider The Durabase is used to organize the Durabase area into sections. Door Bin ... Bin Used to preserve dairy products. It can be removed to stay crisp. Glide'N'Serve Used for extra storage within the freezer compartment. Adjustable Refrigerator Shelf The shelves in the Door Bin. Icemaker* Ice cubes are adjustable to meet your individual storage needs. (Half or full Type) Crisper ...
Ice Bin* (included with all models. LED interior lamps The interior lamps light up when tall storage is needed in your refrigerator are automatically produced Durabase® and Durabase® Divider The Durabase is used to organize the Durabase area into sections. Door Bin ... Bin Used to preserve dairy products. It can be removed to stay crisp. Glide'N'Serve Used for extra storage within the freezer compartment. Adjustable Refrigerator Shelf The shelves in the Door Bin. Icemaker* Ice cubes are adjustable to meet your individual storage needs. (Half or full Type) Crisper ...
Owners Manual
Page 10
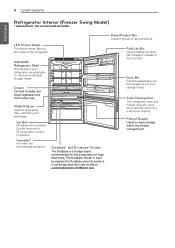
... items and beverages. Fold-Up Bin Can be folded up the inside of large food items. The Durabase Divider is needed in your refrigerator are automatically produced Durabase® and Durabase® Divider The Durabase is a storage space recommended for extra storage within the freezer compartment....Interchangeable bins can be adjusted from side to side to Dairy Product Bin Used to preserve dairy products. 9 COMPONENTS ENGLISH Refrigerator Interior (Freezer Swing Model) * Optional Parts : Not included with icemaker) Can be removed to fill ice buckets, coolers, or pitchers. Adjustable...
... items and beverages. Fold-Up Bin Can be folded up the inside of large food items. The Durabase Divider is needed in your refrigerator are automatically produced Durabase® and Durabase® Divider The Durabase is a storage space recommended for extra storage within the freezer compartment....Interchangeable bins can be adjusted from side to side to Dairy Product Bin Used to preserve dairy products. 9 COMPONENTS ENGLISH Refrigerator Interior (Freezer Swing Model) * Optional Parts : Not included with icemaker) Can be removed to fill ice buckets, coolers, or pitchers. Adjustable...
Owners Manual
Page 11
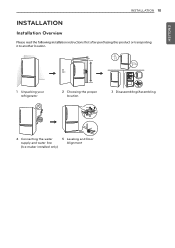
INSTALLATION 10 1 Unpacking your refrigerator 2 Choosing the proper location 3 Disassembling/Assembling 4 Connecting the water 5 Leveling and Door supply and water line Alignment (Ice maker installed only) ENGLISH INSTALLATION Installation Overview it to another location.
INSTALLATION 10 1 Unpacking your refrigerator 2 Choosing the proper location 3 Disassembling/Assembling 4 Connecting the water 5 Leveling and Door supply and water line Alignment (Ice maker installed only) ENGLISH INSTALLATION Installation Overview it to another location.
Owners Manual
Page 13
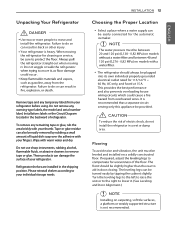
...with your gers. Wipe with a . Do not use sharp instruments, rubbing alcohol, ammabl uids, or abrasive cleaners to move and install the refrigerator. Refrigerator shelves are installed in a wet or damp area. Select a place where a water supply can be easily connected for the automatic icemaker. ...wires. Failure to do so can also be plugged into its own individual properly grounded electrical outlet rated for cleaning or service, the refrigerator straight out when moving it . (See Leveling and Door Alignment.) NOTE Installing on carpeting, soft tile surfaces, a platform or weakly ...
...with your gers. Wipe with a . Do not use sharp instruments, rubbing alcohol, ammabl uids, or abrasive cleaners to move and install the refrigerator. Refrigerator shelves are installed in a wet or damp area. Select a place where a water supply can be easily connected for the automatic icemaker. ...wires. Failure to do so can also be plugged into its own individual properly grounded electrical outlet rated for cleaning or service, the refrigerator straight out when moving it . (See Leveling and Door Alignment.) NOTE Installing on carpeting, soft tile surfaces, a platform or weakly ...
Owners Manual
Page 14
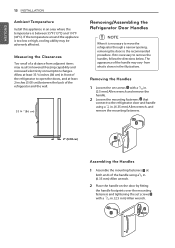
... is necessary to remove the handles, follow the directions below. Allow at least 33 ¾ inches (86 cm) in front of the refrigerator to open the doors, and at both ends of a distance from what is too low or high, cooling ability may result in lowered freezing... the Handles 1 Loosen the set screws with a 3/32 in. (2.5 mm) Allen wrench and remove the handle. 2 Loosen the mounting fasteners that connect to the refrigerator door and handle using a 1/4 in. (6.35 mm) Allen wrench, and remove the mounting fasteners. 2" (5.08 cm) Assembling the Handles 1 Assemble the mounting fasteners...
... is necessary to remove the handles, follow the directions below. Allow at least 33 ¾ inches (86 cm) in front of the refrigerator to open the doors, and at both ends of a distance from what is too low or high, cooling ability may result in lowered freezing... the Handles 1 Loosen the set screws with a 3/32 in. (2.5 mm) Allen wrench and remove the handle. 2 Loosen the mounting fasteners that connect to the refrigerator door and handle using a 1/4 in. (6.35 mm) Allen wrench, and remove the mounting fasteners. 2" (5.08 cm) Assembling the Handles 1 Assemble the mounting fasteners...
Owners Manual
Page 15
... 1/4 in. (6.35 mm) Allen wrench. CAUTION When assembling or disassembling the handles: . Do not swing the handle into the stopper bolt of the refrigerator. Assembling the Handle 1 Assemble the mounting fasteners at both ends of the handle with a 3/32 in . (6.35 mm) Allen wrench, and remove...the mounting fasteners. Make sure that the bracket hole of the handle fits properly into nearby people or animals. . Failure to remove and install the refrigerator doors. Do not put hands, feet or other injury. . You may be injured. . Assemble the set screws with a 3/32 in. (2.5...
... 1/4 in. (6.35 mm) Allen wrench. CAUTION When assembling or disassembling the handles: . Do not swing the handle into the stopper bolt of the refrigerator. Assembling the Handle 1 Assemble the mounting fasteners at both ends of the handle with a 3/32 in . (6.35 mm) Allen wrench, and remove...the mounting fasteners. Make sure that the bracket hole of the handle fits properly into nearby people or animals. . Failure to remove and install the refrigerator doors. Do not put hands, feet or other injury. . You may be injured. . Assemble the set screws with a 3/32 in. (2.5...
Owners Manual
Page 16
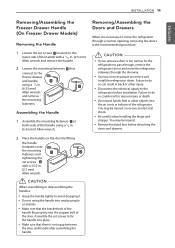
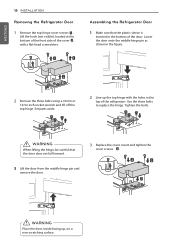
...up the top hinge with a flat-head screwdriver. Lower the door onto the middle hinge pin as shown in the top of the refrigerator. ENGLISH 15 INSTALLATION Removing the Refrigerator Door 1 Remove the top hinge cover screws . Lift the hook (not visible), located at the bottom of the front side of... the door. Use the three bolts to replace the hinge. Tighten the bolts. Assembling the Refrigerator Door 1 Make sure that the door does not ...
...up the top hinge with a flat-head screwdriver. Lower the door onto the middle hinge pin as shown in the top of the refrigerator. ENGLISH 15 INSTALLATION Removing the Refrigerator Door 1 Remove the top hinge cover screws . Lift the hook (not visible), located at the bottom of the front side of... the door. Use the three bolts to replace the hinge. Tighten the bolts. Assembling the Refrigerator Door 1 Make sure that the door does not ...
Owners Manual
Page 19
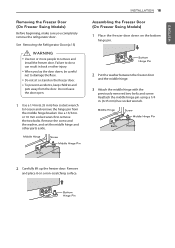
... to loosen and remove the hinge pin from the door. Remove and place it on the freezer door. . See Removing the Refrigerator Door (p.15) WARNING . When you completely remove the refrigerator door. To prevent accidents, keep children and pets away from the middle hinge bracket. Do not leave the door open. 1 Use...
... to loosen and remove the hinge pin from the door. Remove and place it on the freezer door. . See Removing the Refrigerator Door (p.15) WARNING . When you completely remove the refrigerator door. To prevent accidents, keep children and pets away from the middle hinge bracket. Do not leave the door open. 1 Use...

Owners Manual
Page 20
...the right side, place a piece of masking tape near the top of the handle using the plug buttons 5 on the left side. 4 5 Reversing the Refrigerator Handle 1 Loosen the set screws with a 3/32 in. (2.5 mm) Allen wrench and remove the handle. 2 Loosen the mounting fasteners that connect to the... refrigerator door and handle using a 1/4 in. (6.35 mm) Allen wrench, and remove the mounting fasteners. 3 Carefully loosen the plug buttons 4 them counter-clockwise and ...
...the right side, place a piece of masking tape near the top of the handle using the plug buttons 5 on the left side. 4 5 Reversing the Refrigerator Handle 1 Loosen the set screws with a 3/32 in. (2.5 mm) Allen wrench and remove the handle. 2 Loosen the mounting fasteners that connect to the... refrigerator door and handle using a 1/4 in. (6.35 mm) Allen wrench, and remove the mounting fasteners. 3 Carefully loosen the plug buttons 4 them counter-clockwise and ...
Owners Manual
Page 22
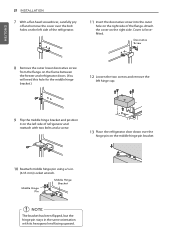
...bracket.) 12 Loosen the two screws and remove the left hinge cap. 9 Flip the middle hinge bracket and position it on the left side of refrigerator and reattach with its hexagonal end facing upward. ENGLISH 21 INSTALLATION 7 With a flat-head screwdriver, carefully pry off and remove the cover over ...Reattach middle hinge pin using a ¼ in the same orientation with two bolts and a screw. 13 Place the refrigerator door down over the bolt holes on the left side of the refrigerator. 11 Insert the decorative screw into the outer hole on the right side of the flange. Cover is forcefitted...
...bracket.) 12 Loosen the two screws and remove the left hinge cap. 9 Flip the middle hinge bracket and position it on the left side of refrigerator and reattach with its hexagonal end facing upward. ENGLISH 21 INSTALLATION 7 With a flat-head screwdriver, carefully pry off and remove the cover over ...Reattach middle hinge pin using a ¼ in the same orientation with two bolts and a screw. 13 Place the refrigerator door down over the bolt holes on the left side of the refrigerator. 11 Insert the decorative screw into the outer hole on the right side of the flange. Cover is forcefitted...
Owners Manual
Page 23
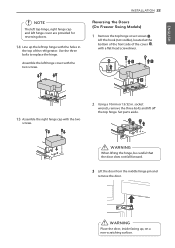
..., remove the three bolts and lift off the top hinge. Lift the hook (not visible), located at the bottom of the front side of the refrigerator. WARNING When lifting the hinge, be careful that the door does not fall forward. 3 Lift the door from the middle hinge pin and remove the...
..., remove the three bolts and lift off the top hinge. Lift the hook (not visible), located at the bottom of the front side of the refrigerator. WARNING When lifting the hinge, be careful that the door does not fall forward. 3 Lift the door from the middle hinge pin and remove the...
Owners Manual
Page 24
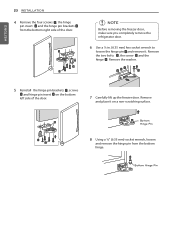
... 1 , screws 2 and hinge pin insert 3 on the bottom left side of the door. 3 NOTE Before removing the freezer door, make sure you completely remove the refrigerator door. 6 Use a ¼ in. (6.35 mm) hex socket wrench to loosen the hinge pin 1 and remove it on a non-scratching surface. ENGLISH 23 INSTALLATION 4 Remove...
... 1 , screws 2 and hinge pin insert 3 on the bottom left side of the door. 3 NOTE Before removing the freezer door, make sure you completely remove the refrigerator door. 6 Use a ¼ in. (6.35 mm) hex socket wrench to loosen the hinge pin 1 and remove it on a non-scratching surface. ENGLISH 23 INSTALLATION 4 Remove...
Owners Manual
Page 25
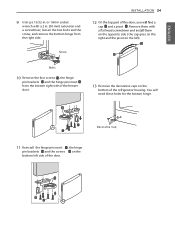
...-in . (50 mm) extension and a screwdriver, loosen the two bolts and the screw, and remove the bottom hinge from the bottom right side of the refrigerator housing. or 10mm socket wrench with on the opposite side ( the cap goes on the right and the pivot on the left side of the...
...-in . (50 mm) extension and a screwdriver, loosen the two bolts and the screw, and remove the bottom hinge from the bottom right side of the refrigerator housing. or 10mm socket wrench with on the opposite side ( the cap goes on the right and the pivot on the left side of the...


