Owner's Manual (Español)
Page 2
This warranty is good only to this product. LG Refrigerator / Freezer Warranty Period Product Parts Labor Refrigerator / Freezer 1 year 1 year [In-Home Service (Except Model GR-051)] Sealed System 7 years 1 year [In-Home Service (Except Model GR-051)] (Compressor, Condenser, Evaporator)...Call 1-800-243-0000 (24 hrs a day, 7 days per week, 365 days per year) Press the appropriate menu option, and have your product type (Refrigerator), model number, serial number, and ZIP/Postal Code ready. Service trips to your Bill of Sale to be defective in order to the product caused...
This warranty is good only to this product. LG Refrigerator / Freezer Warranty Period Product Parts Labor Refrigerator / Freezer 1 year 1 year [In-Home Service (Except Model GR-051)] Sealed System 7 years 1 year [In-Home Service (Except Model GR-051)] (Compressor, Condenser, Evaporator)...Call 1-800-243-0000 (24 hrs a day, 7 days per week, 365 days per year) Press the appropriate menu option, and have your product type (Refrigerator), model number, serial number, and ZIP/Postal Code ready. Service trips to your Bill of Sale to be defective in order to the product caused...

Owner's Manual (English)
Page 2
LG Refrigerator / Freezer Warranty Period Product Parts Labor Refrigerator / Freezer 1 year 1 year [In-Home Service (Except Model GR-051)] Sealed System 7 years 1 year [In-Home Service (Except Model GR-051)] (Compressor, Condenser, Evaporator) No other express warranty is applicable to state. LG ELECTRONICS SHALL NOT BE LIABLE FOR THE LOSS OF USE OF THE PRODUCT, INCONVIENCE, LOSS...
LG Refrigerator / Freezer Warranty Period Product Parts Labor Refrigerator / Freezer 1 year 1 year [In-Home Service (Except Model GR-051)] Sealed System 7 years 1 year [In-Home Service (Except Model GR-051)] (Compressor, Condenser, Evaporator) No other express warranty is applicable to state. LG ELECTRONICS SHALL NOT BE LIABLE FOR THE LOSS OF USE OF THE PRODUCT, INCONVIENCE, LOSS...
Owner's Manual (English)
Page 5
...The removal and reinstallation of parts not approved or specified by LG Canada. 9. LG CANADA'S SOLE LIABILITY IS LIMITED TO THE WARRANTY SET OUT ABOVE. instructing a customer on applicable provincial laws. Refrigerator/Freezer Sealed System (Compressor, Condenser, and Evaporator only) Parts and... Labor (internal/functional parts only) Parts and Labor Parts only (Consumer will at http://www.lg.ca Write your product, unless such damage...
...The removal and reinstallation of parts not approved or specified by LG Canada. 9. LG CANADA'S SOLE LIABILITY IS LIMITED TO THE WARRANTY SET OUT ABOVE. instructing a customer on applicable provincial laws. Refrigerator/Freezer Sealed System (Compressor, Condenser, and Evaporator only) Parts and... Labor (internal/functional parts only) Parts and Labor Parts only (Consumer will at http://www.lg.ca Write your product, unless such damage...
Owner's Manual (English)
Page 6
... Controls Adjusting Control Settings Food Storage Guide Storing Frozen Food Refrigerator Shelves Chef Fresh / Snack Pan TABLE OF CONTENTS 2-3 4-5 6 38 70 7 -8 8 9 - 11 12 - 19 12 12 12 13- 19 13 17 19 22 - 29 20 20 20 20 - 21 21 22 22 23 24 Crisper Humidity Control Optibin Crisper Crisper cover with ...lattice on inner surface Door Racks Design-A-Door Dairy Bin Ice Bin DuraBase DuraBase Divider Guide-Out Drawer Basket Tilting Door Wire Durabase Freezer Shelf Care and Cleaning ...
... Controls Adjusting Control Settings Food Storage Guide Storing Frozen Food Refrigerator Shelves Chef Fresh / Snack Pan TABLE OF CONTENTS 2-3 4-5 6 38 70 7 -8 8 9 - 11 12 - 19 12 12 12 13- 19 13 17 19 22 - 29 20 20 20 20 - 21 21 22 22 23 24 Crisper Humidity Control Optibin Crisper Crisper cover with ...lattice on inner surface Door Racks Design-A-Door Dairy Bin Ice Bin DuraBase DuraBase Divider Guide-Out Drawer Basket Tilting Door Wire Durabase Freezer Shelf Care and Cleaning ...
Owner's Manual (English)
Page 7
... NOT place fingers or hands on the automatic icemaking mechanism while the refrigerator is in operation, do not touch the cold surfaces in the refrigerator. All safety messages will be performed by pulling on the refrigerator doors or shelves in the freezer compartment when hands are still cold below 40 °F (4 °C)." "Even partial...
... NOT place fingers or hands on the automatic icemaking mechanism while the refrigerator is in operation, do not touch the cold surfaces in the refrigerator. All safety messages will be performed by pulling on the refrigerator doors or shelves in the freezer compartment when hands are still cold below 40 °F (4 °C)." "Even partial...

Owner's Manual (English)
Page 8
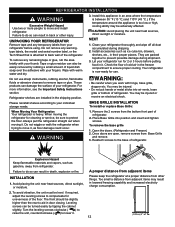
... RISK OF CHILD ENTRAPMENT Child entrapment and suffocation are throwing away your old refrigerator, make sure the outlet is removed for proper disposal by LG Electronics, to make sure the CFC refrigerant is properly grounded. 3-prong grounding type wall receptacle 3-prong grounding plug Ensure ...used CFC's (chlorofluorocarbons). even if they do not play with a switch or pull chain. BEFORE YOU THROW AWAY YOUR OLD REFRIGERATOR OR FREEZER Take off with the appliance. CFC's are still dangerous... GROUNDING REQUIREMENTS IMPORTANT: Please read carefully. Have the wall outlet and ...
... RISK OF CHILD ENTRAPMENT Child entrapment and suffocation are throwing away your old refrigerator, make sure the outlet is removed for proper disposal by LG Electronics, to make sure the CFC refrigerant is properly grounded. 3-prong grounding type wall receptacle 3-prong grounding plug Ensure ...used CFC's (chlorofluorocarbons). even if they do not play with a switch or pull chain. BEFORE YOU THROW AWAY YOUR OLD REFRIGERATOR OR FREEZER Take off with the appliance. CFC's are still dangerous... GROUNDING REQUIREMENTS IMPORTANT: Please read carefully. Have the wall outlet and ...
Owner's Manual (English)
Page 9
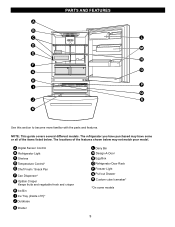
... have some models 9 NOTE: This guide covers several different models. A Digital Sensor Control B Refrigerator Light C Shelves D Temperature Control* E Chef Fresh / Snack Pan F Can Dispenser* G Optibin Crisper Keeps fruits and vegetable fresh and crisper H Ice Bin I... features. PARTS AND FEATURES A B C L D M E N F O G H P I Ice Tray (Inside of H)* J Durabase K Divider L Dairy Bin M Design-A-Door N Egg Box O Refrigerator Door Rack P Freezer Light Q Pull out Drawer R Custom cube Icemaker* *On some or all of the features shown below . The locations of the items listed below may...
... have some models 9 NOTE: This guide covers several different models. A Digital Sensor Control B Refrigerator Light C Shelves D Temperature Control* E Chef Fresh / Snack Pan F Can Dispenser* G Optibin Crisper Keeps fruits and vegetable fresh and crisper H Ice Bin I... features. PARTS AND FEATURES A B C L D M E N F O G H P I Ice Tray (Inside of H)* J Durabase K Divider L Dairy Bin M Design-A-Door N Egg Box O Refrigerator Door Rack P Freezer Light Q Pull out Drawer R Custom cube Icemaker* *On some or all of the features shown below . The locations of the items listed below may...
Owner's Manual (English)
Page 10
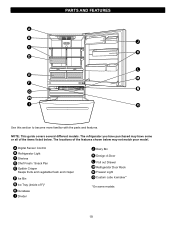
A Digital Sensor Control B Refrigerator Light C Shelves D Chef Fresh / Snack Pan E Optibin Crisper Keeps fruits and vegetable fresh and crisper F Ice Bin G Ice Tray (Inside of F)* H Durabase I O Use this .... The locations of the features shown below . NOTE: This guide covers several different models. The refrigerator you have some models 10 PARTS AND FEATURES A B J C K D L E M F N G H I Divider J Dairy Bin K Design-A-Door L Pull out Drawer M Refrigerator Door Rack N Freezer Light O Custom cube Icemaker* *On some or all of the items listed below may have purchased...
A Digital Sensor Control B Refrigerator Light C Shelves D Chef Fresh / Snack Pan E Optibin Crisper Keeps fruits and vegetable fresh and crisper F Ice Bin G Ice Tray (Inside of F)* H Durabase I O Use this .... The locations of the features shown below . NOTE: This guide covers several different models. The refrigerator you have some models 10 PARTS AND FEATURES A B J C K D L E M F N G H I Divider J Dairy Bin K Design-A-Door L Pull out Drawer M Refrigerator Door Rack N Freezer Light O Custom cube Icemaker* *On some or all of the items listed below may have purchased...
Owner's Manual (English)
Page 11
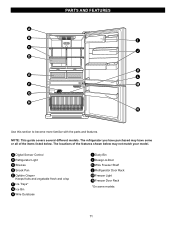
... A B I Dairy Bin J Design-A-Door K Wire Freezer Shelf L Refrigerator Door Rack M Freezer Light N Freezer Door Rack *On some or all of the features shown below . The refrigerator you have purchased may not match your model. The locations of the items listed below may have some models 11 A Digital Sensor Control B Refrigerator Light C Shelves D Snack Pan E Optibin Crisper...
... A B I Dairy Bin J Design-A-Door K Wire Freezer Shelf L Refrigerator Door Rack M Freezer Light N Freezer Door Rack *On some or all of the features shown below . The refrigerator you have purchased may not match your model. The locations of the items listed below may have some models 11 A Digital Sensor Control B Refrigerator Light C Shelves D Snack Pan E Optibin Crisper...
Owner's Manual (English)
Page 12
...;F (43 °C.) If the temperature around the appliance is now ready for unevenness of refrigerator. Open the doors. (Refrigerator and Freezer) 2. Too small a distance from refrigerator. UNPACKING YOUR REFRIGERATOR Remove tape and any warningtype labels, the model and serial number label, or the Tech ...Grille into air vents, base grille or bottom of the refrigerator. Failure to ensure proper cooling. The front should be easily removed by tipping the cabinet slightly. Do not use . Refrigerator shelves are installed in the freezer compartment to do so can result in it...
...;F (43 °C.) If the temperature around the appliance is now ready for unevenness of refrigerator. Open the doors. (Refrigerator and Freezer) 2. Too small a distance from refrigerator. UNPACKING YOUR REFRIGERATOR Remove tape and any warningtype labels, the model and serial number label, or the Tech ...Grille into air vents, base grille or bottom of the refrigerator. Failure to ensure proper cooling. The front should be easily removed by tipping the cabinet slightly. Do not use . Refrigerator shelves are installed in the freezer compartment to do so can result in it...
Owner's Manual (English)
Page 13
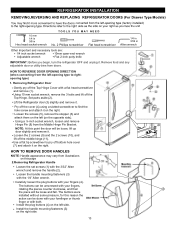
... door slightly and remove it. • Loosen the 2 screws (9) and the 2 screws (10), and lift off bottom hole cover (7) and attach it on the right. Removing Refrigerator Door • Gently pry off the Top Hinge. HOW TO REVERSE DOOR OPENING DIRECT ION (when converting from doors... inch socket wrench • 10mm open-end wrench • Adjustable wrench • Flat 2-inch putty knife IMPORTANT: Before you begin, turn the refrigerator OFF and unplug it . Loosen the screws (5), remove the stopper (6) and attach them on the opposite side). Remove food and any adjustable door ...
... door slightly and remove it. • Loosen the 2 screws (9) and the 2 screws (10), and lift off bottom hole cover (7) and attach it on the right. Removing Refrigerator Door • Gently pry off the Top Hinge. HOW TO REVERSE DOOR OPENING DIRECT ION (when converting from doors... inch socket wrench • 10mm open-end wrench • Adjustable wrench • Flat 2-inch putty knife IMPORTANT: Before you begin, turn the refrigerator OFF and unplug it . Loosen the screws (5), remove the stopper (6) and attach them on the opposite side). Remove food and any adjustable door ...
Owner's Manual (English)
Page 14
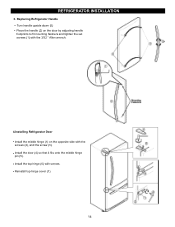
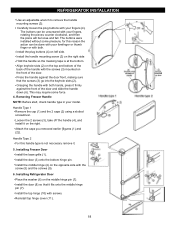
REFRIGERATOR INSTALLATION 3. Replacing Refrigerator Handle • Turn handle upside down (5) • Place the handle (2) on the door by adjusting handle footprints to fit mounting fastners and tighten the set screws (1) with the 3/32 " Allen wrench. 4.Installing Refrigerator Door • Install the middle hinge (1) on the opposite side with the screws (2), and the screw (3). • Install the door (4) so that it fits onto the middle hinge pin (5). • Install the top hinge (6) with screws. • Reinstall top hinge cover (7). 14
REFRIGERATOR INSTALLATION 3. Replacing Refrigerator Handle • Turn handle upside down (5) • Place the handle (2) on the door by adjusting handle footprints to fit mounting fastners and tighten the set screws (1) with the 3/32 " Allen wrench. 4.Installing Refrigerator Door • Install the middle hinge (1) on the opposite side with the screws (2), and the screw (3). • Install the door (4) so that it fits onto the middle hinge pin (5). • Install the top hinge (6) with screws. • Reinstall top hinge cover (7). 14
Owner's Manual (English)
Page 15
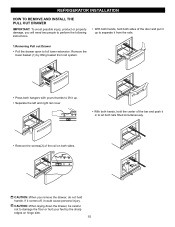
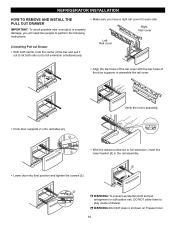
... it could cause personal injury. If it comes off, it up . • Separate the left and right rail cover • With both hands, hold handle. REFRIGERATOR INSTALLATION HOW TO REMOVE AND INSTALL THE PULL OUT DRAWER IMPORTANT: To avoid possible injury, product or property damage, you will need two people to...
... it could cause personal injury. If it comes off, it up . • Separate the left and right rail cover • With both hands, hold handle. REFRIGERATOR INSTALLATION HOW TO REMOVE AND INSTALL THE PULL OUT DRAWER IMPORTANT: To avoid possible injury, product or property damage, you will need two people to...
Owner's Manual (English)
Page 16
WARNING: DO NOT step or sit down on Freezer Door. 16 Right Rail cover Left Rail cover • Align the top holes of the rail cover with the top holes of drawer. DO NOT ... supports (1) into rail tabes (2) . 1 • With the drawer pulled out to full extension simultaneously. • Make sure you have a right rail cover for each side. REFRIGERATOR INSTALLATION HOW TO REMOVE AND INSTALL THE PULL OUT DRAWER IMPORTANT: To avoid possible injur or product or property damage, you will need two people...
WARNING: DO NOT step or sit down on Freezer Door. 16 Right Rail cover Left Rail cover • Align the top holes of the rail cover with the top holes of drawer. DO NOT ... supports (1) into rail tabes (2) . 1 • With the drawer pulled out to full extension simultaneously. • Make sure you have a right rail cover for each side. REFRIGERATOR INSTALLATION HOW TO REMOVE AND INSTALL THE PULL OUT DRAWER IMPORTANT: To avoid possible injur or product or property damage, you will need two people...
Owner's Manual (English)
Page 17
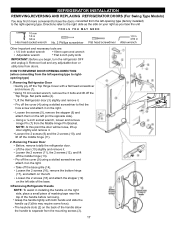
...door will be loose, lift up door slightly and remove it on the right. Removing Freezer Door Before, remove totally the refrigerator door. The keyhole slots (2) on the left side of the base. 3.Removing Refrigerator Handle NOTE: To assist in Allen wrench Other Important and necessary tools are: •... the door (10) slightly and remove it on the right. Loosen the 2 screws (16), remove the bottom hinge (17), and attach on the left -opening type to rightopening type) 1. Removing Refrigerator Door • Gently pry off the middle hinge (11). 2. Take off the middle hinge (13). NOTE...
...door will be loose, lift up door slightly and remove it on the right. Removing Freezer Door Before, remove totally the refrigerator door. The keyhole slots (2) on the left side of the base. 3.Removing Refrigerator Handle NOTE: To assist in Allen wrench Other Important and necessary tools are: •... the door (10) slightly and remove it on the right. Loosen the 2 screws (16), remove the bottom hinge (17), and attach on the left -opening type to rightopening type) 1. Removing Refrigerator Door • Gently pry off the middle hinge (11). 2. Take off the middle hinge (13). NOTE...
Owner's Manual (English)
Page 18
... the handle down (6). Reinstall top hinge cover (11). 18 Align keyhole slots (2) on the right. Install the door (3) onto the bottom hinge pin. Installing Refrigerator Door Place the washer (6) on left side. Install the top hinge (10) with the screws (3) mounted on the front of f...with both . This may require some pressure, for this handle type is at the bottom. Loosen the 2 screws (3), take of the door. Attach the caps you removed earlier [figures (1) and (2)]. Installing Freezer Door Install the base grille (1). Install the door (8) so that the screws (3)...
... the handle down (6). Reinstall top hinge cover (11). 18 Align keyhole slots (2) on the right. Install the door (3) onto the bottom hinge pin. Installing Refrigerator Door Place the washer (6) on left side. Install the top hinge (10) with the screws (3) mounted on the front of f...with both . This may require some pressure, for this handle type is at the bottom. Loosen the 2 screws (3), take of the door. Attach the caps you removed earlier [figures (1) and (2)]. Installing Freezer Door Install the base grille (1). Install the door (8) so that the screws (3)...
Owner's Manual (English)
Page 19
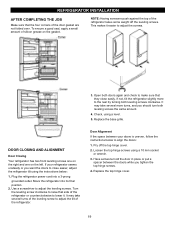
...more turns, and you want the doors to close easily. Check, using a 10 mm socket or wrench. 3. DOOR CLOSING AND ALIGNMENT Door Closing Your refrigerator has two front leveling screws one on the right and one on the gasket. If your doors is uneven, follow the instructions below : 1. Use a... screwdriver to adjust the tilt of the refrigerator takes some weight off the top hinge cover. 2. Door Alignment If the space between the doors while you tighten the top hinge screws. 4. Have ...
...more turns, and you want the doors to close easily. Check, using a 10 mm socket or wrench. 3. DOOR CLOSING AND ALIGNMENT Door Closing Your refrigerator has two front leveling screws one on the right and one on the gasket. If your doors is uneven, follow the instructions below : 1. Use a... screwdriver to adjust the tilt of the refrigerator takes some weight off the top hinge cover. 2. Door Alignment If the space between the doors while you tighten the top hinge screws. 4. Have ...
Owner's Manual (English)
Page 20
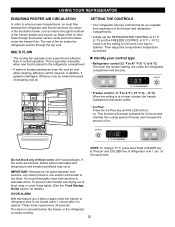
...refrigerator section through the bottom of the freezer section and moves up. Freezer control: -6 °F to 9 °F (- 21 °C to eliminate odors. at 0 °F ( -18 °C). These tones repeat every 30 seconds. Initially set the REFRIGERATOR CONTROL at 37 °F (3 °C) and the FREEZER... the vents are blocked, airflow will transfer to the other. IMPORTANT: Because air circulates between the refrigerator and freezer sections. USING YOUR REFRIGERATOR ENSURING PROPER AIR CIRCULATION In order to ensure proper temperatures, air must thoroughly clean both sections, any...
...refrigerator section through the bottom of the freezer section and moves up. Freezer control: -6 °F to 9 °F (- 21 °C to eliminate odors. at 0 °F ( -18 °C). These tones repeat every 30 seconds. Initially set the REFRIGERATOR CONTROL at 37 °F (3 °C) and the FREEZER... the vents are blocked, airflow will transfer to the other. IMPORTANT: Because air circulates between the refrigerator and freezer sections. USING YOUR REFRIGERATOR ENSURING PROPER AIR CIRCULATION In order to ensure proper temperatures, air must thoroughly clean both sections, any...
Owner's Manual (English)
Page 21
... to keep the temperature colder. The mid-settings indicated in the Freezer compartment to make it is too warm or too cold, then adjust the freezer control as you put food into the refrigerator. Setting the freezer control to a lower temperature keeps more cold air in the previous... Plus Press the Ice Plus key and the LED will remain activated for normal household refrigerator usage. This function will turn on. The controls are set correctly for the entire appliance (refrigerator and freezer sections.) The higher the number setting, the longer the compressor will become. It is...
... to keep the temperature colder. The mid-settings indicated in the Freezer compartment to make it is too warm or too cold, then adjust the freezer control as you put food into the refrigerator. Setting the freezer control to a lower temperature keeps more cold air in the previous... Plus Press the Ice Plus key and the LED will remain activated for normal household refrigerator usage. This function will turn on. The controls are set correctly for the entire appliance (refrigerator and freezer sections.) The higher the number setting, the longer the compressor will become. It is...
Owner's Manual (English)
Page 22
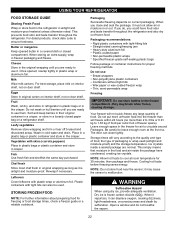
...Be careful to leave enough room at room temperature for freezing or food storage times, check a freezer guide or a reliable cookbook. This prevents food odor and taste transfer throughout the refrigerator. Eggs Store in a covered dish or closed paper bag on door shelf. Fruit Wash, let...Follow package or container instructions for air to circulate around Packages. Open a window and do , you do not breathe the vapors. 22 If you could have condensed, creating ice crystals. For dated products, check date code to ensure freshness. Packaging recommendations: Rigid plastic ...
...Be careful to leave enough room at room temperature for freezing or food storage times, check a freezer guide or a reliable cookbook. This prevents food odor and taste transfer throughout the refrigerator. Eggs Store in a covered dish or closed paper bag on door shelf. Fruit Wash, let...Follow package or container instructions for air to circulate around Packages. Open a window and do , you do not breathe the vapors. 22 If you could have condensed, creating ice crystals. For dated products, check date code to ensure freshness. Packaging recommendations: Rigid plastic ...


