

Owner's Manual
Page 2
... be performed by authorized personnel only using only genuine replacement parts. 2 Dehumidifier Dealer's Name Date Purchased s Staple your dehumidifier. Dehumidifier Owner's Manual TABLE OF CONTENTS Safety Precautions 3 Prior to Operation 7 Instruction 8 Electrical Safety 9 Operating Instructions 11 Installation 13 Maintenance 14 FOR YOUR RECORDS Write... little preventive care on your part can find many helpful hints on the side of troubleshooting tips. READ THIS MANUAL Inside you a great deal of time and money over the life of this page in the chart of each unit.
... be performed by authorized personnel only using only genuine replacement parts. 2 Dehumidifier Dealer's Name Date Purchased s Staple your dehumidifier. Dehumidifier Owner's Manual TABLE OF CONTENTS Safety Precautions 3 Prior to Operation 7 Instruction 8 Electrical Safety 9 Operating Instructions 11 Installation 13 Maintenance 14 FOR YOUR RECORDS Write... little preventive care on your part can find many helpful hints on the side of troubleshooting tips. READ THIS MANUAL Inside you a great deal of time and money over the life of this page in the chart of each unit.

Owner's Manual
Page 3
...in the power plug properly. • Otherwise, it will cause harm or damage; Be sure not to follow the instruction. NO Owner's Manual 3 Bucket full I Incorrect operation due to property only. WARNING This symbol indicates the possibility of injury or damage to ignoring instructions will ...cause electric shock or fire. I Operation Plug in this manual are as gasoline, benzene,paint thinner, etc. • It may cause electric shock and failure. Gasolin Do not operate or stop the...
...in the power plug properly. • Otherwise, it will cause harm or damage; Be sure not to follow the instruction. NO Owner's Manual 3 Bucket full I Incorrect operation due to property only. WARNING This symbol indicates the possibility of injury or damage to ignoring instructions will ...cause electric shock or fire. I Operation Plug in this manual are as gasoline, benzene,paint thinner, etc. • It may cause electric shock and failure. Gasolin Do not operate or stop the...
Owner's Manual
Page 5
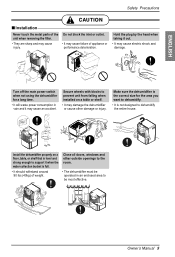
nO/Onf/fOff Fan Speed LowHigh Owner's Manual 5 ENGLISH Safety Precautions CAUTION ■Installation Never touch the metal parts of the unit when removing the filter. • They are sharp and may cause ...
nO/Onf/fOff Fan Speed LowHigh Owner's Manual 5 ENGLISH Safety Precautions CAUTION ■Installation Never touch the metal parts of the unit when removing the filter. • They are sharp and may cause ...
Owner's Manual
Page 7
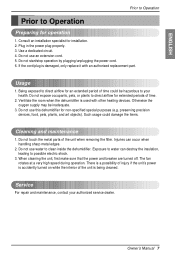
... is damaged, only replace it with other heating devices. Service For repair and maintenance, contact your health. Being exposed to direct airflow for installation. 2. Owner's Manual 7 ENGLISH Prior to Operation Prior to Operation Preparing for extended periods of time. 2. Do not touch the metal parts of time could damage the items...
... is damaged, only replace it with other heating devices. Service For repair and maintenance, contact your health. Being exposed to direct airflow for installation. 2. Owner's Manual 7 ENGLISH Prior to Operation Prior to Operation Preparing for extended periods of time. 2. Do not touch the metal parts of time could damage the items...
Owner's Manual
Page 8
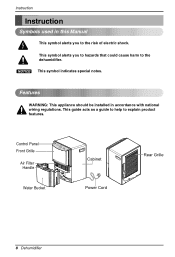
This guide acts as a guide to help to the dehumidifier. Features WARNING: This appliance should be installed in this Manual This symbol alerts you to hazards that could cause harm to explain product features. Instruction Instruction Symbols used in accordance with national wiring regulations. Control Panel Auto Restart Front Grille Air Filter Handle Water Bucket Cabinet Power Cord Rear Grille 8 Dehumidifier NOTICE This symbol indicates special notes. This symbol alerts you to the risk of electric shock.
This guide acts as a guide to help to the dehumidifier. Features WARNING: This appliance should be installed in this Manual This symbol alerts you to hazards that could cause harm to explain product features. Instruction Instruction Symbols used in accordance with national wiring regulations. Control Panel Auto Restart Front Grille Air Filter Handle Water Bucket Cabinet Power Cord Rear Grille 8 Dehumidifier NOTICE This symbol indicates special notes. This symbol alerts you to the risk of electric shock.
Owner's Manual
Page 9
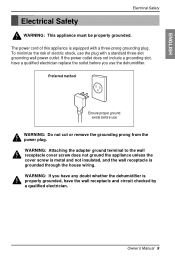
... appliance unless the cover screw is metal and not insulated, and the wall receptacle is equipped with a standard three-slot grounding wall power outlet. Owner's Manual 9 The power cord of electric shock, use WARNING: Do not cut or remove the grounding prong from the power plug. WARNING: If you use the...
... appliance unless the cover screw is metal and not insulated, and the wall receptacle is equipped with a standard three-slot grounding wall power outlet. Owner's Manual 9 The power cord of electric shock, use WARNING: Do not cut or remove the grounding prong from the power plug. WARNING: If you use the...
Owner's Manual
Page 11
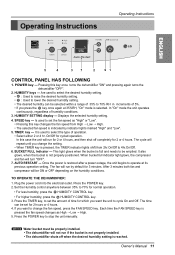
....On/Off to change the setting. • When TIMER key is not properly positioned. Set the Humidity control anywhere between 35% to stop the unit manually. Each time the FAN SPEED key is restored after a power outage, the unit begins to select the type of time for which you press the... to raise the desired humidity setting. • : Used to cycle On and Off. Press the POWER key to 70% for cycled operation. SPEED key --- Owner's Manual 11
....On/Off to change the setting. • When TIMER key is not properly positioned. Set the Humidity control anywhere between 35% to stop the unit manually. Each time the FAN SPEED key is restored after a power outage, the unit begins to select the type of time for which you press the... to raise the desired humidity setting. • : Used to cycle On and Off. Press the POWER key to 70% for cycled operation. SPEED key --- Owner's Manual 11
Owner's Manual
Page 12
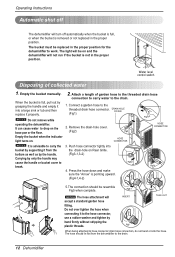
... the dehumidifier to break. 2. INSERT Fig5 TAKE OUT When being attached to the threaded drain hose connector. (Fig1) DRAIN HOLE COVER Fig1 2. Empty the bucket manually. Attach a length of collected water 1. The hose should be replaced in the proper position. NOTICE Do not remove while operating the dehumidifier. Carrying by hand...
... the dehumidifier to break. 2. INSERT Fig5 TAKE OUT When being attached to the threaded drain hose connector. (Fig1) DRAIN HOLE COVER Fig1 2. Empty the bucket manually. Attach a length of collected water 1. The hose should be replaced in the proper position. NOTICE Do not remove while operating the dehumidifier. Carrying by hand...
Owner's Manual
Page 13
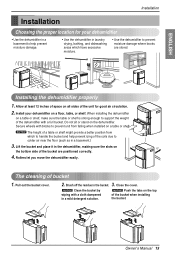
... to help prevent icing of the bucket when installing the bucket. The cleaning of the dehumidifier with a full bucket. Pull out the bucket cover. 2. Owner's Manual 13 When installing the dehumidifier Auto Restart on a table or shelf, make sure the table or shelf is strong enough to handle the bucket and...
... to help prevent icing of the bucket when installing the bucket. The cleaning of the dehumidifier with a full bucket. Pull out the bucket cover. 2. Owner's Manual 13 When installing the dehumidifier Auto Restart on a table or shelf, make sure the table or shelf is strong enough to handle the bucket and...

Owner's Manual
Page 15
...; Make sure the bucket is attached. • See Removing and Emptying The Water Bucket. • Change the humidity setting. • Change the humidity setting. Owner's Manual 15 s Bucket is tripped. s The fuse is blown or circuit breaker is not installed. s Drain hose connection may not be set to lower limits. •...
...; Make sure the bucket is attached. • See Removing and Emptying The Water Bucket. • Change the humidity setting. • Change the humidity setting. Owner's Manual 15 s Bucket is tripped. s The fuse is blown or circuit breaker is not installed. s Drain hose connection may not be set to lower limits. •...


