
Owners Manual
Page 2
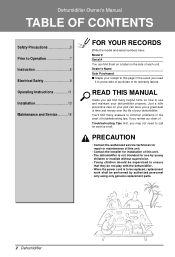
...of this unit. • Contact the installer for installation of this page in the chart of purchase or for warranty issues. Dehumidifier Owner's Manual TABLE OF CONTENTS Safety Precautions 3 Prior to Operation 7 Instruction 8 Electrical Safety 9 Operating Instructions 11 Installation 13 Maintenance and Service...........14 FOR ... not need it to prove date of troubleshooting tips. Just a little preventive care on the side of your dehumidifier properly. READ THIS MANUAL Inside you a great deal of time and money over the life of each unit. You'll find them on a label on your...
...of this unit. • Contact the installer for installation of this page in the chart of purchase or for warranty issues. Dehumidifier Owner's Manual TABLE OF CONTENTS Safety Precautions 3 Prior to Operation 7 Instruction 8 Electrical Safety 9 Operating Instructions 11 Installation 13 Maintenance and Service...........14 FOR ... not need it to prove date of troubleshooting tips. Just a little preventive care on the side of your dehumidifier properly. READ THIS MANUAL Inside you a great deal of time and money over the life of each unit. You'll find them on a label on your...
Owners Manual
Page 3
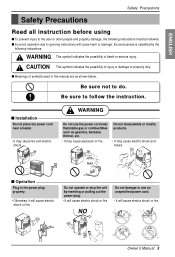
... shock or fire. WARNING Do not use an unspecified power cord. • It will cause electric shock or fire. s Operation Plug in this manual are as gasoline, benzene, thinner, etc. • It may cause explosion or fire. Do not damage or use the power cord near a heater...possibility of injury or damage to do. Gasolin Do not operate or stop the unit by the following instructions must be followed. NO Owner's Manual 3 s Installation Do not place the power cord near flammable gas or combustibles such as shown below. s Meanings of death or serious injury...
... shock or fire. WARNING Do not use an unspecified power cord. • It will cause electric shock or fire. s Operation Plug in this manual are as gasoline, benzene, thinner, etc. • It may cause explosion or fire. Do not damage or use the power cord near a heater...possibility of injury or damage to do. Gasolin Do not operate or stop the unit by the following instructions must be followed. NO Owner's Manual 3 s Installation Do not place the power cord near flammable gas or combustibles such as shown below. s Meanings of death or serious injury...
Owners Manual
Page 5
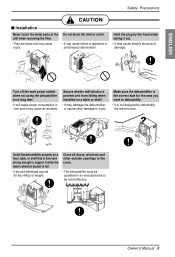
Owner's Manual 5 ENGLISH Safety Precautions CAUTION s Installation Never touch the metal parts of appliance or performance deterioration. Turn off the main power switch when not using the ...
Owner's Manual 5 ENGLISH Safety Precautions CAUTION s Installation Never touch the metal parts of appliance or performance deterioration. Turn off the main power switch when not using the ...
Owners Manual
Page 7
... to your authorized service dealer. Injuries can destroy the insulation, leading to direct airflow for extended periods of the unit when removing the filter. Owner's Manual 7 Consult an installation specialist for non-specified special purposes (e.g. If the cord/plug is used with an authorized replacement part. Do not use water to...
... to your authorized service dealer. Injuries can destroy the insulation, leading to direct airflow for extended periods of the unit when removing the filter. Owner's Manual 7 Consult an installation specialist for non-specified special purposes (e.g. If the cord/plug is used with an authorized replacement part. Do not use water to...
Owners Manual
Page 8
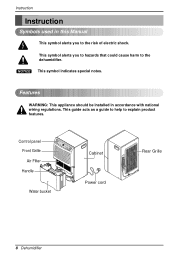
Features WARNING: This appliance should be installed in this Manual This symbol alerts you to hazards that could cause harm to the dehumidifier. This guide acts as a guide to help to the risk of electric ...
Features WARNING: This appliance should be installed in this Manual This symbol alerts you to hazards that could cause harm to the dehumidifier. This guide acts as a guide to help to the risk of electric ...
Owners Manual
Page 9
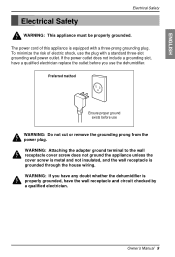
... the power outlet does not include a grounding slot, have the wall receptacle and circuit checked by a qualified electrician. WARNING: If you use the dehumidifier. Owner's Manual 9 Preferred method Ensure proper ground exists before you have any doubt whether the dehumidifier is properly grounded, have a qualified electrician replace the outlet before use...
... the power outlet does not include a grounding slot, have the wall receptacle and circuit checked by a qualified electrician. WARNING: If you use the dehumidifier. Owner's Manual 9 Preferred method Ensure proper ground exists before you have any doubt whether the dehumidifier is properly grounded, have a qualified electrician replace the outlet before use...
Owners Manual
Page 11
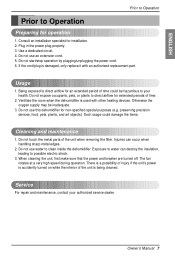
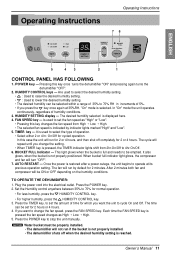
... 35% to set for normal operation. • For less humidity, press the HUMIDITY CONTROL key. • For higher humidity, press the HUMIDITY CONTROL key. 3. Owner's Manual 11 This light glows when the bucket is indicated by default for 2 or 4 hours. In this key once turns the dehumidifier "ON" and pressing again... time can be emptied. HUMIDITY SETTING display --- It is reached. ENGLISH Operating Instructions Operating Instructions 76 Constantly On. 4hr. Are used to stop the unit manually. TO OPERATE THE DEHUMIDIFIER: 1.
... 35% to set for normal operation. • For less humidity, press the HUMIDITY CONTROL key. • For higher humidity, press the HUMIDITY CONTROL key. 3. Owner's Manual 11 This light glows when the bucket is indicated by default for 2 or 4 hours. In this key once turns the dehumidifier "ON" and pressing again... time can be emptied. HUMIDITY SETTING display --- It is reached. ENGLISH Operating Instructions Operating Instructions 76 Constantly On. 4hr. Are used to stop the unit manually. TO OPERATE THE DEHUMIDIFIER: 1.
Owners Manual
Page 12
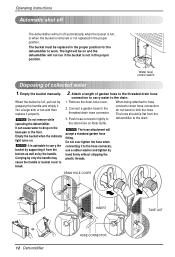
....noO/Onnsf/fOtafnftly On. TIMER High Low SPFEAEND SHEUTTMIINDGITY CHOUNMTRIDOITLY PAOUWTOERRESTABFRUUTCLLKET ENERGY STAR ENERGY STAR INSERT TAKE OUT 12 Dehumidifier HOSE-CONNECTOR Empty the bucket manually. Empty the bucket when the indicator light turns on Rear Grille. Connect a garden hose to the drain. The bucket must be on the base pan...
....noO/Onnsf/fOtafnftly On. TIMER High Low SPFEAEND SHEUTTMIINDGITY CHOUNMTRIDOITLY PAOUWTOERRESTABFRUUTCLLKET ENERGY STAR ENERGY STAR INSERT TAKE OUT 12 Dehumidifier HOSE-CONNECTOR Empty the bucket manually. Empty the bucket when the indicator light turns on Rear Grille. Connect a garden hose to the drain. The bucket must be on the base pan...
Owners Manual
Page 13
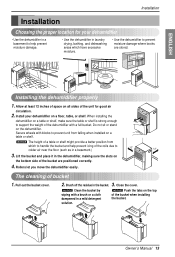
... on the top of a table or shelf might provide a better position from falling when installed on the bottom side of the bucket are stored. Owner's Manual 13
... on the top of a table or shelf might provide a better position from falling when installed on the bottom side of the bucket are stored. Owner's Manual 13
Owners Manual
Page 15
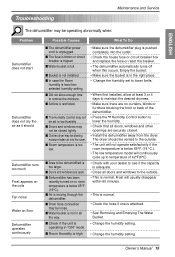
... the Humidity Control button to see if the capacity is adequate. • Close all the way. s Airflow is too low. s Room temperature is restricted. Owner's Manual 15 s Drain hose connection may be closed . • Install the dehumidifier away from the dryer. ENGLISH Troubleshooting Maintenance and Service The dehumidifier may be operating...
... the Humidity Control button to see if the capacity is adequate. • Close all the way. s Airflow is too low. s Room temperature is restricted. Owner's Manual 15 s Drain hose connection may be closed . • Install the dehumidifier away from the dryer. ENGLISH Troubleshooting Maintenance and Service The dehumidifier may be operating...


