
Owner's Manual
Page 1
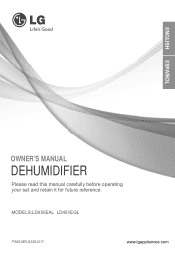
OWNER'S MANUAL DEHUMIDIFIER Please read this manual carefully before operating your set and retain it for future reference. MODELS:LD450EAL LD451EGL P/NO:MFL63261217 www.lgappliances.com
OWNER'S MANUAL DEHUMIDIFIER Please read this manual carefully before operating your set and retain it for future reference. MODELS:LD450EAL LD451EGL P/NO:MFL63261217 www.lgappliances.com
Owner's Manual
Page 2
...technician for repair or maintenance of this unit. • Contact the installer for installation of this page in the chart of each unit. Dehumidifier Owner's Manual TABLE OF CONTENTS Safety Precautions 3 Prior to Operation 7 Instruction 8 Electrical Safety 9 Operating Instructions 11 Installation 13 Maintenance 14 FOR...is to common problems in the event you may not need it to prove date of purchase or for use and maintain your dehumidifier properly. Just a little preventive care on the side of troubleshooting tips. You'll find many answers to be replaced, replacement work...
...technician for repair or maintenance of this unit. • Contact the installer for installation of this page in the chart of each unit. Dehumidifier Owner's Manual TABLE OF CONTENTS Safety Precautions 3 Prior to Operation 7 Instruction 8 Electrical Safety 9 Operating Instructions 11 Installation 13 Maintenance 14 FOR...is to common problems in the event you may not need it to prove date of purchase or for use and maintain your dehumidifier properly. Just a little preventive care on the side of troubleshooting tips. You'll find many answers to be replaced, replacement work...
Owner's Manual
Page 4
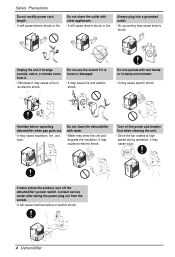
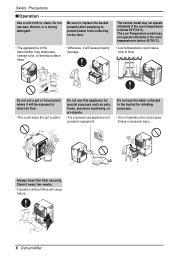
...full Auto Rest Unplug the unit if strange sounds, odors, or smoke come from the socket. • It will cause machine failure or electric shock. 4 Dehumidifier It may cause electric shock. Do not share the outlet with water. • Water may enter the unit and degrade the insulation. Do not clean... the dehumidifier with other appliances. • It will cause electric shock or fire. Do not use the socket if it may cause injury. 4hr2.hOr.nO/...
...full Auto Rest Unplug the unit if strange sounds, odors, or smoke come from the socket. • It will cause machine failure or electric shock. 4 Dehumidifier It may cause electric shock. Do not share the outlet with water. • Water may enter the unit and degrade the insulation. Do not clean... the dehumidifier with other appliances. • It will cause electric shock or fire. Do not use the socket if it may cause injury. 4hr2.hOr.nO/...
Owner's Manual
Page 5
... should withstand around 90 lbs (40kg) of appliance or performance deterioration. Timer 2h4r.hOr.nO/Onf/fOff Fan Speed LoHwigh CHounmtriodlity Bucket full Install the dehumidifier properly on a floor, table, or shelf that is level and strong enough to prevent unit from falling when installed on a table or shelf. &#... shock and damage. 2 h4r.hOr.nO/Onf/Of ff Timer Bucket full Turn off the main power switch when not using the dehumidifier for the area you want to dehumidify. • It is the correct size for a long time. • It will waste power consumption in an enclosed area to...
... should withstand around 90 lbs (40kg) of appliance or performance deterioration. Timer 2h4r.hOr.nO/Onf/fOff Fan Speed LoHwigh CHounmtriodlity Bucket full Install the dehumidifier properly on a floor, table, or shelf that is level and strong enough to prevent unit from falling when installed on a table or shelf. &#... shock and damage. 2 h4r.hOr.nO/Onf/Of ff Timer Bucket full Turn off the main power switch when not using the dehumidifier for the area you want to dehumidify. • It is the correct size for a long time. • It will waste power consumption in an enclosed area to...
Owner's Manual
Page 6
... or personal injury. Be sure to replace the bucket properly after emptying to prevent water from collecting on the floor. • The appearance of the dehumidifier may not operate efficiently if the room temperature is not sanitary and could cause coils to frost. 4hr2.hOr.nO/Onf/fOff CHounmtriodlity Bucket full...
... or personal injury. Be sure to replace the bucket properly after emptying to prevent water from collecting on the floor. • The appearance of the dehumidifier may not operate efficiently if the room temperature is not sanitary and could cause coils to frost. 4hr2.hOr.nO/Onf/fOff CHounmtriodlity Bucket full...
Owner's Manual
Page 7
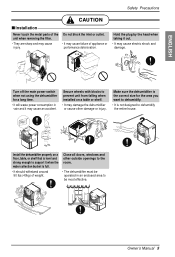
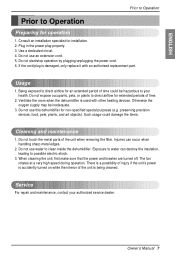
... Service For repair and maintenance, contact your health. Do not expose occupants, pets, or plants to clean inside the dehumidifier. Ventilate the room when the dehumidifier is used with an authorized replacement part. Owner's Manual 7 Otherwise the oxygen supply may be hazardous to possible electric shock... of the unit is damaged, only replace it with other heating devices. Use a dedicated circuit. 4. Do not use this dehumidifier for installation. 2. Do not use an extension cord. 5. When cleaning the unit, first make sure that the power and breaker are turned ...
... Service For repair and maintenance, contact your health. Do not expose occupants, pets, or plants to clean inside the dehumidifier. Ventilate the room when the dehumidifier is used with an authorized replacement part. Owner's Manual 7 Otherwise the oxygen supply may be hazardous to possible electric shock... of the unit is damaged, only replace it with other heating devices. Use a dedicated circuit. 4. Do not use this dehumidifier for installation. 2. Do not use an extension cord. 5. When cleaning the unit, first make sure that the power and breaker are turned ...

Owner's Manual
Page 8
This symbol alerts you to the risk of electric shock. Features WARNING: This appliance should be installed in this Manual This symbol alerts you to hazards that could cause harm to explain product features. NOTICE This symbol indicates special notes. This guide acts as a guide to help to the dehumidifier. Control Panel Auto Restart Front Grille Air Filter Handle Water Bucket Cabinet Power Cord Rear Grille 8 Dehumidifier Instruction Instruction Symbols used in accordance with national wiring regulations.
This symbol alerts you to the risk of electric shock. Features WARNING: This appliance should be installed in this Manual This symbol alerts you to hazards that could cause harm to explain product features. NOTICE This symbol indicates special notes. This guide acts as a guide to help to the dehumidifier. Control Panel Auto Restart Front Grille Air Filter Handle Water Bucket Cabinet Power Cord Rear Grille 8 Dehumidifier Instruction Instruction Symbols used in accordance with national wiring regulations.
Owner's Manual
Page 9
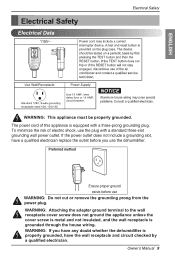
...USE. DO NOT USE IF ABOVE TEST FAILS.WHEN GREEN LIGHTISON, ITIS WORKING PROPERLY! Preferred method Ensure proper ground exists before you use the dehumidifier. To minimize the risk of this appliance is grounded through the house wiring. WARNING: Attaching the adapter ground terminal to the wall receptacle ..., use WARNING: Do not cut or remove the grounding prong from the power plug. WARNING: If you have any doubt whether the dehumidifier is properly grounded, have a qualified electrician replace the outlet before use the plug with a three-prong grounding plug. Owner's Manual 9
...USE. DO NOT USE IF ABOVE TEST FAILS.WHEN GREEN LIGHTISON, ITIS WORKING PROPERLY! Preferred method Ensure proper ground exists before you use the dehumidifier. To minimize the risk of this appliance is grounded through the house wiring. WARNING: Attaching the adapter ground terminal to the wall receptacle ..., use WARNING: Do not cut or remove the grounding prong from the power plug. WARNING: If you have any doubt whether the dehumidifier is properly grounded, have a qualified electrician replace the outlet before use the plug with a three-prong grounding plug. Owner's Manual 9
Owner's Manual
Page 10
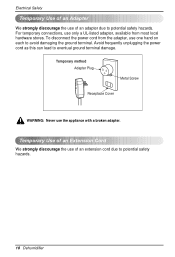
... Metal Screw Receptacle Cover WARNING: Never use only a UL-listed adapter, available from the adapter, use one hand on each to potential safety hazards. 10 Dehumidifier
... Metal Screw Receptacle Cover WARNING: Never use only a UL-listed adapter, available from the adapter, use one hand on each to potential safety hazards. 10 Dehumidifier

Owner's Manual
Page 11
... 2 or 4 hr. The cycle will run if the bucket is full and needs to select the type of humidity conditions. 3. TO OPERATE THE DEHUMIDIFIER: 1. Set the Humidity control anywhere between 35% to stop the unit manually. Displays the selected humidity setting. 4. On/Off for 2 hours or...after a power outage, the unit begins to 4hr.On/Off. 6. This light glows when the bucket is not properly installed. • The dehumidifier shuts off completely for normal operation. • For less humidity, press the HUMIDITY CONTROL key. • For higher humidity, press the HUMIDITY ...
... 2 or 4 hr. The cycle will run if the bucket is full and needs to select the type of humidity conditions. 3. TO OPERATE THE DEHUMIDIFIER: 1. Set the Humidity control anywhere between 35% to stop the unit manually. Displays the selected humidity setting. 4. On/Off for 2 hours or...after a power outage, the unit begins to 4hr.On/Off. 6. This light glows when the bucket is not properly installed. • The dehumidifier shuts off completely for normal operation. • For less humidity, press the HUMIDITY CONTROL key. • For higher humidity, press the HUMIDITY ...
Owner's Manual
Page 12
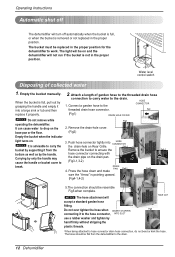
... garden hose to the threaded drain hose connection to carry water to the drain. Fig3-2 bucket by supporting it from the dehumidifier to the drain. 12 Dehumidifier Press the hose down and make sure the "Arrow" is full, pull out by the handle. Connect a garden hose ...pan or the floor. 2. Attach a length of collected water 1. Fig1 (Fig1) DRAIN HOLE COVER NOTICE Do not remove while Fig2 operating the dehumidifier. Carrying by hand firmly without stripping the plastic threads. The bucket must be resemble Fig5 when complete. When the bucket is pointing upward. (Fig4...
... garden hose to the threaded drain hose connection to carry water to the drain. Fig3-2 bucket by supporting it from the dehumidifier to the drain. 12 Dehumidifier Press the hose down and make sure the "Arrow" is full, pull out by the handle. Connect a garden hose ...pan or the floor. 2. Attach a length of collected water 1. Fig1 (Fig1) DRAIN HOLE COVER NOTICE Do not remove while Fig2 operating the dehumidifier. Carrying by hand firmly without stripping the plastic threads. The bucket must be resemble Fig5 when complete. When the bucket is pointing upward. (Fig4...
Owner's Manual
Page 13
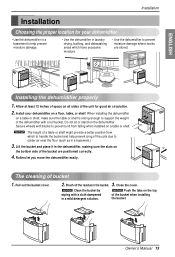
...of a table or shelf might provide a better position from falling when installed on a table or shelf. Owner's Manual 13 When installing the dehumidifier Auto Restart on a table or shelf, make sure the table or shelf is strong enough to prevent unit from which have excessive moisture. •...stand on the bottom side of the bucket when installing the bucket. Close the cover. Auto Restart Auto Restart Auto Restart Installing the dehumidifier properly 1. Allow at least 12 inches of space on the top of the bucket are stored. Brush off the residue in laundry drying...
...of a table or shelf might provide a better position from falling when installed on a table or shelf. Owner's Manual 13 When installing the dehumidifier Auto Restart on a table or shelf, make sure the table or shelf is strong enough to prevent unit from which have excessive moisture. •...stand on the bottom side of the bucket when installing the bucket. Close the cover. Auto Restart Auto Restart Auto Restart Installing the dehumidifier properly 1. Allow at least 12 inches of space on the top of the bucket are stored. Brush off the residue in laundry drying...
Owner's Manual
Page 14
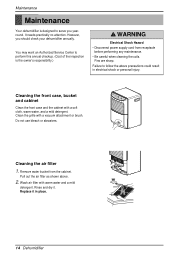
...coils. Auto Restart Cleaning the air filter 1. Pull out the air filter as shown above precautions could result in place. 14 Dehumidifier Replace it . Cleaning the front case, bucket and cabinet Auto Restart Clean the front case and the cabinet with a vacuum ...attachment or brush. Failure to serve you should check your dehumidifier annually. Maintenance Maintenance Your dehumidifier is the owner's responsibility.) Electrical Shock Hazard • Disconnect power supply cord from the cabinet. Do not use ...
...coils. Auto Restart Cleaning the air filter 1. Pull out the air filter as shown above precautions could result in place. 14 Dehumidifier Replace it . Cleaning the front case, bucket and cabinet Auto Restart Clean the front case and the cabinet with a vacuum ...attachment or brush. Failure to serve you should check your dehumidifier annually. Maintenance Maintenance Your dehumidifier is the owner's responsibility.) Electrical Shock Hazard • Disconnect power supply cord from the cabinet. Do not use ...
Owner's Manual
Page 15
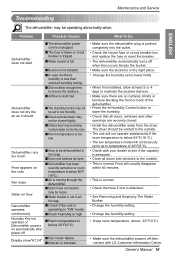
...8226; Make sure there are no curtains, blinds or furniture blocking the front or back of 42°F(6°C). • Check with LG Customer Information Center. Dehumidifier runs too much ■Area to low Humidity. ■Doors and windows may not be blowing moisture-laden air into the outlet. ...• Check the house fuse or circuit breaker box and replace the fuse or reset the breaker. • The dehumidifier automatically turns off ,then contact with your dealer to the outside . • This is normal. continuously ■Room Humidity is high Humidity ...
...8226; Make sure there are no curtains, blinds or furniture blocking the front or back of 42°F(6°C). • Check with LG Customer Information Center. Dehumidifier runs too much ■Area to low Humidity. ■Doors and windows may not be blowing moisture-laden air into the outlet. ...• Check the house fuse or circuit breaker box and replace the fuse or reset the breaker. • The dehumidifier automatically turns off ,then contact with your dealer to the outside . • This is normal. continuously ■Room Humidity is high Humidity ...
Owner's Manual
Page 31
..., WHETHER BASED IN CONTRACT, TORT, OR OTHERWISE. USA WHAT THIS WARRANTY COVERS: LG Electronics U.S.A., Inc. ("LG") warrants your LG Dehumidifier ("product") against defect in the owner's manual. Mail to LG or authorized representative). THIS WARRANTY GIVES YOU SPECIFIC LEGAL RIGHTS AND YOU MAY ALSO HAVE...FROM STATE TO STATE. WARRANTY LG DEHUMIDIFIER LIMITED WARRANTY - This limited warranty is valid only to the original retail purchaser of the product, is purchased through an LG authorized dealer or distributor and used in other damage to a LG Authorized Service Center. Note: ...
..., WHETHER BASED IN CONTRACT, TORT, OR OTHERWISE. USA WHAT THIS WARRANTY COVERS: LG Electronics U.S.A., Inc. ("LG") warrants your LG Dehumidifier ("product") against defect in the owner's manual. Mail to LG or authorized representative). THIS WARRANTY GIVES YOU SPECIFIC LEGAL RIGHTS AND YOU MAY ALSO HAVE...FROM STATE TO STATE. WARRANTY LG DEHUMIDIFIER LIMITED WARRANTY - This limited warranty is valid only to the original retail purchaser of the product, is purchased through an LG authorized dealer or distributor and used in other damage to a LG Authorized Service Center. Note: ...


