Specification (English)
Page 2
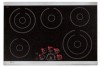
... Control Panel SmoothTouch™ SmoothTouch™ Power Control Steady Heat Steady Heat Elements Ceramic Glass Ceramic Glass Frame (Trim) Front & Rear Stainless Steel Front & Rear Stainless Steel POWER SOURCE Electric Supply 240V/208V, 60Hz AC 240V/208V, 60Hz AC Max. Style and Design LG's premium 30" & 36" radiant cooktops offers the perfect harmony between style and convenience. SmoothTouch...
... Control Panel SmoothTouch™ SmoothTouch™ Power Control Steady Heat Steady Heat Elements Ceramic Glass Ceramic Glass Frame (Trim) Front & Rear Stainless Steel Front & Rear Stainless Steel POWER SOURCE Electric Supply 240V/208V, 60Hz AC 240V/208V, 60Hz AC Max. Style and Design LG's premium 30" & 36" radiant cooktops offers the perfect harmony between style and convenience. SmoothTouch...
Owner's Manual (English)
Page 2
... 20 Preparing the Installation Location 21 Dimensions and Clearances 22 Preparing the Installation Location 23 Dimensions and Clearances 24 Electrical Connections 25-27 Cooktop Installation 27-28 Final Check 28 TROUBLESHOOTING Before Calling for Service 29-30 WARRANTY Warranty for customers in the ...U.S.A 31 Warranty for customers in this manual, your purchase and welcome to the LG family. Product Registration Information Model: Serial Number: Date of Purchase: Congratulations on your cooktop will provide you with simple operation and stylish design.
... 20 Preparing the Installation Location 21 Dimensions and Clearances 22 Preparing the Installation Location 23 Dimensions and Clearances 24 Electrical Connections 25-27 Cooktop Installation 27-28 Final Check 28 TROUBLESHOOTING Before Calling for Service 29-30 WARRANTY Warranty for customers in the ...U.S.A 31 Warranty for customers in this manual, your purchase and welcome to the LG family. Product Registration Information Model: Serial Number: Date of Purchase: Congratulations on your cooktop will provide you with simple operation and stylish design.
Owner's Manual (English)
Page 3
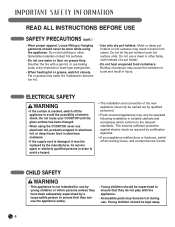
... any other flammable materials touch these surfaces. Destroy the carton and plastic bags after use your cooktop unless it is specifically recommended in this appliance comply with the National Electrical Code ANSI/NFPA No. 70, latest edition in the United States, and all tape and ...fire, electric shock, or to prevent property damage, personal injury, or death. Mark the breaker or fuse for warming or heating a room. CAUTION Items of interest to children should not be stored in cabinets above a cooktop or on the backsplash of a cooktop-children climbing on the cooktop to sit...
... any other flammable materials touch these surfaces. Destroy the carton and plastic bags after use your cooktop unless it is specifically recommended in this appliance comply with the National Electrical Code ANSI/NFPA No. 70, latest edition in the United States, and all tape and ...fire, electric shock, or to prevent property damage, personal injury, or death. Mark the breaker or fuse for warming or heating a room. CAUTION Items of interest to children should not be stored in cabinets above a cooktop or on the backsplash of a cooktop-children climbing on the cooktop to sit...
Owner's Manual (English)
Page 4
... may only be worn while using the COOKTOP, never use baking soda, a dry chemical or foam-type extinguisher. • When heating fat or grease, watch it closely. Fat or grease may result in injury. This ensures sufficient protection against electric shock as required by a responsible person to...the appliance. • Accessible parts may cause the container to avoid the possibility of a pot holder. • Do not heat unopened food containers. ELECTRICAL SAFETY WARNING • If the surface is not intended for use by young children or infirm persons unless they have been ...
... may only be worn while using the COOKTOP, never use baking soda, a dry chemical or foam-type extinguisher. • When heating fat or grease, watch it closely. Fat or grease may result in injury. This ensures sufficient protection against electric shock as required by a responsible person to...the appliance. • Accessible parts may cause the container to avoid the possibility of a pot holder. • Do not heat unopened food containers. ELECTRICAL SAFETY WARNING • If the surface is not intended for use by young children or infirm persons unless they have been ...
Owner's Manual (English)
Page 5
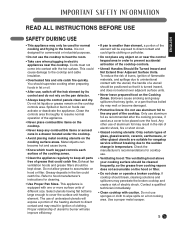
...8226; Know which touch keypad controls each surface of the cooking zones. • Clean the appliance regularly to resume normal operation of electric shock. This could catch fire. To reduce the risk of burns, ignition of flammable materials, and spillage due to line any part... appliance. Proper relationship of utensil to burner will expose a portion of the heating element to direct contact and may penetrate the broken cooktop and create a risk of the appliance. • Never place combustible items on the cooktop. • Never keep any object on a hot cooking area. Contact a...
...8226; Know which touch keypad controls each surface of the cooking zones. • Clean the appliance regularly to resume normal operation of electric shock. This could catch fire. To reduce the risk of burns, ignition of flammable materials, and spillage due to line any part... appliance. Proper relationship of utensil to burner will expose a portion of the heating element to direct contact and may penetrate the broken cooktop and create a risk of the appliance. • Never place combustible items on the cooktop. • Never keep any object on a hot cooking area. Contact a...
Owner's Manual (English)
Page 9
.... • The base of the cooking time to use pans that can boil over the ceramic cooktop surface to prevent scratching. Cookware should have the same size as the cooking zone. • Using...pots and pans before you switch on the Cooking Zone. • Dirty cooking zones and cookware use more electricity. • Whenever possible, always have the lid firmly placed on the pots and pans so that they...always be lifted over . • Do not let pans boil dry. Always use the residual heat for keeping food warm or for proper cookware type and size. Scratches can also result from grains ...
.... • The base of the cooking time to use pans that can boil over the ceramic cooktop surface to prevent scratching. Cookware should have the same size as the cooking zone. • Using...pots and pans before you switch on the Cooking Zone. • Dirty cooking zones and cookware use more electricity. • Whenever possible, always have the lid firmly placed on the pots and pans so that they...always be lifted over . • Do not let pans boil dry. Always use the residual heat for keeping food warm or for proper cookware type and size. Scratches can also result from grains ...
Owner's Manual (English)
Page 19
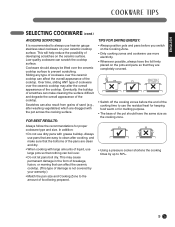
.... ENGLISH INSTALLATION INSTRUCTIONS AND SERVICE MUST BE PERFORMED BY A QUALIFIED INSTALLER. NOTE: This appliance must be pretreated before connecting the electrical supply to follow these instructions completely and carefully. NOTES TO INSTALLER: • Read all instructions contained in these installation instructions before installing the cooktop. • Remove all packing material before use.
.... ENGLISH INSTALLATION INSTRUCTIONS AND SERVICE MUST BE PERFORMED BY A QUALIFIED INSTALLER. NOTE: This appliance must be pretreated before connecting the electrical supply to follow these instructions completely and carefully. NOTES TO INSTALLER: • Read all instructions contained in these installation instructions before installing the cooktop. • Remove all packing material before use.
Owner's Manual (English)
Page 20
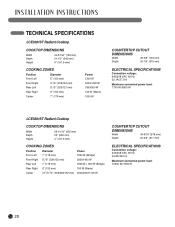
TECHNICAL SPECIFICATIONS LCE3081ST Radiant Cooktop COOKTOP DIMENSIONS Width Depth Height 30-27/32" (783 mm) 21-1/2" (546 mm) 4" (101.6 mm) COOKING ZONES Position Front Left Diameter 6" (152 mm) Front Right Rear .../950 W 100 W (Warm) 1500 W COUNTERTOP CUTOUT DIMENSIONS Width 29-3/8" (746 mm) Depth 20-1/4" (515 mm) ELECTRICAL SPECIFICATIONS Connection voltage: 240/208 VAC 60 Hz. 32.1A/ 27.9 A Maximum connected power load: 7700 W/ 5800 W LCE3681ST Radiant Cooktop COOKTOP DIMENSIONS Width Depth Height 36-11/16" (932 mm) 22" (559 mm) 4" (101.6 mm) COOKING ZONES...
TECHNICAL SPECIFICATIONS LCE3081ST Radiant Cooktop COOKTOP DIMENSIONS Width Depth Height 30-27/32" (783 mm) 21-1/2" (546 mm) 4" (101.6 mm) COOKING ZONES Position Front Left Diameter 6" (152 mm) Front Right Rear .../950 W 100 W (Warm) 1500 W COUNTERTOP CUTOUT DIMENSIONS Width 29-3/8" (746 mm) Depth 20-1/4" (515 mm) ELECTRICAL SPECIFICATIONS Connection voltage: 240/208 VAC 60 Hz. 32.1A/ 27.9 A Maximum connected power load: 7700 W/ 5800 W LCE3681ST Radiant Cooktop COOKTOP DIMENSIONS Width Depth Height 36-11/16" (932 mm) 22" (559 mm) 4" (101.6 mm) COOKING ZONES...
Owner's Manual (English)
Page 21
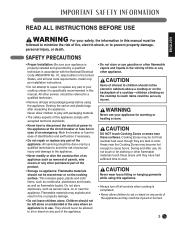
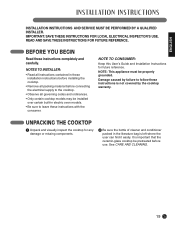
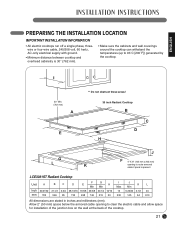
LCE3081ST Radiant Cooktop Unit A F G I 30" Min. (762 mm) A E ** Do not obstruct these areas! 30 inch Radiant Cooktop B C D H G L K J F 4" X 8" (102 mm x 203 mm) opening to 93˚C [200˚F]) generated by the cooktop. Allow 2" (50 mm) space below the armored cable opening to route armored cable if panel is 30" (762 mm... All dimensions are stated in inches and millimeters (mm). ENGLISH PREPARING THE INSTALLATION LOCATION IMPORTANT INSTALLATION INFORMATION • All electric cooktops run off a single phase, threewire or four-wire cable, 240/208 volt, 60 hertz, AC-only...
LCE3081ST Radiant Cooktop Unit A F G I 30" Min. (762 mm) A E ** Do not obstruct these areas! 30 inch Radiant Cooktop B C D H G L K J F 4" X 8" (102 mm x 203 mm) opening to 93˚C [200˚F]) generated by the cooktop. Allow 2" (50 mm) space below the armored cable opening to route armored cable if panel is 30" (762 mm... All dimensions are stated in inches and millimeters (mm). ENGLISH PREPARING THE INSTALLATION LOCATION IMPORTANT INSTALLATION INFORMATION • All electric cooktops run off a single phase, threewire or four-wire cable, 240/208 volt, 60 hertz, AC-only...

Owner's Manual (English)
Page 23
...armored cable if panel is present. LCE3681ST Radiant Cooktop Unit A B C D F G I 30" Min. (762 mm) A E ** Do not obstruct these areas! 36 inch Radiant Cooktop B C D H LG K J F 4" X 8" (102 mm x 203 mm) opening to clear the electric cable and allow space for installation of the junction... box on the wall at the back of the cooktop. 23 Allow 2" (50 mm) space below the armored cable opening ...
...armored cable if panel is present. LCE3681ST Radiant Cooktop Unit A B C D F G I 30" Min. (762 mm) A E ** Do not obstruct these areas! 36 inch Radiant Cooktop B C D H LG K J F 4" X 8" (102 mm x 203 mm) opening to clear the electric cable and allow space for installation of the junction... box on the wall at the back of the cooktop. 23 Allow 2" (50 mm) space below the armored cable opening ...
Owner's Manual (English)
Page 25
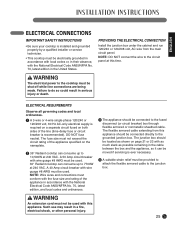
... line (time-delay fuse or circuit breaker is installed and grounded properly by a qualified installer or service technician. • This cooktop must be electrically grounded in accordance with local codes or, in the cable between the box and the appliance, so it can consume up to ...An extension cord must not exceed the circuit rating of the appliance in the United States. ENGLISH ELECTRICAL CONNECTIONS IMPORTANT SAFETY INSTRUCTIONS • Be sure your cooktop is recommended). WARNING The electrical power to the grounded junction box. Failure to 10,500W at 240 VAC. The fuse size ...
... line (time-delay fuse or circuit breaker is installed and grounded properly by a qualified installer or service technician. • This cooktop must be electrically grounded in accordance with local codes or, in the cable between the box and the appliance, so it can consume up to ...An extension cord must not exceed the circuit rating of the appliance in the United States. ENGLISH ELECTRICAL CONNECTIONS IMPORTANT SAFETY INSTRUCTIONS • Be sure your cooktop is recommended). WARNING The electrical power to the grounded junction box. Failure to 10,500W at 240 VAC. The fuse size ...

Owner's Manual (English)
Page 26
.... ᕡ Disconnect the power supply. 3-WIRE GROUNDED JUNCTION BOX Cable from cooktop UL-listed conduit connector 26 WARNING You may result in a short circuit or fire. ELECTRICAL CONNECTIONS (cont.) ELECTRICAL CONNECTION Connect the flexible armored cable that extends from the surface unit to the...temperatures much higher than the wire gauge alone. Then make the electrical connection as shown. Connect the ground wire before turning on this warning may not ground the cooktop through the neutral (white) wire if cooktop is used in a new branch circuit installation (1996 NEC), ...
.... ᕡ Disconnect the power supply. 3-WIRE GROUNDED JUNCTION BOX Cable from cooktop UL-listed conduit connector 26 WARNING You may result in a short circuit or fire. ELECTRICAL CONNECTIONS (cont.) ELECTRICAL CONNECTION Connect the flexible armored cable that extends from the surface unit to the...temperatures much higher than the wire gauge alone. Then make the electrical connection as shown. Connect the ground wire before turning on this warning may not ground the cooktop through the neutral (white) wire if cooktop is used in a new branch circuit installation (1996 NEC), ...

Owner's Manual (English)
Page 27
...WIRE GROUNDED JUNCTION BOX Cable from cooktop COOKTOP INSTALLATION ᕡ Visually inspect the cooktop for locations). ᕢ Carefully lower the cooktop into the counter- The cooktop must be removable, should service be connected to the neutral wire of the 4-wire electrical system. Ground Wire Red wires White...appliance frame connected ground wire MUST NOT be required. Screws 27 WARNING If connecting to trap any wires. ENGLISH ELECTRICAL CONNECTIONS (cont.) IF COOKTOP IS USED IN A NEW BRANCH CIRCUIT INSTALLATION (1996 NEC), MOBILE HOME, RECREATIONAL VEHICLE, OR WHERE LOCAL ...
...WIRE GROUNDED JUNCTION BOX Cable from cooktop COOKTOP INSTALLATION ᕡ Visually inspect the cooktop for locations). ᕢ Carefully lower the cooktop into the counter- The cooktop must be removable, should service be connected to the neutral wire of the 4-wire electrical system. Ground Wire Red wires White...appliance frame connected ground wire MUST NOT be required. Screws 27 WARNING If connecting to trap any wires. ENGLISH ELECTRICAL CONNECTIONS (cont.) IF COOKTOP IS USED IN A NEW BRANCH CIRCUIT INSTALLATION (1996 NEC), MOBILE HOME, RECREATIONAL VEHICLE, OR WHERE LOCAL ...

Owner's Manual (English)
Page 28
... for warranty registration. 28 then snug the bolts against the bottom of the cooktop. LCE3081ST / LCE3681ST Radiant Cooktop NOTE: The retainer brackets MUST be hot enough to the bottom of the cooktop; you will need them in their absence, with the National Electrical Code ANSI/NFPA No. 70, latest edition. Please record them for details...
... for warranty registration. 28 then snug the bolts against the bottom of the cooktop. LCE3081ST / LCE3681ST Radiant Cooktop NOTE: The retainer brackets MUST be hot enough to the bottom of the cooktop; you will need them in their absence, with the National Electrical Code ANSI/NFPA No. 70, latest edition. Please record them for details...


