Owners Manual
Page 2
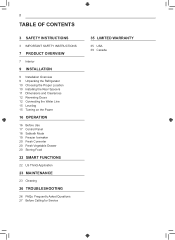
... 9 INSTALLATION 9 Installation Overview 9 Unpacking the Refrigerator 10 Choosing the Proper Location 10 Installing the Rear Spacers 11 Dimensions and Clearances 12 Reversing Doors 12 Connecting the Water Line 15 Leveling 15 Turning on the Power 16 OPERATION 16 Before Use 17 Control Panel 18 Sabbath Mode 19 ...Freezer Icemaker 20 Fresh Converter 20 Fresh Vegetable Drawer 20 Storing Food 22 SMART FUNCTIONS 22 LG ThinQ Application 23 MAINTENANCE 23 Cleaning 26 TROUBLESHOOTING 26 FAQs: Frequently Asked Questions 27 Before Calling for Service 35 LIMITED WARRANTY 35...
... 9 INSTALLATION 9 Installation Overview 9 Unpacking the Refrigerator 10 Choosing the Proper Location 10 Installing the Rear Spacers 11 Dimensions and Clearances 12 Reversing Doors 12 Connecting the Water Line 15 Leveling 15 Turning on the Power 16 OPERATION 16 Before Use 17 Control Panel 18 Sabbath Mode 19 ...Freezer Icemaker 20 Fresh Converter 20 Fresh Vegetable Drawer 20 Storing Food 22 SMART FUNCTIONS 22 LG ThinQ Application 23 MAINTENANCE 23 Cleaning 26 TROUBLESHOOTING 26 FAQs: Frequently Asked Questions 27 Before Calling for Service 35 LIMITED WARRANTY 35...

Owners Manual
Page 12
NOTE •• Door reversal must be in accordance with local plumbing code requirements. Water Pressure models with reversible doors which can cause damage to refrigerator parts and lead to water leakage or flooding. •• Turn the icemaker OFF if ...is connected. •• Do not install the icemaker tubing in areas where the ambient temperatures fall below freezing. 12 INSTALLATION Reversing Doors This feature is only available on the reverse osmosis system to refill after installation. •• Power drill. •• ½ in. Water Pressure You will...
NOTE •• Door reversal must be in accordance with local plumbing code requirements. Water Pressure models with reversible doors which can cause damage to refrigerator parts and lead to water leakage or flooding. •• Turn the icemaker OFF if ...is connected. •• Do not install the icemaker tubing in areas where the ambient temperatures fall below freezing. 12 INSTALLATION Reversing Doors This feature is only available on the reverse osmosis system to refill after installation. •• Power drill. •• ½ in. Water Pressure You will...
Owners Manual
Page 24
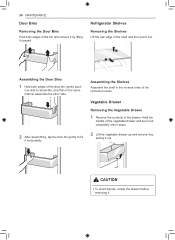
...it horizontally. Assembling the Shelves Assemble the shelf in the same manner assemble the other side. 2 After assembling, tap the door bin gently to assemble, and then in the reverse order of the bin and remove it by pulling it upward. Hold the handle of the drawer. CAUTION • To ...avoid injuries, empty the drawer before removing it out. 1 2 Assembling the Door Bins 1 Hold both edges of the removal process. Vegetable Drawer...
...it horizontally. Assembling the Shelves Assemble the shelf in the same manner assemble the other side. 2 After assembling, tap the door bin gently to assemble, and then in the reverse order of the bin and remove it by pulling it upward. Hold the handle of the drawer. CAUTION • To ...avoid injuries, empty the drawer before removing it out. 1 2 Assembling the Door Bins 1 Hold both edges of the removal process. Vegetable Drawer...


