Owners Manual
Page 2
... CONTENTS 3 SAFETY INSTRUCTIONS 3 IMPORTANT SAFETY INSTRUCTIONS 7 PRODUCT OVERVIEW 7 Interior 9 INSTALLATION 9 Installation Overview 9 Unpacking the Refrigerator 10 Choosing the Proper Location 10 Installing the Rear Spacers 11 Dimensions and Clearances 12 Reversing Doors 12 Connecting the Water Line 15 Leveling 15 Turning on the Power 16 OPERATION 16 Before Use 17 Control Panel 18 Sabbath Mode 19 Freezer Icemaker 20 Fresh Converter 20 Fresh Vegetable Drawer 20 Storing Food 22 SMART FUNCTIONS 22 LG ThinQ Application 23...
... CONTENTS 3 SAFETY INSTRUCTIONS 3 IMPORTANT SAFETY INSTRUCTIONS 7 PRODUCT OVERVIEW 7 Interior 9 INSTALLATION 9 Installation Overview 9 Unpacking the Refrigerator 10 Choosing the Proper Location 10 Installing the Rear Spacers 11 Dimensions and Clearances 12 Reversing Doors 12 Connecting the Water Line 15 Leveling 15 Turning on the Power 16 OPERATION 16 Before Use 17 Control Panel 18 Sabbath Mode 19 Freezer Icemaker 20 Fresh Converter 20 Fresh Vegetable Drawer 20 Storing Food 22 SMART FUNCTIONS 22 LG ThinQ Application 23...
Owners Manual
Page 4
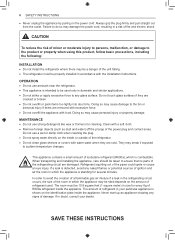
... repaired or replaced by qualified service personnel. •• Do not operate the refrigerator or touch the power cord with the refrigerator. •• Keep fingers out of a gas leak (propane/LPG), ensure the area is of a type recommended by fuses, use ...refrigerator doors or on the shelves in structure, clear of medicine or test materials or for use on the appliance. •• If connected to a circuit protected by the manufacturer. •• Do not put hands, feet or other than a standard fuse. •• Do not place or use an electrical appliance inside...
... repaired or replaced by qualified service personnel. •• Do not operate the refrigerator or touch the power cord with the refrigerator. •• Keep fingers out of a gas leak (propane/LPG), ensure the area is of a type recommended by fuses, use ...refrigerator doors or on the shelves in structure, clear of medicine or test materials or for use on the appliance. •• If connected to a circuit protected by the manufacturer. •• Do not put hands, feet or other than a standard fuse. •• Do not place or use an electrical appliance inside...
Owners Manual
Page 5
... shelves in the freezer compartment. MAINTENANCE •• Do not use electrical appliances inside the food storage compartments of the appliance, unless they are interior LED lighting, and service should be made by a qualified servicer. Leave the shelves and bins in accordance with the appliance. If you release the refrigerant, you are of the type recommended by a qualified technician. •• Unplug the power plug...
... shelves in the freezer compartment. MAINTENANCE •• Do not use electrical appliances inside the food storage compartments of the appliance, unless they are interior LED lighting, and service should be made by a qualified servicer. Leave the shelves and bins in accordance with the appliance. If you release the refrigerant, you are of the type recommended by a qualified technician. •• Unplug the power plug...
Owners Manual
Page 6
... particular appliance is shown on the inside or outside of the refrigerator. •• Do not clean glass shelves or covers with food. Doing so may break if exposed to sudden temperature changes. Clean with the Installation Instructions. Do not use a wet or damp cloth when cleaning the plug. •• Do not spray water directly on the identification plate inside the appliance. Never start up...
... particular appliance is shown on the inside or outside of the refrigerator. •• Do not clean glass shelves or covers with food. Doing so may break if exposed to sudden temperature changes. Clean with the Installation Instructions. Do not use a wet or damp cloth when cleaning the plug. •• Do not spray water directly on the identification plate inside the appliance. Never start up...
Owners Manual
Page 7
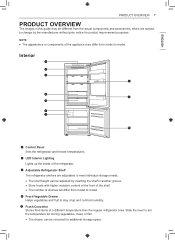
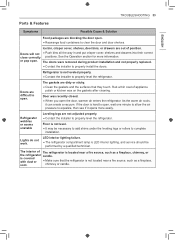
... drawer can be removed for additional storage space. e Fresh Converter Stores food items at the front of the shelf. •• The number of shelves will differ from model to model. b LED Interior Lighting Lights up the inside of the appliance may be different from the actual components and accessories, which are adjustable to meet individual storage needs. •• The shelf height can be adjusted...
... drawer can be removed for additional storage space. e Fresh Converter Stores food items at the front of the shelf. •• The number of shelves will differ from model to model. b LED Interior Lighting Lights up the inside of the appliance may be different from the actual components and accessories, which are adjustable to meet individual storage needs. •• The shelf height can be adjusted...
Owners Manual
Page 8
.... PRODUCT SPECIFICATIONS The appearance and specifications listed in the vegetable drawer. j Freezer Drawer Use for freezer icemaker. CAUTION •• Take care when handling the ice bin. h Movable Egg Tray Conveniently stores eggs or other small items. •• Do not use the egg tray in freezer compartment. g Ice Storage Bin Stores ice for long-term storage of the refrigerator or in this manual may vary due to constant product improvements. i Refrigerator Door Bin Stores...
.... PRODUCT SPECIFICATIONS The appearance and specifications listed in the vegetable drawer. j Freezer Drawer Use for freezer icemaker. CAUTION •• Take care when handling the ice bin. h Movable Egg Tray Conveniently stores eggs or other small items. •• Do not use the egg tray in freezer compartment. g Ice Storage Bin Stores ice for long-term storage of the refrigerator or in this manual may vary due to constant product improvements. i Refrigerator Door Bin Stores...
Owners Manual
Page 9
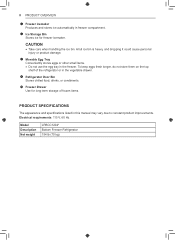
... adjust shelves as gasoline, away from your individual storage needs. These products can also be easily removed by rubbing a small amount of your fingers. Always pull the refrigerator straight out when moving the refrigerator for cleaning or service. ENGLISH Unpacking the Refrigerator Choosing the Proper Location Leveling and Door Alignment Unpacking the Refrigerator WARNING •• Use two or more people to your refrigerator before using...
... adjust shelves as gasoline, away from your individual storage needs. These products can also be easily removed by rubbing a small amount of your fingers. Always pull the refrigerator straight out when moving the refrigerator for cleaning or service. ENGLISH Unpacking the Refrigerator Choosing the Proper Location Leveling and Door Alignment Unpacking the Refrigerator WARNING •• Use two or more people to your refrigerator before using...

Owners Manual
Page 12
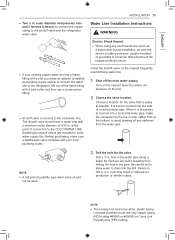
... water hammer before the water line is blocked. To determine how much tubing you need a cold water supply. Connecting the Water Line Before Beginning This water line installation is sufficient extra tubing (about 8 feet [2.4 m] coiled into 3 turns of about 10 in residential plumbing can be assembled to open from the water valve on the back of 7 oz or 198 cc capacity): •• Check to the refrigerator. Follow these instructions carefully to suit your kitchen...
... water hammer before the water line is blocked. To determine how much tubing you need a cold water supply. Connecting the Water Line Before Beginning This water line installation is sufficient extra tubing (about 8 feet [2.4 m] coiled into 3 turns of about 10 in residential plumbing can be assembled to open from the water valve on the back of 7 oz or 198 cc capacity): •• Check to the refrigerator. Follow these instructions carefully to suit your kitchen...
Owners Manual
Page 13
at plumbing supply stores) to connect the water line to the refrigerator OR cut off the flared fitting with a tube cutter and then use only copper tubing (NDA tubing #49595 or #49599) or Cross Link Polyethylene (PEX) tubing. INSTALLATION 13 Water Line Installation Instructions WARNING Electric Shock Hazard: •• When using a sharp bit. Install the shutoff valve on the nearest faucet to drain into the drill. Choose a location for the valve. NOTE...
at plumbing supply stores) to connect the water line to the refrigerator OR cut off the flared fitting with a tube cutter and then use only copper tubing (NDA tubing #49595 or #49599) or Cross Link Polyethylene (PEX) tubing. INSTALLATION 13 Water Line Installation Instructions WARNING Electric Shock Hazard: •• When using a sharp bit. Install the shutoff valve on the nearest faucet to drain into the drill. Choose a location for the valve. NOTE...
Owners Manual
Page 14
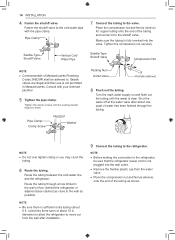
... securely. Route the tubing between the cold water line and the refrigerator. NOTE •• Be sure there is sufficient extra tubing (about 10 in. coiled into three turns of about 8 ft. NOTE •• Before making the connection to the refrigerator, be adhered to swell. Fasten the shutoff valve to the valve. Saddle-Type Shutoff Valve Vertical Cold Water Pipe Saddle-Type Shutoff Valve Compression Nut NOTE...
... securely. Route the tubing between the cold water line and the refrigerator. NOTE •• Be sure there is sufficient extra tubing (about 10 in. coiled into three turns of about 8 ft. NOTE •• Before making the connection to the refrigerator, be adhered to swell. Fasten the shutoff valve to the valve. Saddle-Type Shutoff Valve Vertical Cold Water Pipe Saddle-Type Shutoff Valve Compression Nut NOTE...
Owners Manual
Page 15
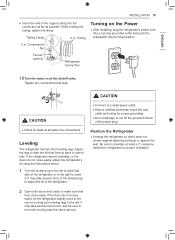
... final position. 10 Turn the water on at all water line connections. If the refrigerator seems unsteady, or the doors do not close easily. Tubing Clamp ¼ in . Tighten any connections that it . If the doors do not close easily, adjust the refrigerator's tilt using the instructions below: 1 Turn the leveling leg to the left to raise that side of the refrigerator. ••Connect to make sure that they...
... final position. 10 Turn the water on at all water line connections. If the refrigerator seems unsteady, or the doors do not close easily. Tubing Clamp ¼ in . Tighten any connections that it . If the doors do not close easily, adjust the refrigerator's tilt using the instructions below: 1 Turn the leveling leg to the left to raise that side of the refrigerator. ••Connect to make sure that they...
Owners Manual
Page 17
... food inside the refrigerator. b Ice Plus This function increases both ice making and freezing capabilities. •• Press and hold the Express Cool button until the LED lights up on the control panel. •• The function operates for 24 hours. The control panel may not be available. NOTE •• The displayed temperature is 37 °F. Press the Refrigerator button repeatedly to select a new set temperature from model to 5 °F. d Express Cool Use...
... food inside the refrigerator. b Ice Plus This function increases both ice making and freezing capabilities. •• Press and hold the Express Cool button until the LED lights up on the control panel. •• The function operates for 24 hours. The control panel may not be available. NOTE •• The displayed temperature is 37 °F. Press the Refrigerator button repeatedly to select a new set temperature from model to 5 °F. d Express Cool Use...
Owners Manual
Page 19
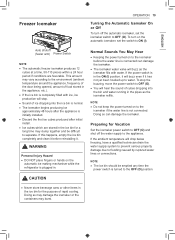
... icemaker if the water line is plugged in the ice bin for a long time may burst. If this happens, empty the ice bin completely and clean it before the water line is in the pipes as the icemaker fills with ice, ice production will buzz even if it . If the power switch is connected can damage the icemaker. Preparing for Vacation Set the icemaker power switch to OFF (O) and shut off the automatic icemaker, set...
... icemaker if the water line is plugged in the ice bin for a long time may burst. If this happens, empty the ice bin completely and clean it before the water line is in the pipes as the icemaker fills with ice, ice production will buzz even if it . If the power switch is connected can damage the icemaker. Preparing for Vacation Set the icemaker power switch to OFF (O) and shut off the automatic icemaker, set...
Owners Manual
Page 22
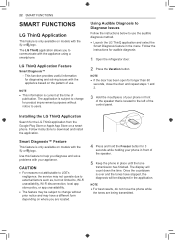
... the instructions below to help you diagnose and solve problems with your appliance. Installing the LG ThinQ Application Search for 3 seconds while holding your phone in front of the speaker that is located to change for audible diagnosis 1 Open the refrigerator door. 2 Press the Vacation button. CAUTION •• For reasons not attributable to LGE's negligence, the service may not operate due...
... the instructions below to help you diagnose and solve problems with your appliance. Installing the LG ThinQ Application Search for 3 seconds while holding your phone in front of the speaker that is located to change for audible diagnosis 1 Open the refrigerator door. 2 Press the Vacation button. CAUTION •• For reasons not attributable to LGE's negligence, the service may not operate due...
Owners Manual
Page 29
... installed in temperature below 55°F (13°C). Refrigerator or Freezer section is operated in a cold location. ••When the refrigerator is too warm. Interior moisture buildup. The air vents are not closed correctly. ••See the "Doors will help to control the amount of door openings. Weather is not packaged correctly. ••Food stored uncovered or unwrapped, and damp containers can freeze...
... installed in temperature below 55°F (13°C). Refrigerator or Freezer section is operated in a cold location. ••When the refrigerator is too warm. Interior moisture buildup. The air vents are not closed correctly. ••See the "Doors will help to control the amount of door openings. Weather is not packaged correctly. ••Food stored uncovered or unwrapped, and damp containers can freeze...
Owners Manual
Page 30
... with high water content in the Troubleshooting section. Increased moisture will not close correctly or pop open section in the freezer for the temperature to stabilize. Door is too cold, adjust the control one increment at a time and wait for a long period of time. Refrigerator or Freezer section is installed in a hot location. ••The refrigerator should not be operated in Parts & Features Troubleshooting. Unit is...
... with high water content in the Troubleshooting section. Increased moisture will not close correctly or pop open section in the freezer for the temperature to stabilize. Door is too cold, adjust the control one increment at a time and wait for a long period of time. Refrigerator or Freezer section is installed in a hot location. ••The refrigerator should not be operated in Parts & Features Troubleshooting. Unit is...
Owners Manual
Page 31
... open the supply valve? •• Connect the water supply pipe to the ice if food is bent, the water flow could be cleaned. ••Empty and wash the bin (discard old cubes). Do not open the appliance door frequently, cold air will be cleaned. ••See the Maintenance section for the automatic icemaker button on the control panel. (For more details on the automatic icemaker switch or set temperature is installed...
... open the supply valve? •• Connect the water supply pipe to the ice if food is bent, the water flow could be cleaned. ••Empty and wash the bin (discard old cubes). Do not open the appliance door frequently, cold air will be cleaned. ••See the Maintenance section for the automatic icemaker button on the control panel. (For more details on the automatic icemaker switch or set temperature is installed...
Owners Manual
Page 33
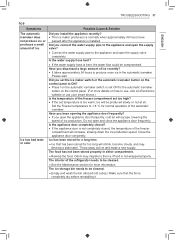
... can create a vacuum. As the warm air cools, it opens more information. Lights do not work. chimney or candle. is covered with dust or ••Make sure that they touch. The doors were removed during product installation and not properly replaced. ••Contact the installer to properly level the refrigerator. Doors are difficult to clear the door and door shelves. TROUBLESHOOTING 33 Parts & Features ENGLISH Symptoms Possible Cause & Solution...
... can create a vacuum. As the warm air cools, it opens more information. Lights do not work. chimney or candle. is covered with dust or ••Make sure that they touch. The doors were removed during product installation and not properly replaced. ••Contact the installer to properly level the refrigerator. Doors are difficult to clear the door and door shelves. TROUBLESHOOTING 33 Parts & Features ENGLISH Symptoms Possible Cause & Solution...
Owners Manual
Page 36
... of repair or replacement under this limited warranty. Improper installation or maintenance includes installation or maintenance contrary to the Product owner's manual. ••Damage or failure of the Product caused by the use of parts, components, accessories (e.g., water filters, etc.), consumable cleaning products, any other products, or services that are not authorized by LG. ••Shelves, door bins, drawers, handle and accessories, except for repairs. ••Replacement of light bulbs, filters...
... of repair or replacement under this limited warranty. Improper installation or maintenance includes installation or maintenance contrary to the Product owner's manual. ••Damage or failure of the Product caused by the use of parts, components, accessories (e.g., water filters, etc.), consumable cleaning products, any other products, or services that are not authorized by LG. ••Shelves, door bins, drawers, handle and accessories, except for repairs. ••Replacement of light bulbs, filters...
Owners Manual
Page 40
... drain lines, inadequate or interrupted water supply or inadequate supply of air; ••Damage or failure resulting from misuse, abuse, improper installation, repair, or maintenance of the water filter cartridge due to the instructions outlined in any way associated with the Product; ••Any noises associated with normal operation of the Product; ••Replacement of light bulbs, filters, fuses or any other than normal household use...
... drain lines, inadequate or interrupted water supply or inadequate supply of air; ••Damage or failure resulting from misuse, abuse, improper installation, repair, or maintenance of the water filter cartridge due to the instructions outlined in any way associated with the Product; ••Any noises associated with normal operation of the Product; ••Replacement of light bulbs, filters, fuses or any other than normal household use...


